标签:android style blog http color strong
转载请注明出处:http://blog.csdn.net/guolin_blog/article/details/9153761
记得在前面的文章中,我带大家一起从源码的角度分析了Android中View的事件分发机制,相信阅读过的朋友对View的事件分发已经有比较深刻的理解了。
还未阅读过的朋友,请先参考 Android事件分发机制完全解析,带你从源码的角度彻底理解(上) 。
那么今天我们将继续上次未完成的话题,从源码的角度分析ViewGruop的事件分发。
首先我们来探讨一下,什么是ViewGroup?它和普通的View有什么区别?
顾名思义,ViewGroup就是一组View的集合,它包含很多的子View和子VewGroup,是Android中所有布局的父类或间接父类,像LinearLayout、RelativeLayout等都是继承自ViewGroup的。但ViewGroup实际上也是一个View,只不过比起View,它多了可以包含子View和定义布局参数的功能。ViewGroup继承结构示意图如下所示:

可以看到,我们平时项目里经常用到的各种布局,全都属于ViewGroup的子类。
简单介绍完了ViewGroup,我们现在通过一个Demo来演示一下Android中VewGroup的事件分发流程吧。
首先我们来自定义一个布局,命名为MyLayout,继承自LinearLayout,如下所示:
1 public class MyLayout extends LinearLayout {
2
3     public MyLayout(Context context, AttributeSet attrs) {
4         super(context, attrs);
5     }
6
7 }
然后,打开主布局文件activity_main.xml,在其中加入我们自定义的布局:
 1 <com.example.viewgrouptouchevent.MyLayout xmlns:android="http://schemas.android.com/apk/res/android"
 2     xmlns:tools="http://schemas.android.com/tools"
 3     android:id="@+id/my_layout"
 4     android:layout_width="match_parent"
 5     android:layout_height="match_parent"
 6     android:orientation="vertical" >
 7
 8     <Button
 9         android:id="@+id/button1"
10         android:layout_width="match_parent"
11         android:layout_height="wrap_content"
12         android:text="Button1" />
13
14     <Button
15         android:id="@+id/button2"
16         android:layout_width="match_parent"
17         android:layout_height="wrap_content"
18         android:text="Button2" />
19
20 </com.example.viewgrouptouchevent.MyLayout>
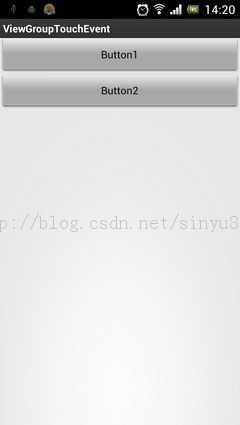
可以看到,我们在MyLayout中添加了两个按钮,接着在MainActivity中为这两个按钮和MyLayout都注册了监听事件:
 1 myLayout.setOnTouchListener(new OnTouchListener() {
 2     @Override
 3     public boolean onTouch(View v, MotionEvent event) {
 4         Log.d("TAG", "myLayout on touch");
 5         return false;
 6     }
 7 });
 8 button1.setOnClickListener(new OnClickListener() {
 9     @Override
10     public void onClick(View v) {
11         Log.d("TAG", "You clicked button1");
12     }
13 });
14 button2.setOnClickListener(new OnClickListener() {
15     @Override
16     public void onClick(View v) {
17         Log.d("TAG", "You clicked button2");
18     }
19 });
我们在MyLayout的onTouch方法,和Button1、Button2的onClick方法中都打印了一句话。现在运行一下项目,效果图如下所示:
分别点击一下Button1、Button2和空白区域,打印结果如下所示:

你会发现,当点击按钮的时候,MyLayout注册的onTouch方法并不会执行,只有点击空白区域的时候才会执行该方法。你可以先理解成Button的onClick方法将事件消费掉了,因此事件不会再继续向下传递。
那就说明Android中的touch事件是先传递到View,再传递到ViewGroup的?现在下结论还未免过早了,让我们再来做一个实验。
查阅文档可以看到,ViewGroup中有一个onInterceptTouchEvent方法,我们来看一下这个方法的源码:
 1 /**
 2  * Implement this method to intercept all touch screen motion events.  This
 3  * allows you to watch events as they are dispatched to your children, and
 4  * take ownership of the current gesture at any point.
 5  *
 6  * <p>Using this function takes some care, as it has a fairly complicated
 7  * interaction with {@link View#onTouchEvent(MotionEvent)
 8  * View.onTouchEvent(MotionEvent)}, and using it requires implementing
 9  * that method as well as this one in the correct way.  Events will be
10  * received in the following order:
11  *
12  * <ol>
13  * <li> You will receive the down event here.
14  * <li> The down event will be handled either by a child of this view
15  * group, or given to your own onTouchEvent() method to handle; this means
16  * you should implement onTouchEvent() to return true, so you will
17  * continue to see the rest of the gesture (instead of looking for
18  * a parent view to handle it).  Also, by returning true from
19  * onTouchEvent(), you will not receive any following
20  * events in onInterceptTouchEvent() and all touch processing must
21  * happen in onTouchEvent() like normal.
22  * <li> For as long as you return false from this function, each following
23  * event (up to and including the final up) will be delivered first here
24  * and then to the target‘s onTouchEvent().
25  * <li> If you return true from here, you will not receive any
26  * following events: the target view will receive the same event but
27  * with the action {@link MotionEvent#ACTION_CANCEL}, and all further
28  * events will be delivered to your onTouchEvent() method and no longer
29  * appear here.
30  * </ol>
31  *
32  * @param ev The motion event being dispatched down the hierarchy.
33  * @return Return true to steal motion events from the children and have
34  * them dispatched to this ViewGroup through onTouchEvent().
35  * The current target will receive an ACTION_CANCEL event, and no further
36  * messages will be delivered here.
37  */
38 public boolean onInterceptTouchEvent(MotionEvent ev) {
39     return false;
40 }
如果不看源码你还真可能被这注释吓到了,这么长的英文注释看得头都大了。可是源码竟然如此简单!只有一行代码,返回了一个false!
好吧,既然是布尔型的返回,那么只有两种可能,我们在MyLayout中重写这个方法,然后返回一个true试试,代码如下所示:
 1 public class MyLayout extends LinearLayout {
 2
 3     public MyLayout(Context context, AttributeSet attrs) {
 4         super(context, attrs);
 5     }
 6
 7     @Override
 8     public boolean onInterceptTouchEvent(MotionEvent ev) {
 9         return true;
10     }
11
12 }
现在再次运行项目,然后分别Button1、Button2和空白区域,打印结果如下所示:

你会发现,不管你点击哪里,永远都只会触发MyLayout的touch事件了,按钮的点击事件完全被屏蔽掉了!这是为什么呢?如果Android中的touch事件是先传递到View,再传递到ViewGroup的,那么MyLayout又怎么可能屏蔽掉Button的点击事件呢?
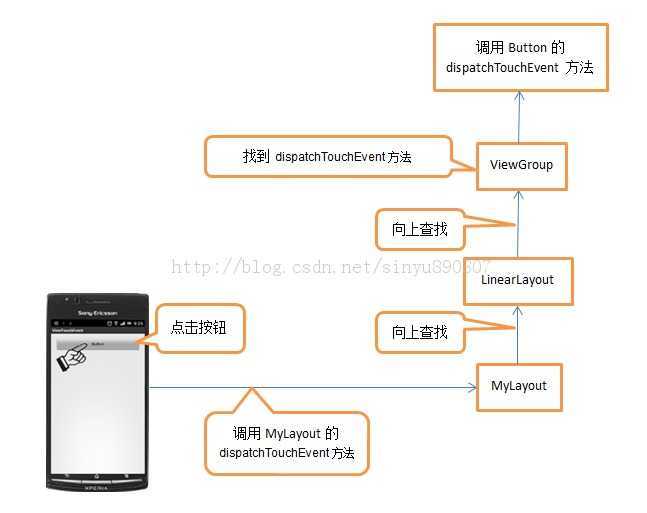
看来只有通过阅读源码,搞清楚Android中ViewGroup的事件分发机制,才能解决我们心中的疑惑了,不过这里我想先跟你透露一句,Android中touch事件的传递,绝对是先传递到ViewGroup,再传递到View的。记得在Android事件分发机制完全解析,带你从源码的角度彻底理解(上) 中我有说明过,只要你触摸了任何控件,就一定会调用该控件的dispatchTouchEvent方法。这个说法没错,只不过还不完整而已。实际情况是,当你点击了某个控件,首先会去调用该控件所在布局的dispatchTouchEvent方法,然后在布局的dispatchTouchEvent方法中找到被点击的相应控件,再去调用该控件的dispatchTouchEvent方法。如果我们点击了MyLayout中的按钮,会先去调用MyLayout的dispatchTouchEvent方法,可是你会发现MyLayout中并没有这个方法。那就再到它的父类LinearLayout中找一找,发现也没有这个方法。那只好继续再找LinearLayout的父类ViewGroup,你终于在ViewGroup中看到了这个方法,按钮的dispatchTouchEvent方法就是在这里调用的。修改后的示意图如下所示:
那还等什么?快去看一看ViewGroup中的dispatchTouchEvent方法的源码吧!代码如下所示:
 1 public boolean dispatchTouchEvent(MotionEvent ev) {
 2     final int action = ev.getAction();
 3     final float xf = ev.getX();
 4     final float yf = ev.getY();
 5     final float scrolledXFloat = xf + mScrollX;
 6     final float scrolledYFloat = yf + mScrollY;
 7     final Rect frame = mTempRect;
 8     boolean disallowIntercept = (mGroupFlags & FLAG_DISALLOW_INTERCEPT) != 0;
 9     if (action == MotionEvent.ACTION_DOWN) {
10         if (mMotionTarget != null) {
11             mMotionTarget = null;
12         }
13         if (disallowIntercept || !onInterceptTouchEvent(ev)) {
14             ev.setAction(MotionEvent.ACTION_DOWN);
15             final int scrolledXInt = (int) scrolledXFloat;
16             final int scrolledYInt = (int) scrolledYFloat;
17             final View[] children = mChildren;
18             final int count = mChildrenCount;
19             for (int i = count - 1; i >= 0; i--) {
20                 final View child = children[i];
21                 if ((child.mViewFlags & VISIBILITY_MASK) == VISIBLE
22                         || child.getAnimation() != null) {
23                     child.getHitRect(frame);
24                     if (frame.contains(scrolledXInt, scrolledYInt)) {
25                         final float xc = scrolledXFloat - child.mLeft;
26                         final float yc = scrolledYFloat - child.mTop;
27                         ev.setLocation(xc, yc);
28                         child.mPrivateFlags &= ~CANCEL_NEXT_UP_EVENT;
29                         if (child.dispatchTouchEvent(ev))  {
30                             mMotionTarget = child;
31                             return true;
32                         }
33                     }
34                 }
35             }
36         }
37     }
38     boolean isUpOrCancel = (action == MotionEvent.ACTION_UP) ||
39             (action == MotionEvent.ACTION_CANCEL);
40     if (isUpOrCancel) {
41         mGroupFlags &= ~FLAG_DISALLOW_INTERCEPT;
42     }
43     final View target = mMotionTarget;
44     if (target == null) {
45         ev.setLocation(xf, yf);
46         if ((mPrivateFlags & CANCEL_NEXT_UP_EVENT) != 0) {
47             ev.setAction(MotionEvent.ACTION_CANCEL);
48             mPrivateFlags &= ~CANCEL_NEXT_UP_EVENT;
49         }
50         return super.dispatchTouchEvent(ev);
51     }
52     if (!disallowIntercept && onInterceptTouchEvent(ev)) {
53         final float xc = scrolledXFloat - (float) target.mLeft;
54         final float yc = scrolledYFloat - (float) target.mTop;
55         mPrivateFlags &= ~CANCEL_NEXT_UP_EVENT;
56         ev.setAction(MotionEvent.ACTION_CANCEL);
57         ev.setLocation(xc, yc);
58         if (!target.dispatchTouchEvent(ev)) {
59         }
60         mMotionTarget = null;
61         return true;
62     }
63     if (isUpOrCancel) {
64         mMotionTarget = null;
65     }
66     final float xc = scrolledXFloat - (float) target.mLeft;
67     final float yc = scrolledYFloat - (float) target.mTop;
68     ev.setLocation(xc, yc);
69     if ((target.mPrivateFlags & CANCEL_NEXT_UP_EVENT) != 0) {
70         ev.setAction(MotionEvent.ACTION_CANCEL);
71         target.mPrivateFlags &= ~CANCEL_NEXT_UP_EVENT;
72         mMotionTarget = null;
73     }
74     return target.dispatchTouchEvent(ev);
75 }
这个方法代码比较长,我们只挑重点看。首先在第13行可以看到一个条件判断,如果disallowIntercept和!onInterceptTouchEvent(ev)两者有一个为true,就会进入到这个条件判断中。disallowIntercept是指是否禁用掉事件拦截的功能,默认是false,也可以通过调用requestDisallowInterceptTouchEvent方法对这个值进行修改。那么当第一个值为false的时候就会完全依赖第二个值来决定是否可以进入到条件判断的内部,第二个值是什么呢?竟然就是对onInterceptTouchEvent方法的返回值取反!也就是说如果我们在onInterceptTouchEvent方法中返回false,就会让第二个值为true,从而进入到条件判断的内部,如果我们在onInterceptTouchEvent方法中返回true,就会让第二个值为false,从而跳出了这个条件判断。
这个时候你就可以思考一下了,由于我们刚刚在MyLayout中重写了onInterceptTouchEvent方法,让这个方法返回true,导致所有按钮的点击事件都被屏蔽了,那我们就完全有理由相信,按钮点击事件的处理就是在第13行条件判断的内部进行的!
那我们重点来看下条件判断的内部是怎么实现的。在第19行通过一个for循环,遍历了当前ViewGroup下的所有子View,然后在第24行判断当前遍历的View是不是正在点击的View,如果是的话就会进入到该条件判断的内部,然后在第29行调用了该View的dispatchTouchEvent,之后的流程就和 Android事件分发机制完全解析,带你从源码的角度彻底理解(上) 中讲解的是一样的了。我们也因此证实了,按钮点击事件的处理确实就是在这里进行的。
然后需要注意一下,调用子View的dispatchTouchEvent后是有返回值的。我们已经知道,如果一个控件是可点击的,那么点击该控件时,dispatchTouchEvent的返回值必定是true。因此会导致第29行的条件判断成立,于是在第31行给ViewGroup的dispatchTouchEvent方法直接返回了true。这样就导致后面的代码无法执行到了,也是印证了我们前面的Demo打印的结果,如果按钮的点击事件得到执行,就会把MyLayout的touch事件拦截掉。
那如果我们点击的不是按钮,而是空白区域呢?这种情况就一定不会在第31行返回true了,而是会继续执行后面的代码。那我们继续往后看,在第44行,如果target等于null,就会进入到该条件判断内部,这里一般情况下target都会是null,因此会在第50行调用super.dispatchTouchEvent(ev)。这句代码会调用到哪里呢?当然是View中的dispatchTouchEvent方法了,因为ViewGroup的父类就是View。之后的处理逻辑又和前面所说的是一样的了,也因此MyLayout中注册的onTouch方法会得到执行。之后的代码在一般情况下是走不到的了,我们也就不再继续往下分析。
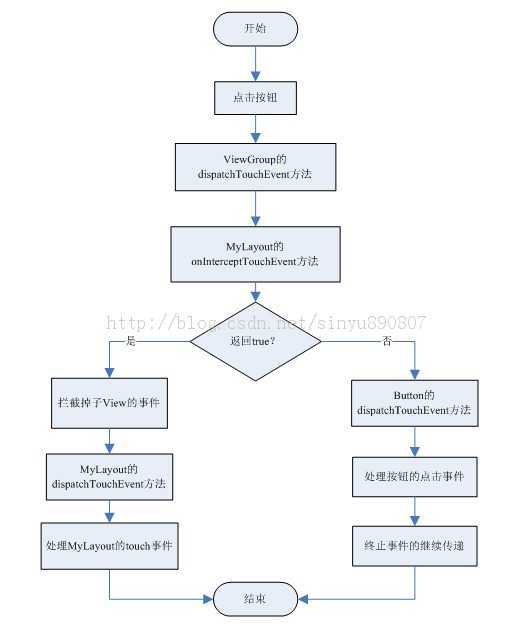
再看一下整个ViewGroup事件分发过程的流程图吧,相信可以帮助大家更好地去理解:
现在整个ViewGroup的事件分发流程的分析也就到此结束了,我们最后再来简单梳理一下吧。
1. Android事件分发是先传递到ViewGroup,再由ViewGroup传递到View的。
2. 在ViewGroup中可以通过onInterceptTouchEvent方法对事件传递进行拦截,onInterceptTouchEvent方法返回true代表不允许事件继续向子View传递,返回false代表不对事件进行拦截,默认返回false。
3. 子View中如果将传递的事件消费掉,ViewGroup中将无法接收到任何事件。
好了,Android事件分发机制完全解析到此全部结束,结合上下两篇,相信大家对事件分发的理解已经非常深刻了。
【转】Android事件分发机制完全解析,带你从源码的角度彻底理解(下),布布扣,bubuko.com
【转】Android事件分发机制完全解析,带你从源码的角度彻底理解(下)
标签:android style blog http color strong
原文地址:http://www.cnblogs.com/Couch-potato/p/3825043.html