标签:
小技巧1 地址:http://www.cnblogs.com/ms-uap/p/4641419.html
我们在上一篇博文中展示了通过Shape.Stroke族属性实现静态重复性UI绘制,使得UWP界面的实现变得稍微灵活一些了。
但这一技巧还是有不少局限的,毕竟折腾StrokeDashArray属性看上去并不是那么直观和适用(还存在用扇形欺骗观众这样的“问题”啦)。
这一篇博文我们将为大家介绍一种更为适用,同时也更为灵活和强大的重复性UI绘制技巧。
ItemsControl是一个很常见的控件,虽然它经常是以ListView、ListBox等衍生类的形式出现,想必大家也是经常使用它们。
而ItemsControl本身,则提供了最基本的“作为对象集合”的功能。
而其中ItemsControl.ItemsSource和ItemsControl.ItemTemplate两个属性最为重要。前者将通过指定策略预处理的数据赋予控件,后者将源数据映射为UI元素。
灵活运用它们,就能方便的做出精准而又快速的设计。
比如:

<Grid>
    <Grid.Resources>
        <design:AngleSource x:Key="source"/>
    </Grid.Resources>

    <Grid HorizontalAlignment="Center" VerticalAlignment="Center"
          Width="200" Height="200">
        <ItemsControl ItemsSource="{Binding Source={StaticResource source}, Path=Items}">
            <ItemsControl.ItemsPanel>
                <ItemsPanelTemplate>
                    <Grid/>
                </ItemsPanelTemplate>
            </ItemsControl.ItemsPanel>
            <ItemsControl.ItemContainerStyle>
                <Style>
                    <Setter Property="Control.VerticalAlignment" Value="Stretch"/>
                    <Setter Property="Control.HorizontalAlignment" Value="Center"/>
                </Style>
            </ItemsControl.ItemContainerStyle>
            <ItemsControl.ItemTemplate>
                <DataTemplate>
                    <Grid RenderTransformOrigin="0.5,0.5">
                        <Line Stroke="Black" StrokeThickness="10" X1="5" X2="5" Y2="20" />

                        <Grid.RenderTransform>
                            <RotateTransform Angle="{Binding}"/>
                        </Grid.RenderTransform>
                    </Grid>
                </DataTemplate>
            </ItemsControl.ItemTemplate>
        </ItemsControl>
    </Grid>
</Grid>
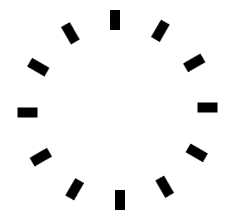
让我们把目光放得“短浅”一点:),此处是不是完美解决了欺骗观众的问题?
一个小小的问题的解决,有时能带出新的解决方案和模式。那么让我们看看这段XAML有什么作用?
首先,AngleSource是这样一个类:
public class AngleSource
{
    public IEnumerable<double> Items
    {
        get
        {
            return Enumerable.Range(0, 12).Select(d => d * 30.0);
        }
    }
}
它的作用就是提供一个数列,里面的数代表了我们要显示的线段相对图形中心的旋转角度。
这个AngleSource类,以静态资源的形式,将其含有的数列暴露给ItemsControl的ItemsSource属性:
ItemsSource="{Binding Source={StaticResource source}, Path=Items}"
然后我们通过自定义ItemTemplate,将简单的double数值具现为旋转的图形!
通过这种方式,我们可以使用简单的代码,来完成其最擅长的事,即按某种策略生成源数据。
PS:如果只有简单的数个元素,不使用ItemsSource+Binding也是可以的,只要像这样:
<ItemsControl>
    <x:Double>30</x:Double>
    <x:Double>60</x:Double>
    <x:Double>90</x:Double>
</ItemsControl>

<ItemsControl>
    <local:FooItem Bar="123" Baz="456"/>
    <local:FooItem Bar="789" Baz="233"/>
</ItemsControl>
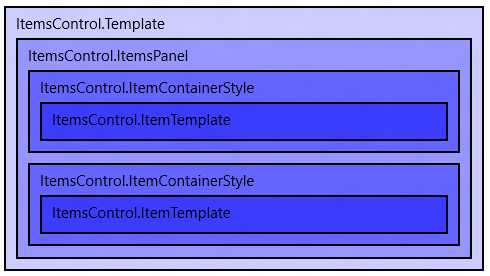
我们还使用ItemsControl.ItemsPanel、ItemsControl.ItemContainerStyle两个属性配合,让每个线段能以表盘的中心为参考点进行旋转:
1)ItemContainerStyle是对Item的区域进行外围定制(Item本身交给ItemTemplate了)。
2)ItemsPanel的作用是定义元素在控件中的布局形式,默认的是StackPanel,也就是常见的ListBox和ListView的形式。
常见的还有:
<Grid/>   <!-- 可以自动对齐 -->
<Canvas/> <!-- 一般为绝对定位,容易调整图层,并可以超出范围 -->
整个ItemsControl的层级大致如下:

这里我们简单地做两种扩展,更多的组合期待大家的灵活运用~

<Grid>
    <Grid.Resources>
        <design:AngleSource x:Key="source"/>
        <design:AngleClockConverter x:Key="toClock"/>
    </Grid.Resources>

    <Grid HorizontalAlignment="Center" VerticalAlignment="Center"
          Width="200" Height="200">
        <ItemsControl ItemsSource="{Binding Source={StaticResource source}, Path=Items}"
                      RenderTransformOrigin="0.5,0.5">
            <ItemsControl.ItemsPanel>
                <ItemsPanelTemplate>
                    <Grid/>
                </ItemsPanelTemplate>
            </ItemsControl.ItemsPanel>
            <ItemsControl.ItemContainerStyle>
                <Style>
                    <Setter Property="Control.VerticalAlignment" Value="Stretch"/>
                    <Setter Property="Control.HorizontalAlignment" Value="Center"/>
                </Style>
            </ItemsControl.ItemContainerStyle>
            <ItemsControl.ItemTemplate>
                <DataTemplate>
                    <Grid RenderTransformOrigin="0.5,0.5" Width="50">
                        <TextBlock Text="{Binding Converter={StaticResource toClock}}"
                                   HorizontalAlignment="Center"/>
                        <Line Stroke="Black" StrokeThickness="10"
                              X1="5" X2="5" Y1="20" Y2="40"
                              HorizontalAlignment="Center"/>
                        <Grid.RenderTransform>
                            <RotateTransform Angle="{Binding}"/>
                        </Grid.RenderTransform>
                   </Grid>
                </DataTemplate>
            </ItemsControl.ItemTemplate>
        </ItemsControl>
    </Grid>
</Grid>
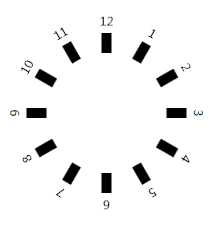
这段XAML不仅按角度画出了旋转的线段,还在此通过一个converter对源数据进行了一次映射。是不是有点linq select的感觉?

<Grid>
    <Grid.Resources>
        <design:FibonacciSource x:Key="fibonacci"/>
    </Grid.Resources>
    <ItemsControl Margin="20"
                  ItemsSource="{Binding Source={StaticResource fibonacci}, Path=Items}">
        <ItemsControl.ItemsPanel>
            <ItemsPanelTemplate>
                <Canvas/>
            </ItemsPanelTemplate>
        </ItemsControl.ItemsPanel>
        <ItemsControl.ItemContainerStyle>
            <Style>
                <Setter Property="Canvas.Left" Value="{Binding}"/>
            </Style>
        </ItemsControl.ItemContainerStyle>
        <ItemsControl.ItemTemplate>
            <DataTemplate>
                <Canvas>
                    <Line Y2="30" Stroke="Black"/>
                    <!-- 由于我们的Left定位实际只用于上面的Line -->
                    <!-- 那我们怎让下面的数值显示能居中于Line呢? -->
                    <!-- 因为Canvas是允许其内容的渲染超出范围的,我们可以以此先用Grid开辟一个足够大的空间 -->
                    <!-- 再在其中将TextBlock居中 -->
                    <Grid Width="50" Canvas.Left="-25" Canvas.Top="40">
                        <TextBlock HorizontalAlignment="Center" Text="{Binding}"/>
                    </Grid>
                </Canvas>
            </DataTemplate>
        </ItemsControl.ItemTemplate>
    </ItemsControl>
</Grid>
这段XAML也是很有趣,其中的ItemsSource仅仅是提供了一个IEnumerable<int>,也就是斐波那契数列,
而我们控制Canvas.Left画出了一系列标注线,它们距左端的位移分别是斐波那契数列的值!
或许在一些数理教学的App里能用得上呢……
Source类同样可以暴露出使用形如FoobarItem的IEnumerable<T>,就可以在FoobarItem中设置更多更丰富的属性,
然后在ItemsControl.ItemTemplate(DataTemplate)进行Binding,辅以Style和Converter,实现更加丰富的效果。
这两篇博文为大家介绍了两种绘制重复性UI的办法,那我们掌握这些办法有什么意义,或者说我们能获得什么好处呢?
解耦。
将这些与程序逻辑完全无关的UI设定,完全地与功能逻辑剥离开。即使需要写一些代码,也和功能逻辑完全没有关联。
让code behind清爽,更加专注于功能的实现,而UI的变换仍旧是动态的。
精确。
由于使用XAML和原始数据生成UI,所以UI元素的属性和位移、旋转等变换是完全精准的,免去手工校准之虞。
并且配合CacheMode和ViewBox,使得UI在适配和渲染时表现清晰不失真,兼顾性能。
同时也提供了新的UI元素控制方式。
比如例子中的圆形进度条的实现。我们可以在后台代码中更新StrokeDashArray来展示进度。
又比如我们设定好了ItemsControl的数据展示策略,只需要再设定数据源,就能轻易地将其展示。
希望这两篇博客能够抛砖引玉,唤来更多创意和技巧,为大家在UWP中的开发提供方便!;)
标签:
原文地址:http://www.cnblogs.com/ms-uap/p/4641473.html