标签:
菜单是用户界面中最常见的元素之一,使用非常频繁,在Android中,菜单被分为如下三种,选项菜单(OptionsMenu)、上下文菜单(ContextMenu)和子菜单(SubMenu)
一、概述
public boolean onCreateOptionsMenu(Menu menu):使用此方法调用OptionsMenu 。
public boolean onOptionsItemSelected(MenuItem item):选中菜单项后发生的动作。
public void onOptionsMenuClosed(Menu menu):菜单关闭后发生的动作。
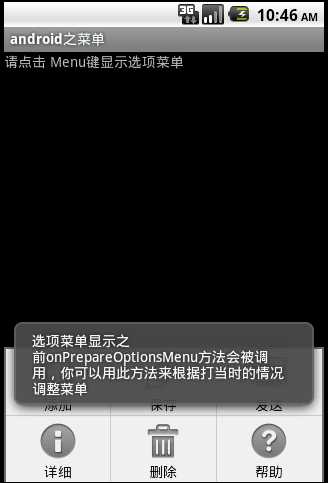
public boolean onPrepareOptionsMenu(Menu menu):选项菜单显示之前onPrepareOptionsMenu方法会被调用,你可以用此方法来根据打当时的情况调整菜单。
public boolean onMenuOpened(int featureId, Menu menu):单打开后发生的动作。
二、默认样式
默认样式是在屏幕底部弹出一个菜单,这个菜单我们就叫他选项菜单OptionsMenu,一般情况下,选项菜单最多显示2排每排3个菜单项,这 些菜单项有文字有图标,也被称作Icon Menus,如果多于6项,从第六项开始会被隐藏,在第六项会出现一个More里,点击More才出现第六项以及以后的菜单项,这些菜单项也被称作 Expanded Menus。下面介绍。

1.main.xml

<?xml version="1.0" encoding="utf-8"?>
<LinearLayout xmlns:android="http://schemas.android.com/apk/res/android"
    android:orientation="vertical" android:layout_width="fill_parent"
    android:layout_height="fill_parent" >

    <TextView android:layout_width="wrap_content"
        android:layout_height="wrap_content" android:text="请点击 Menu键显示选项菜单"
        android:id="@+id/TextView02" />

</LinearLayout>
完整代码

DefaultMenu

package com.wjq.menu;

import android.app.Activity;
import android.os.Bundle;
import android.view.Menu;
import android.view.MenuItem;
import android.widget.Toast;

public class DefaultMenu extends Activity {
    /** Called when the activity is first created. */
    @Override
    public void onCreate(Bundle savedInstanceState) {
        super.onCreate(savedInstanceState);
        setContentView(R.layout.main);
    }

    @Override
    public boolean onCreateOptionsMenu(Menu menu) {
        /*
         *
         * add()方法的四个参数,依次是:
         *
         * 1、组别,如果不分组的话就写Menu.NONE,
         *
         * 2、Id,这个很重要,Android根据这个Id来确定不同的菜单
         *
         * 3、顺序,那个菜单现在在前面由这个参数的大小决定
         *
         * 4、文本,菜单的显示文本
         */

        menu.add(Menu.NONE, Menu.FIRST + 1, 5, "删除").setIcon(

        android.R.drawable.ic_menu_delete);

        // setIcon()方法为菜单设置图标,这里使用的是系统自带的图标,同学们留意一下,以

        // android.R开头的资源是系统提供的,我们自己提供的资源是以R开头的

        menu.add(Menu.NONE, Menu.FIRST + 2, 2, "保存").setIcon(

        android.R.drawable.ic_menu_edit);

        menu.add(Menu.NONE, Menu.FIRST + 3, 6, "帮助").setIcon(

        android.R.drawable.ic_menu_help);

        menu.add(Menu.NONE, Menu.FIRST + 4, 1, "添加").setIcon(

        android.R.drawable.ic_menu_add);

        menu.add(Menu.NONE, Menu.FIRST + 5, 4, "详细").setIcon(

        android.R.drawable.ic_menu_info_details);

        menu.add(Menu.NONE, Menu.FIRST + 6, 3, "发送").setIcon(

        android.R.drawable.ic_menu_send);

        return true;

    }

    @Override
    public boolean onOptionsItemSelected(MenuItem item) {
        switch (item.getItemId()) {

        case Menu.FIRST + 1:

            Toast.makeText(this, "删除菜单被点击了", Toast.LENGTH_LONG).show();

            break;

        case Menu.FIRST + 2:

            Toast.makeText(this, "保存菜单被点击了", Toast.LENGTH_LONG).show();

            break;

        case Menu.FIRST + 3:

            Toast.makeText(this, "帮助菜单被点击了", Toast.LENGTH_LONG).show();

            break;

        case Menu.FIRST + 4:

            Toast.makeText(this, "添加菜单被点击了", Toast.LENGTH_LONG).show();

            break;

        case Menu.FIRST + 5:

            Toast.makeText(this, "详细菜单被点击了", Toast.LENGTH_LONG).show();

            break;

        case Menu.FIRST + 6:

            Toast.makeText(this, "发送菜单被点击了", Toast.LENGTH_LONG).show();

            break;

        }

        return false;

    }

    @Override
    public void onOptionsMenuClosed(Menu menu) {
        Toast.makeText(this, "选项菜单关闭了", Toast.LENGTH_LONG).show();
    }

    @Override
    public boolean onPrepareOptionsMenu(Menu menu) {
        Toast.makeText(this,
                "选项菜单显示之前onPrepareOptionsMenu方法会被调用,你可以用此方法来根据打当时的情况调整菜单",
                Toast.LENGTH_LONG).show();

        // 如果返回false,此方法就把用户点击menu的动作给消费了,onCreateOptionsMenu方法将不会被调用

        return true;

    }
}
3、SubMenu用法
SubMenu实现的是子菜单功能,如“添加”的下一级菜单为“从网络添加”和“从本地添加两个选项的Menu”

SubMenu submenu=menu.addSubMenu(Menu.NONE, 0, 0, "添加")
                .setIcon(android.R.drawable.ic_menu_add);
submenu.add(Menu.NONE, 10, 0, "从网络添加");
submenu.add(Menu.NONE, 11, 1, "从本地添加");
submenu.add()方法不能设置图标,设置了也是无效的;但是submenu本身可以设置图标,submenu.setIcon();
4、ContextMenu用法
长按某个View达2秒后,就弹出menu。创建的方法是复写onCreateContextMenu()方法,处理方法是onContextItemSelected()。因为是长按某一个View,所以ContextMenu要注册到目标view,才能实现。
注册方法如下(如,注册到一个EditText,长按这个EditText就可以调出Menu了),et是EditText的id

this.registerForContextMenu(findViewById(R.id.et));
onCreateContextMenu里面的add()/setIcon()方法不能添加图标,就算添加了,也不能显示出来的。在onCreateContextMenu方法里面也能设置submenu子菜单,方法参考第3点

public class MenuActivity extends Activity {
    @Override
    public void onCreate(Bundle savedInstanceState) {
        super.onCreate(savedInstanceState);
        setContentView(R.layout.main);
        this.registerForContextMenu(findViewById(R.id.et));
        //注册到EditText,et是它的id
    }

    @Override
    public void onCreateContextMenu(ContextMenu menu, View v,
            ContextMenuInfo menuInfo) {
        // TODO Auto-generated method stub
        menu.add(Menu.NONE, 0, 0, "添加");
        menu.add(Menu.NONE, 1, 1, "保存");
        super.onCreateContextMenu(menu, v, menuInfo);
    }
    @Override
    public boolean onContextItemSelected(MenuItem item) {
        // TODO Auto-generated method stub
        switch (item.getItemId()) {
        case 0:
            Toast.makeText(this, "添加", Toast.LENGTH_SHORT).show();
            break;
        case 1:
            Toast.makeText(this, "保存", Toast.LENGTH_SHORT).show();
            break;
        default:
            Toast.makeText(this, "方法还没定义", Toast.LENGTH_SHORT).show();
            break;
        }
        return super.onContextItemSelected(item);
    }
}
5.效果浏览

三、自定义样式

<?xml version="1.0" encoding="utf-8"?>
<LinearLayout xmlns:android="http://schemas.android.com/apk/res/android"
    android:orientation="vertical"
    android:layout_width="fill_parent"
    android:layout_height="fill_parent"
    >
<GridView
         android:id="@+id/gridview"
         android:layout_width="fill_parent"
         android:layout_height="fill_parent"
         android:numColumns="4"
         android:verticalSpacing="10dip"
         android:horizontalSpacing="10dip"
         android:stretchMode="columnWidth"
         android:gravity="center"
         />

</LinearLayout>
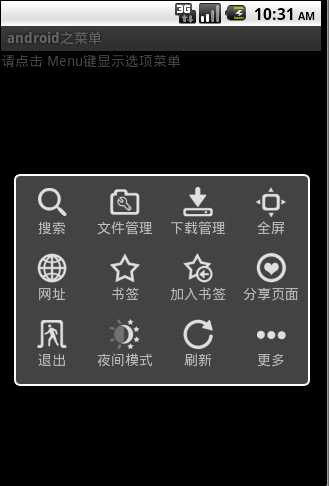
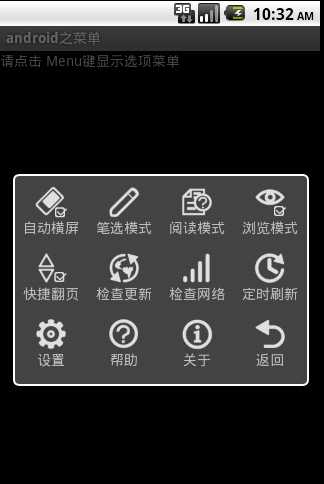
首先自定义菜单界面,我是GridView来包含菜单项,4列3行

2.item_menu.xml

<?xml version="1.0" encoding="utf-8"?>
<RelativeLayout xmlns:android="http://schemas.android.com/apk/res/android"
    android:id="@+id/RelativeLayout_Item"
    android:layout_width="fill_parent" android:layout_height="wrap_content"
    android:paddingBottom="5dip">
    <ImageView android:id="@+id/item_image"
        android:layout_centerHorizontal="true" android:layout_width="wrap_content"
        android:layout_height="wrap_content"></ImageView>
    <TextView android:layout_below="@id/item_image" android:id="@+id/item_text"
        android:layout_centerHorizontal="true" android:layout_width="wrap_content"
        android:layout_height="wrap_content" android:text="选项"></TextView>
</RelativeLayout>
菜单项的现实样式,一个图标和一个文字。

完整代码

package com.wjq.menu;


import java.util.ArrayList;
import java.util.HashMap;

import android.app.Activity;
import android.app.AlertDialog;
import android.content.DialogInterface;
import android.content.DialogInterface.OnKeyListener;
import android.os.Bundle;
import android.view.KeyEvent;
import android.view.Menu;
import android.view.View;
import android.widget.AdapterView;
import android.widget.GridView;
import android.widget.SimpleAdapter;
import android.widget.AdapterView.OnItemClickListener;

public class CustomizeMenu extends Activity {

    private boolean isMore = false;// menu菜单翻页控制
    AlertDialog menuDialog;// menu菜单Dialog
    GridView menuGrid;
    View menuView;

    private final int ITEM_SEARCH = 0;// 搜索
    private final int ITEM_FILE_MANAGER = 1;// 文件管理
    private final int ITEM_DOWN_MANAGER = 2;// 下载管理
    private final int ITEM_FULLSCREEN = 3;// 全屏
    private final int ITEM_MORE = 11;// 菜单


    /** 菜单图片 **/
    int[] menu_image_array = { R.drawable.menu_search,
            R.drawable.menu_filemanager, R.drawable.menu_downmanager,
            R.drawable.menu_fullscreen, R.drawable.menu_inputurl,
            R.drawable.menu_bookmark, R.drawable.menu_bookmark_sync_import,
            R.drawable.menu_sharepage, R.drawable.menu_quit,
            R.drawable.menu_nightmode, R.drawable.menu_refresh,
            R.drawable.menu_more };
    /** 菜单文字 **/
    String[] menu_name_array = { "搜索", "文件管理", "下载管理", "全屏", "网址", "书签",
            "加入书签", "分享页面", "退出", "夜间模式", "刷新", "更多" };
    /** 菜单图片2 **/
    int[] menu_image_array2 = { R.drawable.menu_auto_landscape,
            R.drawable.menu_penselectmodel, R.drawable.menu_page_attr,
            R.drawable.menu_novel_mode, R.drawable.menu_page_updown,
            R.drawable.menu_checkupdate, R.drawable.menu_checknet,
            R.drawable.menu_refreshtimer, R.drawable.menu_syssettings,
            R.drawable.menu_help, R.drawable.menu_about, R.drawable.menu_return };
    /** 菜单文字2 **/
    String[] menu_name_array2 = { "自动横屏", "笔选模式", "阅读模式", "浏览模式", "快捷翻页",
            "检查更新", "检查网络", "定时刷新", "设置", "帮助", "关于", "返回" };
    @Override
    protected void onCreate(Bundle savedInstanceState) {
        // TODO Auto-generated method stub
        super.onCreate(savedInstanceState);

        setContentView(R.layout.main);

        menuView = View.inflate(this, R.layout.gridview_menu, null);
        // 创建AlertDialog
        menuDialog = new AlertDialog.Builder(this).create();
        menuDialog.setView(menuView);
        menuDialog.setOnKeyListener(new OnKeyListener() {
            public boolean onKey(DialogInterface dialog, int keyCode,
                    KeyEvent event) {
                if (keyCode == KeyEvent.KEYCODE_MENU)// 监听按键
                    dialog.dismiss();
                return false;
            }
        });

        menuGrid = (GridView) menuView.findViewById(R.id.gridview);
        menuGrid.setAdapter(getMenuAdapter(menu_name_array, menu_image_array));
        /** 监听menu选项 **/
        menuGrid.setOnItemClickListener(new OnItemClickListener() {
            public void onItemClick(AdapterView<?> arg0, View arg1, int arg2,
                    long arg3) {
                switch (arg2) {
                case ITEM_SEARCH:// 搜索

                    break;
                case ITEM_FILE_MANAGER:// 文件管理

                    break;
                case ITEM_DOWN_MANAGER:// 下载管理

                    break;
                case ITEM_FULLSCREEN:// 全屏

                    break;
                case ITEM_MORE:// 翻页
                    if (isMore) {
                        menuGrid.setAdapter(getMenuAdapter(menu_name_array2,
                                menu_image_array2));
                        isMore = false;
                    } else {// 首页
                        menuGrid.setAdapter(getMenuAdapter(menu_name_array,
                                menu_image_array));
                        isMore = true;
                    }
                    menuGrid.invalidate();// 更新menu
                    menuGrid.setSelection(ITEM_MORE);
                    break;
                }


            }
        });
    }
    @Override
    public boolean onCreateOptionsMenu(Menu menu) {
        menu.add("menu");// 必须创建一项
        return super.onCreateOptionsMenu(menu);
    }

    private SimpleAdapter getMenuAdapter(String[] menuNameArray,
            int[] imageResourceArray) {
        ArrayList<HashMap<String, Object>> data = new ArrayList<HashMap<String, Object>>();
        for (int i = 0; i < menuNameArray.length; i++) {
            HashMap<String, Object> map = new HashMap<String, Object>();
            map.put("itemImage", imageResourceArray[i]);
            map.put("itemText", menuNameArray[i]);
            data.add(map);
        }
        SimpleAdapter simperAdapter = new SimpleAdapter(this, data,
                R.layout.item_menu, new String[] { "itemImage", "itemText" },
                new int[] { R.id.item_image, R.id.item_text });
        return simperAdapter;
    }
    @Override
    public boolean onMenuOpened(int featureId, Menu menu) {
        if (menuDialog == null) {
            menuDialog = new AlertDialog.Builder(this).setView(menuView).show();
        } else {
            menuDialog.show();
        }
        return false;// 返回为true 则显示系统menu
    }

}
原代码下载点击这里
效果浏览


标签:
原文地址:http://www.cnblogs.com/samjustin/p/4650643.html