标签:
带你玩装UITableView
在实际iOS开发中UITableView是使用最多,也是最重要的一个控件,如果你不会用它,那别说什么大神了,菜鸟都不如。
其实关于UItableView事非常简单的,实际开发中用起来却没有那么简单就是因为他结合MVC使用,涉及到了模型数据的读取,自定义View,功能的拓展和更好的解藕,下面就带你玩一遍;
UITableView的两种样式
accessoryType
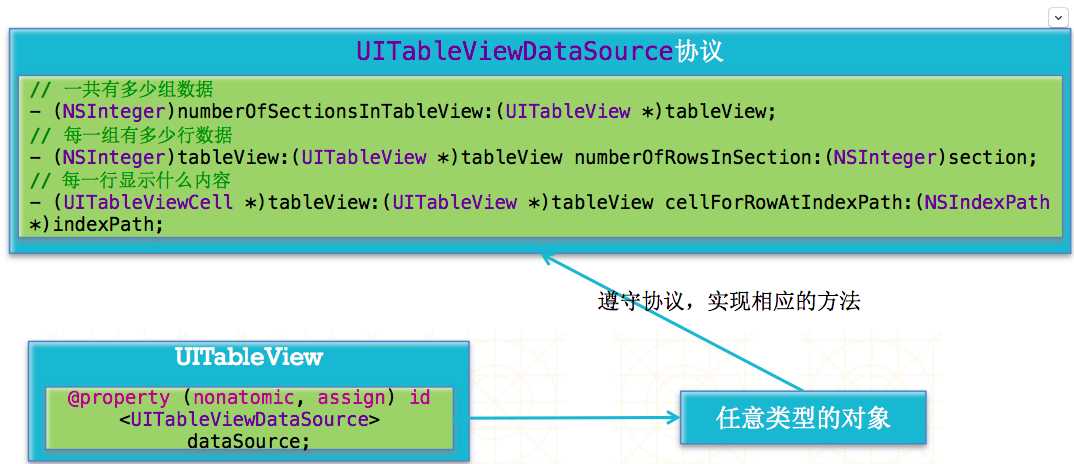
@required 代理必须实现的方法,如果不实现这些方法,控件无法正常工作
* 告诉表格要显示多少行的内容
* 要显示的表格行视图
@optional 代理不一定需要实现的方法,如果使用某些高级功能的时候,才需要实现这些方法
* 表格数据中有多少分组
* 每个分组的标题文字
* 每个分组的尾部文字
提示:
1> 代理方法的返回值,是代理告诉控件(委托)的相关细节
2> 在定义协议方法的时候可以使用
不是所有的代理都需要实现可选方法,可以让自定义控件的灵活度更大!
跟踪数据源方法的执行先后顺序,提示学习和思考的方式,如果
1> 代理方法的命名规范
(1) 协议的名称前半部分与控件名称相同
* 末尾添加"DataSource"表示代理可以通过这些协议方法向控件传递数据
* 末尾添加"Delegate"表示代理实现这些方法,可以在控件发生某些事件时做出响应的动作
(2) 协议方法
* 通常以控件名称(去除类前缀)开头,方便程序编写
* 第一个参数是控件自身,方便在代理方法中直接访问控件属性或者调用方法,而无需再传递更多的额外参数
问题: 表格中的数据是静态的,不够灵活
解决方法: 引入数据模型,将数据与界面分离
1> 使用代码的方式对此前的代码进行改造,进一步体会模型的好处以及MVC架构的设计
2> .语法与set方法的使用对比
3> 搭建界面,在Storyboard中之间做数据源的连线
* 运行会崩掉!
* 原因分析,没有实现数据源方法,进一步体会@required定义的意义
4> 编写数据源方法,只要实现两个必须的方法就可以了
5> UITableViewCell的深入探索
* detailTextLabel 明细内容
6> 要显示明细内容需要修改tableViewCell的样式
7> 设置行高的两种方式
* 使用tableView的rowHeight属性可以统一设置表格行高,效率更高
* 通过代理方法设置行高,可以在
(1) 通过表格数据源方法,知道表格行数之后计算所有单元格的行高,效率不高
(2) 计算获得所有单元格高度后,再创建屏幕显示的单元格
体会懒加载的好处,只有在需要的时候才会创建!
提示:计算行高的时候,单元格还没有被创建
应用场景:类似于新浪微博之类的应用程序,每个单元格的行高都是需要根据内容进行调整,是不固定的
6. TableViewCell的循环引用
1> 使用Reveal查看UITableView的实际布局
2>
方法会在每次一个TalbeViewCell出现在屏幕中时被调用
为了避免为单元格重复分配内存空间,UITableView提供了循环引用机制
重用机制:
iOS设备的内存有限,如果用UITableView显示成千上万条数据,就需要成千上万个UITableViewCell对象的话,那将会耗尽iOS设备的内存。要解决该问题,需要重用UITableViewCell对象
重用原理:
当滚动列表时,部分UITableViewCell会移出窗口,UITableView会将窗口外的UITableViewCell放入一个对象池中,等待重用。当UITableView要求dataSource返回UITableViewCell时,dataSource会先查看这个对象池,如果池中有未使用的UITableViewCell,dataSource会用新的数据配置这个UITableViewCell,然后返回给UITableView,重新显示到窗口中,从而避免创建新对象
还有一个非常重要的问题:有时候需要自定义UITableViewCell(用一个子类继承UITableViewCell),而且每一行用的不一定是同一种UITableViewCell,所以一个UITableView可能拥有不同类型的UITableViewCell,对象池中也会有很多不同类型的UITableViewCell,那么UITableView在重用UITableViewCell时可能会得到错误类型的UITableViewCell
解决方案:UITableViewCell有个NSString *reuseIdentifier属性,可以在初始化UITableViewCell的时候传入一个特定的字符串标识来设置reuseIdentifier(一般用UITableViewCell的类名)。当UITableView要求dataSource返回UITableViewCell时,先通过一个字符串标识到对象池中查找对应类型的UITableViewCell对象,如果有,就重用,如果没有,就传入这个字符串标识来初始化一个UITableViewCell对象
代码实现:
 1 - (UITableViewCell *)tableView:(UITableView *)tableView cellForRowAtIndexPath:(NSIndexPath *)indexPath
 2
 3 {
 4
 5     // 1.定义一个cell的标识
 6
 7       static NSString *ID = @”czcell";
 8
 9
10
11     // 2.从缓存池中取出cell
12
13       UITableViewCell *cell = [tableView dequeueReusableCellWithIdentifier:ID];
14
15
16
17     // 3.如果缓存池中没有cell
18
19       if (cell == nil) {
20
21         cell = [[UITableViewCell alloc] initWithStyle:UITableViewCellStyleSubtitle reuseIdentifier:ID];
22
23     }
24
25
26
27     // 4.设置cell的属性...
28
29
30
31       return cell;
32
33 }
重点:加载Plist数据转成模型
 1 - (NSArray *)wineArray
 2
 3 {
 4
 5     if (!_wineArray) {
 6
 7         // 加载字典数组
 8
 9         NSArray *dictArray = [NSArray arrayWithContentsOfFile:[[NSBundle mainBundle] pathForResource:@"wine.plist" ofType:nil]];
10
11
12
13         // 将字典数组 -> 模型数据
14
15         NSMutableArray *wineArray = [NSMutableArray array];
16
17         for (NSDictionary *dict in dictArray) {
18
19             [wineArray addObject:[XMGWine wineWithDict:dict]];
20
21         }
22
23
24
25         _wineArray = wineArray;
26
27     }
28
29     return _wineArray;
30
31 }
//直接使用MJExtension
 1 - (NSArray *)tgs
 2
 3 {
 4
 5     if (!_tgs) {
 6
 7         _tgs = [XMGTg objectArrayWithFilename:@"tgs.plist"];
 8
 9     }
10
11     return _tgs;
12
13 }
关于MJExtension请看前面的文章:plsit转模型详细介绍,或者你可以直接去github上面搜索看他的官方教程
// accessoryButton点击监听方法
// 选中行操作
添加索引
/** 返回右边显示的索引数组 */
"注意" 索引数组的下标与数据分组索引的下标对应,而与索引的文字无关
辅助方法
/**
只要实现了此方法,TableView就可以对TableView进行编辑
*/
// 代理方法 - 默认返回删除样式
// 只要实现了此方法,就可以进行数据排序,由于UI上已经完成了表格行的交换,此方法中只要实现数据交换即可
注意:[tableView reloadData];的执行效率,本方法通常在对数据改变未知的情况下使用。
自己来编写类似的功能,可以参照这些实现思路
/****************************************简单UITableView实现*******************************************************/
首先我们来看看最简单的方法实现UITableView
  1 #pragma mark - <UITableViewDataSource>
  2
  3 - (NSInteger)numberOfSectionsInTableView:(UITableView *)tableView
  4
  5 {
  6
  7     return 2;
  8
  9 }
 10
 11
 12
 13 - (NSInteger)tableView:(UITableView *)tableView numberOfRowsInSection:(NSInteger)section
 14
 15 {
 16
 17     if (section == 0) return 2;
 18
 19
 20
 21     return 3;
 22
 23 }
 24
 25
 26
 27 - (UITableViewCell *)tableView:(UITableView *)tableView cellForRowAtIndexPath:(NSIndexPath *)indexPath
 28
 29 {
 30
 31     UITableViewCell *cell = [[UITableViewCell alloc] init];
 32
 33
 34
 35     // 设置cell右边的指示样式
 36
 37     // accessoryView的优先级 > accessoryType
 38
 39 //    cell.accessoryView = [[UISwitch alloc] init];
 40
 41     cell.accessoryType = UITableViewCellAccessoryDisclosureIndicator;
 42
 43
 44
 45     if (indexPath.section == 0) { // 第0组
 46
 47         if (indexPath.row == 0) { // 第0组的第0行
 48
 49             cell.textLabel.text = @"奔驰";
 50
 51             cell.imageView.image = [UIImage imageNamed:@"m_2_100"];
 52
 53         } else if (indexPath.row == 1) { // 第0组的第1行
 54
 55             cell.textLabel.text = @"宝马";
 56
 57             cell.imageView.image = [UIImage imageNamed:@"m_3_100"];
 58
 59         }
 60
 61     } else if (indexPath.section == 1) { // 第1组
 62
 63         if (indexPath.row == 0) { // 第1组的第0行
 64
 65             cell.textLabel.text = @"法拉利";
 66
 67             cell.imageView.image = [UIImage imageNamed:@"m_91_100"];
 68
 69         } else if (indexPath.row == 1) { // 第1组的第1行
 70
 71             cell.textLabel.text = @"兰博基尼";
 72
 73             cell.imageView.image = [UIImage imageNamed:@"m_86_100"];
 74
 75         } else if (indexPath.row == 2) { // 第1组的第2行
 76
 77             cell.textLabel.text = @"玛莎拉蒂";
 78
 79             cell.imageView.image = [UIImage imageNamed:@"m_93_100"];
 80
 81         }
 82
 83     }
 84
 85     return cell;
 86
 87 }
 88
 89
 90
 91 /**
 92
 93  *  告诉tableView第section组的头部标题文字
 94
 95  */
 96
 97 - (NSString *)tableView:(UITableView *)tableView titleForHeaderInSection:(NSInteger)section
 98
 99 {
100
101     if (section == 0) return @"德系品牌";
102
103
104
105     return @"意系品牌";
106
107 }
108
109
110
111 /**
112
113  *  告诉tableView第section组的尾部标题文字
114
115  */
116
117 - (NSString *)tableView:(UITableView *)tableView titleForFooterInSection:(NSInteger)section
118
119 {
120
121     if (section == 0) return @"德系品牌NBNBNBN";
122
123
124
125     return @"意系品牌HAHAHHAHAH";
126
127 }
这种方法一般是对初学者来说拿来练手的,真正开发中基本上没有人会这么做,虽然可读性好,但是你不觉得很傻逼吗,拷贝-粘贴-再拷贝-再粘贴。如果我们还有其他地方要用到这里的或者想要拓展这个TableView那你就等着手软吧!
实际开发中我们一半使用的是MVC,这样不仅拓展性好,而且能够很简单的实现想要的功能,最主要是解藕(这是一个很关键的地方),不多说了,直接上代码:
/***
*/
1:创建一个模型类(子)
创建对应的模型属性
 1 @interface XMGCar : NSObject
 2
 3 /** 名字 */
 4
 5 @property (nonatomic, copy) NSString *name;
 6
 7 /** 图标 */
 8
 9 @property (nonatomic, copy) NSString *icon;
10
11
12
13 + (instancetype)carWithName:(NSString *)name icon:(NSString *)icon;
14
15
16
17 + (instancetype)carWithDict:(NSDictionary *)dict;
18
19 @end
实现模型属性中创建模型的方法:
 1 #import "XMGCar.h"
 2
 3
 4
 5 @implementation XMGCar
 6
 7 + (instancetype)carWithName:(NSString *)name icon:(NSString *)icon
 8
 9 {
10
11     XMGCar *car = [[self alloc] init];
12
13     car.name = name;
14
15     car.icon = icon;
16
17     return car;
18
19 }
20
21
22
23 + (instancetype)carWithDict:(NSDictionary *)dict
24
25 {
26
27     XMGCar *car = [[self alloc] init];
28
29     car.name = dict[@"name"];
30
31     car.icon = dict[@"icon"];
32
33     return car;
34
35
36
37 }
38
39 @end
2:创建分组模型类:
穿件对应的模型属性:
 1 #import <Foundation/Foundation.h>
 2
 3
 4
 5 @interface XMGCarGroup : NSObject
 6
 7 /** 头部 */
 8
 9 @property (nonatomic, copy) NSString *header;
10
11 /** 尾部 */
12
13 @property (nonatomic, copy) NSString *footer;
14
15 /** 这组的所有车型(数组中存放着XMGCar模型) */
16
17 @property (nonatomic, strong) NSArray *cars;
18
19
20
21 + (instancetype)carGroupWithDict:(NSDictionary *)dict;
22
23 @end
24
25
实现创建对应模型的方法:导入子模型(这里需要注意的是怎么去取子模型)
 1 #import "XMGCarGroup.h"
 2
 3 #import "XMGCar.h"
 4
 5
 6
 7 @implementation XMGCarGroup
 8
 9 + (instancetype)carGroupWithDict:(NSDictionary *)dict
10
11 {
12
13     XMGCarGroup *group = [[self alloc] init];
14
15     group.header = dict[@"header"];
16
17     group.footer = dict[@"footer"];
18
19
20
21     // 将字典数组(装着车的字典) -> 模型数据(装着车的模型)
22
23     NSMutableArray *cars = [NSMutableArray array];
24
25     for (NSDictionary *carDict in dict[@"cars"]) {
26
27         [cars addObject:[XMGCar carWithDict:carDict]];
28
29     }
30
31     group.cars = cars;
32
33
34
35     return group;
36
37 }
38
39 @end
40
41
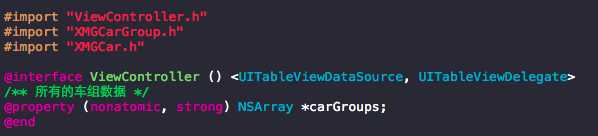
3:控制器实现:
导入两个模型类,创建一个数组用来存放对应的模型数据
使用懒加载从plist文件中加载数据并且转成模型数据
 1 - (NSArray *)carGroups
 2
 3 {
 4
 5     if (!_carGroups) {
 6
 7         // 加载字典数组
 8
 9         NSArray *carGroupDictArray = [NSArray arrayWithContentsOfFile:[[NSBundle mainBundle] pathForResource:@"cars" ofType:@"plist"]];
10
11
12
13         // 创建模型数组
14
15         NSMutableArray *carGroupArray = [NSMutableArray array];
16
17
18
19         // 将字典数组 -> 模型数组
20
21         for (NSDictionary *carGroupDict in carGroupDictArray) {
22
23             XMGCarGroup *carGroup = [XMGCarGroup carGroupWithDict:carGroupDict];
24
25             [carGroupArray addObject:carGroup];
26
27         }
28
29
30
31         _carGroups = carGroupArray;
32
33     }
34
35     return _carGroups;
36
37 }
你也可以直接使用最傻逼的方法来转模型,但是这种不推荐使用,虽然可以,但是这样离大神就差的有点远了:
 1 - (NSArray *)carGroups
 2
 3 {
 4
 5     if (!_carGroups) {
 6
 7         // 德系品牌
 8
 9         XMGCarGroup *group0 = [[XMGCarGroup alloc] init];
10
11         group0.header = @"德系品牌";
12
13         group0.footer = @"德系品牌NBNBNNBNBNBN";
14
15         group0.cars = @[
16
17                         [XMGCar carWithName:@"奔驰" icon:@"m_2_100"],
18
19                         [XMGCar carWithName:@"宝马" icon:@"m_3_100"]
20
21                         ];
22
23
24
25         // 意系品牌
26
27         XMGCarGroup *group1 = [[XMGCarGroup alloc] init];
28
29         group1.header = @"意系品牌";
30
31         group1.footer = @"意系品牌LLLLLLLLL";
32
33         group1.cars = @[
34
35                         [XMGCar carWithName:@"法拉利" icon:@"m_91_100"],
36
37                         [XMGCar carWithName:@"兰博基尼" icon:@"m_86_100"],
38
39                         [XMGCar carWithName:@"玛莎拉蒂" icon:@"m_93_100"]
40
41                         ];
42
43
44
45         // 日系品牌
46
47         XMGCarGroup *group2 = [[XMGCarGroup alloc] init];
48
49         group2.header = @"日系品牌";
50
51         group2.footer = @"日系品牌KKKKKKKKK";
52
53         group2.cars = @[
54
55                         [XMGCar carWithName:@"丰田" icon:@"m_7_100"],
56
57                         [XMGCar carWithName:@"本田" icon:@"m_26_100"]
58
59                         ];
60
61
62
63
64
65         _carGroups = @[group0, group1, group2];
66
67     }
68
69     return _carGroups;
70
71 }
72
73
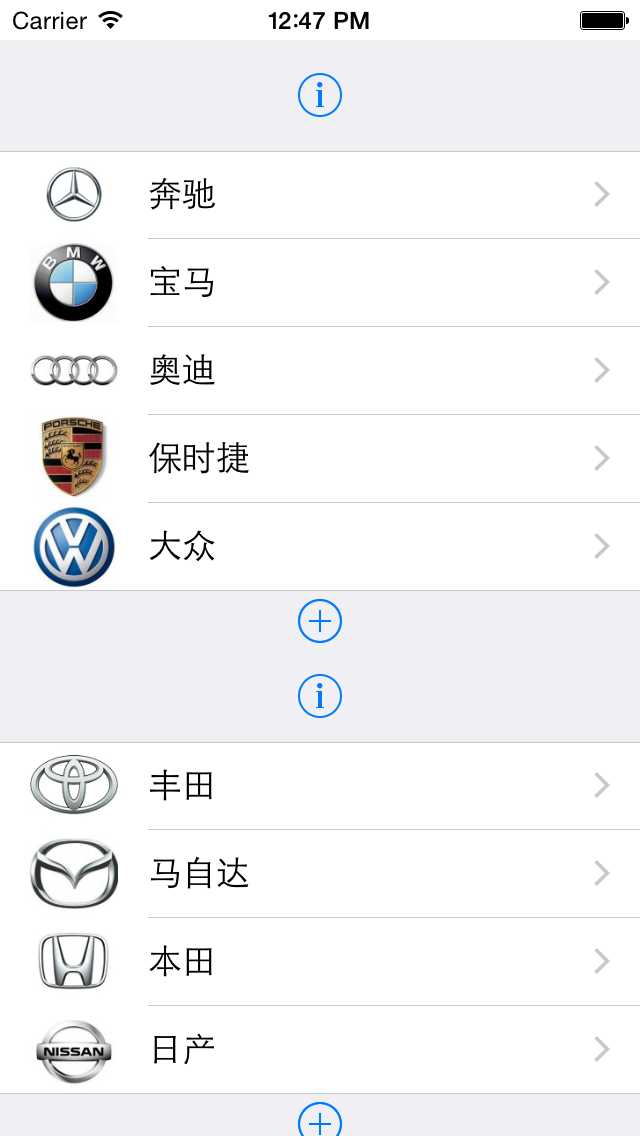
实现响应的代理方法
 1 #pragma mark - <UITableViewDataSource>
 2
 3 - (NSInteger)numberOfSectionsInTableView:(UITableView *)tableView
 4
 5 {
 6
 7     return self.carGroups.count;
 8
 9 }
10
11
12
13 - (NSInteger)tableView:(UITableView *)tableView numberOfRowsInSection:(NSInteger)section
14
15 {
16
17     XMGCarGroup *carGroup = self.carGroups[section];
18
19     return carGroup.cars.count;
20
21 }
22
23
24
25 - (UITableViewCell *)tableView:(UITableView *)tableView cellForRowAtIndexPath:(NSIndexPath *)indexPath
26
27 {
28
29     UITableViewCell *cell = [[UITableViewCell alloc] init];
30
31
32
33     // 设置cell右边的指示样式
34
35     cell.accessoryType = UITableViewCellAccessoryDisclosureIndicator;
36
37
38
39     // 取出indexPath位置对应的XMGCar模型
40
41     XMGCarGroup *carGroup = self.carGroups[indexPath.section];
42
43     XMGCar *car = carGroup.cars[indexPath.row];
44
45
46
47     cell.textLabel.text = car.name;
48
49     cell.imageView.image = [UIImage imageNamed:car.icon];
50
51     return cell;
52
53 }
54
55
56
57
58
59
最后实现头部和尾部数据的显示:
 1 /**
 2
 3  *  告诉tableView第section组的头部标题文字
 4
 5  */
 6
 7 - (NSString *)tableView:(UITableView *)tableView titleForHeaderInSection:(NSInteger)section
 8
 9 {
10
11     XMGCarGroup *carGroup = self.carGroups[section];
12
13     return carGroup.header;
14
15 }
16
17
18
19 /**
20
21  *  告诉tableView第section组的尾部标题文字
22
23  */
24
25 - (NSString *)tableView:(UITableView *)tableView titleForFooterInSection:(NSInteger)section
26
27 {
28
29     XMGCarGroup *carGroup = self.carGroups[section];
30
31     return carGroup.footer;
32
33 }
34
35
36
37 #pragma mark - <UITableViewDelegate>
38
39 - (UIView *)tableView:(UITableView *)tableView viewForHeaderInSection:(NSInteger)section
40
41 {
42
43     return [UIButton buttonWithType:UIButtonTypeInfoDark];
44
45 }
46
47
48
49 - (UIView *)tableView:(UITableView *)tableView viewForFooterInSection:(NSInteger)section
50
51 {
52
53     return [UIButton buttonWithType:UIButtonTypeContactAdd];
54
55 }
/**********************************UItableView结合MVC使用:开发最常用**********************************************/
1:Model
定义模型属性:
 1 #import <Foundation/Foundation.h>
 2
 3
 4
 5 @interface XMGTg : NSObject
 6
 7 /** 标题 */
 8
 9 @property (nonatomic, copy) NSString *title;
10
11 /** 购买数 */
12
13 @property (nonatomic, copy) NSString *buyCount;
14
15 /** 图片 */
16
17 @property (nonatomic, copy) NSString *icon;
18
19 /** 价格 */
20
21 @property (nonatomic, copy) NSString *price;
22
23
24
25 + (instancetype)tgWithDict:(NSDictionary *)dict;
26
27 @end
28
29
实现模型方法:
 1 #import "XMGTg.h"
 2
 3
 4
 5 @implementation XMGTg
 6
 7 + (instancetype)tgWithDict:(NSDictionary *)dict
 8
 9 {
10
11     XMGTg *tg = [[self alloc] init];
12
13     [tg setValuesForKeysWithDictionary:dict];
14
15     return tg;
16
17 }
18
19 @end
注:这里直接使用ivc中的方法setValuesForKeysWithDictionary是因为plist中的数据和我们需要的或者定义的事一一对应的,
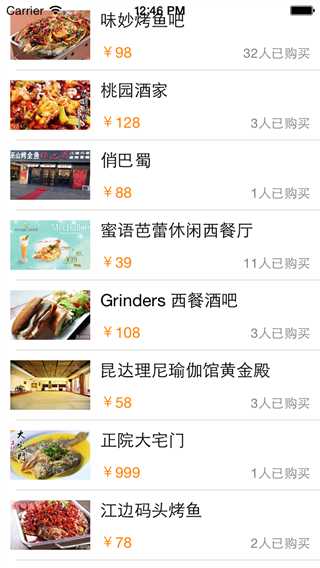
2:View
通过模型创建一个属性:
 1 #import <UIKit/UIKit.h>
 2
 3 @class XMGTg;
 4
 5
 6
 7 @interface XMGTgCell : UITableViewCell
 8
 9 /** 团购模型数据 */
10
11 @property (nonatomic, strong) XMGTg *tg;
12
13 @end
14
15 导入模型类,在私有拓展中定义我们需要用来显示数据的控件
16
17 /** 图片 */
18
19 @property (nonatomic, weak) UIImageView *iconImageView;
20
21 /** 标题 */
22
23 @property (nonatomic, weak) UILabel *titleLabel;
24
25 /** 价格 */
26
27 @property (nonatomic, weak) UILabel *priceLabel;
28
29 /** 购买数 */
30
31 @property (nonatomic, weak) UILabel *buyCountLabel;
根据前面UIScrollView中学习的自定义View类似实现响应的方法和需要实现的代码:
这里因为是UITableView所以,我们使用的是initWithStyle:reuseIdentifier来初始化控件儿而不是initWithFrame,最后面的reuseIdentifier重用标志,后面讲到UItableView重用机制就明白了。
初始化对应的控件
 1 /**
 2
 3  *  在这个方法中添加所有的子控件
 4
 5  */
 6
 7 - (instancetype)initWithStyle:(UITableViewCellStyle)style reuseIdentifier:(NSString *)reuseIdentifier
 8
 9 {
10
11     if (self = [super initWithStyle:style reuseIdentifier:reuseIdentifier]) {
12
13         // 图片
14
15         UIImageView *iconImageView = [[UIImageView alloc] init];
16
17         [self.contentView addSubview:iconImageView];
18
19         self.iconImageView = iconImageView;
20
21
22
23         // 标题
24
25         UILabel *titleLabel = [[UILabel alloc] init];
26
27         [self.contentView addSubview:titleLabel];
28
29         self.titleLabel = titleLabel;
30
31
32
33         // 价格
34
35         UILabel *priceLabel = [[UILabel alloc] init];
36
37         priceLabel.font = [UIFont systemFontOfSize:15];
38
39         priceLabel.textColor = [UIColor orangeColor];
40
41         [self.contentView addSubview:priceLabel];
42
43         self.priceLabel = priceLabel;
44
45
46
47         // 购买数
48
49         UILabel *buyCountLabel = [[UILabel alloc] init];
50
51         buyCountLabel.font = [UIFont systemFontOfSize:13];
52
53         buyCountLabel.textColor = [UIColor grayColor];
54
55         buyCountLabel.textAlignment = NSTextAlignmentRight;
56
57         [self.contentView addSubview:buyCountLabel];
58
59         self.buyCountLabel = buyCountLabel;
60
61     }
62
63     return self;
64
65 }
计算所有子控件的Frame:
// 通过initWithStyle:创建cell,就不会调用这个方法
 1 //- (instancetype)initWithFrame:(CGRect)frame;
 2
 3
 4
 5 /**
 6
 7  *  在这个方法中计算所有子控件的frame
 8
 9  */
10
11 - (void)layoutSubviews
12
13 {
14
15     [super layoutSubviews];
16
17
18
19     CGFloat margin = 10;
20
21 //    CGFloat contentH = self.contentView.frame.size.height;
22
23 //    CGFloat contentW = self.contentView.frame.size.width;
24
25     CGFloat contentH = CGRectGetHeight(self.contentView.frame);
26
27     CGFloat contentW = CGRectGetWidth(self.contentView.frame);
28
29
30
31     // 图片
32
33     CGFloat iconX = margin;
34
35     CGFloat iconY = margin;
36
37     CGFloat iconW = 80;
38
39     CGFloat iconH = contentH - 2 * iconY;
40
41     self.iconImageView.frame = CGRectMake(iconX, iconY, iconW, iconH);
42
43
44
45     // 标题
46
47 //    CGFloat titleX = iconX + iconW + margin;
48
49     CGFloat titleX = CGRectGetMaxX(self.iconImageView.frame) + margin;
50
51     CGFloat titleY = iconY;
52
53     CGFloat titleW = contentW - titleX - margin;
54
55     CGFloat titleH = 20;
56
57     self.titleLabel.frame = CGRectMake(titleX, titleY, titleW, titleH);
58
59
60
61     // 价格
62
63     CGFloat priceX = titleX;
64
65     CGFloat priceH = 15;
66
67 //    CGFloat priceY = iconY + iconH - priceH;
68
69     CGFloat priceY = CGRectGetMaxY(self.iconImageView.frame) - priceH;
70
71     CGFloat priceW = 100;
72
73     self.priceLabel.frame = CGRectMake(priceX, priceY, priceW, priceH);
74
75
76
77     // 购买数
78
79     CGFloat buyCountW = 150;
80
81     CGFloat buyCountH = 13;
82
83     CGFloat buyCountX = contentW - margin - buyCountW;
84
85 //    CGFloat buyCountY = iconY + iconH - buyCountH;
86
87     CGFloat buyCountY = CGRectGetMaxY(self.iconImageView.frame) - buyCountH;
88
89     self.buyCountLabel.frame = CGRectMake(buyCountX, buyCountY, buyCountW, buyCountH);
90
91 }
从模型中获取响应的数据放到对应的控件上面显示:
 1 - (void)setTg:(XMGTg *)tg
 2
 3 {
 4
 5     _tg = tg;
 6
 7
 8
 9     self.iconImageView.image = [UIImage imageNamed:tg.icon];
10
11     self.titleLabel.text = tg.title;
12
13     self.priceLabel.text = [NSString stringWithFormat:@"¥%@", tg.price];
14
15     self.buyCountLabel.text = [NSString stringWithFormat:@"%@人已购买", tg.buyCount];
16
17 }
使用纯代码结合Masonry来初始化Cell:
  1 CGFloat margin = 10;
  2
  3
  4
  5         // 图片
  6
  7         UIImageView *iconImageView = [[UIImageView alloc] init];
  8
  9         [self.contentView addSubview:iconImageView];
 10
 11         self.iconImageView = iconImageView;
 12
 13
 14
 15         [iconImageView makeConstraints:^(MASConstraintMaker *make) {
 16
 17             make.left.top.equalTo(self.contentView).offset(margin);
 18
 19             make.bottom.equalTo(self.contentView).offset(-margin);
 20
 21             make.width.equalTo(80);
 22
 23         }];
 24
 25
 26
 27         // 标题
 28
 29         UILabel *titleLabel = [[UILabel alloc] init];
 30
 31         [self.contentView addSubview:titleLabel];
 32
 33         self.titleLabel = titleLabel;
 34
 35
 36
 37         [titleLabel makeConstraints:^(MASConstraintMaker *make) {
 38
 39             make.top.equalTo(iconImageView);
 40
 41             make.left.equalTo(iconImageView.right).offset(margin);
 42
 43             make.height.equalTo(20);
 44
 45             make.right.equalTo(self.contentView).offset(-margin);
 46
 47         }];
 48
 49
 50
 51         // 价格
 52
 53         UILabel *priceLabel = [[UILabel alloc] init];
 54
 55         priceLabel.font = [UIFont systemFontOfSize:15];
 56
 57         priceLabel.textColor = [UIColor orangeColor];
 58
 59         [self.contentView addSubview:priceLabel];
 60
 61         self.priceLabel = priceLabel;
 62
 63
 64
 65         [priceLabel makeConstraints:^(MASConstraintMaker *make) {
 66
 67             make.left.equalTo(titleLabel);
 68
 69             make.bottom.equalTo(iconImageView);
 70
 71             make.size.equalTo(CGSizeMake(100, 15));
 72
 73         }];
 74
 75
 76
 77         // 购买数
 78
 79         UILabel *buyCountLabel = [[UILabel alloc] init];
 80
 81         buyCountLabel.font = [UIFont systemFontOfSize:13];
 82
 83         buyCountLabel.textColor = [UIColor grayColor];
 84
 85         buyCountLabel.textAlignment = NSTextAlignmentRight;
 86
 87         [self.contentView addSubview:buyCountLabel];
 88
 89         self.buyCountLabel = buyCountLabel;
 90
 91
 92
 93         [buyCountLabel makeConstraints:^(MASConstraintMaker *make) {
 94
 95             make.bottom.equalTo(iconImageView);
 96
 97             make.right.equalTo(titleLabel);
 98
 99             make.size.equalTo(CGSizeMake(150, 13));
100
101         }];
102
103
104
105
3:Controller
上面完成之后,那么控制器里面就很简单了,我们只需要实现少量的代码就能实现响应的功能,这里很好的做到了解藕的功能(数据与逻辑分离)
读取plist转成模型:
 1 - (NSArray *)tgs
 2
 3 {
 4
 5     if (!_tgs) {
 6
 7         // 加载字典数组
 8
 9         NSArray *dictArray = [NSArray arrayWithContentsOfFile:[[NSBundle mainBundle] pathForResource:@"tgs" ofType:@"plist"]];
10
11
12
13         // 创建模型数组
14
15         NSMutableArray *tgArray = [NSMutableArray array];
16
17
18
19         // 将字典数组 -> 模型数组
20
21         for (NSDictionary *dict in dictArray) {
22
23             XMGTg *tg = [XMGTg tgWithDict:dict];
24
25             [tgArray addObject:tg];
26
27         }
28
29
30
31         _tgs = tgArray;
32
33     }
34
35     return _tgs;
36
37 }
在ViewDidLoad中注册一个Cell并且设置他的标志符,
1
2
3     self.tableView.rowHeight = 70;
4
5     [self.tableView registerClass:[XMGTgCell class] forCellReuseIdentifier:ID];
6
7
实现响应的代理方法:
 1 #pragma mark - <数据源方法>
 2
 3 - (NSInteger)tableView:(UITableView *)tableView numberOfRowsInSection:(NSInteger)section
 4
 5 {
 6
 7     return self.tgs.count;
 8
 9 }
10
11
12
13 - (UITableViewCell *)tableView:(UITableView *)tableView cellForRowAtIndexPath:(NSIndexPath *)indexPath
14
15 {
16
17     // 访问缓存池
18
19     XMGTgCell *cell = [tableView dequeueReusableCellWithIdentifier:ID];
20
21
22
23     // 设置数据(传递模型数据)
24
25     cell.tg = self.tgs[indexPath.row];
26
27
28
29     return cell;
30
31 }
32
33
/**********************************************************************使用Xib完整自定义Cell**********************************************************************************/
如果是使用Xib的话,那么我们在自定义View里面实现的代码就很少了,不需要layoutSubviews也不需要initWithStyle,只需要实现Settet方法来获取模型数据就可以:
 1 #import "XMGTgCell.h"
 2
 3 #import "XMGTg.h"
 4
 5
 6
 7 @interface XMGTgCell()
 8
 9 @property (weak, nonatomic) IBOutlet UIImageView *iconImageView;
10
11 @property (weak, nonatomic) IBOutlet UILabel *titleLabel;
12
13 @property (weak, nonatomic) IBOutlet UILabel *priceLabel;
14
15 @property (weak, nonatomic) IBOutlet UILabel *buyCountLabel;
16
17 @end
18
19
20
21 @implementation XMGTgCell
22
23
24
25 - (void)setTg:(XMGTg *)tg
26
27 {
28
29     _tg = tg;
30
31
32
33     self.iconImageView.image = [UIImage imageNamed:tg.icon];
34
35     self.titleLabel.text = tg.title;
36
37     self.priceLabel.text = [NSString stringWithFormat:@"¥%@", tg.price];
38
39     self.buyCountLabel.text = [NSString stringWithFormat:@"%@人已购买", tg.buyCount];
40
41 }
42
43
44
45 @end
同样控制器里面的Nib方法获取对应的View
// 这个方法不会去加载xib文件,因为它是通过alloc 、initWithStyle:..方式创建cell
 1 //    [self.tableView registerClass:[XMGTgCell class] forCellReuseIdentifier:ID];
 2
 3
 4
 5     [self.tableView registerNib:[UINib nibWithNibName:NSStringFromClass([XMGTgCell class]) bundle:nil] forCellReuseIdentifier:ID];
 6
 7 最后实现代理方法:
 8
 9 #pragma mark - <数据源方法>
10
11 - (NSInteger)tableView:(UITableView *)tableView numberOfRowsInSection:(NSInteger)section
12
13 {
14
15     return self.tgs.count;
16
17 }
18
19
20
21 - (UITableViewCell *)tableView:(UITableView *)tableView cellForRowAtIndexPath:(NSIndexPath *)indexPath
22
23 {
24
25     XMGTgCell *cell = [tableView dequeueReusableCellWithIdentifier:ID];
26
27 //
28
29 //    if (!cell) {
30
31 //        cell = [[[NSBundle mainBundle] loadNibNamed:NSStringFromClass([XMGTgCell class]) owner:nil options:nil] lastObject];
32
33 //    }
34
35
36
37     cell.tg = self.tgs[indexPath.row];
38
39
40
41     return cell;
42
43 }
44
45
46
47
/******************************************完整自定义UItableView************************************************************/
1:Model
Cell模型:
 1 #import <Foundation/Foundation.h>
 2
 3
 4
 5 typedef enum {
 6
 7     iCocosSettingItemTypeNone, // 什么也没有
 8
 9     iCocosSettingItemTypeArrow, // 箭头
10
11     iCocosSettingItemTypeSwitch // 开关
12
13 } iCocosSettingItemType;
14
15
16
17
18
19 @interface iCocosSettingItem : NSObject
20
21
22
23 @property (nonatomic, copy) NSString *icon;
24
25 @property (nonatomic, copy) NSString *title;
26
27 @property (nonatomic, assign) iCocosSettingItemType type;// Cell的样式
28
29 @property (nonatomic, copy) void (^operation)() ; // 点击cell后要执行的操作
30
31
32
33 + (id)itemWithIcon:(NSString *)icon title:(NSString *)title type:(iCocosSettingItemType)type;
34
35
36
37 @end
实现文件:
 1 #import "iCocosSettingItem.h"
 2
 3
 4
 5 @implementation iCocosSettingItem
 6
 7 + (id)itemWithIcon:(NSString *)icon title:(NSString *)title type:(iCocosSettingItemType)type
 8
 9 {
10
11     iCocosSettingItem *item = [[self alloc] init];
12
13     item.icon = icon;
14
15     item.title = title;
16
17     item.type = type;
18
19     return item;
20
21 }
22
23 @end
24
25
分组模型:
 1 #import <Foundation/Foundation.h>
 2
 3
 4
 5 @interface iCocosSettingGroup : NSObject
 6
 7 @property (nonatomic, copy) NSString *header; // 头部标题
 8
 9 @property (nonatomic, copy) NSString *footer; // 尾部标题
10
11 @property (nonatomic, strong) NSArray *items; // 中间的条目
12
13 @end
这里不需要实现什么,除非你对你的TableView有特别的需求
2:Cell
添加所有需要显示的子控件(不需要设置子控件的数据和frame, 子控件要添加到contentView中)
进行子控件一次性的属性设置(有些属性只需要设置一次, 比如字体\固定的图片)
3.提供2个模型
4.cell拥有一个frame模型(不要直接拥有数据模型)
5.重写frame模型属性的setter方法: 在这个方法中设置子控件的显示数据和frame
6.frame模型数据的初始化已经采取懒加载的方式(每一个cell对应的frame模型数据只加载一次)
 1 #import <UIKit/UIKit.h>
 2
 3 @class iCocosSettingItem;
 4
 5 @interface iCocosSettingCell : UITableViewCell
 6
 7 @property (nonatomic, strong) iCocosSettingItem *item;
 8
 9
10
11 + (id)settingCellWithTableView:(UITableView *)tableView;
12
13 @end
Cell对应de实现文件:
  1 #import "iCocosSettingCell.h"
  2
  3 #import "iCocosSettingItem.h"
  4
  5
  6
  7 @interface iCocosSettingCell()
  8
  9 {
 10
 11     UIImageView *_arrow;
 12
 13     UISwitch *_switch;
 14
 15 }
 16
 17 @end
 18
 19
 20
 21 @implementation iCocosSettingCell
 22
 23
 24
 25 + (id)settingCellWithTableView:(UITableView *)tableView
 26
 27 {
 28
 29     // 0.用static修饰的局部变量,只会初始化一次
 30
 31     static NSString *ID = @"Cell";
 32
 33
 34
 35     // 1.拿到一个标识先去缓存池中查找对应的Cell
 36
 37     iCocosSettingCell *cell = [tableView dequeueReusableCellWithIdentifier:ID];
 38
 39
 40
 41     // 2.如果缓存池中没有,才需要传入一个标识创建新的Cell
 42
 43     if (cell == nil) {
 44
 45         cell = [[iCocosSettingCell alloc] initWithStyle:UITableViewCellStyleDefault reuseIdentifier:ID];
 46
 47     }
 48
 49
 50
 51     return cell;
 52
 53 }
 54
 55
 56
 57 - (id)initWithStyle:(UITableViewCellStyle)style reuseIdentifier:(NSString *)reuseIdentifier
 58
 59 {
 60
 61     self = [super initWithStyle:style reuseIdentifier:reuseIdentifier];
 62
 63     if (self) {
 64
 65         // Initialization code
 66
 67     }
 68
 69     return self;
 70
 71 }
 72
 73
 74
 75 - (void)setItem:(iCocosSettingItem *)item
 76
 77 {
 78
 79     _item = item;
 80
 81
 82
 83     // 设置数据
 84
 85     self.imageView.image = [UIImage imageNamed:item.icon];
 86
 87     self.textLabel.text = item.title;
 88
 89
 90
 91     if (item.type == iCocosSettingItemTypeArrow) {
 92
 93
 94
 95         if (_arrow == nil) {
 96
 97             _arrow = [[UIImageView alloc] initWithImage:[UIImage imageNamed:@"CellArrow"]];
 98
 99         }
100
101
102
103         // 右边显示箭头
104
105         self.accessoryView = _arrow;
106
107         // 用默认的选中样式
108
109         self.selectionStyle = UITableViewCellSelectionStyleBlue;
110
111
112
113     } else if (item.type == iCocosSettingItemTypeSwitch) {
114
115
116
117         if (_switch == nil) {
118
119             _switch = [[UISwitch alloc] init];
120
121         }
122
123
124
125         // 右边显示开关
126
127         self.accessoryView = _switch;
128
129         // 禁止选中
130
131         self.selectionStyle = UITableViewCellSelectionStyleNone;
132
133
134
135     } else {
136
137
138
139         // 什么也没有,清空右边显示的view
140
141         self.accessoryView = nil;
142
143         // 用默认的选中样式
144
145         self.selectionStyle = UITableViewCellSelectionStyleBlue;
146
147
148
149     }
150
151
152
153 }
154
155 @end
3:Controller
定义一个最基本的TableView用来给其他TableView继承的,这样以后你每实现一个页面活着一个功能只需要继承这个类并且按照使用方法实现响应的代码就可以:
 1 #import <UIKit/UIKit.h>
 2
 3 #import "iCocosSettingGroup.h"
 4
 5 #import "iCocosSettingItem.h"
 6
 7
 8
 9 @interface iCocosBaseSettingViewController : UIViewController <UITableViewDataSource, UITableViewDelegate>
10
11 {
12
13     NSMutableArray *_allGroups; // 所有的组模型
14
15 }
16
17 @end
实现相应的代码:
  1 #import "iCocosBaseSettingViewController.h"
  2
  3 #import "iCocosSettingCell.h"
  4
  5
  6
  7 @interface iCocosBaseSettingViewController ()
  8
  9
 10
 11 @end
 12
 13
 14
 15 @implementation iCocosBaseSettingViewController
 16
 17
 18
 19 - (void)loadView
 20
 21 {
 22
 23     UITableView *tableView = [[UITableView alloc] initWithFrame:[UIScreen mainScreen].applicationFrame style:UITableViewStyleGrouped];
 24
 25     tableView.delegate = self;
 26
 27     tableView.dataSource = self;
 28
 29     self.view = tableView;
 30
 31 }
 32
 33
 34
 35 - (void)viewDidLoad
 36
 37 {
 38
 39     [super viewDidLoad];
 40
 41
 42
 43     _allGroups = [NSMutableArray array];
 44
 45
 46
 47 }
 48
 49
 50
 51 #pragma mark - Table view data source
 52
 53 - (NSInteger)numberOfSectionsInTableView:(UITableView *)tableView
 54
 55 {
 56
 57     return _allGroups.count;
 58
 59 }
 60
 61
 62
 63 - (NSInteger)tableView:(UITableView *)tableView numberOfRowsInSection:(NSInteger)section
 64
 65 {
 66
 67     iCocosSettingGroup *group = _allGroups[section];
 68
 69     return group.items.count;
 70
 71 }
 72
 73
 74
 75 #pragma mark 每当有一个cell进入视野范围内就会调用,返回当前这行显示的cell
 76
 77 - (UITableViewCell *)tableView:(UITableView *)tableView cellForRowAtIndexPath:(NSIndexPath *)indexPath
 78
 79 {
 80
 81     // 1.创建一个iCocosSettingCell
 82
 83     iCocosSettingCell *cell = [iCocosSettingCell settingCellWithTableView:tableView];
 84
 85
 86
 87     // 2.取出这行对应的模型(iCocosSettingItem)
 88
 89     iCocosSettingGroup *group = _allGroups[indexPath.section];
 90
 91     cell.item = group.items[indexPath.row];
 92
 93     return cell;
 94
 95 }
 96
 97
 98
 99 #pragma mark 点击了cell后的操作
100
101 - (void)tableView:(UITableView *)tableView didSelectRowAtIndexPath:(NSIndexPath *)indexPath
102
103 {
104
105     // 0.取出这行对应的模型
106
107     iCocosSettingGroup *group = _allGroups[indexPath.section];
108
109     iCocosSettingItem *item = group.items[indexPath.row];
110
111
112
113     // 1.取出这行对应模型中的block代码
114
115     if (item.operation) {
116
117         // 执行block
118
119         item.operation();
120
121     }
122
123 }
124
125
126
127 #pragma mark 返回每一组的header标题
128
129 - (NSString *)tableView:(UITableView *)tableView titleForHeaderInSection:(NSInteger)section
130
131 {
132
133     iCocosSettingGroup *group = _allGroups[section];
134
135
136
137     return group.header;
138
139 }
140
141 #pragma mark 返回每一组的footer标题
142
143 - (NSString *)tableView:(UITableView *)tableView titleForFooterInSection:(NSInteger)section
144
145 {
146
147     iCocosSettingGroup *group = _allGroups[section];
148
149
150
151     return group.footer;
152
153 }
154
155
156
157
158
159 @end
160
161
那么使用起来就非常简单了,
只需要创建一个继承自上面定义的TableView并且直接使用里面的方法来创建对应的Cell和相应的操作:
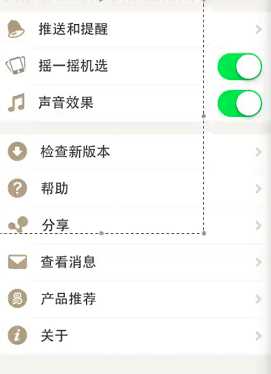
我们这里以一个设置界面为例,如果你需要做成其他界面,除了空间那种说说界面,基本可以实现其他任何关于TableView界面的现实
  1 #import "iCocosSettingViewController.h"
  2
  3 #import "iCocosPushNoticeViewController.h"
  4
  5
  6
  7 @interface iCocosSettingViewController ()
  8
  9 @end
 10
 11
 12
 13 @implementation iCocosSettingViewController
 14
 15 - (void)viewDidLoad
 16
 17 {
 18
 19     [super viewDidLoad];
 20
 21
 22
 23     // 1.第0组:3个
 24
 25     [self add0SectionItems];
 26
 27
 28
 29     // 2.第1组:6个
 30
 31     [self add1SectionItems];
 32
 33 }
 34
 35
 36
 37 #pragma mark 添加第0组的模型数据
 38
 39 - (void)add0SectionItems
 40
 41 {
 42
 43
 44
 45     // 1.标题
 46
 47     self.title = @"设置";
 48
 49
 50
 51     // 2.添加左边的按钮
 52
 53     self.navigationItem.leftBarButtonItem = [[UIBarButtonItem alloc] initWithTitle:@"关闭" style:UIBarButtonItemStyleDone target:self action:@selector(close)];
 54
 55
 56
 57     // 2.添加左边的按钮
 58
 59     self.navigationItem.rightBarButtonItem = [[UIBarButtonItem alloc] initWithTitle:@"更多" style:UIBarButtonItemStyleDone target:self action:@selector(more)];
 60
 61
 62
 63
 64
 65     // 1.1.推送和提醒
 66
 67     iCocosSettingItem *push = [iCocosSettingItem itemWithIcon:@"MorePush" title:@"推送和提醒" type:iCocosSettingItemTypeArrow];
 68
 69     push.operation = ^{
 70
 71         iCocosPushNoticeViewController *notice = [[iCocosPushNoticeViewController alloc] init];
 72
 73         [self.navigationController pushViewController:notice animated:YES];
 74
 75     };
 76
 77
 78
 79     // 1.2.摇一摇机选
 80
 81     iCocosSettingItem *shake = [iCocosSettingItem itemWithIcon:@"handShake" title:@"摇一摇机选" type:iCocosSettingItemTypeSwitch];
 82
 83
 84
 85     // 1.3.声音效果
 86
 87     iCocosSettingItem *sound = [iCocosSettingItem itemWithIcon:@"sound_Effect" title:@"声音效果" type:iCocosSettingItemTypeSwitch];
 88
 89
 90
 91     iCocosSettingGroup *group = [[iCocosSettingGroup alloc] init];
 92
 93     group.header = @"基本设置";
 94
 95     group.items = @[push, shake, sound];
 96
 97     [_allGroups addObject:group];
 98
 99 }
100
101
102
103 - (void)close
104
105 {
106
107     [self dismissViewControllerAnimated:YES completion:nil];
108
109 }
110
111 - (void)more
112
113 {
114
115     UITableViewController *tab = [[UITableViewController alloc] init];
116
117     [self.navigationController pushViewController:tab animated:YES];
118
119 }
120
121
122
123 #pragma mark 添加第1组的模型数据
124
125 - (void)add1SectionItems
126
127 {
128
129     // 2.1.检查新版本
130
131     iCocosSettingItem *update = [iCocosSettingItem itemWithIcon:@"MoreUpdate" title:@"检查新版本" type:iCocosSettingItemTypeArrow];
132
133     update.operation = ^{
134
135         UIAlertView *alert = [[UIAlertView alloc] initWithTitle:@"提醒" message:@"暂时没有新版本" delegate:nil cancelButtonTitle:@"好的" otherButtonTitles:nil];
136
137         [alert show];
138
139     };
140
141
142
143     // 2.2.帮助
144
145     iCocosSettingItem *help = [iCocosSettingItem itemWithIcon:@"MoreHelp" title:@"帮助" type:iCocosSettingItemTypeArrow];
146
147     help.operation = ^{
148
149         UIViewController *helpVc = [[UIViewController alloc] init];
150
151         helpVc.view.backgroundColor = [UIColor brownColor];
152
153         helpVc.title = @"帮助";
154
155         [self.navigationController pushViewController:helpVc animated:YES];
156
157     };
158
159
160
161     // 2.3.分享
162
163     iCocosSettingItem *share = [iCocosSettingItem itemWithIcon:@"MoreShare" title:@"分享" type:iCocosSettingItemTypeArrow];
164
165
166
167     // 2.4.查看消息
168
169     iCocosSettingItem *msg = [iCocosSettingItem itemWithIcon:@"MoreMessage" title:@"查看消息" type:iCocosSettingItemTypeArrow];
170
171
172
173     // 2.5.产品推荐
174
175     iCocosSettingItem *product = [iCocosSettingItem itemWithIcon:@"MoreNetease" title:@"产品推荐" type:iCocosSettingItemTypeArrow];
176
177
178
179     // 2.6.关于
180
181     iCocosSettingItem *about = [iCocosSettingItem itemWithIcon:@"MoreAbout" title:@"关于" type:iCocosSettingItemTypeArrow];
182
183
184
185     iCocosSettingGroup *group = [[iCocosSettingGroup alloc] init];
186
187     group.header = @"高级设置";
188
189     group.footer = @"这的确是高级设置!!!";
190
191     group.items = @[update, help, share, msg, product, about];
192
193     [_allGroups addObject:group];
194
195 }
196
197 @end
198
199
再来一个,直接使用,点击推送和提醒弹出对应的控制器并且实现你想要功能:
 1
 2
 3 #import "iCocosPushNoticeViewController.h"
 4
 5
 6
 7 @interface iCocosPushNoticeViewController ()
 8
 9
10
11 @end
12
13
14
15 @implementation iCocosPushNoticeViewController
16
17
18
19 - (void)viewDidLoad
20
21 {
22
23     [super viewDidLoad];
24
25
26
27     self.title = @"推送和提醒";
28
29
30
31     // 1.1
32
33     iCocosSettingItem *item1 = [iCocosSettingItem itemWithIcon:nil title:@"开奖号码推送" type:iCocosSettingItemTypeArrow];
34
35
36
37     // 1.2
38
39     iCocosSettingItem *item2 = [iCocosSettingItem itemWithIcon:nil title:@"中奖动画" type:iCocosSettingItemTypeArrow];
40
41
42
43     // 1.3
44
45     iCocosSettingItem *item3 = [iCocosSettingItem itemWithIcon:nil title:@"比分直播提醒" type:iCocosSettingItemTypeArrow];
46
47
48
49     // 1.4
50
51     iCocosSettingItem *item4 = [iCocosSettingItem itemWithIcon:nil title:@"购彩定时提醒" type:iCocosSettingItemTypeArrow];
52
53
54
55     iCocosSettingGroup *group = [[iCocosSettingGroup alloc] init];
56
57     group.items = @[item1, item2, item3, item4];
58
59     [_allGroups addObject:group];
60
61 }
62
63
64
65 @end
66
67
/********************************************************关于一些UItableView其他使用技巧******************************************************************/
常见属性与方法:
属性:
属性:
  1 /**
  2
  3      * 设置数据
  4
  5      */
  6
  7      //图片
  8
  9     cell.imageView.image = [UIImage imageNamed:wine.image];
 10
 11      //文字
 12
 13     cell.textLabel.text = wine.name;
 14
 15      //细节文字
 16
 17     cell.detailTextLabel.text = [NSString stringWithFormat:@"¥%@", wine.money];
 18
 19      //图片文字颜色
 20
 21     cell.detailTextLabel.textColor = [UIColor orangeColor];
 22
 23      //图片右边View的类型
 24
 25     cell.accessoryType = UITableViewCellAccessoryDisclosureIndicator;
 26
 27
 28
 29     // 设置cell的选中样式
 30
 31    cell.selectionStyle = UITableViewCellSelectionStyleNone;
 32
 33
 34
 35     // backgroundView优先级 > backgroundColor
 36
 37
 38
 39         // 设置背景色
 40
 41     cell.backgroundColor = [UIColor redColor];
 42
 43
 44
 45     // 设置背景view
 46
 47     UIView *bg = [[UIView alloc] init];
 48
 49     bg.backgroundColor = [UIColor blueColor];
 50
 51     cell.backgroundView = bg;
 52
 53
 54
 55     // 设置选中的背景view
 56
 57     UIView *selectedBg = [[UIView alloc] init];
 58
 59     selectedBg.backgroundColor = [UIColor purpleColor];
 60
 61     cell.selectedBackgroundView = selectedBg;
 62
 63
 64
 65     // 设置背景色
 66
 67     cell.backgroundColor = [UIColor redColor];
 68
 69
 70
 71     // 设置每一行cell的高度
 72
 73     self.tableView.rowHeight = 100;
 74
 75
 76
 77     // 设置每一组头部的高度
 78
 79     self.tableView.sectionHeaderHeight = 50;
 80
 81
 82
 83     // 设置每一组尾部的高度
 84
 85    self.tableView.sectionFooterHeight = 50;
 86
 87
 88
 89     // 设置分割线颜色
 90
 91     self.tableView.separatorColor = [UIColor redColor];
 92
 93     // 设置分割线样式
 94
 95     self.tableView.separatorStyle = UITableViewCellSeparatorStyleNone;
 96
 97     // 设置表头控件
 98
 99     self.tableView.tableHeaderView = [[UISwitch alloc] init];
100
101     // 设置表尾控件
102
103     self.tableView.tableFooterView = [UIButton buttonWithType:UIButtonTypeContactAdd];
104
105
106
107
108
109
110
111
112
113     // 设置右边索引文字的颜色
114
115     self.tableView.sectionIndexColor = [UIColor redColor];
116
117     // 设置右边索引文字的背景色
118
119     self.tableView.sectionIndexBackgroundColor = [UIColor blackColor];
120
121
122
123
124
125     // 尽量将cell的初始化设置,放在这个代码块中
126
127     // 如果这个设置是所有cell都要保持一致的,就可以放在这个代码块中
128
129     cell.textLabel.font = [UIFont systemFontOfSize:30];
130
131     cell.backgroundColor = [UIColor redColor];
132
133
方法:
左滑删除:
 1 #pragma mark - <代理方法>
 2
 3 /**
 4
 5  *  只要实现了这个方法,左滑出现Delete按钮的功能就有了
 6
 7  *  点击了“左滑出现的Delete按钮”会调用这个方法
 8
 9  */
10
11 - (void)tableView:(UITableView *)tableView commitEditingStyle:(UITableViewCellEditingStyle)editingStyle forRowAtIndexPath:(NSIndexPath *)indexPath
12
13 {
14
15     // 删除模型
16
17     [self.wineArray removeObjectAtIndex:indexPath.row];
18
19
20
21     // 刷新
22
23     [tableView deleteRowsAtIndexPaths:@[indexPath] withRowAnimation:UITableViewRowAnimationLeft];
24
25 }
26
27
28
29 /**
30
31  *  修改Delete按钮文字为“删除”
32
33  */
34
35 - (NSString *)tableView:(UITableView *)tableView titleForDeleteConfirmationButtonForRowAtIndexPath:(NSIndexPath *)indexPath
36
37 {
38
39     return @"删除";
40
41 //    return [NSString stringWithFormat:@"删除-%zd", indexPath.row];
42
43 }
编辑模式:
 1 #pragma mark - 数据刷新操作
 2
 3 - (IBAction)remove {
 4
 5 //    self.tableView.editing = !self.tableView.isEditing;
 6
 7     [self.tableView setEditing:!self.tableView.isEditing animated:YES];
 8
 9 }
10
11 #pragma mark - <代理方法>
12
13 /**
14
15  *  只要实现了这个方法,左滑出现Delete按钮的功能就有了
16
17  *  点击了“左滑出现的Delete按钮”会调用这个方法
18
19  */
20
21 - (void)tableView:(UITableView *)tableView commitEditingStyle:(UITableViewCellEditingStyle)editingStyle forRowAtIndexPath:(NSIndexPath *)indexPath
22
23 {
24
25     // 删除模型
26
27     [self.wineArray removeObjectAtIndex:indexPath.row];
28
29
30
31     // 刷新
32
33     [tableView deleteRowsAtIndexPaths:@[indexPath] withRowAnimation:UITableViewRowAnimationLeft];
34
35 }
36
37
38
39 /**
40
41  *  修改Delete按钮文字为“删除”
42
43  */
44
45 - (NSString *)tableView:(UITableView *)tableView titleForDeleteConfirmationButtonForRowAtIndexPath:(NSIndexPath *)indexPath
46
47 {
48
49     return @"删除";
50
51 }
左滑出现更多按钮或者功能:
 1 /**
 2
 3  *  左滑cell时出现什么按钮
 4
 5  */
 6
 7 - (NSArray *)tableView:(UITableView *)tableView editActionsForRowAtIndexPath:(NSIndexPath *)indexPath
 8
 9 {
10
11     UITableViewRowAction *action0 = [UITableViewRowAction rowActionWithStyle:UITableViewRowActionStyleNormal title:@"关注" handler:^(UITableViewRowAction *action, NSIndexPath *indexPath) {
12
13         NSLog(@"点击了关注");
14
15
16
17         // 收回左滑出现的按钮(退出编辑模式)
18
19         tableView.editing = NO;
20
21     }];
22
23
24
25     UITableViewRowAction *action1 = [UITableViewRowAction rowActionWithStyle:UITableViewRowActionStyleDefault title:@"删除" handler:^(UITableViewRowAction *action, NSIndexPath *indexPath) {
26
27         [self.wineArray removeObjectAtIndex:indexPath.row];
28
29         [tableView deleteRowsAtIndexPaths:@[indexPath] withRowAnimation:UITableViewRowAnimationAutomatic];
30
31     }];
32
33
34
35     return @[action1, action0];
36
37 }
多选并且删除:
 1   // 编辑模式的时候可以多选
 2
 3     self.tableView.allowsMultipleSelectionDuringEditing = YES;
 4
 5
 6
 7     // 隐藏删除按钮
 8
 9     self.removeButton.hidden = YES;
10
11
12
13 #pragma mark - 数据刷新操作
14
15 - (IBAction)multipleRemove {
16
17     [self.tableView setEditing:!self.tableView.isEditing animated:YES];
18
19
20
21     self.removeButton.hidden = !self.tableView.isEditing;
22
23 }
24
25
26
27 - (IBAction)remove {
28
29     // self.tableView.indexPathsForSelectedRows = [0, 1]
30
31
32
33     // 获得需要删除的酒模型数据
34
35     NSMutableArray *deletedWineArray = [NSMutableArray array];
36
37     for (NSIndexPath *indexPath in self.tableView.indexPathsForSelectedRows) {
38
39         [deletedWineArray addObject:self.wineArray[indexPath.row]];
40
41     }
42
43
44
45     // 删除模型数据
46
47     [self.wineArray removeObjectsInArray:deletedWineArray];
48
49
50
51     // 刷新
52
53     [self.tableView deleteRowsAtIndexPaths:self.tableView.indexPathsForSelectedRows withRowAnimation:UITableViewRowAnimationLeft];
54
55 }
#pragma mark - <代理方法>
/**
* 只要实现了这个方法,左滑出现Delete按钮的功能就有了
* 点击了“左滑出现的Delete按钮”会调用这个方法
*/
 1 - (void)tableView:(UITableView *)tableView commitEditingStyle:(UITableViewCellEditingStyle)editingStyle forRowAtIndexPath:(NSIndexPath *)indexPath
 2
 3 {
 4
 5     // 删除模型
 6
 7     [self.wineArray removeObjectAtIndex:indexPath.row];
 8
 9
10
11     // 刷新
12
13     [tableView deleteRowsAtIndexPaths:@[indexPath] withRowAnimation:UITableViewRowAnimationLeft];
14
15 }
16
17
18
19 /**
20
21  *  修改Delete按钮文字为“删除”
22
23  */
24
25 - (NSString *)tableView:(UITableView *)tableView titleForDeleteConfirmationButtonForRowAtIndexPath:(NSIndexPath *)indexPath
26
27 {
28
29     return @"删除";
30
31 }
32
33
刷新界面:
1局部刷新
1     [self.tableView insertRowsAtIndexPaths:indexPaths withRowAnimation:UITableViewRowAnimationRight];
2
3
4
5     [self.tableView deleteRowsAtIndexPaths:indexPaths withRowAnimation:UITableViewRowAnimationMiddle];
6
7
8
9     [self.tableView reloadRowsAtIndexPaths:indexPaths withRowAnimation:UITableViewRowAnimationLeft];
2:全局刷新
1 // 告诉tableView:模型数据改变了,赶紧刷新表格 2 3 [self.tableView reloadData];
其他技巧:---------------------
分组并且实现隐藏:
tableView显示和隐藏
 1 @property(nonatomic, assign)BOOL isHiddenItem;
 2
 3
 4
 5     self.isHiddenItem = NO;
 6
 7
 8
 9
10
11
12
13 - (CGFloat)tableView:(UITableView *)tableView heightForRowAtIndexPath:(NSIndexPath *)indexPath {
14
15     // 把要隐藏的item的高度设置为0
16
17     if (self.isHiddenItem) {
18
19         return 0;
20
21     }
22
23     return 100;
24
25 }
26
27
28
29 - (void)tableView:(UITableView *)tableView didSelectRowAtIndexPath:(NSIndexPath *)indexPath {
30
31     if (indexPath.row == 0) {
32
33         // 标示是否被隐藏
34
35         self.isHiddenItem = YES;
36
37
38
39         // 获取要隐藏item的位置
40
41         NSIndexPath *tmpPath = [NSIndexPath indexPathForRow:indexPath.row + 2 inSection:indexPath.section];
42
43
44
45         [UIView animateWithDuration:0.3 animations:^{
46
47             [self.tableView cellForRowAtIndexPath:tmpPath].alpha = 0.0f;
48
49         } completion:^(BOOL finished) {
50
51             // 隐藏的对应item
52
53             [[self.tableView cellForRowAtIndexPath:tmpPath] setHidden:YES];
54
55             // 刷新被隐藏的item
56
57             [self.tableView reloadRowsAtIndexPaths:[NSArray arrayWithObject:tmpPath] withRowAnimation:UITableViewRowAnimationFade];
58
59         }];
60
61         NSLog(@"点击了第0行");
62
63     } else if (indexPath.row == 1){
64
65
66
67         self.isHiddenItem = NO;
68
69
70
71         NSIndexPath *tmpPath = [NSIndexPath indexPathForRow:indexPath.row + 2 inSection:indexPath.section];
72
73
74
75         [UIView animateWithDuration:0.3 animations:^{
76
77             [self.tableView cellForRowAtIndexPath:tmpPath].alpha = 1.0f;
78
79         } completion:^(BOOL finished) {
80
81             [[self.tableView cellForRowAtIndexPath:tmpPath] setHidden:YES];
82
83             [self.tableView reloadRowsAtIndexPaths:[NSArray arrayWithObject:tmpPath] withRowAnimation:UITableViewRowAnimationFade];
84
85         }];
86
87         NSLog(@"点击了第1行");
88
89
90
91     }
92
93 }
94
95
96
97
/*************************Swift:UITableView简单实现**********************************************/
使用UIViewController创建TableView
1:在代理中的application:didFinishLaunchingWithOptions方法中初始化一个UIview控制器,并且将他加到导航控制器中,最后将导航控制器作为主窗口显示到界面上
 1     func application(application: UIApplication, didFinishLaunchingWithOptions launchOptions: [NSObject : AnyObject]?) -> Bool {
 2
 3         var vc = ViewController()
 4
 5         var nav   = UINavigationController(rootViewController:vc);
 6
 7         var rect = UIScreen.mainScreen().bounds;
 8
 9         self.window = UIWindow(frame: rect);
10
11         self.window!.rootViewController = nav;
12
13         self.window?.makeKeyAndVisible();
14
15         return true
16
17     }
2:创建一个UIViewController控制器,遵守协议:,UITableViewDelegate, UITableViewDataSource
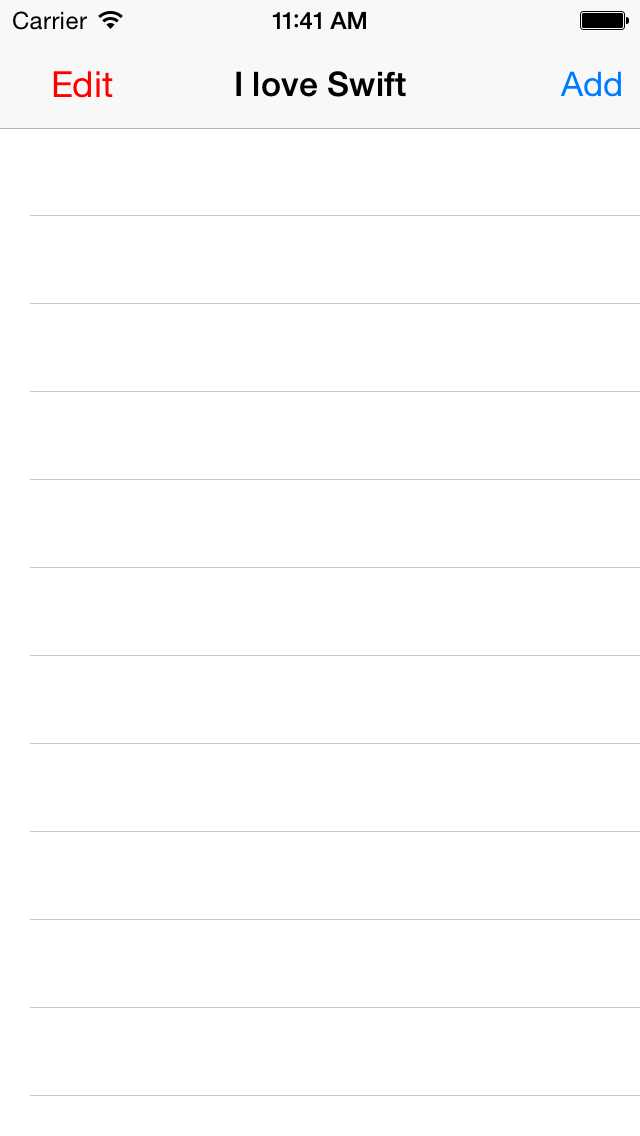
3:初始化界面:
  1 var tableView : UITableView?
  2
  3     var items :NSMutableArray?
  4
  5     var leftBtn:UIButton?
  6
  7
  8
  9     override func viewDidLoad() {
 10
 11         super.viewDidLoad()
 12
 13         self.title = "I love Swift"
 14
 15         self.items = NSMutableArray()
 16
 17        // self.items?.addObject("1","2")
 18
 19         // Do any additional setup after loading the view, typically from a nib.
 20
 21         setupViews()
 22
 23         setupRightBarButtonItem()
 24
 25         setupLeftBarButtonItem();
 26
 27     }
 28
 29
 30
 31     func setupViews()
 32
 33     {
 34
 35         self.tableView = UITableView(frame:self.view!.frame)
 36
 37         self.tableView!.delegate = self
 38
 39         self.tableView!.dataSource = self
 40
 41         self.tableView!.registerClass(UITableViewCell.self, forCellReuseIdentifier: "cell")
 42
 43         self.view?.addSubview(self.tableView!)
 44
 45     }
 46
 47
 48
 49     func setupLeftBarButtonItem()
 50
 51     {
 52
 53         self.leftBtn = UIButton.buttonWithType(UIButtonType.Custom) as? UIButton
 54
 55         self.leftBtn!.frame = CGRectMake(0,0,50,40)
 56
 57         self.leftBtn?.setTitleColor(UIColor.redColor(), forState: UIControlState.Normal)
 58
 59         self.leftBtn?.setTitle("Edit", forState: UIControlState.Normal)
 60
 61         self.leftBtn!.tag = 100
 62
 63         self.leftBtn!.userInteractionEnabled = false
 64
 65         self.leftBtn?.addTarget(self, action: "leftBarButtonItemClicked", forControlEvents: UIControlEvents.TouchUpInside)
 66
 67         var barButtonItem = UIBarButtonItem(customView: self.leftBtn!)
 68
 69         self.navigationItem.leftBarButtonItem = barButtonItem
 70
 71     }
 72
 73
 74
 75     func setupRightBarButtonItem()
 76
 77     {
 78
 79         var barButtonItem = UIBarButtonItem(title: "Add", style: UIBarButtonItemStyle.Plain, target: self, action: "rightBarButtonItemClicked")
 80
 81         self.navigationItem.rightBarButtonItem = barButtonItem
 82
 83     }
 84
 85
 86
 87     func rightBarButtonItemClicked()
 88
 89     {
 90
 91
 92
 93         var row = self.items!.count
 94
 95         var indexPath = NSIndexPath(forRow:row,inSection:0)
 96
 97         self.items?.addObject("1")
 98
 99         self.tableView?.insertRowsAtIndexPaths([indexPath], withRowAnimation: UITableViewRowAnimation.Left)
100
101          self.leftBtn!.userInteractionEnabled = true
102
103     }
104
105
106
107     func leftBarButtonItemClicked()
108
109     {
110
111         if (self.leftBtn!.tag == 100)
112
113         {
114
115             self.tableView?.setEditing(true, animated: true)
116
117             self.leftBtn!.tag = 200
118
119             self.leftBtn?.setTitle("Done", forState: UIControlState.Normal)
120
121         }
122
123         else
124
125         {
126
127             self.tableView?.setEditing(false, animated: true)
128
129             self.leftBtn!.tag = 100
130
131             self.leftBtn?.setTitle("Edit", forState: UIControlState.Normal)
132
133         }
}
4:实现必须实现的三个数据源方法
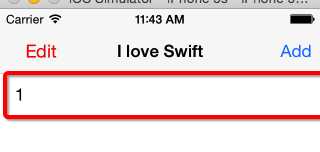
 1 func tableView(tableView: UITableView, numberOfRowsInSection section: Int) -> Int
 2
 3     {
 4
 5         return self.items!.count
 6
 7     }
 8
 9
10
11     func tableView(tableView: UITableView, cellForRowAtIndexPath indexPath: NSIndexPath) -> UITableViewCell
12
13     {
14
15         let cell = tableView.dequeueReusableCellWithIdentifier("cell", forIndexPath: indexPath) as! UITableViewCell
16
17         cell.textLabel!.text = String(format: "%i", indexPath.row+1)
18
19         return cell
20
21     }
22
23
5:点击Add就可以实现在界面上添加行:
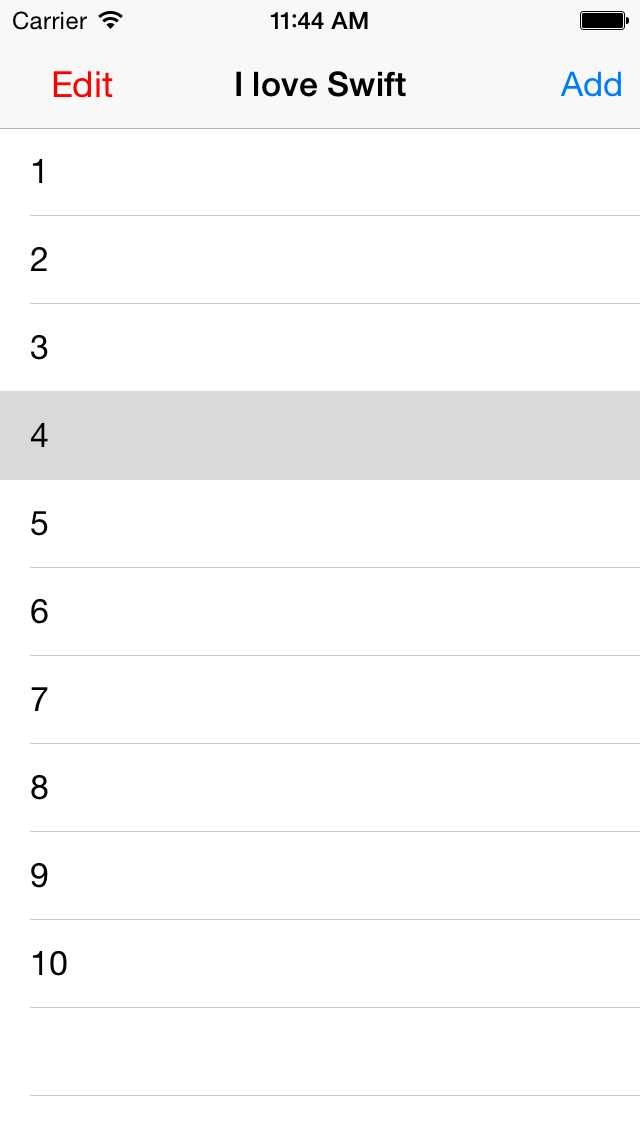
6:选中每一行的时候显示灰色:
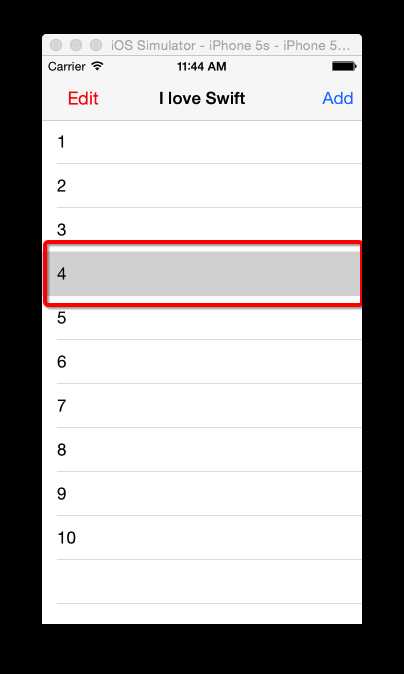
 1 func tableView(tableView: UITableView, didSelectRowAtIndexPath indexPath: NSIndexPath)
 2
 3     {
 4
 5         println("row = %d",indexPath.row)
 6
 7     }
 8
 9
10
11
12
13
7:我们可以实现时按住一行不动然后实现移动
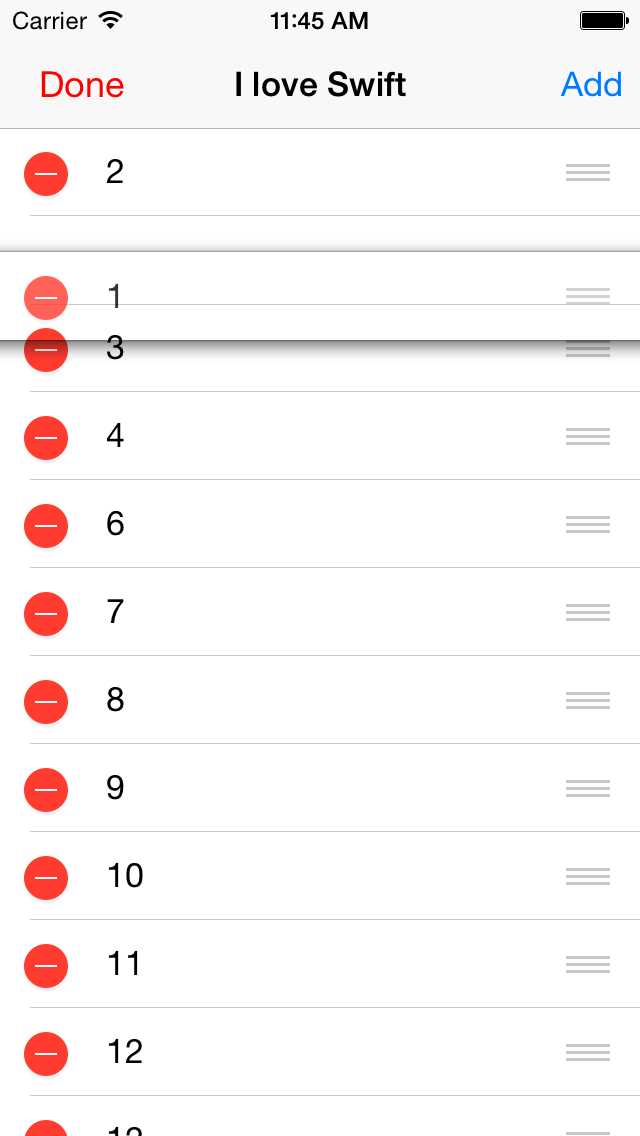
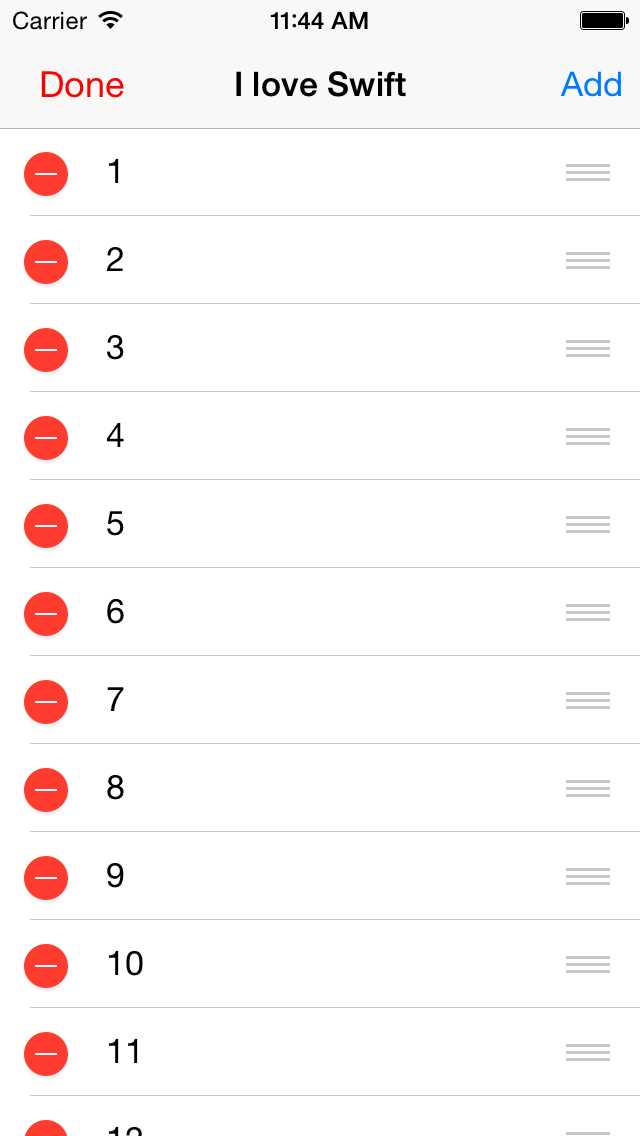
8:点击左边的Edit按钮可是实现编辑每一行:
 1  func tableView(tableView: UITableView,canMoveRowAtIndexPath indexPath: NSIndexPath)-> Bool
 2
 3     {
 4
 5          return true
 6
 7     }
 8
 9
10
11     func tableView(tableView: UITableView, moveRowAtIndexPath sourceIndexPath: NSIndexPath, toIndexPath destinationIndexPath: NSIndexPath)
12
13     {
14
15         self.tableView?.moveRowAtIndexPath(sourceIndexPath, toIndexPath: destinationIndexPath)
16
17         self.items?.exchangeObjectAtIndex(sourceIndexPath.row, withObjectAtIndex: destinationIndexPath.row)
18
19     }
20
21
9:并且可手指往左拖动可以实现删除(编辑)对应的一行:
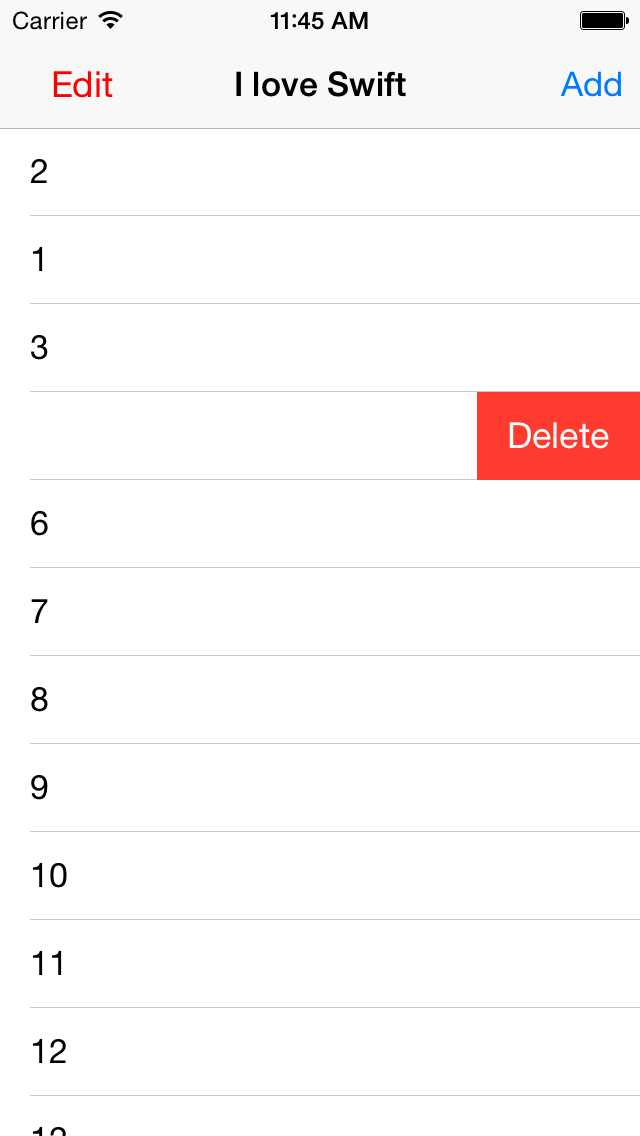
 1     func tableView(tableView: UITableView, canEditRowAtIndexPath indexPath: NSIndexPath) -> Bool
 2
 3     {
 4
 5         return true
 6
 7     }
 8
 9
10
11     func tableView(tableView: UITableView, commitEditingStyle editingStyle: UITableViewCellEditingStyle, forRowAtIndexPath indexPath: NSIndexPath)
12
13     {
14
15         self.items?.removeObjectAtIndex(indexPath.row)
16
17
18
19         self.tableView?.deleteRowsAtIndexPaths([indexPath], withRowAnimation: UITableViewRowAnimation.Top)
20
21         if (self.items!.count == 0)
22
23         {
24
25              self.leftBtn!.userInteractionEnabled = false
26
27         }
28
29
30
31     }
32
33
34
35
36
37
38
39      func tableView(tableView: UITableView, editingStyleForRowAtIndexPath indexPath: NSIndexPath) -> UITableViewCellEditingStyle
40
41     {
42
43         return (UITableViewCellEditingStyle.Delete)
44
45     }
46
47
标签:
原文地址:http://www.cnblogs.com/iCocos/p/4659864.html