标签:
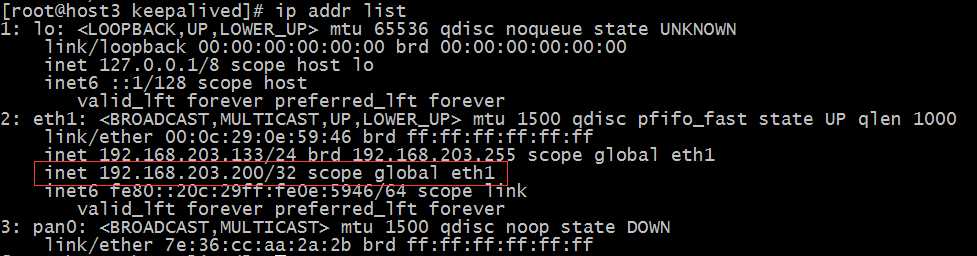
! Configuration File for keepalived
host1上:
global_defs {
   notification_email {
     root@localhost.localdomain
   }
   notification_email_from root@localhost.localdomain
   smtp_server 127.0.0.1
   smtp_connect_timeout 30
   router_id test-mysql-ha
}
vrrp_instance VI_1 {
    state BACKUP
    interface eth3 !当前机器的网络接口名称
    virtual_router_id 51
    priority 100  !优先级别
    nopreempt   !重启后也不要拿回主服务权限
    advert_int 1
    authentication {
        auth_type PASS
        auth_pass 1111
    }
    virtual_ipaddress {
        192.168.203.200  !虚拟ip地址,等会在host2上登陆用此ip
    }
}
virtual_server 192.168.203.200 3306 { !此端口即为mysql的服务
    delay_loop 1
    lb_algo wrr
    lb_kind DR
    persistence_timeout 50
    protocol TCP
    real_server 192.168.203.131 3306 { !主机的ip地址
        weight 1
        notify_down /etc/keepalived/mysql.sh
        TCP_CHECK {
            connect_timeout 10
            bingto 192.168.203.200
            nb_get_retry 3
            delay_before_retry 3
            connect_port 3306
        }
    }
host3上只需将上面加黑的部分做相应的更改并去掉nopreempt 即可
 /etc/keepalived/mysql.sh的内容为:
#!/bin/bash
pkill keepalived
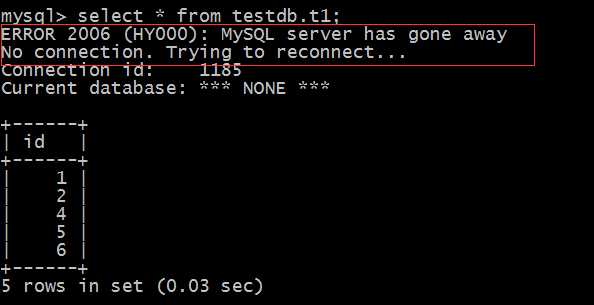
mysql> delete from t1 where id in(4,5,6);
Query OK, 3 rows affected (0.01 sec)

在host1上重新开启mysql
mysql> select * from t1;
+------+
| id   |
+------+
|    1 |
|    2 |
|    4 |
|    5 |
|    6 |
+------+
5 rows in set (0.00 sec)

mysql> start slave;
Query OK, 0 rows affected (0.03 sec)

mysql> select * from t1;
+------+
| id   |
+------+
|    1 |
|    2 |
+------+
2 rows in set (0.00 sec)

数据全部同步过来,再停掉host3上的mysql,在host1上插入一行数据:
mysql> insert into t1 values(3);
在host2上进行查询:
mysql> select * from testdb.t1;
ERROR 2006 (HY000): MySQL server has gone away
No connection. Trying to reconnect...
Connection id:    5
Current database: *** NONE ***

mysql> select * from testdb.t1;
+------+
| id   |
+------+
|    1 |
|    2 |
|    3 |
+------+
3 rows in set (0.00 sec)
标签:
原文地址:http://www.cnblogs.com/zejin2008/p/4660656.html