标签:
<背景>
上一节介绍了python PIL库自带的10种滤镜处理,现成的库函数虽然用起来方便,但是对于图像处理的各种实际需求,还需要开发者开发自定义的滤镜算法。本文将给大家介绍如何使用PIL对图像进行自定义的像素级操作。
<效果>
本文以剪纸风格图像处理作为例子:(算法借鉴了残阳似血的博客http://qinxuye.me/,特此鸣谢。)
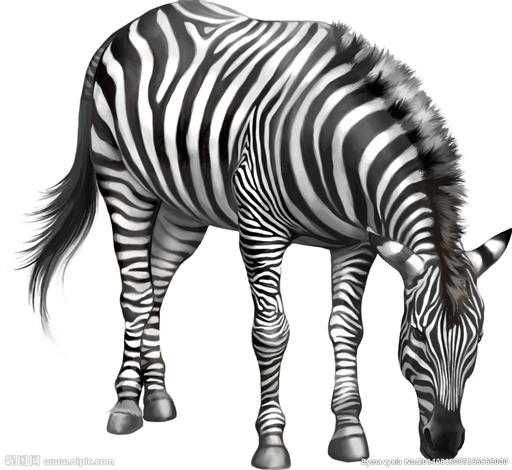
原图:
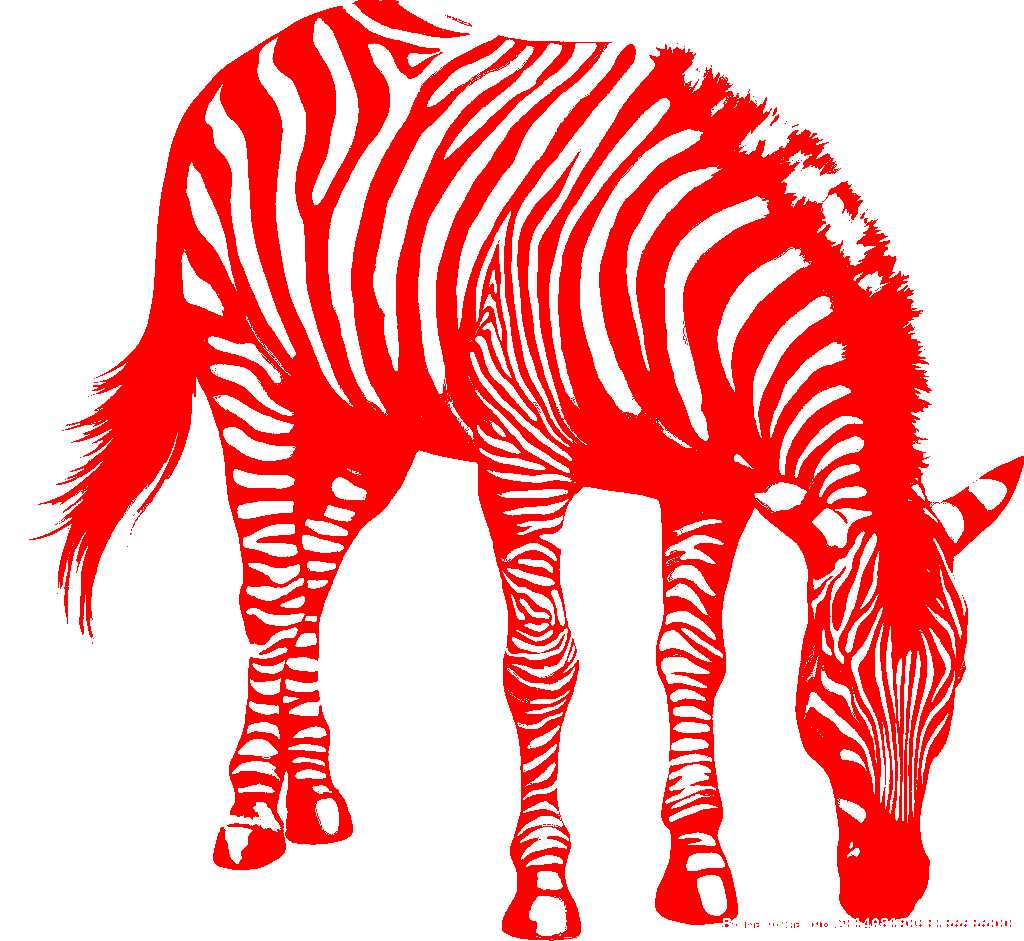
处理后:
<怎么做>
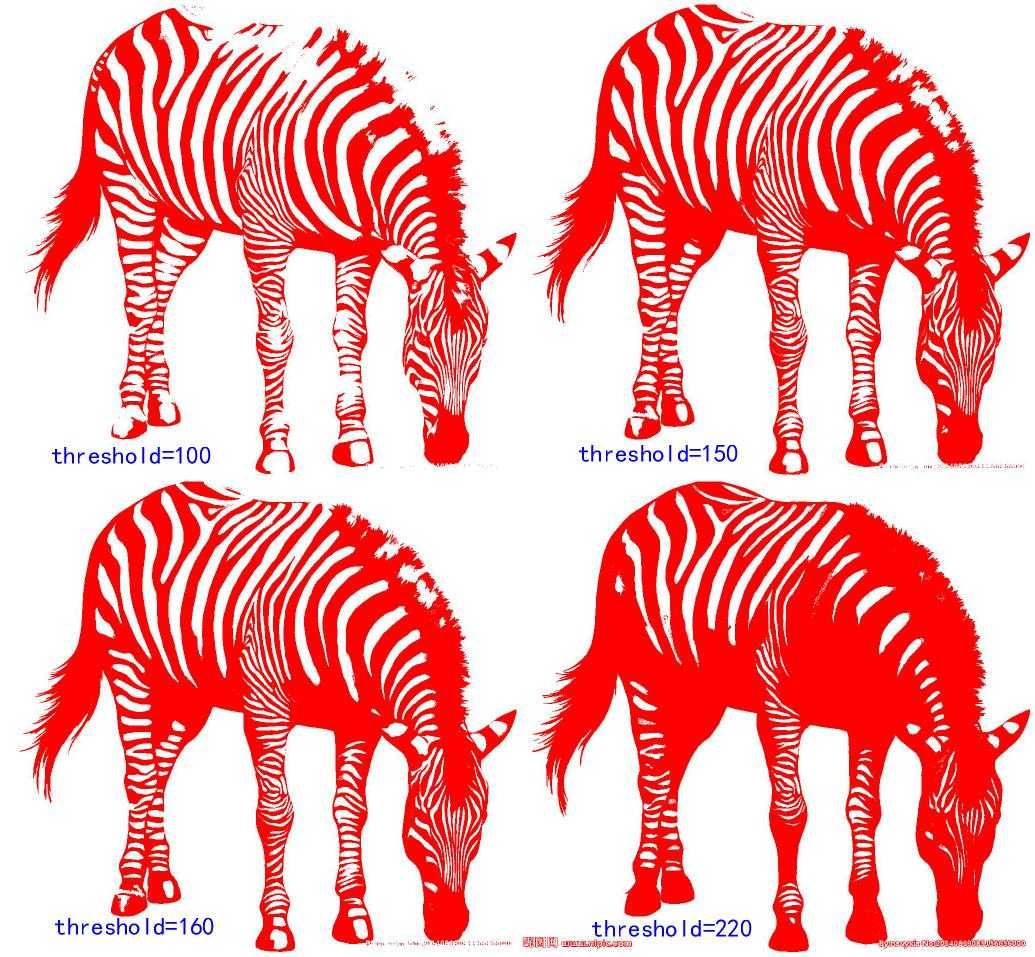
1.首先将处理参数预先设定好。设定阈值threshold,该阈值会用来区分作为目标颜色的前景色和将要被去除掉的的背景色的分界线。同时设置处理后前景色和后景色的颜色,用以呈现最终的分割效果。
threshold = 150
bg_color = (255, 255, 255, 0)
fg_color = (255, 0, 0, 255)
if len(sys.argv) >= 2:
path = sys.argv[1]
if len(sys.argv) == 3:
threshold = int(sys.argv[2])
if len(sys.argv) == 5:
bg_color = tuple(sys.argv[3])
fg_color = tuple(sys.argv[4])
在这一步中,如果阈值threshold设定不同数值,图片会呈现不同的二值分界效果,如下图:
2.将图片转换成可以做像素操作的二值像素集合,然后使用设定好的阈值threshold进行前景后景分割:
def Img2bin_arr(img, threshold):
‘‘‘
@将位图流转化为二维二值数组
@param img: instance of Image
@param threshold: 大小范围[0, 255]
‘‘‘
threshold = max(0, threshold)
threshold = min(255, threshold)
if img.mode != ‘L‘:
img = img.convert(‘L‘)
width, height = img.size
pix = img.load()
get_val = lambda p: 255 if p >= threshold else 0
return [[get_val(pix[w, h]) for w in xrange(width)] for h in xrange(height)]
3.将分割好的像素使用预先设定的颜色上色,然后将像素集合重新封装成图片格式,然后返回这个图片,用于保存或显示。
def bin_arr2Img(matrix, bg_color, fg_color):
‘‘‘
@将二维二值数组转化为位图流
@param img: instance of Image
@param bg_color: 背景色,元组类型,格式:(L)(灰度),(R, G, B),或者(R, G, B, A)
@param fg_color: 前景色
‘‘‘
def ensure_color(color):
if len(color) == 1:
return (color, color, color, 255)
elif len(color) == 3:
color = list(color)
color.append(255)
return tuple(color)
elif len(color) == 4:
return color
else:
raise ValueError, ‘len(color) cannot be %d‘ % len(color)
bg_color = ensure_color(bg_color)
fg_color = ensure_color(fg_color)
height, width = len(matrix), len(matrix[0])
dst_img = Image.new("RGBA", (width, height))
dst_pix = dst_img.load()
for w in xrange(width):
for h in xrange(height):
if matrix[h][w] < 128:
dst_pix[w, h] = fg_color
else:
dst_pix[w, h] = bg_color
return dst_img
总结:使用python进行像素级图像处理,同其他平台的像素处理类似,整个过程非常清晰,大体上都是三步,拆包-处理-封包。鉴于python的处理速度实在是不敢恭维,所以它是一个很好的算法效果验证平台。
<源码分享>
完整代码分享如下:
#start
# -*- coding: cp936 -*-
import Image
img = Image.open("1.jpg")
def Img2bin_arr(img, threshold):
‘‘‘
@将位图流转化为二维二值数组
@param img: instance of Image
@param threshold: 大小范围[0, 255]
‘‘‘
threshold = max(0, threshold)
threshold = min(255, threshold)
if img.mode != ‘L‘:
img = img.convert(‘L‘)
width, height = img.size
pix = img.load()
get_val = lambda p: 255 if p >= threshold else 0
return [[get_val(pix[w, h]) for w in xrange(width)] for h in xrange(height)]
def bin_arr2Img(matrix, bg_color, fg_color):
‘‘‘
@将二维二值数组转化为位图流
@param img: instance of Image
@param bg_color: 背景色,元组类型,格式:(L)(灰度),(R, G, B),或者(R, G, B, A)
@param fg_color: 前景色
‘‘‘
def ensure_color(color):
if len(color) == 1:
return (color, color, color, 255)
elif len(color) == 3:
color = list(color)
color.append(255)
return tuple(color)
elif len(color) == 4:
return color
else:
raise ValueError, ‘len(color) cannot be %d‘ % len(color)
bg_color = ensure_color(bg_color)
fg_color = ensure_color(fg_color)
height, width = len(matrix), len(matrix[0])
dst_img = Image.new("RGBA", (width, height))
dst_pix = dst_img.load()
for w in xrange(width):
for h in xrange(height):
if matrix[h][w] < 128:
dst_pix[w, h] = fg_color
else:
dst_pix[w, h] = bg_color
return dst_img
def paper_cut(img, threshold, bg_color, fg_color):
‘‘‘
@效果:剪纸
@param img: instance of Image
@param threshold: 大小范围[0, 255]
@param bg_color: 背景色,元组类型,格式:(L)(灰度),(R, G, B),或者(R, G, B, A)
@param fg_color: 前景色
@return: instance of Image
‘‘‘
matrix = Img2bin_arr(img, threshold) # 位图转化为二维二值数组
return bin_arr2Img(matrix, bg_color, fg_color) # 二维二值数组转化为位图
if __name__ == "__main__":
import sys, os, time
path = os.path.dirname(__file__) + os.sep.join([‘‘, ‘1.jpg‘])
threshold = 150
bg_color = (255, 255, 255, 0)
fg_color = (255, 0, 0, 255)
if len(sys.argv) >= 2:
path = sys.argv[1]
if len(sys.argv) == 3:
threshold = int(sys.argv[2])
if len(sys.argv) == 5:
bg_color = tuple(sys.argv[3])
fg_color = tuple(sys.argv[4])
start = time.time()
img = Image.open(path)
img = paper_cut(img, threshold, bg_color, fg_color)
img.save(os.path.splitext(path)[0]+‘.papercut_‘+str(threshold)+‘.png‘, ‘PNG‘)
end = time.time()
print ‘It all spends %f seconds time‘ % (end-start)
#end
纯Python综合图像处理小工具(4)图像的自定义像素处理(剪纸滤镜)
标签:
原文地址:http://www.cnblogs.com/sopic/p/4665946.html