标签:
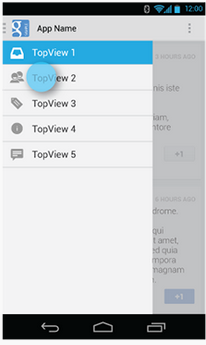
看了很多应用,觉得这种侧滑的抽屉效果的菜单很好。

不用切换到另一个页面,也不用去按菜单的硬件按钮,直接在界面上一个按钮点击,菜单就滑出来,而且感觉能放很多东西。
关于实现,搜索了一下,有如下两种:
1.用SlidingDrawer:
http://developer.android.com/reference/android/widget/SlidingDrawer.html
但是不知道为什么这个类官方不建议再继续用了:
Deprecated since API level 17
2.用DrawerLayout:
http://developer.android.com/reference/android/support/v4/widget/DrawerLayout.html
Guide在这里:
http://developer.android.com/training/implementing-navigation/nav-drawer.html
首先, DrawerLayout这个类是在Support Library里的,需要加上android-support-v4.jar这个包。
然后程序中用时在前面导入import android.support.v4.widget.DrawerLayout;
如果找不到这个类,首先用SDK Manager更新一下Android Support Library,然后在Android SDK\extras\android\support\v4路径下找到android-support-v4.jar,复制到项目的libs路径,将其Add to Build Path.
布局:

<RelativeLayout xmlns:android="http://schemas.android.com/apk/res/android" xmlns:tools="http://schemas.android.com/tools" android:layout_width="match_parent" android:layout_height="match_parent" > <android.support.v4.widget.DrawerLayout xmlns:android="http://schemas.android.com/apk/res/android" android:id="@+id/drawer_layout" android:layout_width="match_parent" android:layout_height="match_parent" > <!-- The main content view --> <!-- main content must be the first element of DrawerLayout because it will be drawn first and drawer must be on top of it --> <FrameLayout android:id="@+id/content_frame" android:layout_width="match_parent" android:layout_height="match_parent" /> <!-- The navigation drawer --> <ListView android:id="@+id/left_drawer" android:layout_width="240dp" android:layout_height="match_parent" android:layout_gravity="left" android:background="#111" android:choiceMode="singleChoice" android:divider="@android:color/transparent" android:dividerHeight="0dp" /> </android.support.v4.widget.DrawerLayout> </RelativeLayout>

DrawerLayout的第一个子元素是主要内容,即抽屉没有打开时显示的布局。这里采用了一个FrameLayout,里面什么也没放。
DrawerLayout的第二个子元素是抽屉中的内容,即抽屉布局,这里采用了一个ListView。
主要的Activity(从官方实例中扒出来的):

package com.example.hellodrawer; import android.os.Bundle; import android.app.Activity; import android.content.res.Configuration; import android.view.MenuItem; import android.view.View; import android.widget.AdapterView; import android.widget.AdapterView.OnItemClickListener; import android.widget.ArrayAdapter; import android.widget.ListView; import android.support.v4.app.ActionBarDrawerToggle; import android.support.v4.view.GravityCompat; import android.support.v4.widget.DrawerLayout; public class HelloDrawerActivity extends Activity
{ private String[] mPlanetTitles; private DrawerLayout mDrawerLayout; private ActionBarDrawerToggle mDrawerToggle; private ListView mDrawerList;

    @Override public void onCreate(Bundle savedInstanceState)
    { super.onCreate(savedInstanceState);
        setContentView(R.layout.activity_hello_drawer);

        mDrawerLayout = (DrawerLayout) findViewById(R.id.drawer_layout); // init the ListView and Adapter, nothing new initListView(); // set a custom shadow that overlays the main content when the drawer // opens mDrawerLayout.setDrawerShadow(R.drawable.drawer_shadow,
                GravityCompat.START);

        mDrawerToggle = new ActionBarDrawerToggle(this, mDrawerLayout,
                R.drawable.ic_drawer, R.string.drawer_open,
                R.string.drawer_close)
        { /** Called when a drawer has settled in a completely closed state. */ public void onDrawerClosed(View view)
            {

                invalidateOptionsMenu(); // creates call to // onPrepareOptionsMenu() } /** Called when a drawer has settled in a completely open state. */ public void onDrawerOpened(View drawerView)
            {

                invalidateOptionsMenu(); // creates call to // onPrepareOptionsMenu() }
        }; // Set the drawer toggle as the DrawerListener mDrawerLayout.setDrawerListener(mDrawerToggle); // enable ActionBar app icon to behave as action to toggle nav drawer getActionBar().setDisplayHomeAsUpEnabled(true); // getActionBar().setHomeButtonEnabled(true); // Note: getActionBar() Added in API level 11 } private void initListView()
    {
        mDrawerList = (ListView) findViewById(R.id.left_drawer);

        mPlanetTitles = getResources().getStringArray(R.array.planets_array); // Set the adapter for the list view mDrawerList.setAdapter(new ArrayAdapter<String>(this,
                R.layout.list_item, mPlanetTitles)); // Set the list‘s click listener mDrawerList.setOnItemClickListener(new OnItemClickListener()
        {

            @Override public void onItemClick(AdapterView<?> parent, View view, int position, long id)
            { // Highlight the selected item, update the title, and close the // drawer mDrawerList.setItemChecked(position, true);
                setTitle(mPlanetTitles[position]);
                mDrawerLayout.closeDrawer(mDrawerList);
            }
        });
    }

    @Override protected void onPostCreate(Bundle savedInstanceState)
    { super.onPostCreate(savedInstanceState); // Sync the toggle state after onRestoreInstanceState has occurred. mDrawerToggle.syncState();
    }

    @Override public void onConfigurationChanged(Configuration newConfig)
    { super.onConfigurationChanged(newConfig);
        mDrawerToggle.onConfigurationChanged(newConfig);
    }

    @Override public boolean onOptionsItemSelected(MenuItem item)
    { // Pass the event to ActionBarDrawerToggle, if it returns // true, then it has handled the app icon touch event if (mDrawerToggle.onOptionsItemSelected(item))
        { return true;
        } // Handle your other action bar items... return super.onOptionsItemSelected(item);
    }

}

比较纠结的是用了Level 11的一个API,这样minSdkVersion就有限制,不能太低。
图片资源Android官网示例处提供下载了。
程序运行后效果如下:
抽屉打开前:

抽屉打开后:

今天又看了一下DrawerLayout的类,发现有很多方法可以直接用的。
重新试了一下,其实不用上面那么麻烦,随便自己定义一个按钮控制抽屉的打开就行:
布局:

<RelativeLayout xmlns:android="http://schemas.android.com/apk/res/android" xmlns:tools="http://schemas.android.com/tools" android:layout_width="match_parent" android:layout_height="match_parent" android:paddingBottom="@dimen/activity_vertical_margin" android:paddingLeft="@dimen/activity_horizontal_margin" android:paddingRight="@dimen/activity_horizontal_margin" android:paddingTop="@dimen/activity_vertical_margin" tools:context=".DrawerActivity" > <android.support.v4.widget.DrawerLayout android:id="@+id/drawer_layout" android:layout_width="match_parent" android:layout_height="match_parent" > <!-- The main content view --> <FrameLayout android:id="@+id/content_frame" android:layout_width="match_parent" android:layout_height="match_parent" > <Button android:id="@+id/btn" android:layout_width="match_parent" android:layout_height="wrap_content" android:text="open" /> </FrameLayout> <!-- The navigation drawer --> <ListView android:id="@+id/left_drawer" android:layout_width="240dp" android:layout_height="match_parent" android:layout_gravity="start" android:background="#111" android:choiceMode="singleChoice" android:divider="@android:color/transparent" android:dividerHeight="0dp" /> </android.support.v4.widget.DrawerLayout> </RelativeLayout>

主要代码:

package com.example.hellodrawer; import android.os.Bundle; import android.app.Activity; import android.support.v4.widget.DrawerLayout; import android.view.Gravity; import android.view.View; import android.view.View.OnClickListener; import android.widget.Button; public class DrawerActivity extends Activity
{ private DrawerLayout mDrawerLayout = null;

    @Override protected void onCreate(Bundle savedInstanceState)
    { super.onCreate(savedInstanceState);
        setContentView(R.layout.activity_drawer);

        mDrawerLayout = (DrawerLayout) findViewById(R.id.drawer_layout);

        Button button = (Button) findViewById(R.id.btn);
        button.setOnClickListener(new OnClickListener()
        {

            @Override public void onClick(View v)
            { // 按钮按下,将抽屉打开 mDrawerLayout.openDrawer(Gravity.LEFT);

            }
        });
    }

}

官方教程:
http://developer.android.com/design/patterns/navigation-drawer.html
http://developer.android.com/training/implementing-navigation/nav-drawer.html
其他参考资料:
http://blog.chengyunfeng.com/?p=493
http://my.eoe.cn/appadventure/archive/3826.html
标签:
原文地址:http://my.oschina.net/yuanxulong/blog/483518