标签:style blog http color 使用 strong
iOS开发项目篇—09新版本特性·分享和开始
一、ios开发中图片的加载
图片的加载:
[UIImage imageNamed:@"home"]; 加载png图片
(一)非retina屏幕
(1)3.5 inch(320 x 480)
* home.png
(二)retina屏幕
(1)3.5 inch(640 x 960)
* home@2x.png
(2)4.0 inch(640 x 1136)
* home-568h@2x.png(如果home是程序的启动图片,才支持自动加载)
(三)举例(以下情况都是系统自动加载)
(1)home是启动图片
* iPhone 1\3G\3GS -- 3.5 inch 非retina :home.png
* iPhone 4\4S -- 3.5 inch retina :home@2x.png
* iPhone 5\5S\5C -- 4.0 inch retina :home-568h@2x.png
(2)home不是启动图片
* iPhone 1\3G\3GS -- 3.5 inch 非retina :home.png
* iPhone 4\4S -- 3.5 inch retina :home@2x.png
* iPhone 5\5S\5C -- 4.0 inch retina :home@2x.png
(3)总结
* home.png :3.5 inch 非retina
* home@2x.png :retina
* home-568h@2x.png :4.0 inch retina + 启动图片
二、分享和开始微博功能的实现
1.实现效果


2.实现代码
  1 //
  2 //  YYNewfeatureViewController.m
  3 //  06-微博版本新特性
  4 //
  5
  6 #import "YYNewfeatureViewController.h"
  7 #import "YYTabBarViewController.h"
  8 #define YYNewfeatureImageCount    4
  9 @interface YYNewfeatureViewController ()<UIScrollViewDelegate>
 10 @property(nonatomic,strong)UIPageControl *pageControl;
 11
 12 @end
 13
 14 @implementation YYNewfeatureViewController
 15
 16
 17 - (void)viewDidLoad
 18 {
 19     [super viewDidLoad];
 20     //1.添加UIScrollView
 21     [self setupScrollView];
 22     //2.添加pageControl
 23     [self setupPageControl];
 24 }
 25 /**
 26  *添加UIScrollVie
 27  */
 28 -(void)setupScrollView
 29 {
 30     //1.添加UIScrollVie
 31     //创建
 32     UIScrollView *scrollView=[[UIScrollView alloc]init];
 33     //设置frame
 34     scrollView.frame=self.view.bounds;
 35     //设置代理
 36     scrollView.delegate=self;
 37     //添加到view
 38     [self.view addSubview:scrollView];
 39
 40     //2.添加图片
 41     //设置每张图片的宽高和scrollView的一致
 42     CGFloat imageW=scrollView.width;
 43     CGFloat imageH=scrollView.height;
 44     //添加四张图片
 45     for (int i=0; i<YYNewfeatureImageCount; i++) {
 46         //创建ImageView
 47         UIImageView *imageView=[[UIImageView alloc]init];
 48         NSString *name=[NSString stringWithFormat:@"new_feature_%d",i+1];
 49 //        if ([UIScreen mainScreen].bounds.size.height==568.0) {
 50 //            name=[name stringByAppendingString:@"-568h"];
 51 //        }
 52         if (FourInch) {//需要手动去加载4英寸对应的-568h@2x图片
 53             name=[name stringByAppendingString:@"-568h"];
 54         }
 55         imageView.image=[UIImage imageWithName:name];
 56
 57         //把ImageView添加到scrollView上
 58         [scrollView addSubview:imageView];
 59
 60         //设置imageView的frame
 61         imageView.y=0;
 62         imageView.width=imageW;
 63         imageView.height=imageH;
 64         imageView.x=i*imageW;
 65
 66         if(i==YYNewfeatureImageCount-1)
 67         {
 68             [self setupLastImageView:imageView];
 69         }
 70     }
 71     //设置其他的属性
 72     //设置活动范围
 73     scrollView.contentSize=CGSizeMake(YYNewfeatureImageCount*imageW, 0);
 74     //设置背景颜色
 75     scrollView.backgroundColor=YYColor(246, 246, 246);
 76     //隐藏水平滚动条
 77     scrollView.showsHorizontalScrollIndicator=NO;
 78 //    scrollView.pagingEnabled=YES;
 79     //去除弹簧效果
 80     scrollView.bounces=NO;
 81 }
 82
 83 /**
 84  *2.添加pageControl
 85  */
 86 -(void)setupPageControl
 87 {
 88     UIPageControl *pageControl=[[UIPageControl alloc]init];
 89     //设置一共有几页
 90     pageControl.numberOfPages=YYNewfeatureImageCount;
 91     //设置显示的位置
 92     pageControl.centerX=self.view.width*0.5;
 93     pageControl.centerY=self.view.height-30;
 94     //把pageControl添加到view上
 95     [self.view addSubview:pageControl];
 96
 97     //设置圆点的颜色
 98     //当前页的圆点的颜色
 99     pageControl.currentPageIndicatorTintColor=YYColor(253, 98, 42);
100     //其它叶的圆点的颜色
101     pageControl.pageIndicatorTintColor=YYColor(189, 189, 189);
102     self.pageControl=pageControl;
103
104 }
105
106
107 /**
108  *  设置最后一个UIImageView,在上面添加两个按钮
109  */
110 -(void)setupLastImageView:(UIImageView *)imageView
111 {
112     //设置为可交互的
113     imageView.userInteractionEnabled=YES;
114     //1.添加开始微博按钮
115     [self setupStarButton:imageView];
116     //2.添加分享按钮
117     [self setupShareButton:imageView];
118 }
119
120 /**
121  *  开始微博按钮
122  */
123 -(void)setupStarButton:(UIImageView *)imageView
124 {
125     // 1.添加开始按钮
126     UIButton *startButton = [[UIButton alloc] init];
127     [imageView addSubview:startButton];
128
129     // 2.设置背景图片
130     [startButton setBackgroundImage:[UIImage imageWithName:@"new_feature_finish_button"] forState:UIControlStateNormal];
131     [startButton setBackgroundImage:[UIImage imageWithName:@"new_feature_finish_button_highlighted"] forState:UIControlStateHighlighted];
132
133     // 3.设置frame
134     startButton.size = startButton.currentBackgroundImage.size;
135     startButton.centerX = self.view.width * 0.5;
136     //注意:这是为了适配3.5inch和4.0inch
137     startButton.centerY = self.view.height * 0.8;
138
139     // 4.设置文字
140     [startButton setTitle:@"开始微博" forState:UIControlStateNormal];
141     [startButton setTitleColor:[UIColor whiteColor] forState:UIControlStateNormal];
142     [startButton addTarget:self action:@selector(start) forControlEvents:UIControlEventTouchUpInside];
143
144 }
145 -(void)start
146 {
147
148     //显示主控制器
149     YYTabBarViewController *vc=[[YYTabBarViewController alloc]init];
150
151     //切换控制器(3)
152     //push(当前没有导航控制器,但是可以添加一个)
153 //    [self.navigationController pushViewController:vc animated:NO];
154     //modal
155 //    [self presentViewController:vc animated:NO completion:Nil];
156     //window.rootViewController
157    // self.view.window注意,不要用这种方法去获取主窗口
158     [UIApplication sharedApplication].keyWindow.rootViewController=vc;
159 }
160
161 /**
162  *分享给大家按钮
163  */
164 -(void)setupShareButton:(UIImageView *)imageView
165 {
166     //1.创建并添加分享按钮
167     UIButton *shareButton=[[UIButton alloc]init];
168     [imageView addSubview:shareButton];
169
170     //2.设置文字和图片等信息
171     [shareButton setTitle:@"分享给大家" forState:UIControlStateNormal];
172     [shareButton setTitleColor:[UIColor blackColor] forState:UIControlStateNormal];
173     [shareButton setImage:[UIImage imageWithName:@"new_feature_share_false"] forState:UIControlStateNormal];
174     [shareButton setImage:[UIImage imageWithName:@"new_feature_share_true"] forState:UIControlStateSelected];
175     //监听点击事件
176     [shareButton addTarget:self action:@selector(share:) forControlEvents:UIControlEventTouchUpInside];
177
178     //3.设置按钮的frame
179     shareButton.size=CGSizeMake(150, 35);
180     shareButton.centerX=self.view.width*0.5;
181     shareButton.centerY=self.view.height*0.7;
182
183     //4.设置间距
184     shareButton.titleEdgeInsets=UIEdgeInsetsMake(0, 10, 0, 0);
185 }
186
187 -(void)share:(UIButton *)shareButton
188 {
189     //对状态进行取反
190     shareButton.selected=!shareButton.isSelected;
191 }
192 #pragma mark-UIScrollViewDelegate
193 -(void)scrollViewDidScroll:(UIScrollView *)scrollView
194 {
195 //    YYLog(@"scrollViewDidScroll----%f",scrollView.contentOffset.x);
196     //拿到浮点数进行四舍五入
197     double doublePage=scrollView.contentOffset.x/scrollView.width;
198     int intPage=(int)(doublePage + 0.5);
199     //设置当前页码
200     self.pageControl.currentPage=intPage;
201
202 }
203 #pragma mark-隐藏状态栏
204 -(BOOL)prefersStatusBarHidden
205 {
206     return YES;
207 }
208 @end
3.代码说明
(1)手动加载-568h@2x的图片
1 //        if ([UIScreen mainScreen].bounds.size.height==568.0) {
2 //            name=[name stringByAppendingString:@"-568h"];
3 //        }
4         if (FourInch) {//需要手动去加载4英寸对应的-568h@2x图片
5             name=[name stringByAppendingString:@"-568h"];
6         }
宏定义:
//是否为4英寸
#define FourInch ([UIScreen mainScreen].bounds.size.height==568.0)
(2)设置scrollView的细节
设置活动范围 scrollView.contentSize=CGSizeMake(YYNewfeatureImageCount*imageW, 0);
设置背景颜色 scrollView.backgroundColor=YYColor(246, 246, 246);
隐藏水平滚动条 scrollView.showsHorizontalScrollIndicator=NO;
去除弹簧效果 scrollView.bounces=NO;
(3)设置页码
 1 #pragma mark-UIScrollViewDelegate
 2 -(void)scrollViewDidScroll:(UIScrollView *)scrollView
 3 {
 4 //    YYLog(@"scrollViewDidScroll----%f",scrollView.contentOffset.x);
 5     //拿到浮点数进行四舍五入
 6     double doublePage=scrollView.contentOffset.x/scrollView.width;
 7     int intPage=(int)(doublePage + 0.5);
 8     //设置当前页码
 9     self.pageControl.currentPage=intPage;
10
11 }
三、补充说明
1.关于边距的设置
原始的图片:
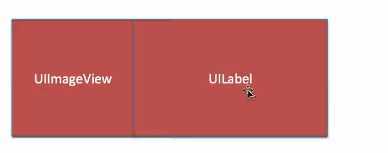
(1)contentEdgeInsets : 切掉按钮内部的内容,内边距=自切 被切掉的区域不能再显示内容
shareButton.contentEdgeInsets = UIEdgeInsetsMake(10, 20, 10, 20);
设置效果如下:

(2)titleEdgeInsets : 切掉按钮内部UILabel的内容
shareButton.titleEdgeInsets = UIEdgeInsetsMake(10, 20, 10, 20);
设置效果如下:

(3)imageEdgeInsets : 切掉按钮内部UIImageView的内容
shareButton.imageEdgeInsets = UIEdgeInsetsMake(5, 5, 5, 5);
设置效果如下:

2.切换控制器
有下面三种方式可以切换控制器:
(1)设置Window的根控制器(注意这里不推荐使用通过self.view.window获取window)
UIWindow *window = [UIApplication sharedApplication].keyWindow;
window.rootViewController = vc;
提示:可以销毁之前的控制器,显示新的控制器
(2)使用push切换
push : [self.navigationController pushViewController:vc animated:NO];
提示:无法销毁之前的控制器,显示新的控制器
(3)通过modal切换
modal : [self presentViewController:vc animated:NO completion:nil];
提示:无法销毁之前的控制器,显示新的控制器
(4)三种切换方式的比较
切换之前在内存中的表现如下图所示:

说明:新特性控制器是window的根控制器,所以,新特性控制器的view此时添加到window的view上。
使用modal的方式(之前的控制器无法被销毁):
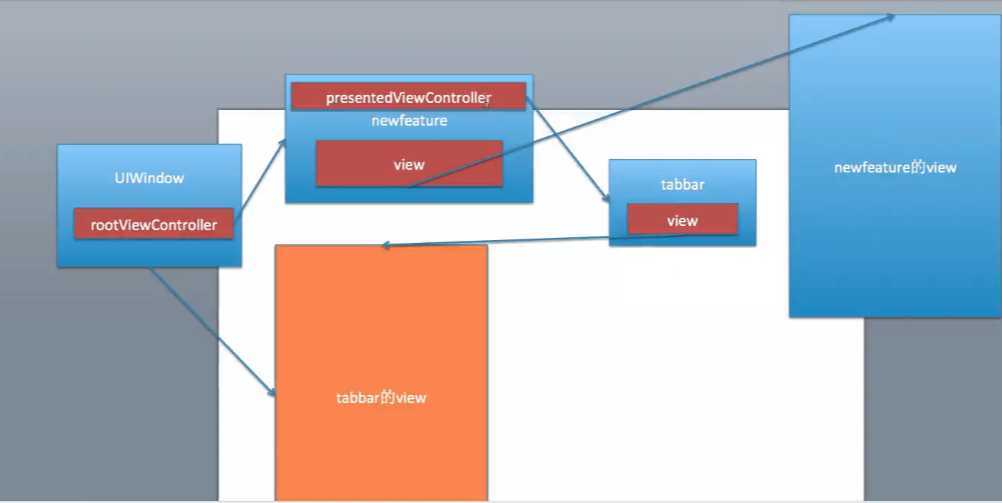
这里的控制器切换是不可逆的,也就是说当切换之后,将不会再切换回去。也就是说新特性控制器在切换之后,就没有继续留在内存中的理由了,但是通过上图可以看出,新特性的控制器因为有强指针引用着它,所以它将不会被销毁。此方法不被推荐(使用push也不会销毁)。
四、附录
项目的pch文件
 1 #import <Availability.h>
 2
 3 #ifndef __IPHONE_5_0
 4 #warning "This project uses features only available in iOS SDK 5.0 and later."
 5 #endif
 6
 7 #ifdef __OBJC__
 8     #import <UIKit/UIKit.h>
 9     #import <Foundation/Foundation.h>
10     #import "UIImage+Extension.h"
11     #import "UIBarButtonItem+Extension.h"
12     #import "UIView+Extension.h"
13
14 #ifdef DEBUG // 调试状态, 打开LOG功能
15 #define YYLog(...) NSLog(__VA_ARGS__)
16 #else // 发布状态, 关闭LOG功能
17 #define YYLog(...)
18 #endif
19
20 // 颜色
21 #define YYColor(r, g, b) [UIColor colorWithRed:(r)/255.0 green:(g)/255.0 blue:(b)/255.0 alpha:1.0]
22
23 // 随机色
24 #define YYRandomColor [UIColor colorWithRed:arc4random_uniform(256)/255.0 green:arc4random_uniform(256)/255.0 blue:arc4random_uniform(256)/255.0 alpha:1.0]
25
26 // 是否为iOS7
27 #define iOS7 ([[UIDevice currentDevice].systemVersion doubleValue] >= 7.0)
28
29 //是否为4英寸
30 #define FourInch ([UIScreen mainScreen].bounds.size.height==568.0)
31 #endif
iOS开发项目篇—09新版本特性·分享,布布扣,bubuko.com
标签:style blog http color 使用 strong
原文地址:http://www.cnblogs.com/wendingding/p/3832304.html