标签:
事件总线分发库EventBus和Otto的简介及对比
什么是事件总线管理:
a.将事件放到队列里,用于管理和分发
b.保证应用的各个部分之间高效的通信及数据、事件分发
c.模块间解耦
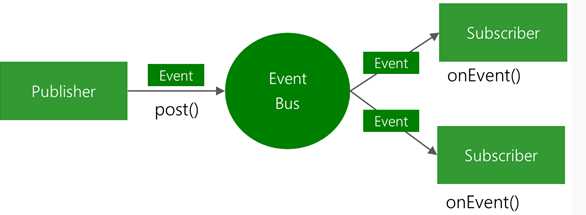
Event Bus是一个发布 / 订阅的事件总线。Event Bus模式 — 也被称为Message Bus或者发布者/订阅者(publisher/subscriber)
模式 — 可以让两个组件相互通信,但是他们之间并不相互知晓。
基于事件总线管理/订阅/分发模式的。事件响应有更多的线程选择,EventBus可以向不同的线程中发布事件。
EventBus支持 Sticky Event。
使用时需要先注册订阅,然后向订阅者分发消息数据即可。包含4个成分:发布者,订阅者,事件,总线。订阅者可以订阅多个事件,
发送者可以发布任何事件,发布者同时也可以是订阅者。分订阅、注册、发布、取消注册等步骤。


Event Bus的基本用法
分订阅、注册、发布、取消注册。
注册:
EventBus.getDefault().register(this);
EventBus.getDefault().register(new MyClass());
//注册:三个参数分别是,消息订阅者(接收者),接收方法名,事件类
EventBus.getDefault().register(this,"setTextA",SetTextAEvent.class);
取消注册:
EventBus.getDefault().unregister(this);
EventBus.getDefault().unregister(new MyClass());
订阅处理数据:
public void onEventMainThread{}
public void onEvent(AnyEventType event) {}
onEventPostThread、onEventBackgroundThread、onEventAsync
发布:
EventBus.getDefault().postSticky(new SecondActivityEvent("Message From SecondActivity"));
EventBus.getDefault().post(new ChangeImgEvent(1));
EventBus的实际项目应用案例
实现效果:一处点击发送数据,另一处或多处注册点可以及时获取更新传输过来的数据。
涉及知识点:事件类自定义、注册,订阅事件、事件的发布、数据解析、取消注册。
<LinearLayout
    xmlns:android="http://schemas.android.com/apk/res/android"
    android:layout_width="match_parent"
    android:layout_height="match_parent"
    android:orientation="vertical" >
    <Button
        android:id="@+id/btn_send"
        android:layout_width="fill_parent"
        android:layout_height="wrap_content"
        android:text="发送事件" />
    <TextView
        android:id="@+id/tv_content"
        android:layout_width="fill_parent"
        android:layout_height="wrap_content"
        android:layout_marginTop="20dp"
        android:gravity="center"
        android:textSize="20sp" />
</LinearLayout>
/**
 * EventBus的实际项目案例演示
 */
public class MainActivity extends Activity {
    private TextView tv_content;
    private Button btn_send;

    @Override
    protected void onCreate(Bundle savedInstanceState) {
        super.onCreate(savedInstanceState);
        setContentView(R.layout.activity_main);
        tv_content = (TextView) this.findViewById(R.id.tv_content);
        btn_send = (Button) this.findViewById(R.id.btn_send);

        btn_send.setOnClickListener(new OnClickListener() {
            @Override   // 发送数据事件
            public void onClick(View arg0) {
                MyEvent my = new MyEvent();
                my.setType("1");
                my.setContent("1内容");
                EventBus.getDefault().post(my);
            }
        });
        EventBus.getDefault().register(this);
    }

    public void onEvent(MyEvent event) {
        if (event.getType().equals("0")) {
            tv_content.setText(event.getContent());
        }
    }

    public void onEventMainThread(MyEvent event) {
        if (event.getType().equals("1")) {
            tv_content.setText(event.getContent());
        }
    }

    @Override
    protected void onDestroy() {
        super.onDestroy();
        EventBus.getDefault().unregister(this);
    }

}
public class MyEvent {
    private String type;
    private String content;

    public String getType() {
        return type;
    }
    public void setType(String type) {
        this.type = type;
    }
    public String getContent() {
        return content;
    }
    public void setContent(String content) {
        this.content = content;
    }
}
标签:
原文地址:http://www.cnblogs.com/androidsj/p/4679434.html