标签:
规划主机:
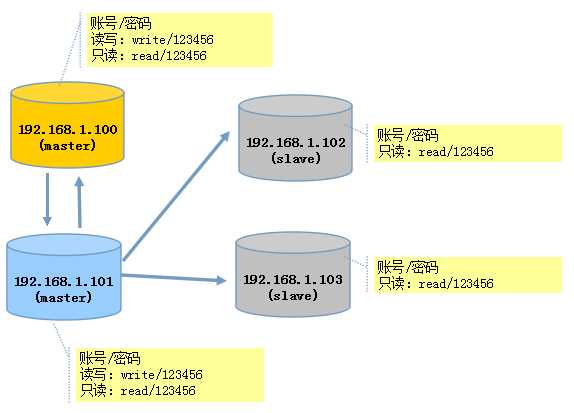
IP 节点类型
192.168.1.100 master/slave
192.168.1.101 master/slave
192.168.1.102 slave
192.168.1.103 slave
操作系统均为centos6.5
原理图:
1. 分别安装mysql (192.168.1.100~103)
1)下载repo,wget http://repo.mysql.com/mysql-community-release-el6-5.noarch.rpm
或从MySQL Yum仓库(http://dev.mysql.com/downloads/repo/yum/ )手动下载
2)安装repo:yum localinstall mysql-community-release-el6-5.noarch.rpm
可以通过下面的命令来确认这个仓库被成功添加:yum repolist enabled | grep community
3)yum install mysql-community-server
2. 配置文件(192.168.1.100~103)
注:这个配置是通用配置,配置好后,每个节点都可以是主节点,也可以是从节点,关键是是否启用
vim /etc/my.cnf
[client]
socket=/root/data/mysql/mysql.sock
[mysqld]
datadir=/root/data/mysql #修改默认datadir
socket=/root/data/mysql/mysql.sock
server_id=100 #每台主机不一样,根据实际情况填写唯一ID
log_bin=mysql_bin_log
binlog_format=row
relay_log = mysql_relay_bin_log
log_slave_updates = 1
read_only = 1
slave-skip-errors = 1062,1032,1060 #skip some errors such as keys conflict,data‘s not exists,table already exists
修改默认datadir:
vim /etc/init.d/mysqld
修改这一行为:get_mysql_option mysqld datadir "/root/data/mysql"
建立数据保存目录并赋予读写权限
chmod 755 /root
mkdir -p /root/data/mysql
chown -R mysql:mysql /root/data/mysql
chgrp -R mysql /root/data/mysql
chmod -R 755 /root/data/
3.初始化表并启动mysql
mysql_install_db --user=mysql
service mysqld start
4.账号配置
在master主机(192.168.1.100/101)上配置replication专用账号 repl,并授权
create user ‘repl‘@‘10.%‘ identified by ‘repl‘;
GRANT REPLICATION SLAVE ON *.* TO ‘repl‘@‘10.%‘ IDENTIFIED BY ‘repl‘;
注意:建议在slave上也相同的配置repl用户,方便主从切换
设置主节点(192.168.100/101)读写密码,
从节点不设置write密码和远程登录权限,防止使用slave查询过程中误用更新插入类写入语句导致产生不同步的数据)
create user ‘write‘@‘%‘ identified by ‘123456‘;
grant all privileges on *.* to ‘write‘@‘%‘ identified by ‘123456‘;
flush privileges;
在从节点(
192.168.1.102/103)上配置replication只读专用账号 read
create user ‘read‘@‘%‘ identified by ‘123456‘;
GRANT select ON *.* TO ‘read‘@‘%‘ IDENTIFIED BY ‘123456‘;
5.启动从服务器Replicate
除了192.168.1.101主机要从192.168.1.100同步外,其它全部从192.168.1.101同步(请看原理图)
CHANGE MASTER TO MASTER_HOST=‘192.168.1.101‘, MASTER_USER=‘repl‘,MASTER_PASSWORD=‘repl‘,MASTER_LOG_FILE=‘mysql-bin.000001‘,
MASTER_LOG_POS=0;
start slave;
查看从节点状态:show slave status \g
第一次配置一般都会出现错误1:
错误1:Got fatal error 1236 from master when reading data from binary log: ‘Could not find first log file name in b
在master那边,执行:flush logs; show master status;
+----------------------+------------+--------------+------------------+-------------------+
| File | Position | Binlog_Do_DB | Binlog_Ignore_DB | Executed_Gtid_Set |
+----------------------+------------+--------------+------------------+-------------------+
| mysql_bin_log.000002 | 120| | | |
+----------------------+------------+--------------+------------------+-------------------+
记下File, Position。在slave端,执行:
stop slave;
CHANGE MASTER TO MASTER_LOG_FILE=‘mysql_bin_log.000002‘,MASTER_LOG_POS=120;
start slave;
查看状态:show slave status \g
成功:
*************************** 1. row ***************************
Slave_IO_State: Waiting for master to send event
Master_Host: 192.168.1.101
Master_User: repl
Master_Port: 3306
Connect_Retry: 60
Master_Log_File: mysql_bin_log.000006
Read_Master_Log_Pos: 120
Relay_Log_File: mysql_relay_bin_log.000002
Relay_Log_Pos: 287
Relay_Master_Log_File: mysql_bin_log.000006
Slave_IO_Running: Yes
Slave_SQL_Running: Yes
.....
6.如何跳过一个错误?
错误2: Last_SQL_Errno: 1418
Last_SQL_Error: Error ‘This function has none of DETERMINISTIC, NO SQL, or READS SQL DATA in its declaration and binary logging is enabled (you *might* want to use the less safe log_bin_trust_function_creators variable)‘ on query.
解决方法一:
处理临时错误,主动跳过一个错误的事务(这是我在新建一个函数是出现的,其它情况可以类似处理)
stop slave;
set GLOBAL SQL_SLAVE_SKIP_COUNTER=1;
start slave;
如果此类错较多,则在配置中忽略这种错误,
vim etc/my.cnf
在slave-skip-errors后面加 1418:
slave-skip-errors = .. ,1418 #跳过1418错误
重启mysql: serveice mysqld restart;
解决方法二:
show variables like ‘log_bin_trust_function_creators‘;
发现是off状态,
配置文件中增加一行
log_bin_trust_function_creators=1
7.注意事项
建表时不要以自增字段作为主键,否则双机相互同步的时候难免会出现主键冲突,导致同步失败或数据丢失,建议使用guid(uuid)作为主键
快速安装及配置MySQL Replication双主节点集群--及改变数据保存目录
标签:
原文地址:http://www.cnblogs.com/zhaohz/p/4691586.html