标签:webservice 实例 demo
原文:java
webservice实例教程
源代码下载地址:http://www.zuidaima.com/share/1590350954564608.htm
最近在学习web services,网上先关的资料不多,讲的都是很基础,例子也很简单,自己动手敲了敲在这里和大家分享一下,希望能对初学者有所帮助。
Web Services服务器端开发
服务器端开发用的是XFire,版本是1.2.6,XFire现在已经成apache下面的一个项目CXF的一部分了,老早就不更新版本了,XFire过不过时我是不知道,不过还有一些人在用。
开发环境是:IDEA,Tomcat 8.0
新建一个项目,可以是web project也可以是web service project,区别不大。项目建好之后:(项目名假设为:webservice)
1、下载XFire1.2.6.jar
jar包下载地址 http://xfire.codehaus.org/Download
加压下载好的文件,将lib文件夹下所有jar包添加到项目中,并且将xfire-all-1.2.6.jar加入到项目中。
2、编写服务接口
1 |
public interface CalculatorService
{ |
2 |
public int add(int a,int b); |
3 |
public int sub(int a,int b); |
4 |
public int mul(int a,int b); |
5 |
public int div(int a,int b); |
3、编写服务接口实现类
01 |
public class CalculatorServiceImpl implements CalculatorService{ |
04 |
public int add(int a, int b)
{ |
09 |
public int sub(int a, int b)
{ |
14 |
public int mul(int a, int b)
{ |
19 |
public int div(int a, int b)
{ |
4、编写web.xml
01 |
<?xml
 version=
"1.0" encoding="UTF-8"?> |
04 |
xsi:schemaLocation="http: |
08 |
<servlet-name>XFireServlet</servlet-name> |
09 |
<servlet-class>org.codehaus.xfire.transport.http.XFireConfigurableServlet</servlet-class> |
10 |
<load-on-startup>0</load-on-startup> |
14 |
<servlet-name>XFireServlet</servlet-name> |
15 |
<url-pattern>/services/*</url-pattern> |
19 |
<servlet-name>XFireServlet</servlet-name> |
20 |
<url-pattern>/services/XFireServlet/*</url-pattern> |
24 |
<welcome-file>index.jsp</welcome-file> |
5、配置服务
在src目录下新建WEB-INF文件夹,在WEB-INF文件夹下新建xfire文件夹,在xfire下新建services.xml文件。
name表示服务的名字可以自己随便定义,serviceClass指明服务接口类,implementationClass指明服务实现类
01 |
<?xml
 version=
"1.0" encoding="UTF-8"?> |
04 |
<name>CalculatorService</name> |
05 |
<serviceClass>com.young.service.CalculatorService</serviceClass> |
07 |
com.young.service.CalculatorServiceImpl |
08 |
</implementationClass> |
6、启动服务
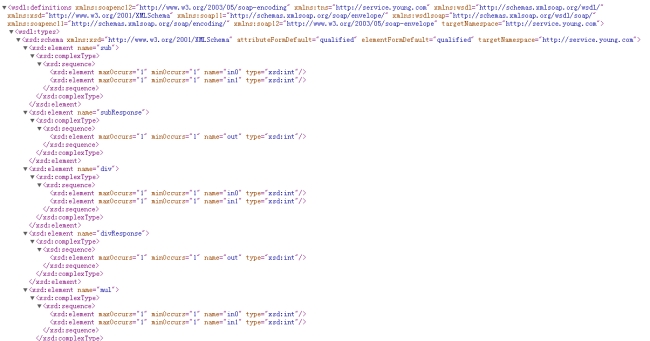
将该项目添加到tomcat中,启动tomcat,在浏览器中输入http://localhost:8080/webservice/services就能看到该项目下所有服务,点击服务后面的[wsdl],就会看到服务的wsdl文件内容。

6、编写客户端
通过WSDL地址来创建动态客户端,代码如下
1 |
public class ClientTest
{ |
2 |
public static void main(String[]
args) throws Exception
{ |
4 |
Object[]
results = client.invoke("add", new Object[]{1, 2}); |
5 |
System.out.println(results[0]); |
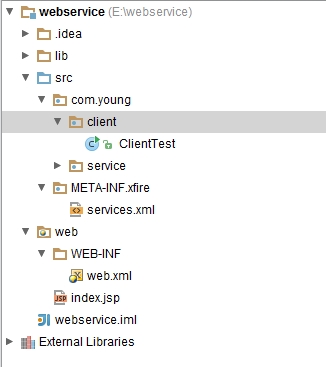
项目文件目录结构如下:

7.跨语言编写客户端
前面编写的客户端采用的是java语言,与Service采用的是同一个JVM,无法直观的体会出webservice跨平台跨语言的特性
下面采用c#编写客户端
打开Visual Studio,新建一个c# console project,命名为wsclient,添加引用,选择添加web引用,输入http://localhost:8080/webservice/services/CalculatorService?wsdl
给该引用命名为CalculatorService
编写测试代码,代码如下
02 |
using
System.Collections.Generic; |
05 |
using
wsclient.CalculatorService; |
11 |
static void Main(string[]
args) |
13 |
CalculatorService.CalculatorService
 cal =
new CalculatorService.CalculatorService(); |
14 |
int result
= cal.add(1, 2); |
15 |
Console.WriteLine(result); |
点击运行,效果如下

版权声明:本文为博主原创文章,未经博主允许不得转载。
java webservice实例教程
标签:webservice 实例 demo
原文地址:http://blog.csdn.net/springmvc_springdata/article/details/47204853
