标签:
1.新建一个微博的项目,去掉屏幕旋转
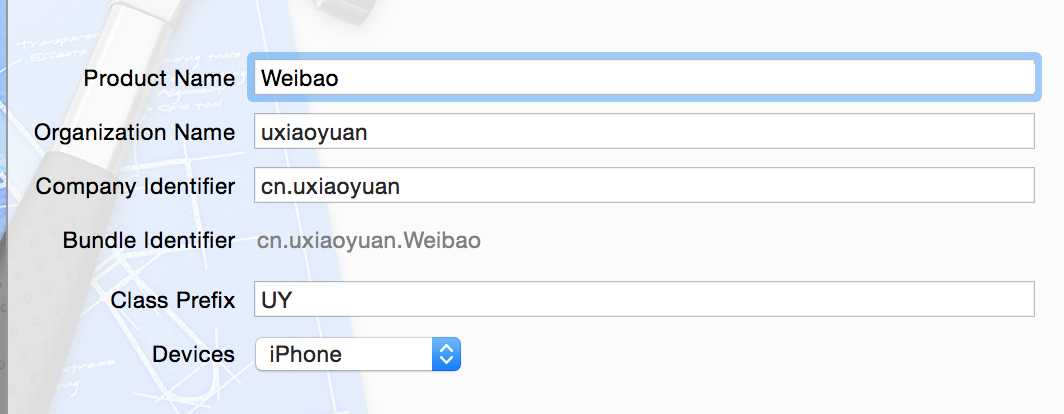
2.设置屏幕方向-->只有竖向

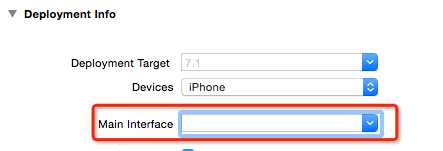
3.使用代码构建UI,不使用storyboard
4.配置图标AppIcon和LaunchImage
将微博资料的相关素材拉到AppIcon和LaunchImage中,并将除了AppIcon和LaunchImage其它图片也全部拉到images.xcassets中。
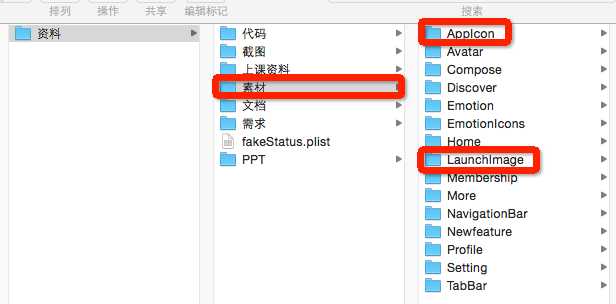
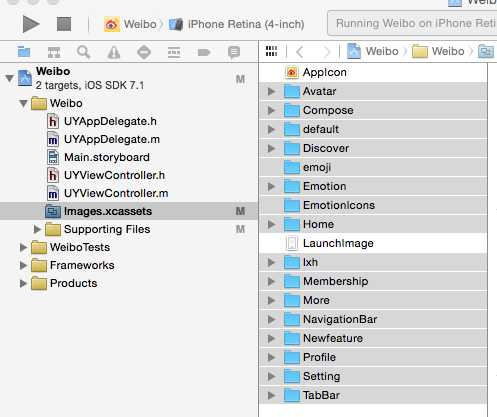
1、项目分层。为了让在Finder中显示跟Xcode中显示都是分层效果,首先在Finder中建文件目录,再拉到xcode中。
2.添加导航及控制器
思路:
(1)创建一个集成UITabBarController的类作为window的rootViewController
(2)由于中间有一个特殊的+加按钮,需要重写(KVC)导航控制器类来重新布局
AppDelegate.m
- (BOOL)application:(UIApplication *)application didFinishLaunchingWithOptions:(NSDictionary *)launchOptions
{

    //1.创建窗口
    self.window=[[UIWindow alloc] init];
    self.window.frame=[UIScreen mainScreen].bounds;

    //2.设置根控制器
    self.window.rootViewController=[[UYTabBarViewController alloc] init];

    //显示窗口
    [self.window makeKeyAndVisible];
    return YES;
}
Weibo-Prefix.pch :为了下面方便测试,我们在全局宏命令中定义随机色及RGB颜色
// RGB颜色
#define HWColor(r, g, b) [UIColor colorWithRed:(r)/255.0 green:(g)/255.0 blue:(b)/255.0 alpha:1.0]

// 随机色
#define HWRandomColor HWColor(arc4random_uniform(256), arc4random_uniform(256), arc4random_uniform(256))
UYTabBarViewController:
#import "UYTabBarViewController.h"
#import "UYHomeViewController.h"
#import "UYMessageCenterViewController.h"
#import "UYProfileViewController.h"
#import "UYDiscoverViewController.h"
#import "UYTabBar.h"


@interface UYTabBarViewController ()

@end

@implementation UYTabBarViewController

- (void)viewDidLoad
{
    [super viewDidLoad];

    // 1.初始化子控制器
    UYHomeViewController *home = [[UYHomeViewController alloc] init];
    [self addChildVc:home title:@"首页" image:@"tabbar_home" selectedImage:@"tabbar_home_selected"];

    UYMessageCenterViewController *messageCenter = [[UYMessageCenterViewController alloc] init];
    [self addChildVc:messageCenter title:@"消息" image:@"tabbar_message_center" selectedImage:@"tabbar_message_center_selected"];

    UYDiscoverViewController *discover = [[UYDiscoverViewController alloc] init];
    [self addChildVc:discover title:@"发现" image:@"tabbar_discover" selectedImage:@"tabbar_discover_selected"];

    UYProfileViewController *profile = [[UYProfileViewController alloc] init];
    [self addChildVc:profile title:@"我" image:@"tabbar_profile" selectedImage:@"tabbar_profile_selected"];

    // 2.更换系统自带的tabbar,由于tabbar是realonly,因此使用KVC来重写。如果没有特殊的导航布局,去掉这下面这部分代码即可。
//    UYTabBar *tabBar = [[UYTabBar alloc] init];
//    tabBar.delegate = self;
//    [self setValue:tabBar forKeyPath:@"tabBar"];
}

/**
 *  添加一个子控制器
 *
 *  @param childVc       子控制器
 *  @param title         标题
 *  @param image         图片
 *  @param selectedImage 选中的图片
 */
- (void)addChildVc:(UIViewController *)childVc title:(NSString *)title image:(NSString *)image selectedImage:(NSString *)selectedImage
{
    // 设置子控制器的文字
    childVc.title = title; // 同时设置tabbar和navigationBar的文字

    // 设置子控制器的图片
    childVc.tabBarItem.image = [UIImage imageNamed:image];
    childVc.tabBarItem.selectedImage = [[UIImage imageNamed:selectedImage]imageWithRenderingMode:UIImageRenderingModeAlwaysOriginal];

    // 设置文字的样式
    NSMutableDictionary *textAttrs = [NSMutableDictionary dictionary];
    textAttrs[NSForegroundColorAttributeName] = HWColor(123, 123, 123);
    NSMutableDictionary *selectTextAttrs = [NSMutableDictionary dictionary];
    selectTextAttrs[NSForegroundColorAttributeName] = [UIColor orangeColor];
    [childVc.tabBarItem setTitleTextAttributes:textAttrs forState:UIControlStateNormal];
    [childVc.tabBarItem setTitleTextAttributes:selectTextAttrs forState:UIControlStateSelected];

    // 先给外面传进来的小控制器 包装 一个导航控制器
    //HWNavigationController *nav = [[HWNavigationController alloc] initWithRootViewController:childVc];
    // 添加为子控制器
    [self addChildViewController:childVc];
}

@end
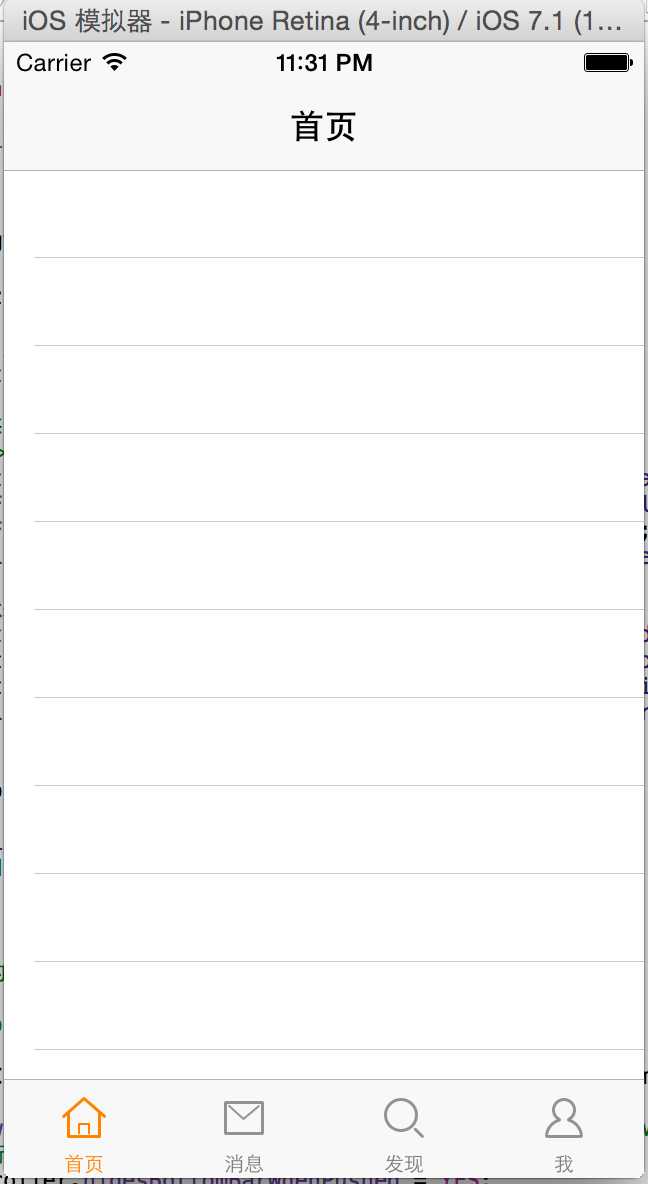
运行后,效果如下:

从上面的效果可以看到,我们还需要设置顶部导航控制器:
思路:
#import "UYNavigationController.h"

@interface UYNavigationController ()

@end

@implementation UYNavigationController

+ (void)initialize
{
    // 设置整个项目所有item的主题样式
    UIBarButtonItem *item = [UIBarButtonItem appearance];

    // 设置普通状态
    // key:NS****AttributeName
    NSMutableDictionary *textAttrs = [NSMutableDictionary dictionary];
    textAttrs[NSForegroundColorAttributeName] = [UIColor orangeColor];
    textAttrs[NSFontAttributeName] = [UIFont systemFontOfSize:13];
    [item setTitleTextAttributes:textAttrs forState:UIControlStateNormal];

    // 设置不可用状态
    NSMutableDictionary *disableTextAttrs = [NSMutableDictionary dictionary];
    disableTextAttrs[NSForegroundColorAttributeName] = [UIColor colorWithRed:0.6 green:0.6 blue:0.6 alpha:0.7];
    disableTextAttrs[NSFontAttributeName] = [UIFont systemFontOfSize:13];
    [item setTitleTextAttributes:disableTextAttrs forState:UIControlStateDisabled];
}

- (void)viewDidLoad
{
    [super viewDidLoad];
    // Do any additional setup after loading the view.
}

/**
 *  重写这个方法目的:能够拦截所有push进来的控制器
 *
 *  @param viewController 即将push进来的控制器
 */
- (void)pushViewController:(UIViewController *)viewController animated:(BOOL)animated
{
    if (self.viewControllers.count > 0) { // 这时push进来的控制器viewController,不是第一个子控制器(不是根控制器)
        /* 自动显示和隐藏tabbar */
        viewController.hidesBottomBarWhenPushed = YES;
    }

    [super pushViewController:viewController animated:animated];
}

- (void)back
{
#warning 这里要用self,不是self.navigationController
    // 因为self本来就是一个导航控制器,self.navigationController这里是nil的
    [self popViewControllerAnimated:YES];
}

- (void)more
{
    [self popToRootViewControllerAnimated:YES];
}

@end
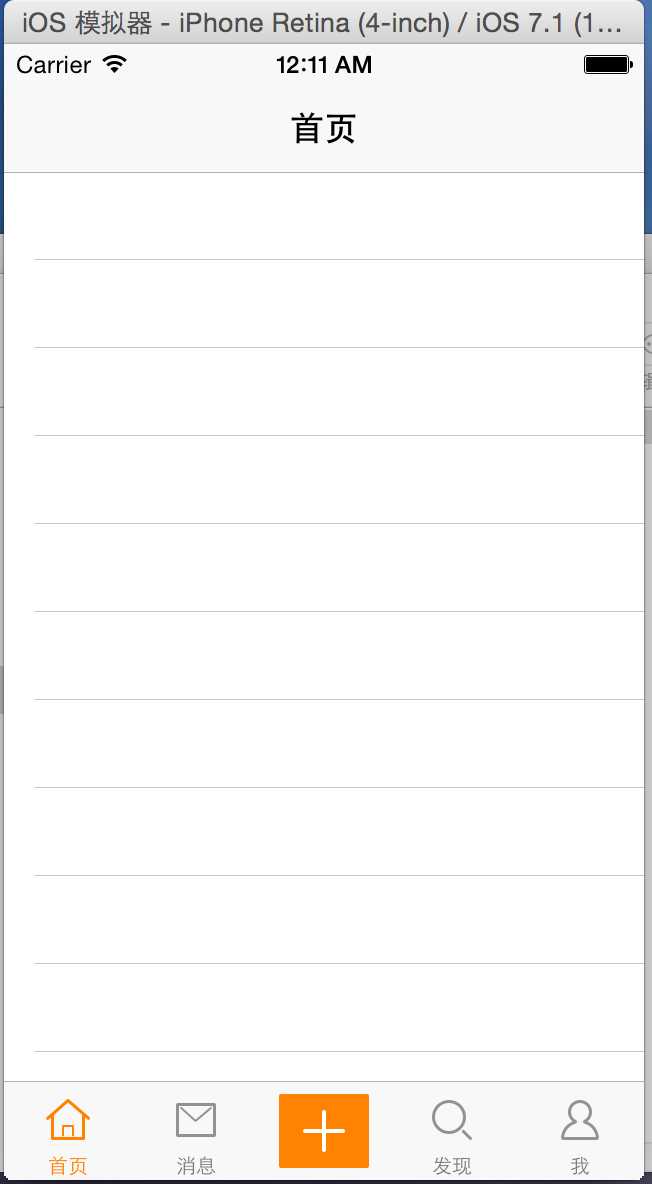
效果如下:
需要反注释掉UYTabBarViewController部分代码:
    // 2.更换系统自带的tabbar,由于tabbar是realonly,因此使用KVC来重写。如果没有特殊的导航布局,去掉这下面这部分代码即可。
    UYTabBar *tabBar = [[UYTabBar alloc] init];
    tabBar.delegate = self;
    [self setValue:tabBar forKeyPath:@"tabBar"];
UYTabBar 中,在layoutSubviews重新对四个底部TabBar进行位置调整,并给+号按钮增加点击事件:
UYTabBar.h
#import <UIKit/UIKit.h>
@class UYTabBar;

#warning 因为UYTabBar继承自UITabBar,所以称为UYTabBar的代理,也必须实现UITabBar的代理协议
@protocol UYTabBarDelegate <UITabBarDelegate>
@optional
- (void)tabBarDidClickPlusButton:(UYTabBar *)tabBar;
@end

@interface UYTabBar : UITabBar
@property (nonatomic, weak) id<UYTabBarDelegate> delegate;
@end
UYTabBar.m
#import "UYTabBar.h"

@interface UYTabBar()
@property(nonatomic,weak) UIButton *plusBtn;
@end

@implementation UYTabBar

- (id)initWithFrame:(CGRect)frame
{
    self = [super initWithFrame:frame];
    if (self) {
        // 添加一个+号按钮 到tabbar中
        UIButton *plusBtn = [[UIButton alloc] init];
        //设置背影
        [plusBtn setBackgroundImage:[UIImage imageNamed:@"tabbar_compose_button"] forState:UIControlStateNormal];
        [plusBtn setBackgroundImage:[UIImage imageNamed:@"tabbar_compose_button_highlighted"] forState:UIControlStateHighlighted];
        //增加+号图片
        [plusBtn setImage:[UIImage imageNamed:@"tabbar_compose_icon_add"] forState:UIControlStateNormal];
        [plusBtn setImage:[UIImage imageNamed:@"tabbar_compose_icon_add_highlighted"] forState:UIControlStateHighlighted];
        plusBtn.size = plusBtn.currentBackgroundImage.size;
        [plusBtn addTarget:self action:@selector(plusClick) forControlEvents:UIControlEventTouchUpInside];
        [self addSubview:plusBtn];
        self.plusBtn = plusBtn;
    }
    return self;
}


/**
 *  加号按钮点击
 */
- (void)plusClick
{
    // 通知代理
    if ([self.delegate respondsToSelector:@selector(tabBarDidClickPlusButton:)]) {
        [self.delegate tabBarDidClickPlusButton:self];
    }
}


- (void)layoutSubviews
{
#warning [super layoutSubviews] 一定要调用
    [super layoutSubviews];

    // 1.设置加号按钮的位置
    self.plusBtn.centerX = self.width * 0.5;
    self.plusBtn.centerY = self.height * 0.5;

    // 2.设置其他tabbarButton的位置和尺寸
    CGFloat tabbarButtonW = self.width / 5;
    CGFloat tabbarButtonIndex = 0;
    for (UIView *child in self.subviews) {
        Class class = NSClassFromString(@"UITabBarButton");
        if ([child isKindOfClass:class]) {
            // 设置宽度
            child.width = tabbarButtonW;
            // 设置x
            child.x = tabbarButtonIndex * tabbarButtonW;

            // 增加索引
            tabbarButtonIndex++;
            if (tabbarButtonIndex == 2) {
                tabbarButtonIndex++;
            }
        }
    }
}

@end
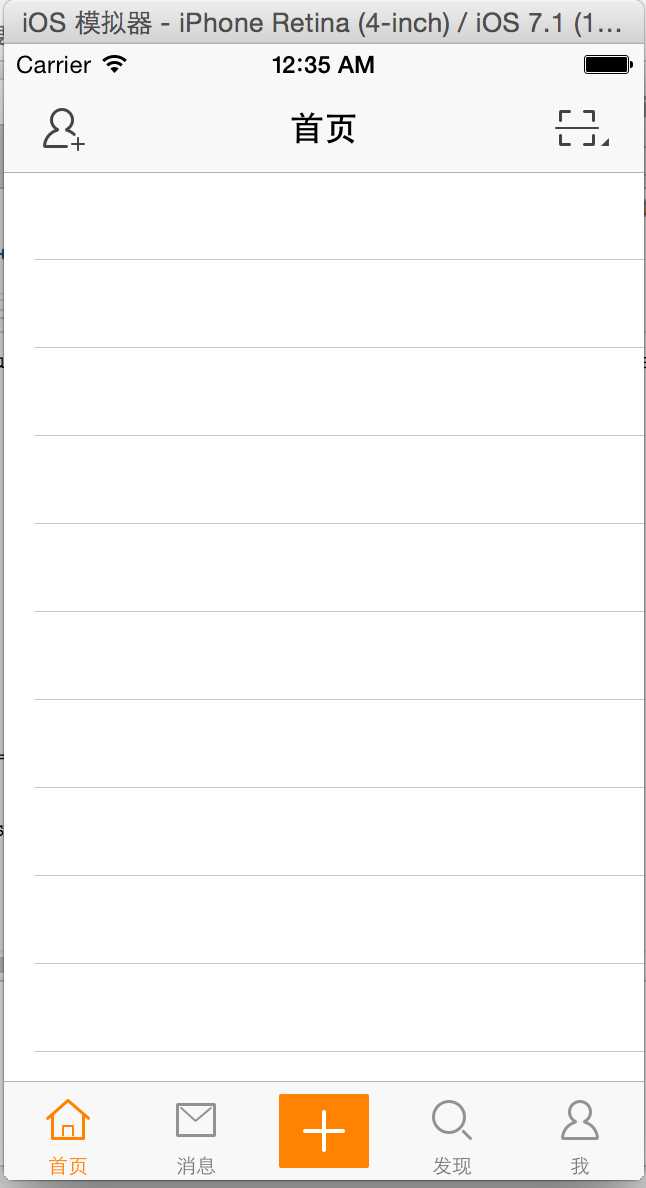
效果如下:
@interface UIBarButtonItem (Extension)
+ (UIBarButtonItem *)itemWithTarget:(id)target action:(SEL)action image:(NSString *)image highImage:(NSString *)highImage;
@end
UIBarButtonItem.m
@implementation UIBarButtonItem (Extension)
/**
 *  创建一个item
 *
 *  @param target    点击item后调用哪个对象的方法
 *  @param action    点击item后调用target的哪个方法
 *  @param image     图片
 *  @param highImage 高亮的图片
 *
 *  @return 创建完的item
 */
+ (UIBarButtonItem *)itemWithTarget:(id)target action:(SEL)action image:(NSString *)image highImage:(NSString *)highImage
{
    UIButton *btn = [UIButton buttonWithType:UIButtonTypeCustom];
    [btn addTarget:target action:action forControlEvents:UIControlEventTouchUpInside];
    // 设置图片
    [btn setBackgroundImage:[UIImage imageNamed:image] forState:UIControlStateNormal];
    [btn setBackgroundImage:[UIImage imageNamed:highImage] forState:UIControlStateHighlighted];
    // 设置尺寸
    btn.size = btn.currentBackgroundImage.size;
    return [[UIBarButtonItem alloc] initWithCustomView:btn];
}
@end
在HWNavigationController.m方法pushViewController下,增加
/**
 *  重写这个方法目的:能够拦截所有push进来的控制器
 *
 *  @param viewController 即将push进来的控制器
 */
- (void)pushViewController:(UIViewController *)viewController animated:(BOOL)animated
{
    if (self.viewControllers.count > 0) { // 这时push进来的控制器viewController,不是第一个子控制器(不是根控制器)
        /* 自动显示和隐藏tabbar */
        viewController.hidesBottomBarWhenPushed = YES;

        /* 设置导航栏上面的内容 */
        // 设置左边的返回按钮
        viewController.navigationItem.leftBarButtonItem = [UIBarButtonItem itemWithTarget:self action:@selector(back) image:@"navigationbar_back" highImage:@"navigationbar_back_highlighted"];

        // 设置右边的更多按钮
        viewController.navigationItem.rightBarButtonItem = [UIBarButtonItem itemWithTarget:self action:@selector(more) image:@"navigationbar_more" highImage:@"navigationbar_more_highlighted"];
    }

    [super pushViewController:viewController animated:animated];
}
新建一个测试页UYTest1ViewController
首页UYHomeViewController.m
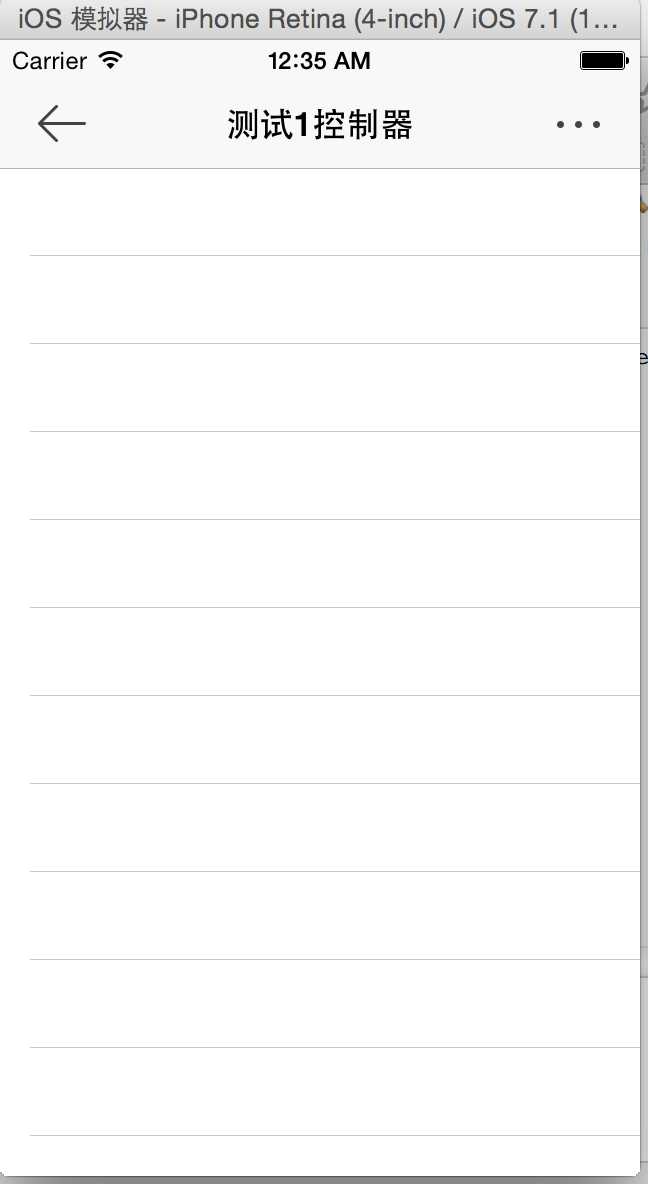
- (void)viewDidLoad
{
    [super viewDidLoad];

    /* 设置导航栏上面的内容 */
    self.navigationItem.leftBarButtonItem = [UIBarButtonItem itemWithTarget:self action:@selector(friendSearch) image:@"navigationbar_friendsearch" highImage:@"navigationbar_friendsearch_highlighted"];

    self.navigationItem.rightBarButtonItem = [UIBarButtonItem itemWithTarget:self action:@selector(pop) image:@"navigationbar_pop" highImage:@"navigationbar_pop_highlighted"];
}

- (void)friendSearch
{
    NSLog(@"friendSearch");
}

- (void)pop
{
    //NSLog(@"pop");
    UYTest1ViewController *test1 = [[UYTest1ViewController alloc] init];
    test1.title = @"测试1控制器";
    [self.navigationController pushViewController:test1 animated:YES];

}
效果:
源代码下载:点击下载
标签:
原文地址:http://www.cnblogs.com/jys509/p/4593292.html