标签:
在很多Web系统中,一般都可能提供一些图标的选择,方便配置按钮,菜单等界面元素的图标,从而是Web系统界面看起来更加美观和协调。但是在系统中一般内置的图标样式相对比较有限,而且硬编码写到样式表里面,这样给我们扩展使用有很多的不方便。基于这个原因,我想如果能够独立一个模块,自动根据图标生成图标CSS样式文件,并存储相应的记录到数据库里面,方便我们查询显示,那样我们使用起来就很方便了,最后有了这些数据,只需要做一个通用的图标选择界面,并可以在很多地方重用了。本文正是基于这个思路,开发了一个图标管理模块和图标选择界面,本文主要阐述这个开发过程和最终的效果展示。
为了方便根据读取的图标文件列表,生成对应的图标样式文件,我们可以利用NVelocity组件,基于模板进行CSS样式文件的生成。关于NVelocity的使用,可以参考我多篇关于它的介绍,这个组件非常强大,我自己的代码生成工具也是基于它编写了很多模板进行代码生成,具体可以参考一下《使用NVelocity生成内容的几种方式》这篇文章。
有了这些准备,我们可以定义一个模板的文件用来生成样式文件了,我们先看最终的样式文件效果。
.icon-table{
    background:url(‘table.png‘) no-repeat center center;
}
.icon-telephone{
    background:url(‘telephone.png‘) no-repeat center center;
}
.icon-user{
    background:url(‘user.png‘) no-repeat center center;
}
.icon-view{
    background:url(‘view.png‘) no-repeat center center;
}
.icon-word{
    background:url(‘word.png‘) no-repeat center center;
}
根据以上组织效果,我们可以定义一个模板内容如下所示。
#foreach($item in ${FileNameList})
.${item.Text}{
    background:url(‘${item.Value}‘) no-repeat center center;
}
#end ##endforeach
其中FileNameList变量是一个基于名称和值的集合对象,我们遍历它进行生成就可以了。
有了模板,我们还需要组织好对应的文件目录,一般来说,Web的图标可以使用16,24,32这些标准大小的图表,适应不同场合的需要。
因此我们创建几个不同的目录,并放入对应的模板文件和图标文件。
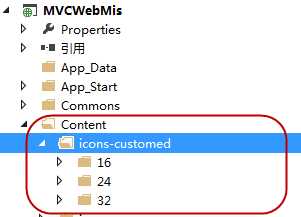
生成图标样式文件的操作分为下面几个步骤:
获取对应目录的图标文件,转换为实际的对象格式集合,生成图标样式文件,存储图表样式到数据库方便查询。
这些操作我们在图标管理的控制器 IconController 里面增加方法完成,部分代码如下所示。
        /// <summary>
        /// 生成图标文件
        /// </summary>
        /// <param name="iconSize">图表尺寸,可选16,32等</param>
        /// <returns></returns>
        public ActionResult GenerateIconCSS(int iconSize = 16)
        {
            CommonResult result = new CommonResult();

            string realPath = Server.MapPath("~/Content/icons-customed/" + iconSize);
            if (Directory.Exists(realPath))
            {
                List<CListItem> list = GetImageToList(realPath, iconSize);

                try
                {
                    //使用相对路径进行构造处理
                    string template = string.Format("Content/icons-customed/{0}/icon.css.vm", iconSize);
                    NVelocityHelper helper = new NVelocityHelper(template);
                    helper.AddKeyValue("FileNameList", list);

                    helper.FileNameOfOutput = "icon";
                    helper.FileExtension = ".css";
                    helper.DirectoryOfOutput = realPath;//指定实际路径

                    string outputFilePath = helper.ExecuteFile();
                    if (!string.IsNullOrEmpty(outputFilePath))
                    {
                        result.Success = true;

                        //写入数据库
                        bool write = BLLFactory<Icon>.Instance.BatchAddIcon(list, iconSize);
                    }
                }
                catch (Exception ex)
                {
                    LogTextHelper.Error(ex);
                    result.ErrorMessage = ex.Message;
                }
            }
            else
            {
                result.ErrorMessage = "没有找到图片文件";
            }

            return ToJsonContent(result);
        }
上面的方法很好的完成了对图标样式的生成和保存数据库的操作,这个生成操作主要就是基于模板化的生成,非常方便。
在构建名称值的集合的时候,注意图标样式名称,不能包含有 一些特殊的字符,如[]()这些符号需要去掉,因此可以通过下面的正则表达式替换方法进行去除。
                    string displayText = Path.GetFileNameWithoutExtension(file);
                    //文件名需要去除()和[]等符号
                    displayText = CRegex.Replace(displayText, @"[)\];,\t\r ]|[\n]", "", 0);
                    displayText = CRegex.Replace(displayText, @"[(\[]", "-", 0);
最终,我们可以构建一个独立的页面,用来实现生成图标样式并保存的操作,界面如下所示。

界面操作代码如下所示。
            //绑定按钮的的点击事件
            function BindEvent() {
                $("#btnGenerateCSS").click(function () {
                    $.messager.confirm("操作确认", "您确认重新生成图标记录吗?", function (action) {
                        if (action) {
                            //图表尺寸
                            var iconSize = $("#IconSize").combobox(‘getValue‘);
                            //alert(iconSize);
                            var postData = "";

                            $.ajax({
                                type: ‘POST‘,
                                url: ‘/Icon/GenerateIconCSS?iconSize=‘ + iconSize,
                                dataType: ‘json‘,
                                data: postData,
                                success: function (data) {
                                    if (data.Success) {
                                        showTips("操作成功");
                                        location.reload();
                                    }
                                    else {
                                        showError("操作失败:" + data.ErrorMessage, 3000);
                                    }
                                }
                            });
                        }
                    });
                });
            }
为了有效查看我们生成在数据库的图标列表,我们需要一个合理的界面表现方式,用来显示图标信息。传统的使用datagrid的方式比较呆板,也不是很方便,所以我们需要自定义分页处理进行展现,基于重用一些优秀组件的原则,我侧重于使用一些现成的组件模块,MVC分页方面,考虑使用杨涛的MVC分页控件(http://www.webdiyer.com/mvcpager/),这个功能看起来很不错。
图表的展现方式,我希望通过easyui的这个例子进行展现一组图表的效果。

然后系统通过把它们进行分页处理,选择一些好的分页样式表现方式
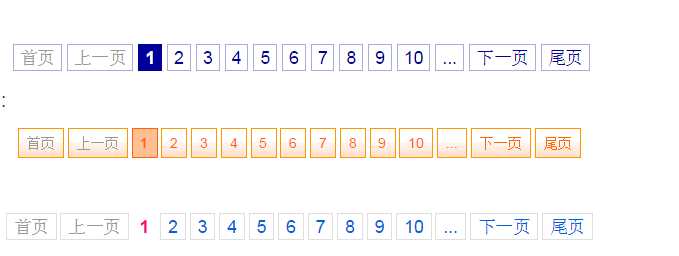
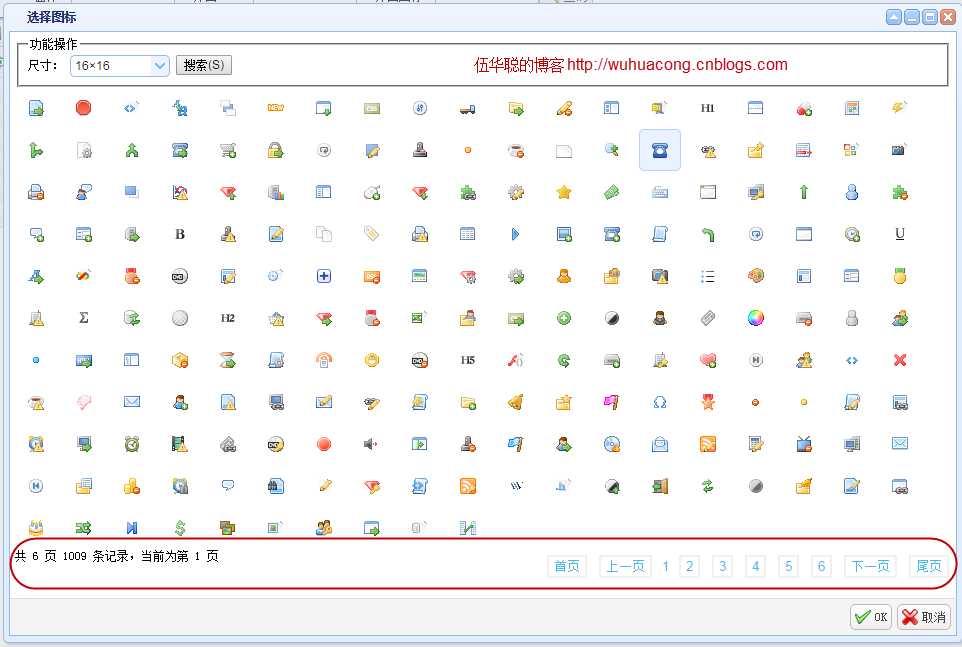
最终实现的图表样式显示效果如下所示。
小图标效果如下所示。
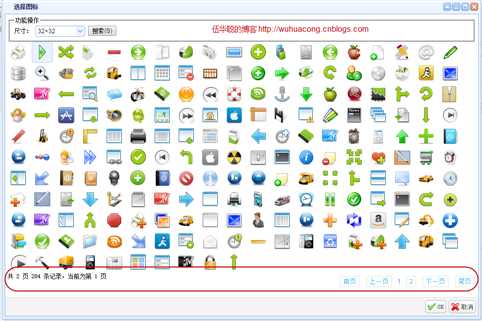
大图标效果如下所示。
杨涛的分页控件,提供了很多绑定分页的方式,不过都主要是基于MVC的模型数据处理,在我的Web框架里面主要利用JS绑定数据,有 一定的差异,但是既然大家都是MVC应用,整合还是没问题的。
为了展现上面的效果,我们需要建立一个表单查询的内容,代码如下所示。
            <fieldset>
                <legend>功能操作</legend>
                @using (Html.BeginForm("select", "Icon", new RouteValueDictionary { { "id", "" } }, FormMethod.Get))
                {
                    <span>尺寸:</span>
                    <select class="easyui-combobox" id="IconSize" name="IconSize" style="width:100px">
                        <option value="16">16×16</option>
                        <option value="24">24×24</option>
                        <option value="32">32×32</option>
                    </select>
                    <input type="submit" value="搜索(S)" accesskey="S" />
                }
            </fieldset>
数据内容的展现,主要就是利用了easyUI的样式,创建一些linkbutton的代码,代码如下所示。这里注意的是,我也是用了model,它是PagedList<WHC.MVCWebMis.Entity.IconInfo>类型的。
也就是说,最终这个视图界面后台,是有一个模型的绑定的。
        <div id="contents">
            @using Webdiyer.WebControls.Mvc;
            @model  PagedList<WHC.MVCWebMis.Entity.IconInfo>
            @foreach (var item in Model)
            {
                <a href="javascript:void(0)" class="easyui-linkbutton" onclick="SelectItem(this, ‘@item.IconCls‘)" id="@item.ID" data-options="plain:true,iconCls:‘@item.IconCls‘,size:‘large‘,toggle:true"> </a>
            }
        </div>
图标后台处理的控制器方法如下所示。
        /// <summary>
        /// 根据条件获取基于PagedList的对象集合,并返回给分页视图使用
        /// </summary>
        /// <param name="id">分页页码</param>
        /// <param name="iconsize">图标尺寸</param>
        /// <returns></returns>
        private PagedList<IconInfo> GetPageList(int? id, int? iconsize = 16)
        {
            int size = iconsize ?? 16;
            int pageIndex = id ?? 1;
            int pageSize = 200;

            PagerInfo pagerInfo = new PagerInfo();
            pagerInfo.CurrenetPageIndex = pageIndex;
            pagerInfo.PageSize = pageSize;

            string where = string.Format("iconsize = {0}", size);
            List<IconInfo> list = BLLFactory<Icon>.Instance.FindWithPager(where, pagerInfo);
            PagedList<IconInfo> pageList = pageList = new PagedList<IconInfo>(list, pageIndex, pageSize, pagerInfo.RecordCount);
            return pageList;
        }

        /// <summary>
        /// 根据条件获取分页数据集合,并绑定到视图里面
        /// </summary>
        /// <param name="id">分页页码</param>
        /// <param name="iconsize">图标尺寸</param>
        /// <returns></returns>
        public ActionResult Select(int? id = 1, int? iconsize = 16)
        {
            PagedList<IconInfo> pageList = GetPageList(id, iconsize);
            return View("select", pageList);
        }
最后部分是分页部分的展现了,就是在底部展现各页的页码等信息了。

这个部分很简单,代码如下所示。
        <div>
            <div style="float:left;width:50%">
                共 @Model.TotalPageCount 页 @Model.TotalItemCount 条记录,当前为第 @Model.CurrentPageIndex 页
            </div>
            @Html.Pager(Model, new PagerOptions { PageIndexParameterName = "id" }, new { style = "float:right", id = "badoopager" })
        </div>
在分页的时候,可能很多时候,发现更新页面后,条件就消失了,这种情况是因为没有很好绑定条件的值到界面上,我们可以通过页面加载完成后,把URL里面的参数值赋值给控件就可以了。
        $(function () {
            var iconSize = ‘@Request.QueryString["iconSize"]‘;
            if(iconSize != undefined && iconSize != "")
            {
                $("#IconSize").combobox(‘setValue‘, iconSize);
            }
        });
这样图表大小的条件就一直可以保持正确的内容,提交表单后依旧可以正常保持了。
既然生成了图标文件,并且构建了图标的展示界面,那么我们就需要在一些需要配置图标的地方,能够提供一个界面选择图标了。
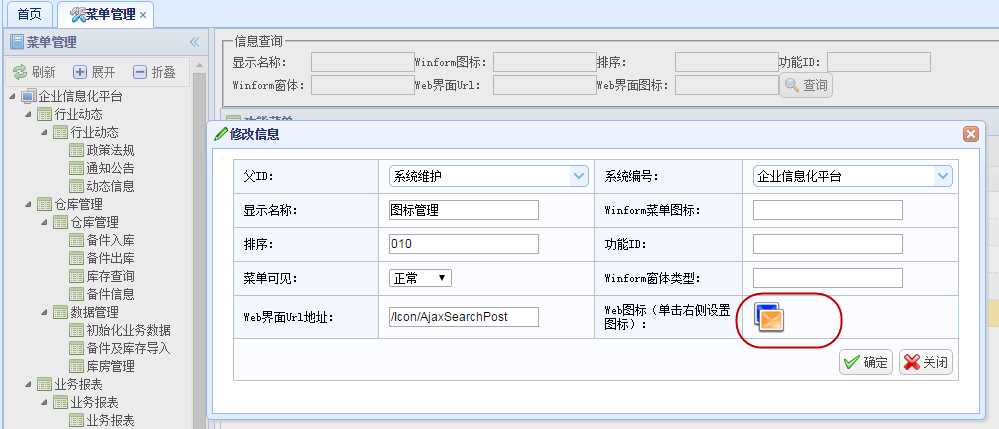
绑定弹出选择图标界面操作,在EasyUI的基础上,使用了扩展对话框的操作,可以弹出一个外部页面的选择图标菜单。
        function SelectIcon(id, value) {
            $.showWindow({
                title: ‘选择图标‘,
                useiframe: true,
                width: 960,
                height: 640,
                content: ‘url:/Icon/Select‘,
                data: { id: $(id), value: $(value) },
                buttons: [{
                    text: ‘OK‘,
                    iconCls: ‘icon-ok‘,
                    handler: ‘doOK‘ //此方法在_content3.html中
                }, {
                    text: ‘取消‘,
                    iconCls: ‘icon-cancel‘,
                    handler: function (win) {
                        win.close();
                    }
                }],
                onLoad: function (win, content) {
                    //window打开时调用,初始化form内容
                    if (content) {
                        content.doInit(win);
                    }
                }
            });
        }

        //绑定选择按钮的事件
        function BindSelectIconEvent() {
            $("#tdIcon").click(function () { SelectIcon("#imgIcon", "#WebIcon") });
            $("#tdIcon1").click(function () { SelectIcon("#imgIcon1", "#WebIcon1") });
        }
选择好每个图标后,我们就会返回到主界面上,并设置好主界面上的图表样式,让它显示出我们选择的图标效果。

基于MVC4+EasyUI的Web开发框架经验总结(14)--自动生成图标样式文件和图标的选择操作
标签:
原文地址:http://www.cnblogs.com/feng-NET/p/4697027.html