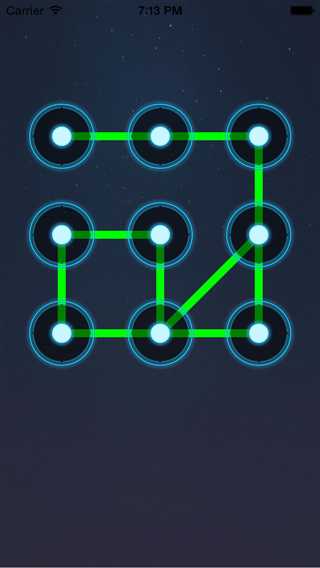
标签:
简单九宫格锁屏功能的实现与封装
首先来看看最后的实现界面。

在这开始看下面的内容之前希望你能先大概思考活着回顾一下如果
你会怎么做,只要知道大概的思路就可以。
由于iphone5指纹解锁的实现是的这个功能呗淘汰,但是你可能会在想,都淘汰了你还在这里说个毛线啊,其实大家都知道,编程注重的思想,当然会了这个你不可能就会了指纹技术,哪还得等笔者在后面的学习中给大家分享,只是或许有一天这种功能或者思路在哪里要用到你不觉得是一件很开心的事情吗,而且如果你是不想自己敲的话直接可以拿来用。
好了不多废话直接上。。。
关于节目的搭建这里就不多说了,那都是简单的不能再简单的东西,这里只是介绍怎么一步步去实现这个功能。
这里我使用的是触摸事件,当然你也可是使用手势识别来实现,思路基本一致:
一:头文件的处理
首先我们在头文件中使用代理的当时传值,只要遵守这个代理,并且实现了这个代理方法,再将对应的View设置为我们自定义的View就可以了。
 1 #import <UIKit/UIKit.h>
 2
 3
 4
 5 @class iCocosLockView;
 6
 7 @protocol iCocosLockView Delegate <NSObject>
 8
 9
10
11 @optional
12
13 - (void)lockView:(iCocosLockView *)lockView didFinishPath:(NSString *)path;
14
15
16
17 @end
18
19
20
21 @interface iCocosLockView : UIView
22
23
24
25 @property (nonatomic, weak) IBOutlet id<YZLockViewDelegate> delegate;
26
27
28
29 @end
二:下面就是实现文件中来一步步的实现这个功能
在私有拓展中定义一下相关属性
 1 #import "iCocosLockView.h"
 2
 3
 4
 5 #define kCount 9
 6
 7
 8
 9 @interface iCocosLockView ()
10
11
12
13 @property (nonatomic, strong) NSMutableArray *selectedButtons;
14
15 @property (nonatomic, assign) CGPoint currentMovePoint;
16
17 @end
第一步:根据定义的那个选中按钮属性实现懒加载
 1 - (NSMutableArray *)selectedButtons
 2
 3 {
 4
 5     if (_selectedButtons == nil) {
 6
 7         _selectedButtons = [NSMutableArray array];
 8
 9     }
10
11     return _selectedButtons;
12
13 }
第二部:为了方便拓展,使用代码的方式创建活着使用IB方式创建我们需要事项两个方法,并且在里面实现按钮的初始化
// 通过代码
 1 - (id)initWithFrame:(CGRect)frame
 2
 3 {
 4
 5     self = [super initWithFrame:frame];
 6
 7     if (self) {
 8
 9         // Initialization code
10
11         [self setUp];
12
13
14
15     }
16
17     return self;
18
19 }
// 通过xib加载
 1 - (id)initWithCoder:(NSCoder *)aDecoder
 2
 3 {
 4
 5
 6
 7     if (self = [super initWithCoder:aDecoder]) {
 8
 9         [self setUp];
10
11     }
12
13     return self;
14
15 }
// 初始化实现
 1 - (void)setUp
 2
 3 {
 4
 5     // 创建9个按钮
 6
 7     for (int i = 0;i < kCount; i++) {
 8
 9         // 创建按钮
10
11         UIButton *btn = [UIButton buttonWithType:UIButtonTypeCustom];
12
13         btn.userInteractionEnabled = NO;
14
15         // 设置按钮默认的图片
16
17         [btn setImage:[UIImage imageNamed:@"gesture_node_normal"] forState:UIControlStateNormal];
18
19         // 设置按钮选中的图片
20
21         [btn setImage:[UIImage imageNamed:@"gesture_node_highlighted"] forState:UIControlStateSelected];
22
23
24
25         btn.tag= i;
26
27         // 将btn添加到视图
28
29         [self addSubview:btn];
30
31     }
32
33 }
第三步:设置按钮的位置,因为在init方法中可能没有frame,在这里设置最准确
 1 - (void)layoutSubviews
 2
 3 {
 4
 5     [super layoutSubviews];
 6
 7
 8
 9     // 设置按钮的位置
10
11     for (int i = 0; i < self.subviews.count; i++) {
12
13         // 取出按钮
14
15         UIButton *btn = self.subviews[i];
16
17
18
19         // 设置位置
20
21         CGFloat w = 74;
22
23         CGFloat h = 74;
24
25         int totalCol = 3;
26
27         CGFloat col = i % totalCol;
28
29         CGFloat row = i / totalCol;
30
31
32
33         CGFloat margin = (self.bounds.size.width - totalCol * w) / (totalCol + 1);
34
35         CGFloat x = col * (margin + w) + margin;
36
37         CGFloat y = row * (margin + h);
38
39         btn.frame = CGRectMake(x, y, w, h);
40
41
42
43     }
44
45
46
47 }
第四步: 根据touches集合获取对应的触摸点位置
 1 - (CGPoint)pointWithTouches:(NSSet *)touches
 2
 3 {
 4
 5     UITouch *touch = [touches anyObject];
 6
 7     CGPoint pos = [touch locationInView:self];
 8
 9     return pos;
10
11 }
第五步:根据不同的业务逻辑,划分功能,一个功能里面不要处理太多业务逻辑,以后开发就不好找了。
// 根据触摸点获得对应的按钮
 1 - (UIButton *)buttonWithPoint:(CGPoint)point
 2
 3 {
 4
 5     for (int i = 0; i < kCount; i++) {
 6
 7         UIButton *btn = self.subviews[i];
 8
 9
10
11         CGFloat wh = 24;
12
13         CGPoint center = btn.center;
14
15         CGFloat x = center.x - wh * 0.5;
16
17         CGFloat y = center.y - wh * 0.5;
18
19         CGRect r = CGRectMake(x, y, wh, wh);
20
21         if (CGRectContainsPoint(btn.frame, point)) {
22
23
24
25             return btn;
26
27         }
28
29     }
30
31     // 都没有找到就返回Nil
32
33     return nil;
34
35 }
第六步:触摸开始
 1 - (void)touchesBegan:(NSSet *)touches withEvent:(UIEvent *)event
 2
 3 {
 4
 5     _currentMovePoint = CGPointMake(-10, -10);
 6
 7     // 1.获取触摸点
 8
 9     CGPoint pos =[self pointWithTouches:touches];
10
11
12
13     // 2.获取触摸的按钮
14
15     UIButton *btn = [self buttonWithPoint:pos];
16
17
18
19     // 3.设置状态
20
21     if (btn && btn.selected == NO) { // 摸到按钮
22
23         btn.selected = YES;
24
25         [self.selectedButtons addObject:btn];
26
27
28
29     }
30
31
32
33     [self setNeedsDisplay];
34
35 }
第七步:开始移动
 1 - (void)touchesMoved:(NSSet *)touches withEvent:(UIEvent *)event
 2
 3 {
 4
 5     // 1.获取触摸点
 6
 7     CGPoint pos =[self pointWithTouches:touches];
 8
 9
10
11     // 2.获取触摸的按钮
12
13     UIButton *btn = [self buttonWithPoint:pos];
14
15
16
17     // 3.设置状态
18
19     if (btn && btn.selected == NO) { // 摸到按钮
20
21         btn.selected = YES;
22
23         [self.selectedButtons addObject:btn];
24
25
26
27     }else{
28
29         _currentMovePoint = pos;
30
31     }
32
33
34
35     [self setNeedsDisplay];
36
37 }
第八步:开始触摸的时候获取位置
 1 - (void)touchesEnded:(NSSet *)touches withEvent:(UIEvent *)event
 2
 3 {
 4
 5
 6
 7     // 获取路径
 8
 9     NSMutableString *str = [NSMutableString string];
10
11
12
13     for (UIButton *b  in _selectedButtons) {
14
15         [str appendFormat:@"%d",b.tag];
16
17     }
18
19
20
21     if ([_delegate respondsToSelector:@selector(lockView:didFinishPath:)]) {
22
23         [_delegate lockView:self didFinishPath:str];
24
25     }
26
27
28
29     // 全部取消选中
30
31     [self.selectedButtons makeObjectsPerformSelector:@selector(setSelected:) withObject:@(NO)];
32
33     // 清空数组
34
35     [self.selectedButtons removeAllObjects];
36
37     // 重绘
38
39     [self setNeedsDisplay];
40
41 }
42
43
第九步:绘制
 1 - (void)drawRect:(CGRect)rect
 2
 3 {
 4
 5     // Drawing code
 6
 7
 8
 9     if (self.selectedButtons.count == 0) return;
10
11
12
13     UIBezierPath *path = [UIBezierPath bezierPath];
14
15     for (int i = 0; i < self.selectedButtons.count; i++) {
16
17         UIButton *b = _selectedButtons[i];
18
19         if (i == 0) {
20
21             [path moveToPoint:b.center];
22
23         }else{
24
25             [path addLineToPoint:b.center];
26
27         }
28
29     }
30
31
32
33     // 如果不是原点才需要画,但是有时候我们也需要画原点,怎么做,是不是可以搞个默认的初始值啊
34
35     // 注意啊,这个初始值不能在初始化里面搞,应该在触摸开始的时候设置
36
37     if (!CGPointEqualToPoint(_currentMovePoint,CGPointMake(-10, -10))) {
38
39
40
41         [path addLineToPoint:_currentMovePoint];
42
43     }
44
45
46
47     path.lineWidth = 8;
48
49     // 设置线段样式
50
51     path.lineJoinStyle = kCGLineJoinBevel;
52
53
54
55     [[UIColor greenColor] set];
56
57
58
59     [path stroke];
60
61
62
63 }
@end
上面我们就实现了关于九宫格锁屏的疯转,下载使用起来就非常简单了,几行代码搞定:
 1 #import "iCocosLockView.h"
 2
 3 @interface iCocosViewController ()<iCocosLockViewDelegate>
 4
 5
 6
 7 - (void)lockView:(iCocosLockView *)lockView didFinishPath:(NSString *)path
 8
 9 {
10
11     NSLog(@"拿到解锁路径---%@",path);
12
13 }
好了,一个很炫的九宫格解锁酒实现了,是不是很酷,,,,

iOS开发——使用技术OC篇&简单九宫格锁屏功能的实现与封装
标签:
原文地址:http://www.cnblogs.com/iCocos/p/4705643.html