标签:
Volley is an HTTP library that makes networking for Android apps easier and most importantly, faster. Volley is available through the open AOSP repository.
Volley offers the following benefits:
Volley excels at RPC-type operations used to populate a UI, such as fetching a page of search results as structured data. It integrates easily with any protocol and comes out of the box with support for raw strings, images, and JSON. By providing built-in support for the features you need, Volley frees you from writing boilerplate code and allows you to concentrate on the logic that is specific to your app.
Volley is not suitable for large download or streaming operations, since Volley holds all responses in memory during parsing. For large download operations, consider using an alternative like DownloadManager.
The core Volley library is developed in the open AOSP repository at frameworks/volley and contains the main request dispatch pipeline as well as a set of commonly applicable utilities, available in the Volley "toolbox." The easiest way to add Volley to your project is to clone the Volley repository and set it as a library project:
git clone https://android.googlesource.com/platform/frameworks/volley
.jar file.
RequestQueue, and how to implement a singleton pattern to create a RequestQueuethat lasts the lifetime of your app.
At a high level, you use Volley by creating a RequestQueue and passing it Request objects. The RequestQueue manages worker threads for running the network operations, reading from and writing to the cache, and parsing responses. Requests do the parsing of raw responses and Volley takes care of dispatching the parsed response back to the main thread for delivery.
This lesson describes how to send a request using theVolley.newRequestQueue convenience method, which sets up a RequestQueue for you. See the next lesson, Setting Up a RequestQueue, for information on how to set up aRequestQueue yourself.
This lesson also describes how to add a request to aRequestQueue and cancel a request.
To use Volley, you must add the android.permission.INTERNET permission to your app‘s manifest. Without this, your app won‘t be able to connect to the network.
Volley provides a convenience method Volley.newRequestQueue that sets up a RequestQueue for you, using default values, and starts the queue. For example:
final TextView mTextView = (TextView) findViewById(R.id.text);
...

// Instantiate the RequestQueue.
RequestQueue queue = Volley.newRequestQueue(this);
String url ="http://www.google.com";

// Request a string response from the provided URL.
StringRequest stringRequest = new StringRequest(Request.Method.GET, url,
            new Response.Listener() {
    @Override
    public void onResponse(String response) {
        // Display the first 500 characters of the response string.
        mTextView.setText("Response is: "+ response.substring(0,500));
    }
}, new Response.ErrorListener() {
    @Override
    public void onErrorResponse(VolleyError error) {
        mTextView.setText("That didn‘t work!");
    }
});
// Add the request to the RequestQueue.
queue.add(stringRequest);
Volley always delivers parsed responses on the main thread. Running on the main thread is convenient for populating UI controls with received data, as you can freely modify UI controls directly from your response handler, but it‘s especially critical to many of the important semantics provided by the library, particularly related to canceling requests.
See Setting Up a RequestQueue for a description of how to set up a RequestQueue yourself, instead of using theVolley.newRequestQueue convenience method.
To send a request, you simply construct one and add it to the RequestQueue with add(), as shown above. Once you add the request it moves through the pipeline, gets serviced, and has its raw response parsed and delivered.
When you call add(), Volley runs one cache processing thread and a pool of network dispatch threads. When you add a request to the queue, it is picked up by the cache thread and triaged: if the request can be serviced from cache, the cached response is parsed on the cache thread and the parsed response is delivered on the main thread. If the request cannot be serviced from cache, it is placed on the network queue. The first available network thread takes the request from the queue, performs the HTTP transaction, parsse the response on the worker thread, writes the response to cache, and posts the parsed response back to the main thread for delivery.
Note that expensive operations like blocking I/O and parsing/decoding are done on worker threads. You can add a request from any thread, but responses are always delivered on the main thread.
Figure 1 illustrates the life of a request:
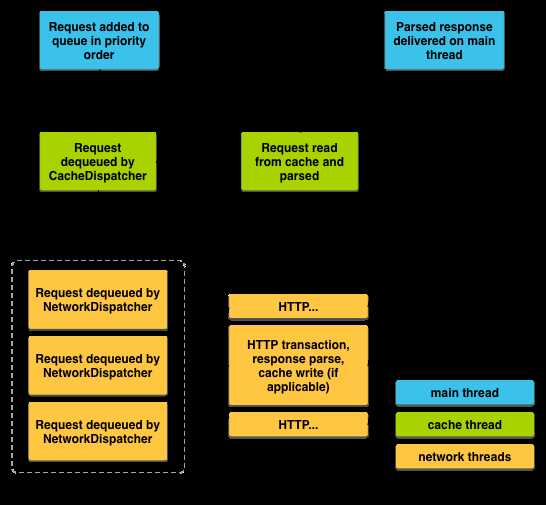
Figure 1. Life of a request.
To cancel a request, call cancel() on your Request object. Once cancelled, Volley guarantees that your response handler will never be called. What this means in practice is that you can cancel all of your pending requests in your activity‘s onStop() method and you don‘t have to litter your response handlers with checks forgetActivity() == null, whether onSaveInstanceState() has been called already, or other defensive boilerplate.
To take advantage of this behavior, you would typically have to track all in-flight requests in order to be able to cancel them at the appropriate time. There is an easier way: you can associate a tag object with each request. You can then use this tag to provide a scope of requests to cancel. For example, you can tag all of your requests with the Activity they are being made on behalf of, and call requestQueue.cancelAll(this) fromonStop(). Similarly, you could tag all thumbnail image requests in a ViewPager tab with their respective tabs and cancel on swipe to make sure that the new tab isn‘t being held up by requests from another one.
Here is an example that uses a string value for the tag:
public static final String TAG = "MyTag";
StringRequest stringRequest; // Assume this exists.
RequestQueue mRequestQueue;  // Assume this exists.

// Set the tag on the request.
stringRequest.setTag(TAG);

// Add the request to the RequestQueue.
mRequestQueue.add(stringRequest);
onStop() method, cancel all requests that have this tag.
@Override
protected void onStop () {
    super.onStop();
    if (mRequestQueue != null) {
        mRequestQueue.cancelAll(TAG);
    }
}
Take care when canceling requests. If you are depending on your response handler to advance a state or kick off another process, you need to account for this. Again, the response handler will not be called.
The previous lesson showed you how to use the convenience method Volley.newRequestQueue to set up a RequestQueue, taking advantage of Volley‘s default behaviors. This lesson walks you through the explicit steps of creating aRequestQueue, to allow you to supply your own custom behavior.
This lesson also describes the recommended practice of creating a RequestQueue as a singleton, which makes theRequestQueue last the lifetime of your app.
A RequestQueue needs two things to do its job: a network to perform transport of the requests, and a cache to handle caching. There are standard implementations of these available in the Volley toolbox: DiskBasedCache provides a one-file-per-response cache with an in-memory index, and BasicNetwork provides a network transport based on your choice of AndroidHttpClient orHttpURLConnection.
BasicNetwork is Volley‘s default network implementation. A BasicNetwork must be initialized with the HTTP client your app is using to connect to the network. Typically this is AndroidHttpClient or HttpURLConnection:
AndroidHttpClient for apps targeting Android API levels lower than API Level 9 (Gingerbread). Prior to Gingerbread, HttpURLConnection was unreliable. For more discussion of this topic, see Android‘s HTTP Clients.HttpURLConnection for apps targeting Android API Level 9 (Gingerbread) and higher.To create an app that runs on all versions of Android, you can check the version of Android the device is running and choose the appropriate HTTP client, for example:
HttpStack stack;
...
// If the device is running a version >= Gingerbread...
if (Build.VERSION.SDK_INT >= Build.VERSION_CODES.GINGERBREAD) {
    // ...use HttpURLConnection for stack.
} else {
    // ...use AndroidHttpClient for stack.
}
Network network = new BasicNetwork(stack);
This snippet shows you the steps involved in setting up a RequestQueue:
RequestQueue mRequestQueue;

// Instantiate the cache
Cache cache = new DiskBasedCache(getCacheDir(), 1024 * 1024); // 1MB cap

// Set up the network to use HttpURLConnection as the HTTP client.
Network network = new BasicNetwork(new HurlStack());

// Instantiate the RequestQueue with the cache and network.
mRequestQueue = new RequestQueue(cache, network);

// Start the queue
mRequestQueue.start();

String url ="http://www.myurl.com";

// Formulate the request and handle the response.
StringRequest stringRequest = new StringRequest(Request.Method.GET, url,
        new Response.Listener<String>() {
    @Override
    public void onResponse(String response) {
        // Do something with the response
    }
},
    new Response.ErrorListener() {
        @Override
        public void onErrorResponse(VolleyError error) {
            // Handle error
    }
});

// Add the request to the RequestQueue.
mRequestQueue.add(stringRequest);
...
If you just need to make a one-time request and don‘t want to leave the thread pool around, you can create theRequestQueue wherever you need it and call stop() on the RequestQueue once your response or error has come back, using the Volley.newRequestQueue() method described in Sending a Simple Request. But the more common use case is to create the RequestQueue as a singleton to keep it running for the lifetime of your app, as described in the next section.
If your application makes constant use of the network, it‘s probably most efficient to set up a single instance ofRequestQueue that will last the lifetime of your app. You can achieve this in various ways. The recommended approach is to implement a singleton class that encapsulates RequestQueue and other Volley functionality. Another approach is to subclass Application and set up the RequestQueue in Application.onCreate(). But this approach is discouraged; a static singleton can provide the same functionality in a more modular way.
A key concept is that the RequestQueue must be instantiated with the Application context, not an Activitycontext. This ensures that the RequestQueue will last for the lifetime of your app, instead of being recreated every time the activity is recreated (for example, when the user rotates the device).
Here is an example of a singleton class that provides RequestQueue and ImageLoader functionality:
private static MySingleton mInstance;
    private RequestQueue mRequestQueue;
    private ImageLoader mImageLoader;
    private static Context mCtx;

    private MySingleton(Context context) {
        mCtx = context;
        mRequestQueue = getRequestQueue();

        mImageLoader = new ImageLoader(mRequestQueue,
                new ImageLoader.ImageCache() {
            private final LruCache<String, Bitmap>
                    cache = new LruCache<String, Bitmap>(20);

            @Override
            public Bitmap getBitmap(String url) {
                return cache.get(url);
            }

            @Override
            public void putBitmap(String url, Bitmap bitmap) {
                cache.put(url, bitmap);
            }
        });
    }

    public static synchronized MySingleton getInstance(Context context) {
        if (mInstance == null) {
            mInstance = new MySingleton(context);
        }
        return mInstance;
    }

    public RequestQueue getRequestQueue() {
        if (mRequestQueue == null) {
            // getApplicationContext() is key, it keeps you from leaking the
            // Activity or BroadcastReceiver if someone passes one in.
            mRequestQueue = Volley.newRequestQueue(mCtx.getApplicationContext());
        }
        return mRequestQueue;
    }

    public <T> void addToRequestQueue(Request<T> req) {
        getRequestQueue().add(req);
    }

    public ImageLoader getImageLoader() {
        return mImageLoader;
    }
}
Here are some examples of performing RequestQueue operations using the singleton class:
// Get a RequestQueue
RequestQueue queue = MySingleton.getInstance(this.getApplicationContext()).
    getRequestQueue();
...

// Add a request (in this example, called stringRequest) to your RequestQueue.
MySingleton.getInstance(this).addToRequestQueue(stringRequest);
-
Android训练课程(Android Training) - 使用Volley传输网络数据(Transmitting Network Data Using Volley)
标签:
原文地址:http://www.cnblogs.com/vir56k/p/4707351.html