标签:
读完vimtutor,把summary抽出来合到一起以便随时翻看。
If you only read the text, you will forget the commands!
虽然我跟着做了一遍,还是记不全,多练吧,谁让我笨呢。
不过我自己想了点帮助记忆的办法,当然每个人都可以有自己的一套,有用就好。
四个方向键:

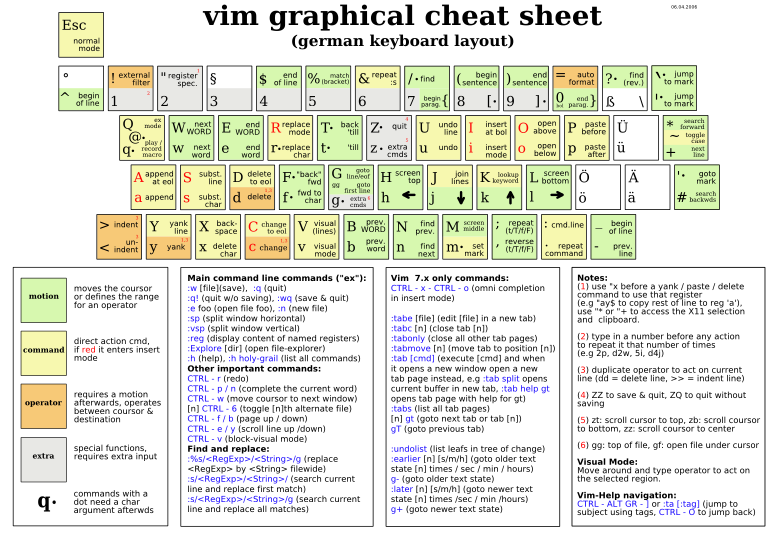
找出每个命令代表的英文,猜猜作者定义命令时思路。随便列了点我觉得常用的。以前师兄给过一张图,我找了英文版,图上就比较全了:
a  append      append after the cursor
A  Append      append after the end of line(eol)
i  insert      insert after the cursor
o  open        open a line BELOW the cursor
O  Open        open a line ABOVE the cursor
u  undo        undo previous action
U  Undo        undo all the changes on a line
c  change      change from the cursor to where the motion takes you
C  Change      change to the end of a line
e  end         move to the end of a word
y  yank        yanks(copies) text
p  paste       puts(pastes) text
r  replace     replace one
R  replace     replace until ESC
d  delete      delete from the cursor to where the motion takes you
s  substitute  subsitute old with new
w  write       write to file
q  quit        quit vim

附上summary,方便复习。
~~~~~~~~~~~~~~~~~~~~~~~~~~~~~~~~~~~~~~~~~~~~~~~~~~~~~~~~~~~~~~~~~~~~~~~~~~~~~~
			       Lesson 1 SUMMARY


  1. The cursor is moved using either the arrow keys or the hjkl keys.
	 h (left)	j (down)       k (up)	    l (right)

  2. To start Vim from the shell prompt type:  vim FILENAME <ENTER>

  3. To exit Vim type:	   <ESC>   :q!	 <ENTER>  to trash all changes.
	     OR type:	   <ESC>   :wq	 <ENTER>  to save the changes.

  4. To delete the character at the cursor type:  x

  5. To insert or append text type:
	 i   type inserted text   <ESC>		insert before the cursor
	 A   type appended text   <ESC>         append after the line

NOTE: Pressing <ESC> will place you in Normal mode or will cancel
      an unwanted and partially completed command.

Now continue with Lesson 2.

~~~~~~~~~~~~~~~~~~~~~~~~~~~~~~~~~~~~~~~~~~~~~~~~~~~~~~~~~~~~~~~~~~~~~~~~~~~~~~
			       Lesson 2 SUMMARY


  1. To delete from the cursor up to the next word type:    dw
  2. To delete from the cursor to the end of a line type:    d$
  3. To delete a whole line type:    dd

  4. To repeat a motion prepend it with a number:   2w
  5. The format for a change command is:
               operator   [number]   motion
     where:
       operator - is what to do, such as  d  for delete
       [number] - is an optional count to repeat the motion
       motion   - moves over the text to operate on, such as  w (word),
		  $ (to the end of line), etc.

  6. To move to the start of the line use a zero:  0

  7. To undo previous actions, type: 	       u  (lowercase u)
     To undo all the changes on a line, type:  U  (capital U)
     To undo the undo‘s, type:		       CTRL-R

~~~~~~~~~~~~~~~~~~~~~~~~~~~~~~~~~~~~~~~~~~~~~~~~~~~~~~~~~~~~~~~~~~~~~~~~~~~~~~
			       Lesson 3 SUMMARY


  1. To put back text that has just been deleted, type   p .  This puts the
     deleted text AFTER the cursor (if a line was deleted it will go on the
     line below the cursor).

  2. To replace the character under the cursor, type   r   and then the
     character you want to have there.

  3. The change operator allows you to change from the cursor to where the
     motion takes you.  eg. Type  ce  to change from the cursor to the end of
     the word,  c$  to change to the end of a line.

  4. The format for change is:

	 c   [number]   motion

Now go on to the next lesson.


~~~~~~~~~~~~~~~~~~~~~~~~~~~~~~~~~~~~~~~~~~~~~~~~~~~~~~~~~~~~~~~~~~~~~~~~~~~~~~
			       Lesson 4 SUMMARY


  1. CTRL-G  displays your location in the file and the file status.
             G  moves to the end of the file.
     number  G  moves to that line number.
            gg  moves to the first line.

  2. Typing  /	followed by a phrase searches FORWARD for the phrase.
     Typing  ?	followed by a phrase searches BACKWARD for the phrase.
     After a search type  n  to find the next occurrence in the same direction
     or  N  to search in the opposite direction.
     CTRL-O takes you back to older positions, CTRL-I to newer positions.

  3. Typing  %	while the cursor is on a (,),[,],{, or } goes to its match.

  4. To substitute new for the first old in a line type    :s/old/new
     To substitute new for all ‘old‘s on a line type	   :s/old/new/g
     To substitute phrases between two line #‘s type	   :#,#s/old/new/g
     To substitute all occurrences in the file type	   :%s/old/new/g
     To ask for confirmation each time add ‘c‘		   :%s/old/new/gc

~~~~~~~~~~~~~~~~~~~~~~~~~~~~~~~~~~~~~~~~~~~~~~~~~~~~~~~~~~~~~~~~~~~~~~~~~~~~~~
			       Lesson 5 SUMMARY


  1.  :!command  executes an external command.

      Some useful examples are:
	 (MS-DOS)	  (Unix)
	  :!dir		   :!ls		   -  shows a directory listing.
	  :!del FILENAME   :!rm FILENAME   -  removes file FILENAME.

  2.  :w FILENAME  writes the current Vim file to disk with name FILENAME.

  3.  v  motion  :w FILENAME  saves the Visually selected lines in file
      FILENAME.

  4.  :r FILENAME  retrieves disk file FILENAME and puts it below the
      cursor position.

  5.  :r !dir  reads the output of the dir command and puts it below the
      cursor position.

~~~~~~~~~~~~~~~~~~~~~~~~~~~~~~~~~~~~~~~~~~~~~~~~~~~~~~~~~~~~~~~~~~~~~~~~~~~~~~
			       Lesson 6 SUMMARY

  1. Type  o  to open a line BELOW the cursor and start Insert mode.
     Type  O  to open a line ABOVE the cursor.

  2. Type  a  to insert text AFTER the cursor.
     Type  A  to insert text after the end of the line.

  3. The  e  command moves to the end of a word.

  4. The  y  operator yanks (copies) text,  p  puts (pastes) it.

  5. Typing a capital  R  enters Replace mode until  <ESC>  is pressed.

  6. Typing ":set xxx" sets the option "xxx".  Some options are:
  	‘ic‘ ‘ignorecase‘	ignore upper/lower case when searching
	‘is‘ ‘incsearch‘	show partial matches for a search phrase
	‘hls‘ ‘hlsearch‘	highlight all matching phrases
     You can either use the long or the short option name.

  7. Prepend "no" to switch an option off:   :set noic

~~~~~~~~~~~~~~~~~~~~~~~~~~~~~~~~~~~~~~~~~~~~~~~~~~~~~~~~~~~~~~~~~~~~~~~~~~~~~~
			       Lesson 7 SUMMARY


  1. Type  :help  or press <F1> or <Help>  to open a help window.

  2. Type  :help cmd  to find help on  cmd .

  3. Type  CTRL-W CTRL-W  to jump to another window

  4. Type  :q  to close the help window

  5. Create a vimrc startup script to keep your preferred settings.

  6. When typing a  :  command, press CTRL-D to see possible completions.
     Press <TAB> to use one completion.
标签:
原文地址:http://my.oschina.net/amhuman/blog/489102