标签:des style blog http os width
一般搭建成功了opentack后,都会按照文档的这样创建网络
Scenario 1: one tenant, two networks, one router

Scenario 2: two tenants, two networks, two routers

然而neutron号称软件定义网络,可否创建更复杂的拓扑图

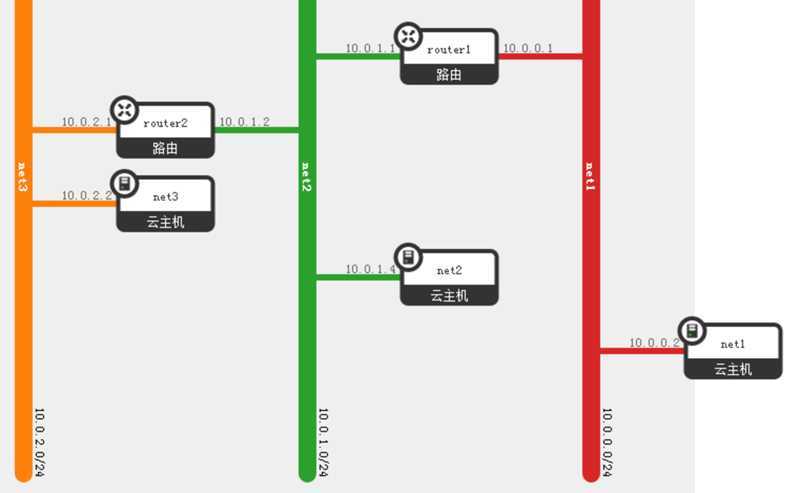
我创建了上面的三个网络,每个网络都运行一个主机,网络1和网络2,并不直接相连,但是通过网络2相连。
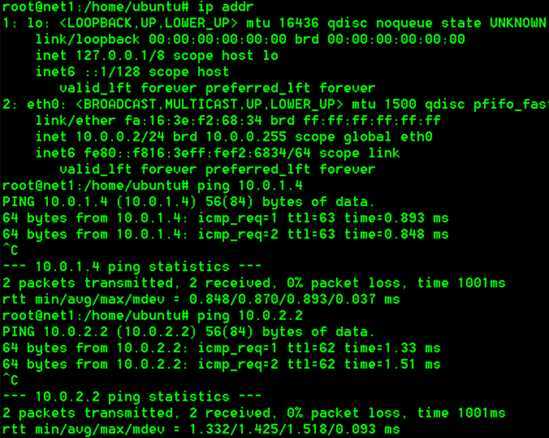
对于主机net1,由于网络只有一个路由器,所以gateway只能是它
root@net1:/home/ubuntu# ip addr
1: lo: <LOOPBACK,UP,LOWER_UP> mtu 16436 qdisc noqueue state UNKNOWN
link/loopback 00:00:00:00:00:00 brd 00:00:00:00:00:00
inet 127.0.0.1/8 scope host lo
inet6 ::1/128 scope host
valid_lft forever preferred_lft forever
2: eth0: <BROADCAST,MULTICAST,UP,LOWER_UP> mtu 1500 qdisc pfifo_fast state UP qlen 1000
link/ether fa:16:3e:f2:68:34 brd ff:ff:ff:ff:ff:ff
inet 10.0.0.2/24 brd 10.0.0.255 scope global eth0
inet6 fe80::f816:3eff:fef2:6834/64 scope link
valid_lft forever preferred_lft forever
root@net1:/home/ubuntu# route -n
Kernel IP routing table
Destination Gateway Genmask Flags Metric Ref Use Iface
0.0.0.0 10.0.0.1 0.0.0.0 UG 100 0 0 eth0
10.0.0.0 0.0.0.0 255.255.255.0 U 0 0 0 eth0
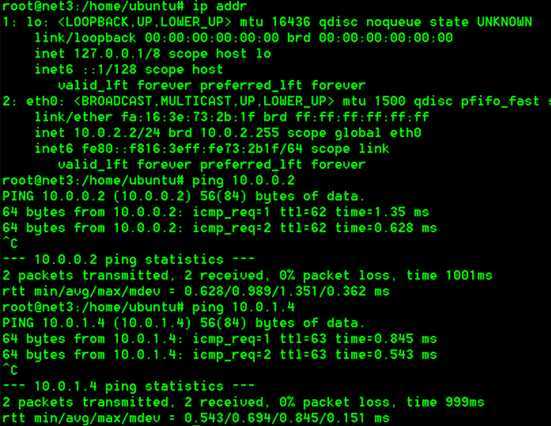
对于主机net3,所在的网络业只有一个路由器,所以gateway也只能是它
root@net3:/home/ubuntu# ip addr
1: lo: <LOOPBACK,UP,LOWER_UP> mtu 16436 qdisc noqueue state UNKNOWN
link/loopback 00:00:00:00:00:00 brd 00:00:00:00:00:00
inet 127.0.0.1/8 scope host lo
inet6 ::1/128 scope host
valid_lft forever preferred_lft forever
2: eth0: <BROADCAST,MULTICAST,UP,LOWER_UP> mtu 1500 qdisc pfifo_fast state UP qlen 1000
link/ether fa:16:3e:73:2b:1f brd ff:ff:ff:ff:ff:ff
inet 10.0.2.2/24 brd 10.0.2.255 scope global eth0
inet6 fe80::f816:3eff:fe73:2b1f/64 scope link
valid_lft forever preferred_lft forever
root@net3:/home/ubuntu# route -n
Kernel IP routing table
Destination Gateway Genmask Flags Metric Ref Use Iface
0.0.0.0 10.0.2.1 0.0.0.0 UG 100 0 0 eth0
10.0.2.0 0.0.0.0 255.255.255.0 U 0 0 0 eth0
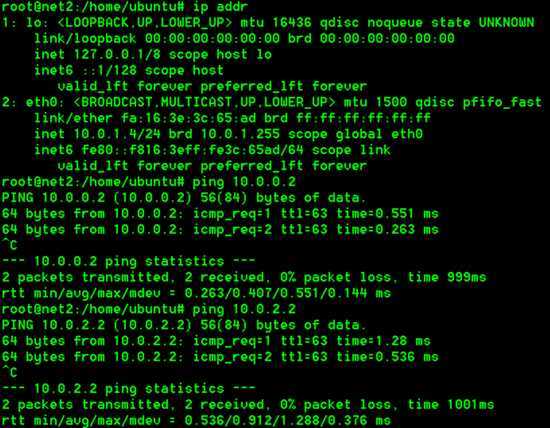
比较纠结的是主机net2,它的网络上有两个路由器,默认gateway只能是一个,那它如何才能ping通两面的主机呢,必须手动添加路由器。
root@net2:/home/ubuntu# ip addr
1: lo: <LOOPBACK,UP,LOWER_UP> mtu 16436 qdisc noqueue state UNKNOWN
link/loopback 00:00:00:00:00:00 brd 00:00:00:00:00:00
inet 127.0.0.1/8 scope host lo
inet6 ::1/128 scope host
valid_lft forever preferred_lft forever
2: eth0: <BROADCAST,MULTICAST,UP,LOWER_UP> mtu 1500 qdisc pfifo_fast state UP qlen 1000
link/ether fa:16:3e:3c:65:ad brd ff:ff:ff:ff:ff:ff
inet 10.0.1.4/24 brd 10.0.1.255 scope global eth0
inet6 fe80::f816:3eff:fe3c:65ad/64 scope link
valid_lft forever preferred_lft forever
root@net2:/home/ubuntu# route -n
Kernel IP routing table
Destination Gateway Genmask Flags Metric Ref Use Iface
0.0.0.0 10.0.1.1 0.0.0.0 UG 100 0 0 eth0
10.0.0.0 10.0.1.1 255.255.255.0 UG 0 0 0 eth0
10.0.1.0 0.0.0.0 255.255.255.0 U 0 0 0 eth0
10.0.2.0 10.0.1.2 255.255.255.0 UG 0 0 0 eth0
到不同的网络,gateway不一样。
最后的问题是,net1和net3之间怎么通信,如果neutron创建的路由器支持动态路由就好了,一般通过routed或者gated,相邻的路由器router1和router2可以相互同步路由表,这样router1才可能知道,在router2的另一端,还有一个网络,反之亦然。
https://blueprints.launchpad.net/neutron/+spec/bgp-dynamic-routing
然而这个好像还没实现,所以要想net1和net3之间通信,需要手动添加路由表到路由器
我们修改router1的路由表
root@escto-bj-hp-z620:~# ip netns exec qrouter-8fd947fc-2b5b-40a3-b16e-72aabb001f2d route -n
Kernel IP routing table
Destination Gateway Genmask Flags Metric Ref Use Iface
10.0.0.0 0.0.0.0 255.255.255.0 U 0 0 0 qr-bbbc67c3-81
10.0.1.0 0.0.0.0 255.255.255.0 U 0 0 0 qr-10b0d153-4c
10.0.2.0 10.0.1.2 255.255.255.0 UG 0 0 0 qr-10b0d153-4c
再来修改router2的路由表
root@escto-bj-hp-z620:~# ip netns exec qrouter-d2c831c9-44ff-43dd-8c9d-2dc42370c2fd route -n
Kernel IP routing table
Destination Gateway Genmask Flags Metric Ref Use Iface
10.0.0.0 10.0.1.1 255.255.255.0 UG 0 0 0 qr-ad73f294-6d
10.0.1.0 0.0.0.0 255.255.255.0 U 0 0 0 qr-ad73f294-6d
10.0.2.0 0.0.0.0 255.255.255.0 U 0 0 0 qr-866838bd-d7
这样相互就ping通了


通过API创建路由表
https://blueprints.launchpad.net/neutron/+spec/quantum-l3-routes
多个router和多个network,布布扣,bubuko.com
标签:des style blog http os width
原文地址:http://www.cnblogs.com/popsuper1982/p/3835466.html