标签:
是由 spring+springmvc+hibernate+spring-security +easyui +boostrap 写的一个框架集合,目前实现了一个基础的权限管理系统,权限是基于细粒度的过滤,对于初学权限设计的人来说也算是个最简洁的权限实现,基于它来做项目,它只是做了一些绝大部分项目都应该做的一些基础功能。1参考资料
http://blog.csdn.net/k10509806/article/details/6369131
http://www.cnblogs.com/wenxiu/archive/2011/01/22/1942084.html
http://ootabc.iteye.com/blog/688213
http://wenku.baidu.com/view/abf23846336c1eb91a375d83.html
http://www.cnblogs.com/zhangliang0115/archive/2012/04/02/2429584.html
http://aokunsang.iteye.com/blog/1638558
2.数据库建表
2.1.权限表 sys_authorities
2.2.权限资源表 sys_authorities_resources

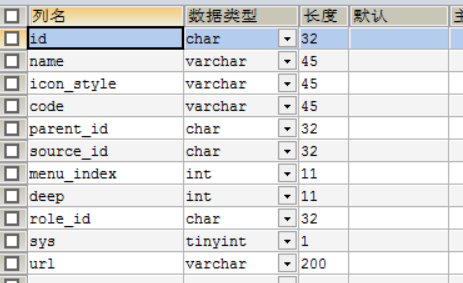
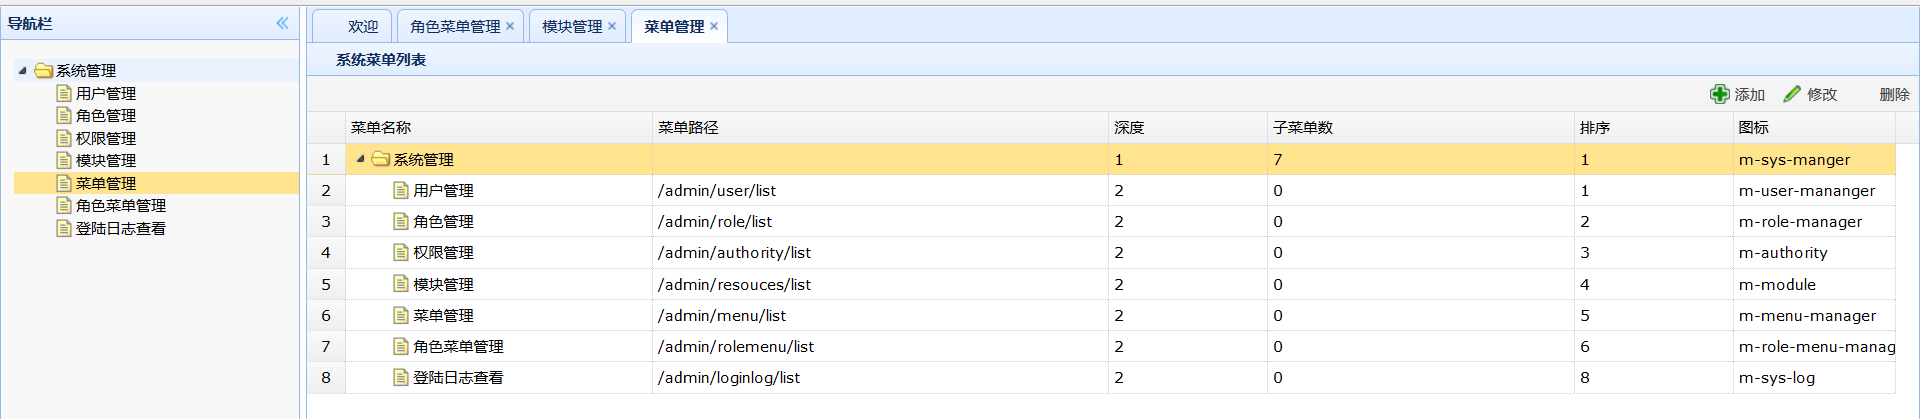
2.3.菜单表 sys_menus
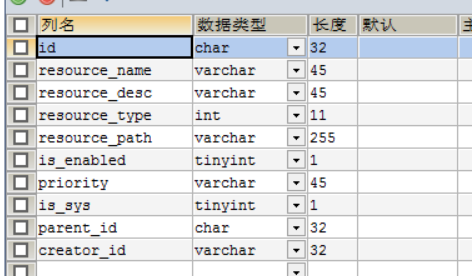
2.4.资源表 sys_resources
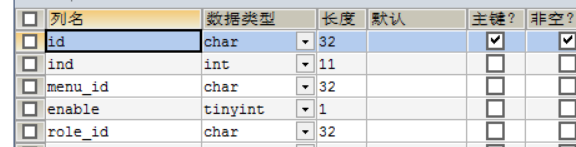
2.4.角色菜单表 sys_role_menu
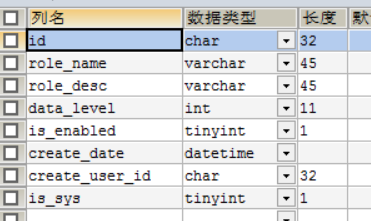
2.5 角色表 sys_roles
2.5 角色权限表 sys_roles_anthorities

2.6 用户表 sys_users

2.6 用户角色表 sys_users_roles:

1、 web.xml配置
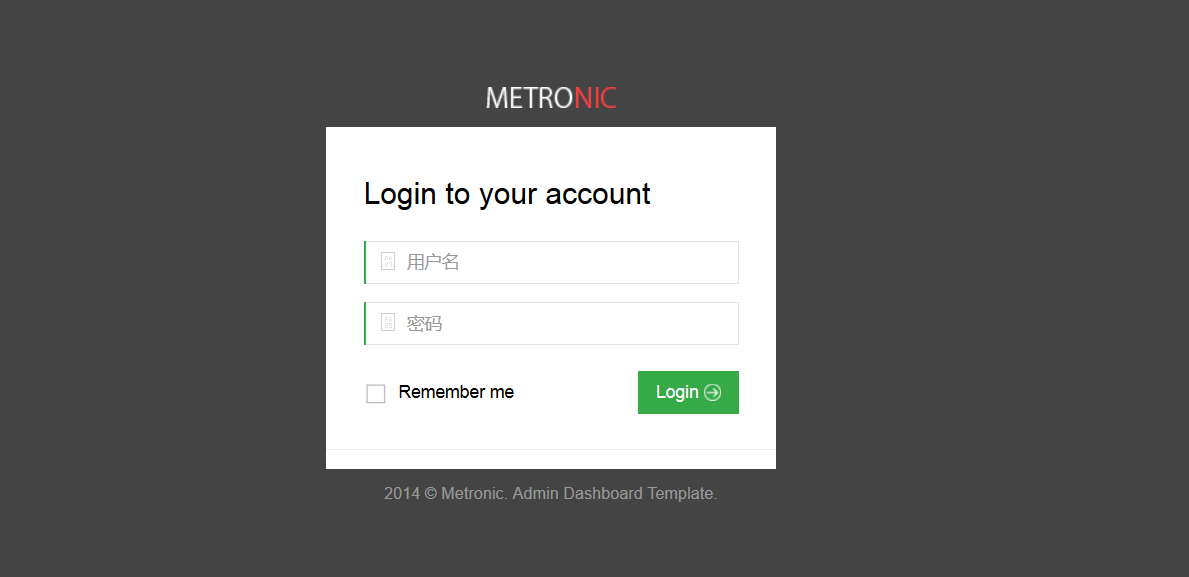
<?xml version="1.0" encoding="UTF-8"?>
<web-app version="3.0" xmlns="http://java.sun.com/xml/ns/javaee"
	xmlns:xsi="http://www.w3.org/2001/XMLSchema-instance"
	xsi:schemaLocation="http://java.sun.com/xml/ns/javaee
	http://java.sun.com/xml/ns/javaee/web-app_3_0.xsd">
	<display-name></display-name>

	<context-param>
		<param-name>log4jConfigLocation</param-name>
		<param-value>/WEB-INF/log4j.properties</param-value>
	</context-param>
	<context-param>
		<param-name>log4jRefreshInterval</param-name>
		<param-value>600000</param-value>
	</context-param>
	<context-param>
		<param-name>webAppRootKey</param-name>
		<param-value>webPath</param-value>
	</context-param>
	<listener>
		<listener-class>org.springframework.web.util.Log4jConfigListener</listener-class>
	</listener>
	<filter>
		<filter-name>encodingFilter</filter-name>
		<filter-class>org.springframework.web.filter.CharacterEncodingFilter</filter-class>
		<init-param>
			<param-name>encoding</param-name>
			<param-value>UTF-8</param-value>
		</init-param>
		<init-param>
			<param-name>forceEncoding</param-name>
			<param-value>true</param-value>
		</init-param>
	</filter>
	<filter>
		<filter-name>springSecurityFilterChain</filter-name>
		<filter-class>org.springframework.web.filter.DelegatingFilterProxy</filter-class>
	</filter>
	<filter-mapping>
		<filter-name>springSecurityFilterChain</filter-name>
		<url-pattern>/*</url-pattern>
	</filter-mapping>
	<filter-mapping>
		<filter-name>encodingFilter</filter-name>
		<url-pattern>/*</url-pattern>
	</filter-mapping>


	<listener>
		<listener-class>org.springframework.web.context.ContextLoaderListener</listener-class>
	</listener>

	<context-param>
		<param-name>contextConfigLocation</param-name>
		<param-value>classpath*:applicationContext.xml</param-value>
	</context-param>
	<servlet>
		<servlet-name>dispatcher</servlet-name>
		<servlet-class>org.springframework.web.servlet.DispatcherServlet</servlet-class>
		<load-on-startup>1</load-on-startup>
	</servlet>
	<servlet-mapping>
		<servlet-name>dispatcher</servlet-name>
		<url-pattern>/</url-pattern>
	</servlet-mapping>

	<welcome-file-list>
		<welcome-file>/WEB-INF/jsp/common/login.jsp</welcome-file>
	</welcome-file-list>
	<session-config>
		<session-timeout>60</session-timeout>
	</session-config>
</web-app>
Xml代码
2、 application-security.xml文件的配置。application-servlet.xml配置不懂的参考spring MVC搭建全程。
<?xml version="1.0" encoding="UTF-8"?>
<beans xmlns="http://www.springframework.org/schema/beans"
       xmlns:xsi="http://www.w3.org/2001/XMLSchema-instance"
       xmlns:security="http://www.springframework.org/schema/security"
       xmlns:beans="http://www.springframework.org/schema/beans"
       xsi:schemaLocation="http://www.springframework.org/schema/beans
       http://www.springframework.org/schema/beans/spring-beans.xsd
       http://www.springframework.org/schema/security
       http://www.springframework.org/schema/security/spring-security.xsd">


    <security:http security="none" pattern="/public/**"/>
    <security:http security="none" pattern="/login*"/>
    <security:http security="none" pattern="/maxSessionError*"/>
    <security:http security="none" pattern="/forbidden*"/>
    <security:http use-expressions="true">
        <security:intercept-url pattern="/**" access="isAuthenticated()"/>
        <security:form-login login-page="/login"
                             default-target-url="/home"
                             authentication-failure-url="/login"
                             authentication-success-handler-ref="loginSuccessHandler"
        />
        <security:logout  invalidate-session="true"  delete-cookies="true" success-handler-ref="logoutSuccessHandler" />
        <security:access-denied-handler error-page="/forbidden"/>
        <security:session-management session-fixation-protection="newSession" >
            <security:concurrency-control max-sessions="1" error-if-maximum-exceeded="false"  expired-url="/maxSessionError" />
        </security:session-management>

        <security:custom-filter ref="myFilter" before="FILTER_SECURITY_INTERCEPTOR" />
    </security:http>

    <!--用户权限管理-->
    <security:authentication-manager alias="authenticationManager"  >
        <security:authentication-provider user-service-ref="userInfoProvider" >
            <security:password-encoder hash="md5" base64="true"/>
        </security:authentication-provider>
    </security:authentication-manager>


    <!--过滤器-->
    <beans:bean id="myFilter" class="com.authority.filter.MyFilterSecurityInterceptor">
        <beans:property name="authenticationManager" ref="authenticationManager"/>
        <beans:property name="accessDecisionManager"  ref="myAccessDesisionmanager"/>
        <beans:property name="securityMetadataSource" ref="mySecurityMetadataSource"/>
    </beans:bean>

    <!--访问决策-->
    <bean id="myAccessDesisionmanager" class="com.authority.filter.MyAccessDesisionmanager" />

    <!--用户信息Provider-->
    <bean id="userInfoProvider" class="com.authority.service.impl.UserInfoServiceImpl" />

    <!--登陆成功-->
    <bean id="loginSuccessHandler" class="com.authority.handler.MyLoginSuccessHandler" />
    <!--退出登录-->
    <bean id="logoutSuccessHandler" class="com.authority.handler.MyLogoutSuccessHandler" />

    <!--系统资源管理-->
    <bean id="mySecurityMetadataSource" class="com.authority.filter.MySecurityMetadataSource" >
    </bean>

    <!--登陆失败-->
    <bean id="loginFailHandler" class="com.authority.handler.MyLoginFailHandler"/>

</beans>
1.系统实现了基于URL的权限管理,页面操作控制到按钮级别,根据权限配置进行显示,并在拦截器再次认证,只有分配权限后才能进行操作
页面效果图:
源码分享:
http://git.oschina.net/gz-tony/spring-authority/
标签:
原文地址:http://my.oschina.net/nuotang/blog/489812