标签:
网易彩票开发知识点总结
关于网易彩票开发中遇到了不少的坑,弄了好久才弄懂,或者有些犹豫很久没用就不记得了,所以这里就总结了一下,希望以后不会忘记,就算忘记也能快速查看!
/***************************************&.设置状态栏样式(白色) 两种方法******************************************/
 1 -(UIStatusBarStyle)preferredStatusBarStyle
 2
 3 {
 4
 5     if ([self isEqualToFirstChildTabBarController]) {
 6
 7             return UIStatusBarStyleDefault;
 8
 9         } else {
10
11             return UIStatusBarStyleLightContent;
12
13         }
14
15
16
17     //    if (self.tabBarController.selectedIndex == 0) {
18
19     //        return UIStatusBarStyleDefault;
20
21     //    } else {
22
23     //        return UIStatusBarStyleLightContent;
24
25     //    }
26
27 }
28
29
30
31 -(BOOL)prefersStatusBarHidden
32
33 {
34
35     return NO;
36
37 }
•在要info.plist文件添加一个配置View controller-based status bar appearance = NO;
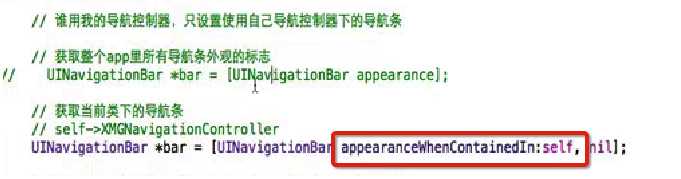
>如果有导航控制器,状态栏的样式由"导航控制器" 决定,而不是由导航控制器的"子控制器"
[UIApplication sharedApplication].statusBarStyle = UIStatusBarStyleLightContent;

[UIApplication sharedApplication].statusBarHidden = NO;
/************************************&修改系统默认的导航栏:使用KVC*************************************************/
iCocosNavigationBar *bar = [[iCocosNavigationBar alloc] init];

[self setValue:bar forKey:@"navigationBar"];
/*********************************************&取消高亮效果****************************************************/
 1 //取消系统实现的高亮效果
 2
 3 -(void)setHighlighted:(BOOL)highlighted
 4
 5 {
 6
 7
 8
 9 }
10
11
/******************** ****************&关于按钮选中的三部曲************************ ***********************************/
 1 //设置之前的不选中
 2
 3 self.selectedBtn.selected = NO;
 4
 5 //设置当前按钮选中
 6
 7 btn.selected = YES;
 8
 9
10
11 //设置当前选中的为按钮
12
13 self.selectedBtn = btn;
14
15
/********************************&设置导航栏左右控制器的布局*****************************************************/
 1 //遍历所有子控件
 2
 3 for (UIView *subView in self.subviews) {
 4
 5     //如果是左边的控制器
 6
 7     if ([subView isKindOfClass:[iCocosnavigationLeftButton class]]) {
 8
 9         CGRect leftRect = subView.frame;
10
11         leftRect.origin.x = margin;
12
13         subView.frame = leftRect;
14
15     }
16
17
18
19     //如果是右边的控制器
20
21     if ([subView isKindOfClass:[iCocosnavigationRightButton class]]) {
22
23         CGRect rightRect = subView.frame;
24
25         rightRect.origin.x = self.frame.size.width - margin - rightRect.size.width;
26
27         subView.frame = rightRect;
28
29     }
30
31 }
32
33
/********************** ***************&设置导航栏主题样式(重点)******************** ********************************/
 1 //获取导航栏主题
 2
 3 UINavigationBar *appearance = [UINavigationBar appearance];
 4
 5
 6
 7 //设置导航栏背景主题
 8
 9 [appearance setBackgroundImage:[UIImage imageNamed:@"NavBar64"] forBarMetrics:UIBarMetricsDefault];
10
11
12
13 //使用键值对的方式设置导航栏字体的颜色和大小
14
15 NSMutableDictionary *dic = [NSMutableDictionary dictionary];
16
17
18
19 dic[NSForegroundColorAttributeName] = [UIColor whiteColor];
20
21 //    dic[NSFontAttributeName] = [UIFont systemFontOfSize:15];
22
23 dic[NSFontAttributeName] = [UIFont fontWithName:@"Helvetica Bold" size:15];
24
25
26
27 [appearance setTitleTextAttributes:dic];
//导航栏左右按钮(标题按钮颜色)
[appearance setTintColor:[UIColor whiteColor]];
// 1.1.设置背景颜色
 1 // 局部方式
 2
 3 //    [navBar setBackgroundImage:[UIImage imageNamed:@"NavBar64"] forBarMetrics:UIBarMetricsDefault];
 4
 5
 6
 7 //=========== 第一方法设置导航栏样式 (全局方式)==============
 8
 9 // 2.1获取导航栏
10
11 //    navBar = [UINavigationBar appearance];
12
13 //
14
15 //    [navBar setBackgroundImage:[UIImage imageNamed:@"NavBar64"] forBarMetrics:UIBarMetricsDefault];
16
17
18
19
#warning 要求,设置导航栏背景图片只要调用一次
/********************** ********&使用代理的方式实现点击对应的tabBar跳到对应的控制器**************************** ***************/
 1 1):创建一个协议
 2
 3 @class iCocosTabBar;
 4
 5
 6
 7 @protocol iCocosTabBarDelegate <NSObject>
 8
 9
10
11 @optional
12
13 -(void)iCocosTabBar:(iCocosTabBar *)tabBar selectIndex:(NSInteger)selectindex;
14
15 @end
16
17
18
19
20
21 2):创建一个代理属性
22
23 @property (nonatomic, weak) id<iCocosTabBarDelegate> delegate;
24
25
26
27 3):判断是否实现代理方法
28
29 if ([self.delegate respondsToSelector:@selector(iCocosTabBar:selectIndex:)]) {
30
31     [self.delegate iCocosTabBar:self selectIndex:btn.tag];
32
33
34
35     self.tabBarController.selectedIndex = btn.tag;
36
37 }
38
39
40
41 4):遵守协议,设置代理对应,实现代理方法
42
43 <iCocosTabBarDelegate>
44
45
46
47 tabBar.delegate = self;
48
49
50
51 -(void)iCocosTabBar:(iCocosTabBar *)tabBar selectIndex:(NSInteger)selectindex
52
53 {
54
55     self.selectedIndex = selectindex;
56
57 }
/**************** **************&使用属性的方式实现点击对应的按钮跳转到对应的界面**************** ***************************/
 1 1):创建一个控制器属性
 2
 3 @property (nonatomic, weak) UITabBarController *tabBarController;
 4
 5
 6
 7 2):设置对应控制器属性的选中为按钮对应的tag
 8
 9 self.tabBarController.selectedIndex = btn.tag;
10
11
12
13 3):让tabBar的这个属性成为我们自己创建的那个(他自己)
14
15 tabBar.tabBarController = self;
发现Cell时动态的,设置自定义的控制器之后发现数据不显示,解决办法:注释或者删除对应tableView控制器中实现的代理方法
/*************** **********************************&****************** *****************************************/
tableView顶部间距-(和导航栏)是35,tableview上移动(edgninset)35的时候cell顶部和导航栏地步对应,所以这个时候顶部个屏幕顶部是29!
静态tableView顶部和导航栏的底部对其,即y=64
/************** **********************************&***************************** **************************/
tableView属性设置
1
2
3 self.tableView.contentInset = UIEdgeInsetsMake(-20, 0, 0, 0);
4
5 self.tableView.sectionHeaderHeight =5;
6
7
/************************** ***********************&*********************** ********************************/
通知传值:带参数
 1 -(void)addiCocosCheckSelectionNotification
 2
 3 {
 4
 5     [[NSNotificationCenter defaultCenter] addObserver:self selector:@selector(iCocosCheckSelection:) name:iCocosCheckSelectionNotification object:nil];
 6
 7 }
 8
 9
10
11 -(void)iCocosCheckSelection:(NSNotification *)noti
12
13 {
14
15     id checkCell = noti.userInfo[@"CheckCell"];
16
17
18
19     if (checkCell != self) {
20
21         self.iCocosCheck.selected = NO;
22
23     }
24
25 }
26
27
28
29
30
31 -(void)dealloc
32
33 {
34
35     [[NSNotificationCenter defaultCenter] removeObserver:self];
36
37 }
38
39
1
2
3 NSDictionary *userInfo = @{@"CheckCell":cell};
4
5 [[NSNotificationCenter defaultCenter] postNotificationName:iCocosCheckSelectionNotification object:nil userInfo:userInfo];
6
7
/*************************** *********************&******************** **********************************/
Block传值:切换控制器
 1 //使用block传值
 2
 3 @property (nonatomic, strong) void(^operationBlock)(NSIndexPath *indexpath);
 4
 5
 6
 7 //typedef void(^operationBlock)(NSIndexPath *indexpath);
 8
 9 //@property (nonatomic, copy) operationBlock block;
10
11
// 保存一个跳转的控制器类名,1.字符串 2.Class
/** 目的控制器的类名 Class:一般用assign */
@property (nonatomic, assign) Class descVc;
 1 #pragma mark - 监听cell点击
 2
 3 - (void)tableView:(UITableView *)tableView didSelectRowAtIndexPath:(NSIndexPath *)indexPath
 4
 5 {
 6
 7
 8
 9     [tableView deselectRowAtIndexPath:indexPath animated:YES];
10
11
12
13     // 取出模型
14
15     XMGGroupItem *group = self.groups[indexPath.section];
16
17
18
19     XMGSettingItem *item = group.items[indexPath.row];
20
21
22
23     // 判断下有木有事情,就判断下block有没有值
24
25     if (item.operationBlock) {
26
27
28
29         // 执行保存的代码
30
31         item.operationBlock(indexPath);
32
33
34
35         return;
36
37     }
38
39
40
41     if ([item isKindOfClass:[XMGSettingArrowItem class]]) {
42
43         XMGSettingArrowItem *arrowItem = (XMGSettingArrowItem *)item;
44
45
46
47
48
49         if (arrowItem.descVc) {
50
51             // 创建目的控制器
52
53             UIViewController *vc = [[arrowItem.descVc alloc] init];
54
55
56
57             vc.navigationItem.title = item.title;
58
59
60
61             // 跳转界面
62
63             [self.navigationController pushViewController:vc animated:YES];
64
65         }
66
67
68
69
70
71     }
72
73
74
75
76
77 }
 1 __weak typeof(self) weakSelf = self;
 2
 3 // 在block中最好不要直接访问成员属性
 4
 5 RedeemCode.operationBlock = ^(NSIndexPath *indexPath){
 6
 7
 8
 9     UIViewController *vc = [[UIViewController alloc] init];
10
11
12
13     vc.view.backgroundColor = [UIColor redColor];
14
15
16
17     vc.title = @"asldjasd";
18
19
20
21     [weakSelf.navigationController pushViewController:vc animated:YES];
22
23
24
25     // self -> _groups
26
27
28
29     NSLog(@"%@",weakSelf.groups);
30
31 };
32
33
34
35 //
36
37 //// 保存检查新版本需要做的事情
38
39 //version.operationBlock = ^(NSIndexPath *indexPath){
40
41 //    [MBProgressHUD showSuccess:@"没有最新的版本"];
42
43 //};
44
45
46
47
48
49 // 设置目的控制器的类名
50
51 push.descVc = [XMGPushViewController class];
52
53
/************************* ********************&************************** *******************************/
使用属性的方式实现控制器去的切换
 1 @property (nonatomic, assign) Class destinationControllerClass;
 2
 3
 4
 5
 6
 7 -(void)tableView:(UITableView *)tableView didSelectRowAtIndexPath:(NSIndexPath *)indexPath
 8
 9 {
10
11     iCocosSettingGroupModel *group = self.groups[indexPath.section];
12
13
14
15     iCocosSettingCellModel *item = group.items[indexPath.row];
16
17
18
19
20
21     if (item.destinationControllerClass) {
22
23         id dest = [[item.destinationControllerClass alloc] init];
24
25         [self.navigationController pushViewController:dest animated:YES];
26
27     }
28
29
30
31
32
33     if ([item isKindOfClass:[iCocosSettingCheckModel class]]) {
34
35         iCocosSettingCell *cell = (iCocosSettingCell *)[tableView cellForRowAtIndexPath:indexPath];
36
37
38
39         if (!cell.iCocosCheck.selected) {
40
41             //            if (cell.iCocosCheck.selected == nil) {
42
43             cell.iCocosCheck.selected = !cell.iCocosCheck.selected;
44
45
46
47
48
49             NSDictionary *userInfo = @{@"CheckCell":cell};
50
51             [[NSNotificationCenter defaultCenter] postNotificationName:iCocosCheckSelectionNotification object:nil userInfo:userInfo];
52
53         }
54
55     }
56
57 }
58
59
item1.destinationControllerClass = [iCocosPushController class];
/********************** ************************&******************* ***********************************/
模型实现方法,关于值的存在与否
 1
 2
 3 //不需要让外部知道,写在实现文件就可以
 4
 5 -(instancetype)initWithIcon:(NSString *)icon title:(NSString *)title subTitle:(NSString *)subTitle
 6
 7 {
 8
 9     if (self == [super init]) {
10
11         self.icon = icon;
12
13         self.title = title;
14
15         self.subTitle = subTitle;
16
17     }
18
19     return self;
20
21 }
22
23
24
25
26
27
28
29 +(instancetype)cellWithIcon:(NSString *)icon title:(NSString *)title
30
31 {
32
33     return [[self alloc] initWithIcon:icon title:title subTitle:nil];
34
35 }
36
37
38
39
40
41
42
43 +(instancetype)cellWithTitle:(NSString *)title subTitle:(NSString *)subTitle
44
45 {
46
47     return [[self alloc] initWithIcon:nil title:title subTitle:subTitle];
48
49 }
/******************* ****************************&************ *******************************************/
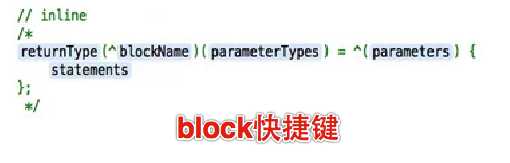
block使用精髓:自定义block实现传值
// block:作用保存一段代码
#pragma mark - XMGPopMenuDelegate
 1 // 点击菜单上关闭按钮的时候就会调用
 2
 3 - (void)popMenuDidClickCloseMenu:(XMGPopMenu *)menu
 4
 5 {
 6
 7
 8
 9     // 定义移动完成的block,保存移动完成的代码
10
11     void (^completion)() = ^{
12
13
14
15         // 当移动完成的时候,把蒙板消失
16
17         [XMGCover hide];
18
19     };
20
21
22
23     // block精髓:可以当做参数去用。
24
25
26
27     // 菜单移动到某个位置,并且缩放。
28
29     [menu hideInPoint:CGPointMake(44, 44) completion:completion];
30
31
32
33
34
35
36
37 }
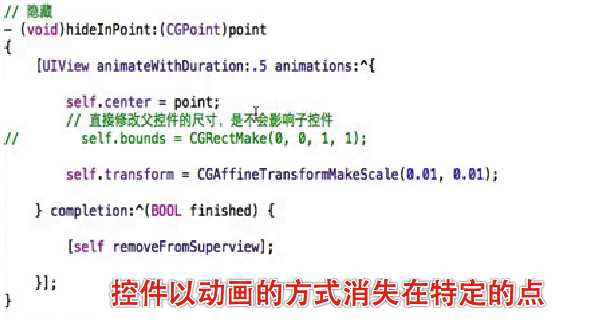
// 隐藏到某个点
 1 // 隐藏
 2
 3 - (void)hideInPoint:(CGPoint)point completion:(void (^)())completion
 4
 5 {
 6
 7
 8
 9     [UIView animateWithDuration:.5 animations:^{
10
11
12
13         self.center = point;
14
15
16
17         // 直接修改父控件的尺寸,是不会影响子控件
18
19         //        self.bounds = CGRectMake(0, 0, 1, 1);
20
21
22
23         // 如果设置0,控件直接缩放为0,没有动画,如果想要动画,搞一个最小值
24
25         self.transform = CGAffineTransformMakeScale(0.01, 0.01);
26
27
28
29     } completion:^(BOOL finished) {
30
31
32
33         [self removeFromSuperview];
34
35
36
37         if (completion) {
38
39
40
41             completion();
42
43         }
44
45             /*
46
47      void (^completion)() = ^{
48
49
50
51      // 当移动完成的时候,把蒙板消失
52
53      [XMGCover hide];
54
55      };
56
57      */
58
59         // 移除蒙板
60
61         //        [XMGCover hide];
62
63
64
65     }];
66
67 }
/***************** *******************&.使用拼接方式实现tabBar按钮图片的设置(解藕)********************************************/
1):定义前缀,后缀和图片数组
 1 /**
 2
 3  *  图片的前缀
 4
 5  */
 6
 7 @property (nonatomic, copy) NSString *prefix;
 8
 9 /**
10
11  *  图片选中的后缀
12
13  */
14
15 @property (nonatomic, copy) NSString *seleSubfix;
16
17 /**
18
19  *  设置各个按钮正常状态的背景图片
20
21  */
22
23 @property (nonatomic, strong) NSArray *normalImgs;
2):在数组的setter方法中遍历图片数组,创建对应的按钮,并且根据是否有前缀和后缀(选中)设置对应的图片
 1 //判断是否有前缀
 2
 3 NSString *normal = img;
 4
 5 if (self.prefix) {
 6
 7     normal = [NSString stringWithFormat:@"%@%@", self.prefix, img];
 8
 9 }
10
11 [tabBarBtn setBackgroundImage:[UIImage imageNamed:normal] forState:UIControlStateNormal];
12
13 //判断是否有后缀
14
15 if (self.seleSubfix) {
16
17     NSString *selectedImage = [normal stringByAppendingString:self.seleSubfix];
18
19     [tabBarBtn setBackgroundImage:[UIImage imageNamed:selectedImage] forState:UIControlStateSelected];
20
21 } else {
22
23     NSLog(@"iCocos 没有设置后缀图片");
24
25 }
3):使用的时候,创建对应的控件,然后创建一个图片中间名字的数组,设置对应的前缀和后缀,最后将中间名字的数组赋值给前面的图片数组属性
/**
* 设置tabBar默认图片和选中的图片——》这里使用的是拼接技术,由于图片不是连贯的
*/
 1 NSArray *imgs = @[@"LotteryHall",@"Arena",@"Discovery",@"History",@"MyLottery"];
 2
 3
 4
 5 //设置前缀和选中的图片
 6
 7 tabBar.prefix = @"TabBar_";
 8
 9 tabBar.seleSubfix = @"_selected";
10
11
12
13 //设置图片数组为tabBar中的数组图片
14
15 tabBar.normalImgs = imgs;
16
17
18
19
标签:
原文地址:http://www.cnblogs.com/iCocos/p/4725484.html