标签:
自定义控件之调整按钮中子控件(图片和文字)的位置

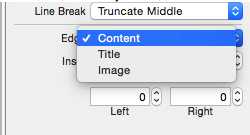
其实还有一种是在storyBoard中实现的,只需要设置对应空间的左右间距:

这里实现前面两种自定义的方式
一:imageRectForContentRect/titleRectForContentRect
自定义一个按钮控件在系统自带的位置设置方法中实现对应子控件位置调整
 1 /**
 2
 3  *  设置内部图标的frame
 4
 5  */
 6
 7 - (CGRect)imageRectForContentRect:(CGRect)contentRect
 8
 9 {
10
11     CGFloat imageY = 0;
12
13     CGFloat imageW = self.height;
14
15     CGFloat imageH = imageW;
16
17     CGFloat imageX = self.width - imageW;
18
19     return CGRectMake(imageX, imageY, imageW, imageH);
20
21 }
22
23
24
25 /**
26
27  *  设置内部文字的frame
28
29  */
30
31 - (CGRect)titleRectForContentRect:(CGRect)contentRect
32
33 {
34
35     CGFloat titleY = 0;
36
37     CGFloat titleX = 0;
38
39     CGFloat titleH = self.height;
40
41     CGFloat titleW = self.width - self.height;
42
43     return CGRectMake(titleX, titleY, titleW, titleH);
44
45 }
46
47
然后做进步一的优化:
 1 - (id)initWithFrame:(CGRect)frame
 2
 3 {
 4
 5     self = [super initWithFrame:frame];
 6
 7     if (self) {
 8
 9         // 内部图标居中
10
11         self.imageView.contentMode = UIViewContentModeCenter;
12
13         // 文字对齐
14
15         self.titleLabel.textAlignment = NSTextAlignmentRight;
16
17         // 文字颜色
18
19         [self setTitleColor:[UIColor blackColor] forState:UIControlStateNormal];
20
21         // 字体
22
23         self.titleLabel.font = HMNavigationTitleFont;
24
25         // 高亮的时候不需要调整内部的图片为灰色
26
27         self.adjustsImageWhenHighlighted = NO;
28
29     }
30
31     return self;
32
33 }
34
35
36
37 - (void)setTitle:(NSString *)title forState:(UIControlState)state
38
39 {
40
41     [super setTitle:title forState:state];
42
43
44
45     // 1.计算文字的尺寸
46
47     CGSize titleSize = [title sizeWithFont:self.titleLabel.font];
48
49
50
51     // 2.计算按钮的宽度
52
53     self.width = titleSize.width + self.height + 10;
54
55 }
56
57
二:类似签名的自定义View在layoutSubViews里面实现子控件位置的调整:
创建一个继承自UIButton得子类,实现响应的自定义子控件的方法
 1 - (id)initWithFrame:(CGRect)frame
 2
 3 {
 4
 5     self = [super initWithFrame:frame];
 6
 7     if (self) {
 8
 9         //设置文字颜色
10
11         [self setTitleColor:[UIColor blackColor] forState:UIControlStateNormal];
12
13         //设置文字大小
14
15         self.titleLabel.font = [UIFont boldSystemFontOfSize:17];
16
17         //设置按钮的图片(普通和选中)
18
19         [self setImage:[UIImage imageNamed:@"navigationbar_arrow_down"] forState:UIControlStateNormal];
20
21         [self setImage:[UIImage imageNamed:@"navigationbar_arrow_up"] forState:UIControlStateSelected];
22
23     }
24
25     return self;
26
27 }
28
29
30
31 - (void)layoutSubviews
32
33 {
34
35     [super layoutSubviews];
36
37     // 如果仅仅是调整按钮内部titleLabel和imageView的位置,那么在layoutSubviews中单独设置位置即可
38
39
40
41     // 1.计算titleLabel的frame
42
43     self.titleLabel.x = self.imageView.x - 3;
44
45
46
47     // 2.计算imageView的frame
48
49     self.imageView.x = CGRectGetMaxX(self.titleLabel.frame);
50
51 }
52
53
54
55 - (void)setTitle:(NSString *)title forState:(UIControlState)state
56
57 {
58
59     [super setTitle:title forState:state];
60
61
62
63     // 只要修改了文字,就让按钮重新计算自己的尺寸
64
65     [self sizeToFit];
66
67 }
68
69
70
71 - (void)setImage:(UIImage *)image forState:(UIControlState)state
72
73 {
74
75     [super setImage:image forState:state];
76
77
78
79     // 只要修改了图片,就让按钮重新计算自己的尺寸
80
81     [self sizeToFit];
82
83 }
84
85
最后来看看Swift怎么去实现:
 1 class ShopButton: UIButton {
 2
 3
 4
 5     var shop: Shop? {
 6
 7         didSet {
 8
 9             print(shop)
10
11             // 重写set方法
12
13             /*
14
15             // 错误写法
16
17             self.imageView?.image = UIImage(named: shop!.icon)
18
19             self.titleLabel?.text = shop!.name
20
21             */
22
23             self.setTitle(shop!.name, forState: UIControlState.Normal)
24
25             self.setImage(UIImage(named: shop!.icon), forState: UIControlState.Normal)
26
27         }
28
29     }
30
31
32
33     class func shopView(shop: Shop) -> ShopButton{
34
35         let btn:ShopButton = ShopButton()
36
37         btn.shop = shop
38
39         return btn
40
41     }
42
43
44
45     /*
46
47     override func titleRectForContentRect(contentRect: CGRect) -> CGRect {
48
49         return CGRectMake(0, contentRect.size.width, contentRect.size.width, contentRect.size.height - contentRect.size.width)
50
51     }
52
53
54
55     override func imageRectForContentRect(contentRect: CGRect) -> CGRect {
56
57         return CGRectMake(0, 0, contentRect.size.width, contentRect.size.width)
58
59     }
60
61     */
62
63     override func layoutSubviews() {
64
65         super.layoutSubviews()
66
67         print(self.frame)
68
69         let width: CGFloat = self.frame.size.width
70
71         let height: CGFloat = self.frame.size.height
72
73         self.imageView?.frame = CGRectMake(0, 0, width, width)
74
75         self.titleLabel?.frame = CGRectMake(0, width, width, height - width)
76
77     }
78
79 }
其实思路非常简单,就是设置对应控件的frame就可以,当然如果真的不想写那么就直接使用吧,使用方法有两种直接创建设置对应的子控件需要的值或者在XIB或StoryBoard中给对应的UIButton控件设置为我们自定义的类就可以。
iOS开发——UI高级OC篇&自定义控件之调整按钮中子控件(图片和文字)的位置
标签:
原文地址:http://www.cnblogs.com/iCocos/p/4725426.html