标签:
边看源码边参考别人的博客等,做一下学习笔记。
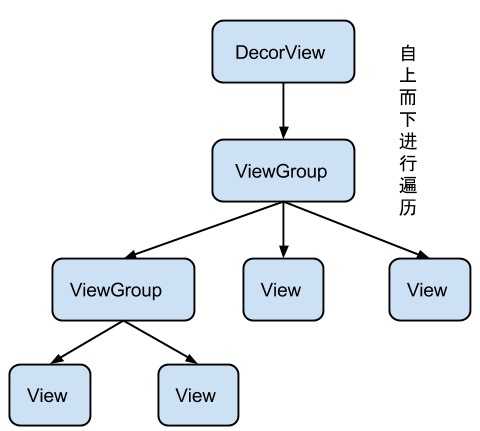
要了解View的绘制,首先得知道View树的结构:(可以参考http://blog.csdn.net/qinjuning/article/details/7226787)

整个 View 树的绘图流程在ViewRoot.java类的performTraversals()函数展开,其绘制流程如下:

我们从最基本的思路来理解绘图流程:先确定所有View的大小,然后根据布局决定每个View的位置,然后开画!
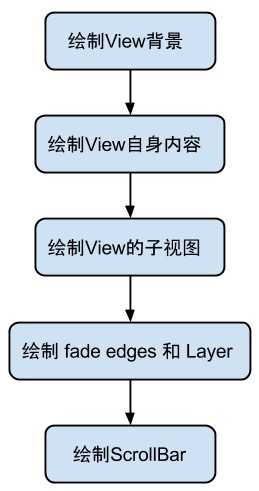
这里着重关注具体绘图的Draw方法,其绘制流程为:

View.draw(Canvas) 方法:
/**
     * Manually render this view (and all of its children) to the given Canvas.
     * The view must have already done a full layout before this function is
     * called.  When implementing a view, implement
     * {@link #onDraw(android.graphics.Canvas)} instead of overriding this method.
     * If you do need to override this method, call the superclass version.
     *
     * @param canvas The Canvas to which the View is rendered.
     *
     * 根据给定的 Canvas 自动渲染 View(包括其所有子 View)。在调用该方法之前必须要完成 layout。当你自定义 view 的时候,
     * 应该去是实现 onDraw(Canvas) 方法,而不是 draw(canvas) 方法。如果你确实需要复写该方法,请记得先调用父类的方法。
     */
    public void draw(Canvas canvas) {

        / * Draw traversal performs several drawing steps which must be executed
         * in the appropriate order:
         *
         *      1. Draw the background if need
         *      2. If necessary, save the canvas‘ layers to prepare for fading
         *      3. Draw view‘s content
         *      4. Draw children (dispatchDraw)
         *      5. If necessary, draw the fading edges and restore layers
         *      6. Draw decorations (scrollbars for instance)
         */

     // Step 1, draw the background, if needed
        if (!dirtyOpaque) {
            drawBackground(canvas);
        }

         // skip step 2 & 5 if possible (common case)
        final int viewFlags = mViewFlags;
        if (!verticalEdges && !horizontalEdges) {
            // Step 3, draw the content
            if (!dirtyOpaque) onDraw(canvas);

            // Step 4, draw the children
            dispatchDraw(canvas);

            // Step 6, draw decorations (scrollbars)
            onDrawScrollBars(canvas);

            if (mOverlay != null && !mOverlay.isEmpty()) {
                mOverlay.getOverlayView().dispatchDraw(canvas);
            }

            // we‘re done...
            return;
        }

        // Step 2, save the canvas‘ layers
        ...

        // Step 3, draw the content
        if (!dirtyOpaque)
            onDraw(canvas);

        // Step 4, draw the children
        dispatchDraw(canvas);

        // Step 5, draw the fade effect and restore layers

        // Step 6, draw decorations (scrollbars)
        onDrawScrollBars(canvas);
    }
ViewGroup.dispatchDraw()方法:
dispatchDraw(Canvas canvas){

...

 if ((flags & FLAG_RUN_ANIMATION) != 0 && canAnimate()) {//处理 ChildView 的动画
     final boolean buildCache = !isHardwareAccelerated();
            for (int i = 0; i < childrenCount; i++) {
                final View child = children[i];
                if ((child.mViewFlags & VISIBILITY_MASK) == VISIBLE) {//只绘制 Visible 状态的布局,因此可以通过延时加载来提高效率
                    final LayoutParams params = child.getLayoutParams();
                    attachLayoutAnimationParameters(child, params, i, childrenCount);// 添加布局变化的动画
                    bindLayoutAnimation(child);//为 Child 绑定动画
                    if (cache) {
                        child.setDrawingCacheEnabled(true);
                        if (buildCache) {
                            child.buildDrawingCache(true);
                        }
                    }
                }
            }

     final LayoutAnimationController controller = mLayoutAnimationController;
            if (controller.willOverlap()) {
                mGroupFlags |= FLAG_OPTIMIZE_INVALIDATE;
            }

    controller.start();// 启动 View 的动画
}

 // 绘制 ChildView
 for (int i = 0; i < childrenCount; i++) {
            int childIndex = customOrder ? getChildDrawingOrder(childrenCount, i) : i;
            final View child = (preorderedList == null)
                    ? children[childIndex] : preorderedList.get(childIndex);
            if ((child.mViewFlags & VISIBILITY_MASK) == VISIBLE || child.getAnimation() != null) {
                more |= drawChild(canvas, child, drawingTime);
            }
        }

...

}

protected boolean drawChild(Canvas canvas, View child, long drawingTime) {
        return child.draw(canvas, this, drawingTime);
}

/**
     * This method is called by ViewGroup.drawChild() to have each child view draw itself.
     * This draw() method is an implementation detail and is not intended to be overridden or
     * to be called from anywhere else other than ViewGroup.drawChild().
     */
    boolean draw(Canvas canvas, ViewGroup parent, long drawingTime) {
        ...
    }
参考资料:
http://codekk.com/blogs/detail/54cfab086c4761e5001b253f
http://blog.csdn.net/qinjuning/article/details/7110211
http://blog.csdn.net/xyz_lmn/article/details/20385049
标签:
原文地址:http://www.cnblogs.com/albert1017/p/4730906.html