tar xf linux-3.7.4.tar.xz;cd linux-3.7.4make distcleancp /boot/config-*** ./.configmake menuconfig,或者直接调用之前已经有的linux 3.7.4 (已包含xen所需模块)的配置文件
# These core options (Processor type and features| Paravirtualized guest support]
CONFIG_PARAVIRT=y
CONFIG_XEN=y
CONFIG_PARAVIRT_GUEST=y
CONFIG_PARAVIRT_SPINLOCKS=y
# add this item

# And Xen pv console device support (Device Drivers|Character devices
CONFIG_HVC_DRIVER=y
CONFIG_HVC_XEN=y

# And Xen disk and network support (Device Drivers|Block devices and Device Drivers|Network device support)
CONFIG_XEN_FBDEV_FRONTEND=y
CONFIG_XEN_BLKDEV_FRONTEND=y
# change the value to y
CONFIG_XEN_NETDEV_FRONTEND=y
# change the value to y

# And the rest (Device Drivers|Xen driver support)
CONFIG_XEN_PCIDEV_FRONTEND=y
CONFIG_INPUT_XEN_KBDDEV_FRONTEND=y
CONFIG_XEN_FBDEV_FRONTEND=y
CONFIG_XEN_XENBUS_FRONTEND=y
CONFIG_XEN_SAVE_RESTORE=y
CONFIG_XEN_GRANT_DEV_ALLOC=m

# And for tmem support:
CONFIG_XEN_TMEM=y
# add the item
CONFIG_CLEANCACHE=y
# enable the item
CONFIG_FRONTSWAP=y
# enable the item
CONFIG_XEN_SELFBALLOONING=y
# add the item

# Configure kernel for dom0 support
# NOTE: Xen dom0 support depends on ACPI support. Make sure you enable ACPI support or you won‘t see Dom0 options at all.
# In addition to the config options above you also need to enable:
CONFIG_X86_IO_APIC=y
CONFIG_ACPI=y
CONFIG_ACPI_PROCFS=y (optional)
CONFIG_XEN_DOM0=y
CONFIG_PCI_XEN=y
CONFIG_XEN_DEV_EVTCHN=y
CONFIG_XENFS=y
# change the value to y
CONFIG_XEN_COMPAT_XENFS=y
CONFIG_XEN_SYS_HYPERVISOR=y
CONFIG_XEN_GNTDEV=y
CONFIG_XEN_BACKEND=y
CONFIG_XEN_NETDEV_BACKEND=m
# enable the item
CONFIG_XEN_BLKDEV_BACKEND=m
# enable the item
CONFIG_XEN_PCIDEV_BACKEND=m
CONFIG_XEN_PRIVILEGED_GUEST=y
CONFIG_XEN_BALLOON=y
CONFIG_XEN_SCRUB_PAGES=y

# If you‘re using RHEL5 or CentOS5 as a dom0 (ie. you have old udev version), make sure you enable the following options as well:
CONFIG_SYSFS_DEPRECATED=y
CONFIG_SYSFS_DEPRECATED_V2=y
.config文件,找到CONFIG_SYSFS_DEPRECATED,将此行改为CONFIG_SYSFS_DEPRECATED_V2=y,如不修改,则无法启动系统make allmake modules_installmake install,安装的过程中可能会出现某些模块找不到,如果找不到的模块,已经在.config中设置为y,则不用理会,因为已经内置编译;如果是无关紧要的模块,也可以不用理会./etc/grub.conf,将default设置为0[root@localhost ~]# vim /etc/yum.repos.d/xen.repo
[CentOS-xen4]
name=CentOS_xen4
baseurl=file:///usr/local/src/xen-4.1.3/
gpgcheck=0
[root@localhost ~]# ls /usr/local/src/xen-4.1.3/
repodata xen-doc-4.1.3-2.el6.x86_64.rpm xen-ocaml-4.1.3-2.el6.x86_64.rpm
xen-4.1.3-2.el6.x86_64.rpm xen-hypervisor-4.1.3-2.el6.x86_64.rpm xen-ocaml-devel-4.1.3-2.el6.x86_64.rpm
xen-debuginfo-4.1.3-2.el6.x86_64.rpm xen-libs-4.1.3-2.el6.x86_64.rpm xen-runtime-4.1.3-2.el6.x86_64.rpm
xen-devel-4.1.3-2.el6.x86_64.rpm xen-licenses-4.1.3-2.el6.x86_64.rpmxenyum install xen-4.1.3 kernel-xenvim /etc/grub.confdefault=0
timeout=5
splashimage=(hd0,0)/grub/splash.xpm.gz
hiddenmenu
title CentOS (3.7.4)
root (hd0,0)
kernel /xen.gz dom0_mem=512M cpufreq=xen dom0_max_vcpus=2 dom0_vcpus_pin
module /vmlinuz-3.7.4 ro root=/dev/mapper/VolGroup-lv_root rd_NO_LUKS LANG=en_US.UTF-8 rd_NO_MD rd_LVM_LV=VolGroup/lv_swap SYSFONT=latarcyrheb-sun16 crashkernel=auto rd_LVM_LV=VolGroup/lv_root KEYBOARDTYPE=pc KEYTABLE=us rd_NO_DM rhgb quiet
module /initramfs-3.7.4.img
title CentOS (2.6.32-431.20.3.el6.x86_64)
root (hd0,0)
kernel /vmlinuz-2.6.32-431.20.3.el6.x86_64 ro root=/dev/mapper/VolGroup-lv_root rd_NO_LUKS LANG=en_US.UTF-8 rd_NO_MD rd_LVM_LV=VolGroup/lv_swap SYSFONT=latarcyrheb-sun16 crashkernel=auto rd_LVM_LV=VolGroup/lv_root KEYBOARDTYPE=pc KEYTABLE=us rd_NO_DM rhgb quiet
initrd /initramfs-2.6.32-431.20.3.el6.x86_64.img
title CentOS (2.6.32-431.el6.x86_64)
root (hd0,0)
kernel /vmlinuz-2.6.32-431.el6.x86_64 ro root=/dev/mapper/VolGroup-lv_root rd_NO_LUKS LANG=en_US.UTF-8 rd_NO_MD rd_LVM_LV=VolGroup/lv_swap SYSFONT=latarcyrheb-sun16 crashkernel=auto rd_LVM_LV=VolGroup/lv_root KEYBOARDTYPE=pc KEYTABLE=us rd_NO_DM rhgb quiet
initrd /initramfs-2.6.32-431.el6.x86_64.imgcat /proc/xen/capabilities出现control_d,则说明表示正常xm list[root@localhost ~]# xm list
Name ID Mem VCPUs State Time(s)
Domain-0 0 512 2 r----- 99.5常用的命令有:
* `xm list`列出虚拟实例
* `xm create -c xen_config`创建实例,-c是监控,即console
* `xm destroy xen_name`对某个实例断电
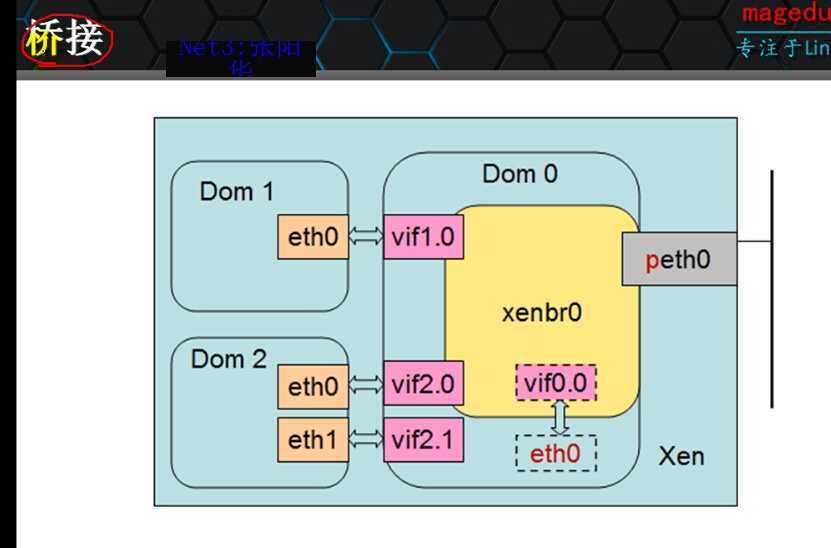
* `xm console xen_name`连接到某个实例,可通过`ctrl+]`返回/etc/xen/xend-config.sxp,内含的就有网络配置,例如网桥模式,路由模式,nat模式,仅主机模式等,不过即便有,如果不懂实现方式,也不知如何配置,故而本次试验采用手动实现网桥模式.我这里的环境如下:虚拟宿主机192.168.182.130就相当于实际环境下的宿主机

创建桥接除了xen自身的,还有有以下几种:这里选择第三种,手动方式
libvirt后,使用virsh可以直接创建bridge-utils包,使用brctl工具brctl show可以看桥接设备brctl addbr可以直接关联一个网卡到桥设备上[root@localhost network-scripts]# cp ifcfg-eth0 ifcfg-xenbr0
[root@localhost network-scripts]# vim ifcfg-xenbr0
DEVICE=xenbr0
BOOTPROTO=none
NM_CONTROLLED=no
ONBOOT=yes
TYPE=Bridge
IPADDR=192.168.128.130
NETMASK=255.255.255.0
GATEWAY=192.168.128.2
DNS1=114.114.114.114
[root@localhost network-scripts]# vim ifcfg-eth0
DEVICE=xenbr0
BOOTPROTO=none
HWADDR=00:0C:29:D3:E7:B1
NM_CONTROLLED=no
ONBOOT=yes
TYPE=Ethernet
BRIDGE=xenbr0
[root@localhost network-scripts]# service network restartvirt-manager或者virtinstvirt-manager或者virtinst创建losetup -f查看当前空闲lo设备
qemu-img create -f qcow2 /xen/images/centos1.img 2G创建一个稀疏磁盘文件dd if=/dev/zero of=/xenimages/centos1.img oflag=direct seek=20479 bs=1M count=1 dd方式创建稀疏磁盘dd if=/dev/zero of=/xen/images/centos1.img bs=1M count=1024创建一个非稀疏磁盘文件losetup -f /xen/images/centos1.img挂载磁盘文件到当前空闲lo上
losetup -d /dev/loopN可以卸载磁盘文件vim /etc/xen/centos1
kernel="/tmp/vmlinuz"
ramdisk="/tmp/initrd.img"
name="centos1"
memory=512
#定义虚拟几颗cpu,一般来说宿主机cpu是几个,就虚拟几个,最多不要超过2倍
vcpus=2
disk=[‘file:/xen/images/centos1.img,xvda,w‘]
root="/dev/vol0/root ro"
extra="rhgb quiet"
#vif可以定义多个网卡,[]是列表
vif=[‘bridge=xenbr0‘]第三种方式,利用自己(domU)内核+虚拟宿主机负责引导第一阶段+虚拟机xen构建好的根系统,来启动vim /etc/xen/centos2
bootloder="/usr/bin/pygrub"
name="centos2"
memory=512
vcpus=2
disk=[‘file:/xen/images/centos2.img,xvda,w‘]
vif=[‘bridge=xenbr0‘]第四种方式,仅有xen和xm工具下,使用cobbler进行网络自动化安装
vim /etc/xen/centos3
kernel="/tmp/vmlinuz"
ramdisk="/tmp/initrd.img"
name="centos3"
memory=512
vcpus=2
disk=[‘file:/xen/images/centos3.img,xvda,w‘]
extra="ks=http://192.168.182.128/cobbler/ks_mirror/config/ks.cfg"
vif=[‘bridge=xenbr0‘]dd if=/dev/zero of=/xen/images/centos3.img oflag=direct seek=20479 count=1 bs=1M第五种方式,克隆
losetup -f查看当前空闲lo设备,假设空闲是loop1dd if=/dev/zero of=/xen/images/centos2.img bs=1M count=1024创建一个非稀疏磁盘文件(稀疏磁盘不知道为什么没有柱面,所以无法用fdisk分区)losetup -f /xen/images/centos1.img挂载磁盘文件到当前空闲lo上fdisk /dev/loop1,创建一个boot分区,和一个根分区kpartx -a /dev/loop1,用cat /proc/partitions查看是否分区已经识别mke2fs -t ext2 /dev/mapper/loop1p1``mke2fs -t ext2 /dev/mapper/loop1p2mount /dev/mapper/loop1p1 /mnt/bootmount /dev/mapper/loop1p2 /mnt/sysrootcp /boot/vmlinuz /mnt/boot/vmlinuz``cp /boot/initramfs /mnt/boot/initramfs.imggrub-install --root-directory=/mnt /dev/loop1vim /boot/grub/grub.conf
  default 0
  timeout 5
  title xen centos
      root (hd0,0)
      kernel /vmlinuz ro root=/dev/xvda2 selinux=0 init=/sbin/init 3
initrd /initramfs.imginit``bash``ls``cat``uname #cd /mnt/sysroot/
#mkdir -pv proc sys dev tmp var home root usr etc/{rc.d,init}
#cp /etc/init/rcS.conf etc/init
#vim etc/init/rcS.conf
start on startup
stop on runlevel
task
console output
exec /etc/rc.d/rc.sysinit
#vim etc/rc.d/rc.sysinit
#!/bin/bash
echo -e "Welcome to my Centos"
/bin/bash
#chmod u+x etc/rc.d/rc.sysinitvim /etc/xen/centos1
bootloder=/sbin/pygrub
name="centos2"
memory=512
#定义虚拟几颗cpu,一般来说宿主机cpu是几个,就虚拟几个,最多不要超过2倍
vcpus=2
disk=[‘file:/xen/images/centos1,xvda,w‘]
#vif可以定义多个网卡,[]是列表
vif=[‘bridge=xenbr0‘]Xen配置文件一般由选项(options)、变量(variables)、CPU、网络、PCI、HVM、计时器(timers)、驱动(drivers)、磁盘设备(disk devices)、动作(behavior),以及图形及声音(Graphics and audio)几个段组成,分别用于定义不同类别的域属性或设备属性。
上面的配置文件中的各选项作用如下。
原文地址:http://www.cnblogs.com/aaa103439/p/3e79d6a83335957261c886d8b83b4ae2.html