标签:
读取plist文件并将其内容显示到表视图上。并添加编辑(增加,删除)、移动cell的操作。
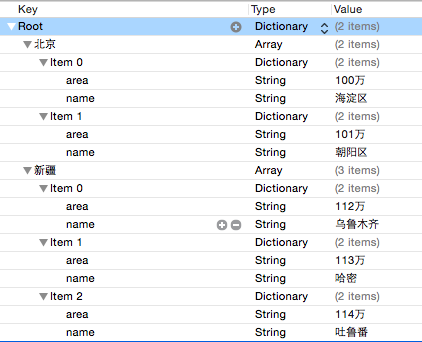
plist文件内容如下:
<?xml version="1.0" encoding="UTF-8"?>
<!DOCTYPE plist PUBLIC "-//Apple//DTD PLIST 1.0//EN" "
http://www.apple.com/DTDs/PropertyList-1.0.dtd
">
<plist version="1.0">
<dict>
  <key>北京</key>
        <array>
           <dict>
                     <key>area</key>
                      <string>100万</string>
                <key>name</key>
                      <string>海淀区</string>
         </dict>
            <dict>
            <key>area</key>
            <string>101万</string>
                   <key>name</key>
                      <string>朝阳区</string>
         </dict>
     </array>
   <key>新疆</key>
        <array>
           <dict>
            <key>area</key>
            <string>112万</string>
                   <key>name</key>
                      <string>乌鲁木齐</string>
        </dict>
            <dict>
            <key>area</key>
            <string>113万</string>
                   <key>name</key>
                      <string>哈密</string>
          </dict>
            <dict>
            <key>area</key>
            <string>114万</string>
                   <key>name</key>
                      <string>吐鲁番</string>
         </dict>
     </array>
</dict>
</plist>
结构图如下:
?、tableView编辑
编辑的步骤如下:
1、进入可编辑状态
2、设置指定分区(section)中的行(row)是否可以被编辑
3、设置指定分区(section)中的行(row)是什么类型的编辑样式
4、编辑完成(一定要先操作数据,后操作UI)
//1、进入可编辑状态
- (void)setEditing:(BOOL)editing animated:(BOOL)animated
{
[super setEditing:editing animated:animated];
[_tableView setEditing:editing animated:animated];
}
//2、设置指定分区(section)中的行(row)是否可以被编辑
- (BOOL)tableView:(UITableView *)tableView canEditRowAtIndexPath:(NSIndexPath *)indexPath
{
if (!indexPath.section&&!indexPath.row) {
return NO;
}
return YES;
}
//3、设置指定分区(section)中的行(row)是什么类型的编辑样式
- (UITableViewCellEditingStyle)tableView:(UITableView *)tableView editingStyleForRowAtIndexPath:(NSIndexPath *)indexPath
{
if (indexPath.section==1) {
return UITableViewCellEditingStyleInsert;
}
return UITableViewCellEditingStyleDelete;
}
//4、编辑完成(一定要先操作数据,后操作UI)
- (void)tableView:(UITableView *)tableView commitEditingStyle:(UITableViewCellEditingStyle)editingStyle forRowAtIndexPath:(NSIndexPath *)indexPath
{
switch (editingStyle) {
case UITableViewCellEditingStyleDelete:
NSLog(@"Delete");
//1.先删除数据
NSString *key=_keysArray[indexPath.section];
NSMutableArray *array = _allCityDic[key];
[array removeObjectAtIndex:indexPath.row];
//2.操作UI
[tableView deleteRowsAtIndexPaths:@[indexPath] withRowAnimation:UITableViewRowAnimationLeft];
if (!array.count) {
//1.先操作数据
[_keysArray removeObject:key];
[_allCityDic removeObjectForKey:key];
//2.再操作UI
[tableView deleteSections:[NSIndexSet indexSetWithIndex:indexPath.section] withRowAnimation:UITableViewRowAnimationBottom];
}
break;
case UITableViewCellEditingStyleNone:
NSLog(@"None");
break;
case UITableViewCellEditingStyleInsert:
NSLog(@"Insert");
City *aCity = [[City alloc] init];
aCity.name = @"丰台区";
aCity.area = @"30万";
//1.数据
NSString *key1 = _keysArray[indexPath.section];
NSMutableArray *cityArray = _allCityDic[key1];
[cityArray insertObject:aCity atIndex:indexPath.row];
//2.UI
[tableView insertRowsAtIndexPaths:@[indexPath] withRowAnimation:UITableViewRowAnimationNone];
break;
default:
break;
}
}
最后,不要忘了添加编辑按钮
self.navigationItem.rightBarButtonItem = self.editButtonItem;
?、tableView移动
步骤:
1.让tableView处于可编辑状态(同上)
2.设置指定的分区section中的行row是否可以被移动
3.实现移动
4.限制跨区移动
//1.让tableView处于可编辑状态(同上)
//2.设置指定的分区section中的行row是否可以被移动
- (BOOL)tableView:(UITableView *)tableView canMoveRowAtIndexPath:(NSIndexPath *)indexPath
{
return YES;
}
//3.实现移动
//方法:保存-删除-插入
- (void)tableView:(UITableView *)tableView moveRowAtIndexPath:(NSIndexPath *)sourceIndexPath toIndexPath:(NSIndexPath *)destinationIndexPath
{
if (sourceIndexPath.row!=destinationIndexPath.row) {
NSString *key = _keysArray[sourceIndexPath.section];
NSMutableArray *citiesArray = _allCityDic[key];
//获取数组中要被移动的元素
City *aCity = citiesArray[sourceIndexPath.row];
// //保存
// [aCity retain];
// //删除(必须retain)
// [citiesArray removeObjectAtIndex:sourceIndexPath.row];
// //移动
// [citiesArray insertObject:aCity atIndex:destinationIndexPath.row];
// [aCity release];
[citiesArray insertObject:aCity atIndex:destinationIndexPath.row];
[citiesArray removeObjectAtIndex:sourceIndexPath.row+1];
}
}
//4.限制跨区移动
-(NSIndexPath *)tableView:(UITableView *)tableView targetIndexPathForMoveFromRowAtIndexPath:(NSIndexPath *)sourceIndexPath toProposedIndexPath:(NSIndexPath *)proposedDestinationIndexPath
{
//如果目的地与出发地位置在同一区
if (sourceIndexPath.section == proposedDestinationIndexPath.section) {
return proposedDestinationIndexPath;
} else {
return sourceIndexPath;
}
}
三、UITableViewController
注意:
UITableViewController继承?UIViewController,?带?个tableView
self.view不是UIView?是UITableView
datasource和delegate默认都是self(UITableViewController)
开发中只需要建?UITableViewController?类
UI_10 表视图的编辑、UITableViewController
标签:
原文地址:http://my.oschina.net/zooyf/blog/498364