标签:
真尼玛累了,但是又怕第二天早上又忘掉,在这先大概写写。
安装:
http://www.tecmint.com/install-and-configure-ansible-automation-tool-in-linux/
http://www.tecmint.com/how-to-enable-epel-repository-for-rhel-centos-6-5/
基本就靠这俩就搞定了
登录网络设备让我比较费劲,因为之前不了解公钥私钥加密(说实话是别人讲了,没理解,这次终于理解了,改天得专门写个博客写公钥私钥和如何反其道而行的设置私钥登陆,见http://superuser.com/questions/556355/is-there-a-difference-if-ssh-key-is-created-on-serverside 这哥们儿和我想的一样哈哈!删掉生成者服务器上的私钥!然后放到本地PC!),公钥私钥是让马哥Linux给讲明白的。如何配置公钥私钥主要靠下面这俩链接
http://wilson18.com/topic/72-how-to-set-up-ssh-keys-to-log-in-on-centos-65-from-windows/ 这个链接很神奇,它给了我反其道而行之的思路,也大概让我知道了我们公司的账号是怎么架构的,估计就是反着来,用脚本生成给user, user自己负责保管私钥。其中的 chmod也有用!然后也传递给我一个概念,加上上面那个哥们儿心里所想的,让我觉得,key pair 这个东西的生成者是哪个机器根本不重要,重要的就是这个私钥放在哪里(登录者),公钥放在哪里(被登录者),然后还有私钥的主人是谁,也就是那个账号,账号是由ssh-keygen时那个机器上的那个Linux账号决定的(不过我觉得可以改...也许不能)。还有这个链接,http://serverfault.com/questions/591476/ssh-server-refused-our-key-for-all-users-except-root-user,这个是用来解决非root用户如何使用密钥的,当我把私钥从生成者服务器上拿走之后,就要解决这个问题,而这个链接给了我方法解决非root用户登录进来的问题。
当把上面的一切弄明白之后,我给自己hsun建了一个账号在10.19.96.150上,然后把私钥剪切到了我的OS X上,然后解决掉一切的权限问题,免密码从OS X登录到这个机器上去。然后正餐才开始:
1、建立一个叫ansibleserver的账号,为他生成key pair, 把public key传到办公室的vc上去,这样ansibleserver就能直接登录vc switch了。
[ansibleserver@Ansible_Server ~]$ ssh cn-pek1-10-a01-ex-vc1.cnet.com
Enter passphrase for key ‘/home/ansibleserver/.ssh/id_rsa‘:
--- JUNOS 12.3R9-S1 built 2015-03-13 08:00:19 UTC
{master:0}
ansibleserver@cn-pek1-10-a01-ex-vc1>
2、然后比着Kirk老师在https://pynet.twb-tech.com/blog/ansible/ansible-cfg-template.html 这个博客里写的架构ansible账户的方法,为ansibleserver这个用户建立相应的用户家目录,如下图,哈哈,我画了图,清楚多了
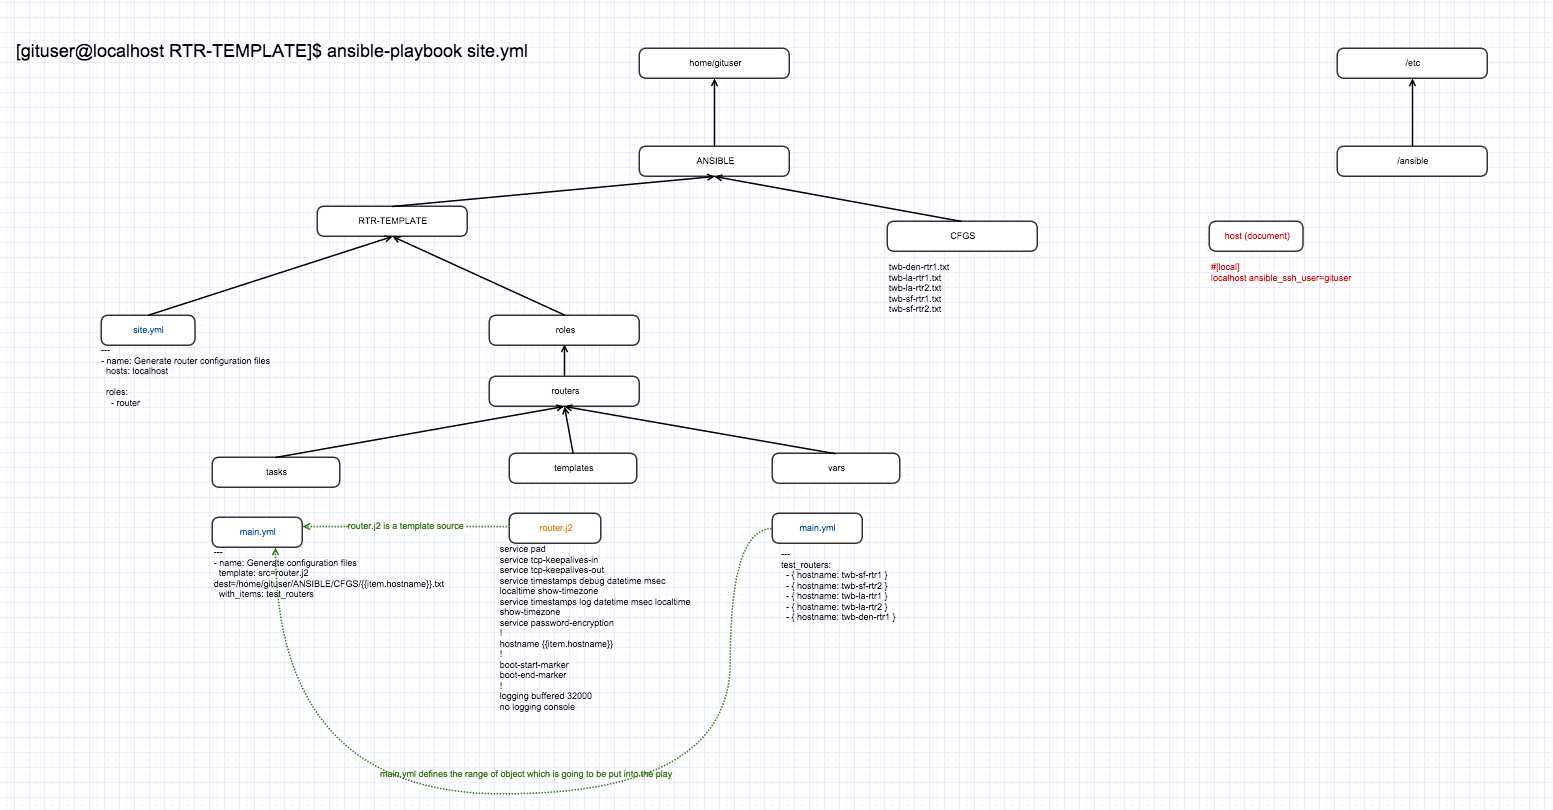
就这样,比着这个图取理解Kirk的前两篇博客。也为ansibleserver这个账户建立好这一切。
哦?hosts文件要改一下,为的是让ansibleserver这个账户为我们办公室的vc switch服务,图里这个gituser是完全按照Kirk的博客里说的建立的。
那么下面就是如何让ansibleserver为办公室的vc switch服务,这个我参考了诸多的博客,最终知道了hosts文件应该怎么写,因为这个时候ssh已经能直接登录vc switch了,没有理由ansible命令get不到vc switch,当时报的错如下:
[ansibleserver@Ansible_Server ansible]$ ansible all -m ping -u ansibleserver
localhost | FAILED => SSH Error: Permission denied (publickey,gssapi-keyex,gssapi-with-mic,password).
It is sometimes useful to re-run the command using -vvvv, which prints SSH debug output to help diagnose the issue.
Enter passphrase for key ‘/home/ansibleserver/.ssh/id_rsa‘:
Enter passphrase for key ‘/home/ansibleserver/.ssh/id_rsa‘:
cn-pek1-10-a01-ex-vc1.cnet.com | FAILED => failed to transfer file to error: unknown command: /bin/sh/ping:

Connecting to cn-pek1-10-a01-ex-vc1.cnet.com...
Permission denied (publickey,password,keyboard-interactive).
Couldn‘t read packet: Connection reset by peer

[ansibleserver@Ansible_Server ansible]$
[ansibleserver@Ansible_Server ansible]$
我特么的当时感到十分的奇怪,尼玛我passphrase根本没打错啊,我直接ssh命令到vc switch的时候也没出错啊,那我就去搜错报错信息中的“unknown command: /bin/sh/ping:”这一句去了,结果真就找到了解决的办法,来自这个链接 https://groups.google.com/forum/?utm_medium=email&utm_source=footer#!msg/ansible-project/9zG8bMyv4es/Lw6CpW_pIW0J , 这个链接里就教会了我如何去些hosts文件,来避免这个错误,它的里面写的那个IP,其实就是目标主机的地址,我这里写的我的vc的主机名,下面是我的hosts文件的内容
[root@Ansible_Server ansible]# more hosts
[switch]
cn-pek1-10-a01-ex-vc1.cnet.com   ansible_connection=local    ansible_ssh_host=cn-pek1-10-a01-ex-vc1.cnet.com

[local]
localhost ansible_ssh_user=ansibleserver
[root@Ansible_Server ansible]#
改成这样之后,ansible的那个ping命令就能正常使用了,效果如下:
[ansibleserver@Ansible_Server ansible]$ ansible all -m ping
localhost | FAILED => SSH Error: Permission denied (publickey,gssapi-keyex,gssapi-with-mic,password).
It is sometimes useful to re-run the command using -vvvv, which prints SSH debug output to help diagnose the issue.
cn-pek1-10-a01-ex-vc1.cnet.com | success >> {
    "changed": false,
    "ping": "pong"
}
我不得不吐槽一下官方文档之简陋,连个ansible all -m ping应该出来什么output它都不写,官方doc链接在这 http://docs.ansible.com/ansible/intro_getting_started.html,基本没帮上什么忙,唉。
to be re-modified....
Ansible用于网络设备管理 part 0 安装和登录网络设备
标签:
原文地址:http://www.cnblogs.com/Vooom/p/4770188.html