标签:style blog http color 使用 strong


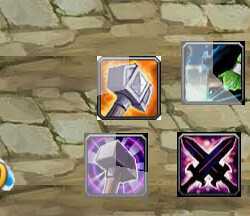
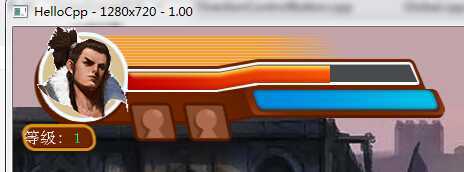
上图就是技能CD的一个效果,在此我需要给介绍下,cocosStuido这个工具中的UI Eidtor功能,编辑UI真的是很方便,至于怎么使用它,我相信您可以随便看看网上的东西,自己摸索,参考接下来的代码就知道了
在UI编辑器中,我们的技能是没有CD遮罩效果的,那怎么实现的呢?
答案就是:在点击触摸技能时,我们在技能的上方覆盖一张灰色的图片(这个你可以用PS去制作一张),大小与技能图标相同,然后根据每个技能的CD时间,产生一个扇形进度动画,动画结束后取消定时器跟这个遮罩对象就可以了
至于人物头像的血条,我想基本不用介绍你都可以知道怎么去用,so easy
以下是OptionLayer操作层中的init()初始化处理以及触摸监听处理,和技能遮罩效果处理
如果您只想看如何处理,请直接参考第三段代码
//init()
bool OptionLayer::init(){
    this->setTouchEnabled(true);//开启触摸
    //添加摇杆
    CCTexture2D* ControlWheelTexture = CCTextureCache::sharedTextureCache()->addImage("MyImages/ControlWheel.png");
    DirectionControlButton* ControlWheelSprite = DirectionControlButton::ObjectWithTexture(ControlWheelTexture);//加载摇杆背景图
    ControlWheelSprite->setPosition(ccp(ControlWheelSprite->getContentSize().width/2, ControlWheelSprite->getContentSize().height/2));
    this->addChild(ControlWheelSprite,1);

    //加载摇杆小圈
    CCTexture2D *TinyCircleTexture = CCTextureCache::sharedTextureCache()->addImage("MyImages/TinyCircle.png");
    CCSprite *TinyCircleSprite = CCSprite::createWithTexture(TinyCircleTexture);
    TinyCircleSprite->setPosition(ccp(ControlWheelSprite->getContentSize().width/2, ControlWheelSprite->getContentSize().height/2));
     this->addChild(TinyCircleSprite,2);
     ControlWheelSprite->setTinyCircleSprite(TinyCircleSprite);        //设置触摸后的小圆圈
     this->setDirectionCrtl(ControlWheelSprite);        //设置操作层摇杆对象,方便在场景Init中使用

     //人物属性UI加载
    TouchGroup* ul =TouchGroup::create();
    ul->setTag(200);
    ul->setPosition(-40,450);
    this->addChild(ul);
    ul->addWidget(GUIReader::shareReader()->widgetFromJsonFile("RoleProperty/DemoHead_UI.json"));
    UILoadingBar * redBar = dynamic_cast<UILoadingBar *>(ul->getWidgetByTag(4));
    UILoadingBar * blueBar = dynamic_cast<UILoadingBar *>(ul->getWidgetByTag(16));
    UIImageView * head = dynamic_cast<UIImageView *>(ul->getWidgetByTag(42));
    UITextField * level = dynamic_cast<UITextField *>(ul->getWidgetByTag(26));
    this->setRedBar(redBar);
    this->setBlueBar(blueBar);
    this->setHead(head);
    this->setLevel(level);

     //开始加载操作技能UI
    TouchGroup* skillUI =TouchGroup::create();
    skillUI->setTag(201);
    skillUI->setPosition(800,10);
    CCLog("ScreenSize.height = %f", CCDirector::sharedDirector()->getVisibleSize().height);
    CCLog("ScreenSize.width = %f",ScreenSize.width);
    this->addChild(skillUI);
    skillUI->addWidget(GUIReader::shareReader()->widgetFromJsonFile("Skill_UI/Skill_UI.json"));

    UIImageView * skill_attack = dynamic_cast<UIImageView *>(skillUI->getWidgetByTag(9));            //普通攻击
    UIImageView * skill_attack_1 = dynamic_cast<UIImageView *>(skillUI->getWidgetByTag(6));        //特殊攻击1
    UIImageView * skill_attack_2 = dynamic_cast<UIImageView *>(skillUI->getWidgetByTag(8));        //特殊攻击2
    UIImageView * skill_attack_3 = dynamic_cast<UIImageView *>(skillUI->getWidgetByTag(7));        //特殊攻击3
    UIImageView * blood_bottle = dynamic_cast<UIImageView *>(skillUI->getWidgetByTag(10));//血瓶
    UIImageView * magic_bottle = dynamic_cast<UIImageView *>(skillUI->getWidgetByTag(11));//魔瓶
    UILabelAtlas * blood_bottle_num = dynamic_cast<UILabelAtlas *>(skillUI->getWidgetByTag(12));//血瓶数量
    UILabelAtlas * magic_bottle_num = dynamic_cast<UILabelAtlas *>(skillUI->getWidgetByTag(13));//魔瓶数量

    //初始化类成员变量
    this->setSkillUI(skillUI);
    this->setSkill_attack(skill_attack);
    this->setSkill_attack_1(skill_attack_1);
    this->setSkill_attack_2(skill_attack_2);
    this->setSkill_attack_3(skill_attack_3);
    this->setBlood_bottle(blood_bottle);
    this->setMagic_bottle(magic_bottle);
    this->setBlood_bottle_num(blood_bottle_num);
    this->setMagic_bottle_num(magic_bottle_num);

    //防止init()完自动释放对象
    skillUI->retain();
    skill_attack->retain();
    skill_attack_1->retain();
    skill_attack_1_cool->retain();
    skill_attack_2->retain();
    skill_attack_2_cool->retain();
    skill_attack_3->retain();
    skill_attack_3_cool->retain();
    blood_bottle->retain();
    magic_bottle->retain();
    blood_bottle_num->retain();
    magic_bottle_num->retain();

    //添加技能图标的触摸监听
    skill_attack->addTouchEventListener(skill_attack_1,toucheventselector(OptionLayer::touchEventHandler));
    skill_attack_1->addTouchEventListener(skill_attack_1,toucheventselector(OptionLayer::touchEventHandler));
    skill_attack_2->addTouchEventListener(skill_attack_1,toucheventselector(OptionLayer::touchEventHandler));
    skill_attack_3->addTouchEventListener(skill_attack_1,toucheventselector(OptionLayer::touchEventHandler));
    //添加物品触摸监听
    blood_bottle->addTouchEventListener(blood_bottle,toucheventselector(OptionLayer::touchEventHandler));
    magic_bottle->addTouchEventListener(magic_bottle,toucheventselector(OptionLayer::touchEventHandler));
    //开启技能触摸
    skill_attack_1->setTouchEnabled(true);
    skill_attack_2->setTouchEnabled(true);
    skill_attack_3->setTouchEnabled(true);
    skill_attack->setTouchEnabled(true);
    //开启物品触摸
    blood_bottle->setTouchEnabled(true);
    magic_bottle->setTouchEnabled(true);

    return true;
}
//................监听处理函数........
void OptionLayer::touchEventHandler(CCObject* pSender,TouchEventType type)
{
    UIImageView* target = (UIImageView*)pSender;
    OptionLayer *optionLayer = global->optionLayer;
    ActionState actionState = global->hero->getActionState();
    //角色上一个技能动画未执行完,禁止执行下一攻击动作(actionState 由该状态决定,任何技能动画播放完状态都还原为ActionStateNone,参考Role类动画回调函数Role::callBackAction()
    if (type == TOUCH_EVENT_BEGAN)
    {
        if(target == optionLayer->getSkill_attack() || target == optionLayer->getSkill_attack_1()
            || target == optionLayer->getSkill_attack_2() || target == optionLayer->getSkill_attack_3()){
                //当触摸技能时,只有角色在ActionStateNone,ActionStateIdle状态才响应处理
                if(actionState == ActionStateNone || actionState == ActionStateIdle){
                    skillCoolHandler(pSender);
             }
        }else{
                skillCoolHandler(pSender);
        }
    }
    if (type == TOUCH_EVENT_MOVED)
    {
        //nothing to do
    }
    if (type == TOUCH_EVENT_ENDED)
    {
       // nothing to do
    }
}
//......................................关键点 技能CD遮罩处理来了...........................
void OptionLayer::skillCoolHandler(CCObject* pSender)
{
    OptionLayer *optionLayer = global->optionLayer;
     UIImageView* skillView = (UIImageView*)pSender;
     global->hero->setAllowMove(false);//动画执行期间角色不可移动
     float SumCD = 10.0f;
    //判断指向对象是否相等来初始化cd时间
     if(optionLayer->getSkill_attack_1() == skillView){
            SumCD = optionLayer->skill_SumCD_1;
            global->hero->RunAttackAction_1();        //执行特殊攻击1动画
    }else if(optionLayer->getSkill_attack_2() == skillView){
            SumCD = optionLayer->skill_SumCD_2;
    }else if(optionLayer->getSkill_attack_3() == skillView){
            SumCD = optionLayer->skill_SumCD_3;
    }else if(optionLayer->getSkill_attack() == skillView){
            SumCD = optionLayer->skill_SumCD_0;
            global->hero->RunAttackAction();        //执行普通攻击动画
    }else if(optionLayer->getBlood_bottle() == skillView){
            SumCD = optionLayer->blood_SumCD;
    }else if(optionLayer->getMagic_bottle() == skillView){
            SumCD = optionLayer->magic_SumCD;
    }
    skillView->setTouchEnabled(false);        //CD开始,禁止本技能使用
    //初始化 cd遮罩
    CCTexture2D *spriteTx = CCTextureCache::sharedTextureCache()->addImage("Skill_UI/cooling_cover.png");
    CCSprite * SkillCover = CCSprite::createWithTexture(spriteTx);
    CCProgressTimer *skillTimer  = CCProgressTimer::create(SkillCover);
    skillTimer->setOpacity(125);                            //透明度
    skillTimer->setPosition(skillView->getPosition());//将进度遮罩设置在技能图标位置上
    optionLayer->getSkillUI()->addChild(skillTimer);

    skillTimer->setType(kCCProgressTimerTypeRadial);//扇形
    skillTimer->setPercentage(100);
    skillTimer->setReverseProgress(true);

    CCProgressTo* cdAction=CCProgressTo::create(SumCD, 100);
    CCCallFuncND* func=CCCallFuncND::create(this, callfuncND_selector(OptionLayer::allowToClick),skillView);//附带skillView参数 方便cd结束后处理
    CCFiniteTimeAction* seq=CCSequence::create(cdAction,func,NULL);
    skillTimer->runAction(seq);
}

//技能CD结束后 移除定时器 重新开启触摸
void OptionLayer::allowToClick(CCNode* pSender,void* data){
    UIImageView* skillView = (UIImageView*)data;
    CCProgressTimer* skillTimer = (CCProgressTimer*)pSender;
    OptionLayer *optionLayer = global->optionLayer;
    optionLayer->getSkillUI()->removeChild(skillTimer);
    skillView->setTouchEnabled(true);
}
至此,我们的整个过程代码都贴完整了
如果您现在没有看接下来的另外一部分处理,你就会发现,你的技能遮罩是从无到有的扇形动画,这明显不是我们想要的结果,你会发现你怎么都找不到一个成员方法,可以让CCProgressTimer对象能够反过来从有到无的....怎么办呢?
这里我们需要修改下cocos2dx这部分源代码:CCProgressTimer.cpp中
void CCProgressTimer::updateRadial(void)
{
    if (!m_pSprite) {
        return;
    }
    float alpha = m_fPercentage / 100.f;

    //2014-7-11 扇形从有到无(这里需要添加这段代码)
    if(alpha != 0.f && alpha !=1.f) {
        alpha = 1.f-alpha;
    }
............................
然后你要的效果就都出来了..................
横版游戏制作之英雄技能CD遮罩,人物头像血条属性,布布扣,bubuko.com
标签:style blog http color 使用 strong
原文地址:http://www.cnblogs.com/zouly/p/3842333.html