标签:
一、利用txt文件存储游戏物品信息
首先在asset下创建一个txt文件,这里我们命名为objectsInfoList.txt,并将其拖放到unity Project视图中。
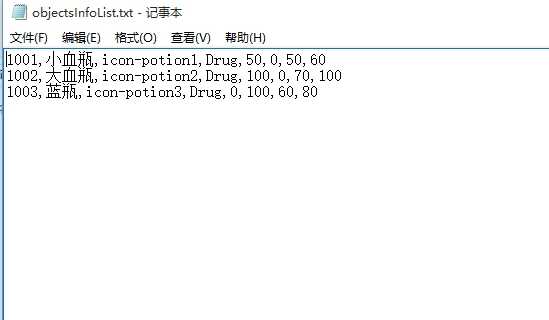
其中txt中我们先存放一些物品信息,每行存储一种物品信息,分别为编号、名称、物品对应的图片名、种类、回血值、回蓝值、出售价和购买价。
其中物品图片要先用NGUI做成图集,种类中的Drug为药品类,以后在代码中我们会定义一个枚举用于存储物品种类。

接下来我们创建一个空物体叫做GameSetting,上面挂一个脚本ObjectsInfo,我们把txt文件读取到一个string中,根据‘\n‘及‘,‘分割字符串,取得对应的物品信息,然后存储到Dictionary中,以后需要物品信息时便可以从dictionary中取出来了。
代码如下,就不做具体解释了。。。虽然注释少点,但还是挺简单的
 1 using UnityEngine;
 2 using System.Collections;
 3 using System.Collections.Generic;
 4
 5 public class ObjectsInfo : MonoBehaviour
 6 {
 7
 8     public static ObjectsInfo _instance;
 9     public TextAsset objectsInfoListText;
10
11     private Dictionary<int, ObjectInfo> objectInfoDictionary =
12         new Dictionary<int, ObjectInfo>();
13
14     void Awake()
15     {
16         _instance = this;
17         ReadInfo();
18     }
19
20     public ObjectInfo GetObjectInfoById(int key)
21     {
22         ObjectInfo info = new ObjectInfo();
23         objectInfoDictionary.TryGetValue(key, out info);
24         return info;
25     }
26     private void ReadInfo()
27     {
28         string text = objectsInfoListText.text;
29         string[] strArray = text.Split(‘\n‘);
30         foreach (string str in strArray)
31         {
32             string[] proArray = str.Split(‘,‘);
33
34             ObjectInfo info = new ObjectInfo();
35
36             int id = int.Parse(proArray[0]);
37             string name = proArray[1];
38             string iconName = proArray[2];
39             string typeStr = proArray[3];
40
41             info.id=id;
42             info.name=name;
43             info.iconName=iconName;
44             ObjectType type = ObjectType.Drug;
45             switch (typeStr)
46             {
47                 case "Drug":
48                     type = ObjectType.Drug;
49                     break;
50                 case "Equip":
51                     type = ObjectType.Equip;
52                     break;
53                 case "Mat":
54                     type = ObjectType.Mat;
55                     break;
56             }
57             info.type=type;
58             if (type == ObjectType.Drug)
59             {
60                 int hp = int.Parse(proArray[4]);
61                 int mp = int.Parse(proArray[5]);
62                 int priceSell = int.Parse(proArray[6]);
63                 int priceBuy = int.Parse(proArray[7]);
64
65                 info.hp = hp;
66                 info.mp = mp;
67                 info.priceBuy = priceBuy;
68                 info.priceSell = priceSell;
69             }
70
71             //添加到字典上,id为key,方便根据id查找
72             objectInfoDictionary.Add(id, info);
73         }
74     }
75 }
76
77 public enum ObjectType
78 {
79     Drug,
80     Equip,
81     Mat
82 }
83
84 //id,名称,icon名称,类型,加血值,加蓝值,卖出价,买入价
85 public class ObjectInfo
86 {
87     public int id;
88     public string name;
89     public string iconName;
90     public ObjectType type;
91     public int hp;
92     public int mp;
93     public int priceSell;
94     public int priceBuy;
95 }
二、背包系统
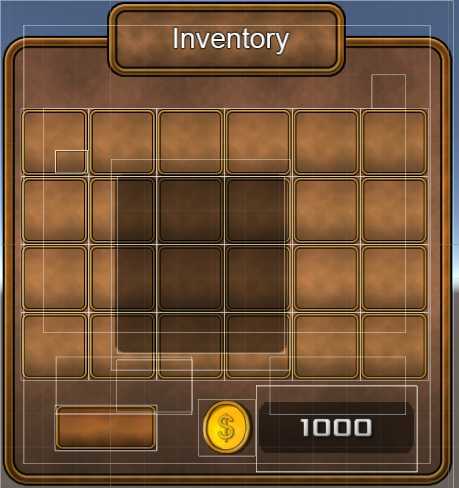
1、设计背包系统的UI界面
主界面背景:新建一个sprite,选择相应图片,命名为Inventory
格子:在Inventory下创建sprite,并在下面创建一个label用来显示物品数量,命名为NumLabel,然后做成prefab并复制多个
其他:整理背包按钮、金钱图标及显示金币数量的label
做出来的界面如下

2、控制背包物品的管理
我们给Inventory添加一个脚本命名为Inventory,给格子添加一个脚本命名为InventoryItemGrid方便对格子的管理
在Inventory脚本中,定义一个List<InventoryItemGrid> itemGridList用于存放背包的所有格子,并在unity界面中将所有格子拖过去赋值(注意要按照格子的顺序赋值,所以格子创建完后,最好给格子分别命名一下如gide00,grid01.....,也方便以后的测试),并定义好金钱数目等变量;我们给背包添加一个tween动画,控制背包的显示与隐藏,并在脚本中提供相应方法,具体代码如下
 1 using UnityEngine;
 2 using System.Collections;
 3 using System.Collections.Generic;
 4
 5 public class Inventory : MonoBehaviour {
 6
 7     public static Inventory _instance;
 8     private TweenPosition tweenPosition;
 9
10     private int coinCount = 1000;
11     public UILabel coinCountLabel;
12
13     public List<InventoryItemGrid> itemGridList = new List<InventoryItemGrid>();
14
15     // Use this for initialization
16     void Awake () {
17         _instance = this;
18         tweenPosition = GetComponent<TweenPosition>();
19     }
20
21     private bool isShow = false;
22     private void Show()
23     {
24         isShow = true;
25         tweenPosition.PlayForward();
26     }
27
28     private void Hide()
29     {
30         isShow = false;
31         tweenPosition.PlayReverse();
32     }
33
34
35     public void TransformState()
36     {
37         if (!isShow)
38         {
39             Show();
40             isShow = true;
41         }
42         else
43         {
44             Hide();
45             isShow = false;
46         }
47     }
48 }
3、背包方格物品的prefab制作
在格子下创建一个sprite,可以随便选一张图片,调整大小使之适应格子大小,将其做成prefab,添加一个脚本命名为InventoryItem
由于我们的物品应该是可以拖动的,所以应attach一个Box Collider,脚本InventoryItem让其继承于UIDragDropItem 便可以实现拖拽功能了。定义一个int id用于设置要显示物品的id,并提供一个SetId方法控制对应图片的显示。代码如下:
using UnityEngine;
using System.Collections;

public class InventoryItem : UIDragDropItem {

    private UISprite sprite;
    private int id;

    void Awake()
    {
        base.Awake();
        sprite = this.gameObject.GetComponent<UISprite>();
    }

    public void SetId(int id)
    {
        ObjectInfo info = ObjectsInfo._instance.GetObjectInfoById(id);
        sprite.spriteName = info.iconName;
        this.id = id;
    }


}
4、控制方格对下面物品的管理
InventoryItemGrid脚本中定义变量id为物品的编号,num为物品的数量,以及UILabel控制物品数量的显示,并获取格子下面物品上的脚本InventoryItem调用上面的SetId方法,设置物品相应的图片。代码很简单。。。
 1 using UnityEngine;
 2 using System.Collections;
 3
 4 public class InventoryItemGrid : MonoBehaviour {
 5
 6     public int id = 0;
 7     public int num = 0;
 8     private ObjectInfo info = null;
 9     private UILabel numLabel;
10
11     void Start()
12     {
13         numLabel = this.GetComponentInChildren<UILabel>();
14     }
15
16     public void SetId(int id, int num = 1)
17     {
18         this.id = id;
19         info = ObjectsInfo._instance.GetObjectInfoById(id);
20         InventoryItem item = this.GetComponentInChildren<InventoryItem>();
21         this.num = num;
22         numLabel.text = this.num.ToString();
23         numLabel.enabled = true;
24
25         item.SetId(id);
26     }
27
28     public void PlusNum(int num = 1)
29     {
30         this.num += num;
31         numLabel.text = this.num.ToString();
32     }
33     public void ClearInfo()
34     {
35         id = 0;
36         num = 0;
37         info = null;
38         numLabel.enabled = false;
39     }
40 }
5、背包物品的拾取功能
由于我们txt文件中只存储了3种物品,这里我们使用随机数模拟一下拾取功能,每次按下x键随机一个数,并根据id取得该物品其他信息,实例化该物体并调整坐标及parent
 1 void Update () {
 2         if (Input.GetKeyDown(KeyCode.X))
 3         {
 4             GetSomething(Random.Range(1001, 1004));
 5         }
 6     }
 7
 8     private void GetSomething(int id)
 9     {
10         InventoryItemGrid grid = null;
11         //检测grid中有没有当前物体
12         foreach (InventoryItemGrid temp in itemGridList)
13         {
14             if (temp.id == id)
15             {
16                 grid = temp;
17                 break;
18             }
19         }
20         if (grid != null)//有当前物体 num加1
21         {
22             grid.PlusNum(1);
23         }
24         else//没有当前物体 查找是否有空格 根据id是否为0判断
25         {
26             foreach (InventoryItemGrid temp in itemGridList)
27             {
28                 if (temp.id == 0)
29                 {
30                     grid = temp;
31                     break;
32                 }
33             }
34
35             if (grid != null)//有空格
36             {
37                 //在当前格实例化物体
38                 GameObject go = NGUITools.AddChild(grid.gameObject, inventoryItemGameobject);
39                 go.transform.localPosition = Vector3.zero;
40                 go.GetComponent<UISprite>().depth = 8;
41                 grid.SetId(id);
42
43             }
44             else//没有空格
45             {
46                 print("背包满了");
47             }
48
49         }
50     }
6、实现背包物品的拖拽功能
物品的拖拽有几种情况需要分别实现:物品拖到一个空格,物品拖到有物品的格子、两物品应交换位置信息,物品拖到背包界面外等应还在当前格子
拖拽功能的实现应在protected override void OnDragDropRelease(GameObject surface) 这个函数中实现,判断拖放结束时停留的物体为surface,要区分surface的类别,应根据tag来实现,因此我们给所有的格子添加Tag InventoryItemGrid,给物品添加Tag InventoryItem,为了方便tag管理我们添加一个Tags脚本,其中存储各种Tags信息
 1 using UnityEngine;
 2 using System.Collections;
 3
 4 public class Tags : MonoBehaviour {
 5
 6     public const string GROUND = "Ground";
 7     public const string PLAYER = "Player";
 8     public const string INVENTORY_ITEM = "InventoryItem";
 9     public const string INVENTORY_ITEM_GRID = "InventoryItemGrid";
10 }
物品拖拽功能的实现代码如下
 1 protected override void OnDragDropRelease(GameObject surface)
 2     {
 3         base.OnDragDropRelease(surface);
 4
 5         if (surface != null)
 6         {
 7             //拖放到一个有物体的格子
 8             if (surface.tag == Tags.INVENTORY_ITEM)
 9             {
10                 InventoryItemGrid oldGrid = this.transform.parent.GetComponent<InventoryItemGrid>();
11                 int id = oldGrid.id;
12                 int num = oldGrid.num;
13                 InventoryItemGrid newGrid = surface.transform.parent.GetComponent<InventoryItemGrid>();
14
15                 //交换数据
16                 oldGrid.SetId(newGrid.id, newGrid.num);
17                 newGrid.SetId(id, num);
18
19                 ResetPosition();
20             }
21             //拖放到一个空格子
22             else if (surface.tag == Tags.INVENTORY_ITEM_GRID)
23             {
24                 //拖放到自己的格子
25                 if (surface.transform.parent == this.transform.parent)
26                 {
27                     ResetPosition();
28                 }
29                 else//其他空格子
30                 {
31                     InventoryItemGrid oldGrid = this.transform.parent.GetComponent<InventoryItemGrid>();
32
33                     InventoryItemGrid nowGrid = surface.GetComponent<InventoryItemGrid>();
34                     this.transform.parent = surface.transform;
35                     ResetPosition();
36                     nowGrid.SetId(oldGrid.id, oldGrid.num);
37                     oldGrid.ClearInfo();
38                 }
39
40             }
41             else
42             {
43                 ResetPosition();
44             }
45         }
46         else
47         {
48             ResetPosition();
49         }
50     }
51
52     private void ResetPosition()
53     {
54         transform.localPosition = Vector3.zero;
55     }
7、背包物品的信息提示
在unity背包下面添加一个sprite作为提示信息的背景,背景下面添加一个label显示提示信息。
我们应在鼠标放在物品上时显示该物品的详细信息,鼠标移出时提示信息框则应消失。要实现这种效果,我们可以在物品prefab上添加一个NGUI提供的UI Event Trigger组件,On Hover Over和On Hover Out分别绑定InventoryItem中的两个函数
public void OnHoverOver()
    {
        InventoryDes._instance.Show(id,this.transform.position);
    }

    public void OnHoverOut()
    {
        InventoryDes._instance.Hide();
    }
在界面上提示信息的sprite上面挂一个脚本命名为InventoryDes,该脚本控制提示信息的显示隐藏等功能
 1 using UnityEngine;
 2 using System.Collections;
 3
 4 public class InventoryDes : MonoBehaviour {
 5
 6     public static InventoryDes _instance;
 7
 8     private UILabel label;
 9     void Awake()
10     {
11         _instance = this;
12         label = this.GetComponentInChildren<UILabel>();
13         this.gameObject.SetActive(false);
14     }
15
16     public void Show(int id,Vector3 pos)
17     {
18         this.gameObject.SetActive(true);
19         this.transform.position = pos;
20         ObjectInfo info = ObjectsInfo._instance.GetObjectInfoById(id);
21         string des = "";
22         switch (info.type)
23         {
24             case ObjectType.Drug:
25                 des = GetDrugDes(info);
26                 break;
27             case ObjectType.Equip:
28                 break;
29             case ObjectType.Mat:
30                 break;
31         }
32         label.text = des;
33     }
34
35     public void Hide()
36     {
37         this.gameObject.SetActive(false);
38     }
39     private string GetDrugDes(ObjectInfo info)
40     {
41         string s = "";
42         s += "名称:" + info.name + "\n";
43         s += "回复Hp:" + info.hp + "\n";
44         s += "回复Mp:" + info.mp + "\n";
45         s += "出售价:" + info.priceSell + "\n";
46         s += "购买价:" + info.priceBuy + "\n";
47         return s;
48     }
49 }
8、背包物品的整理功能
当我们背包中的物品排列很散乱是,点击整理按钮,所有的物品应有序的从前到后排列整齐,中间应该没有空格,这个功能该如何实现呢?这里提供一种方法,可能效率不是最高的(没有想到更好的实现方法,有更好方法的朋友请告诉我一下,谢谢),但可以实现基本要求:


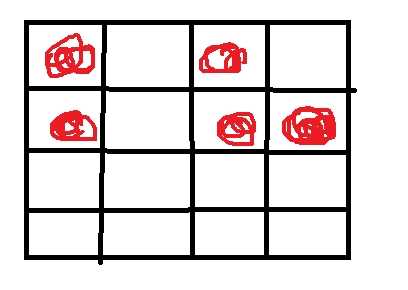
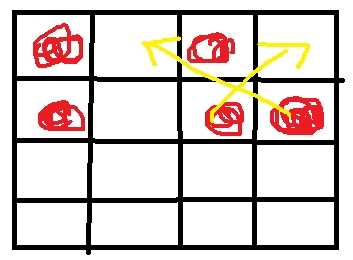
例如上面的图,有红圈的地方代表有物体,其余为空格,我们怎样将物品排列好使之没有空格呢?我们可以先将所有格子遍历一变,记下空格的索引;然后从最小的索引
开始向后循环,将所有格子从后向前遍历,如果格子中有物体则将其移动到该空格索引对应的格子中,然后继续...
下面是代码:
 1 //整理背包物品
 2     public void OnArrangeInventory()
 3     {
 4         List<int> nullGridIndexList = new List<int>();
 5         for (int i = 0; i < itemGridList.Count; i++)
 6         {
 7             if (itemGridList[i].id == 0)
 8             {
 9                 nullGridIndexList.Add(i);
10             }
11         }
12         //背包满了不整理
13         if (nullGridIndexList.Count != 0)
14         {
15
16             foreach (int index in nullGridIndexList)
17             {
18
19                 for (int i = itemGridList.Count - 1; i > index; i--)
20                 {
21                     if (itemGridList[i].id != 0)
22                     {
23                         if (i > index)
24                         {
25                             ExchangeItemToANullGrid(index, i);
26                             break;
27                         }
28                         else
29                             break;
30                     }
31                 }
32             }
33         }
34     }
35
36     //index为空格子索引, i为有物品的格子
37     private void ExchangeItemToANullGrid(int index, int i)
38     {
39
40         Transform transform = itemGridList[i].GetComponentInChildren<InventoryItem>().gameObject.transform;
41         transform.parent
42             = itemGridList[index].transform;
43         transform.localPosition = Vector3.zero;
44         itemGridList[index].SetId(itemGridList[i].id, itemGridList[i].num);
45         itemGridList[i].ClearInfo();
46     }
至此,一个简单但功能齐全的背包系统便做好了!
标签:
原文地址:http://www.cnblogs.com/zhangbaochong/p/4820160.html