标签:
前一段时间通过Wireshark抓包,定位了一个客户端和服务器之间数据传输的问题。最近就抽空看了看《TCP/IP详解 卷1》中关于TCP的部分,书中用了很多例子展示了TCP/IP协议中的一些基本概念。
所以,也准备自己动手,通过一些简单的实验来进一步了解一下TCP中的一些基本概念。
在开始进行实验之前,首先看看实验环境的搭建:
在建立好实验环境之后,还需要进行一些简单的配置,保证宿主机和虚拟机之间的网络是畅通的。
将虚拟机网络设置为"Host-only Adapter"模式。
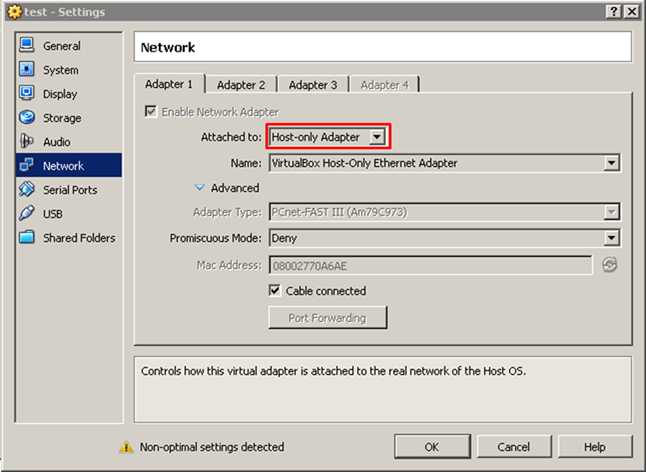
虚拟机网络设置好之后,就可以配置本机和虚拟机IP地址了,然后保证宿主机可以ping通虚拟机。
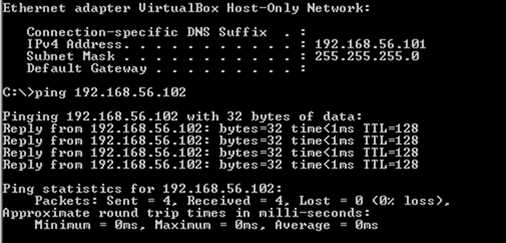
通过上面的步骤,简单的实验环境就建立完成了,下面就要来实现客户端和服务端了,试试实验环境是否能够正常工作。
首先,将虚拟机(192.168.56.102)作为服务端,运行下面一段代码创建一个简单的socket server,服务端绑定192.168.56.102:8081:
import sys
from socket import *

HOST = "192.168.56.102"
PORT = 8081
BUFSIZ = 1024
ADDR = (HOST, PORT)

server = socket(AF_INET, SOCK_STREAM)
print "Socket created"
try:
    server.bind(ADDR)
except error, msg:
    print ‘Bind failed. Error Code : ‘ + str(msg[0]) + ‘ Message ‘ + msg[1]
    sys.exit()

server.listen(10)
print ‘Socket now listening‘

while True:
    conn, addr = server.accept()
    try:
        data = conn.recv(100)
        if data:
            print data
    except Exception, e:
     print e
    conn.close()
客户端的实现在本机(192.168.56.101),使用一段基于Pcap.Net的代码向服务器发送一个[SYN]包(TCP连接建立需要进行三次握手,[SYN]包就是第一个握手包),来请求建立TCP连接。
在客户端代码中,通过Pcap.Net实现了两个工具函数,一个用来获取本机网卡设备列表,一个用在构造不同类型的TPC包。
获取本机网卡设备列表代码:
public static PacketDevice GetNICDevice()
{
    // Retrieve the device list from the local machine
    IList<LivePacketDevice> allDevices = LivePacketDevice.AllLocalMachine;

    if (allDevices.Count == 0)
    {
        Console.WriteLine("No interfaces found! Make sure WinPcap is installed.");
        return null;
    }

    // Print the device list
    for (int i = 0; i != allDevices.Count; ++i)
    {
        LivePacketDevice device = allDevices[i];
        Console.Write((i + 1) + ". " + device.Name);
        if (device.Description != null)
            Console.WriteLine(" (" + device.Description + ")");
        else
            Console.WriteLine(" (No description available)");
    }

    int deviceIndex = 0;
    do
    {
        Console.WriteLine("Enter the interface number (1-" + allDevices.Count + "):");
        string deviceIndexString = Console.ReadLine();
        if (!int.TryParse(deviceIndexString, out deviceIndex) ||
            deviceIndex < 1 || deviceIndex > allDevices.Count)
        {
            deviceIndex = 0;
        }
    } while (deviceIndex == 0);

    return allDevices[deviceIndex - 1];
}
另一段重要的代码就是构造TCP包的代码,根据OSI七层模型,下面代码中分别创建了链路层、网络层和传输层的部分,然后生成一个数据包:
public static Packet BuildTcpPacket(EndPointInfo endPointInfo, TcpControlBits tcpControlBits, List<TcpOption> tcpOptionList = null)
{
    EthernetLayer ethernetLayer =
        new EthernetLayer
        {
            Source = new MacAddress(endPointInfo.SourceMac),
            Destination = new MacAddress(endPointInfo.DestinationMac),
            EtherType = EthernetType.None, // Will be filled automatically.
        };

    IpV4Layer ipV4Layer =
        new IpV4Layer
        {
            Source = new IpV4Address(endPointInfo.SourceIp),
            CurrentDestination = new IpV4Address(endPointInfo.DestinationIp),
            Fragmentation = IpV4Fragmentation.None,
            HeaderChecksum = null, // Will be filled automatically.
            Identification = 123,
            Options = IpV4Options.None,
            Protocol = null, // Will be filled automatically.
            Ttl = 10,
            TypeOfService = 0,
        };

    TcpLayer tcpLayer =
        new TcpLayer
        {
            SourcePort = endPointInfo.SourcePort,
            DestinationPort = endPointInfo.DestinationPort,
            Checksum = null, // Will be filled automatically.
            SequenceNumber = seqNum,
            AcknowledgmentNumber = ackNum,
            ControlBits = tcpControlBits,
            Window = windowSize,
            UrgentPointer = 0,
            Options = (tcpOptionList == null) ? TcpOptions.None : new TcpOptions(tcpOptionList),
        };

    PacketBuilder builder = new PacketBuilder(ethernetLayer, ipV4Layer, tcpLayer);

    return builder.Build(DateTime.Now);
}
主程序中,首先配置了客户端和服务器的端口、IP/MAC地址信息,然后通过前面两个工具函数构造一个TCP连接建立请求包([SYN]包),并通过"VirtualBox Host-Only Network"网卡发送给服务端。
static void Main(string[] args)
{
    // Take the selected adapter
    PacketDevice selectedDevice = Utils.GetNICDevice();

    // Open the output device
    using (PacketCommunicator communicator = selectedDevice.Open(System.Int32.MaxValue, // name of the device
                                                                 PacketDeviceOpenAttributes.Promiscuous, // promiscuous mode
                                                                 1)) // read timeout
    {
        EndPointInfo endPointInfo = new EndPointInfo();
        endPointInfo.SourceMac = "08:00:27:00:C0:D5";
        endPointInfo.DestinationMac = "08:00:27:70:A6:AE";
        endPointInfo.SourceIp = "192.168.56.101";
        endPointInfo.DestinationIp = "192.168.56.102";
        endPointInfo.SourcePort = 3330;
        endPointInfo.DestinationPort = 8081;

        using (BerkeleyPacketFilter filter = communicator.CreateFilter("tcp port " + endPointInfo.DestinationPort))
        {
            // Set the filter
            communicator.SetFilter(filter);
        }

        communicator.SendPacket(Utils.BuildTcpPacket(endPointInfo, TcpControlBits.Synchronize, null));
        PacketHandler(communicator, endPointInfo);
    }

    Console.WriteLine("Press Enter to Quit!");
    Console.ReadLine();

}

private static void PacketHandler(PacketCommunicator communicator, EndPointInfo endPointInfo)
{
    Packet packet = null;

    do
    {
        PacketCommunicatorReceiveResult result = communicator.ReceivePacket(out packet);

        switch (result)
        {
            case PacketCommunicatorReceiveResult.Timeout:
                // Timeout elapsed
                continue;
            case PacketCommunicatorReceiveResult.Ok:
                Utils.PacketInfoPrinter(packet);
                break;
            default:
                throw new InvalidOperationException("The result " + result + " should never be reached here");
        }
    } while (true);
}
代码完成了,下面看看运行效果,为了直观的看到数据包的传输,这是就可以打开Wireshark了。
为了避免抓到不相关的数据包,可以设置Wireshark中的filter,然后开始抓取。
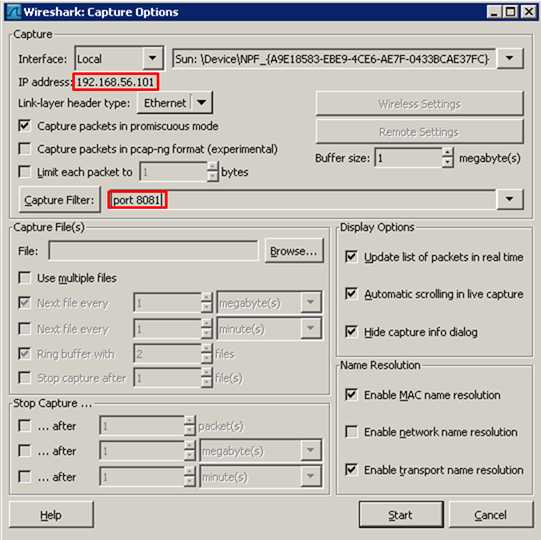
下面运行代码,并选择正确的网卡。通过console和Wireshark的输出可以看到,我们成功的生产了一个[SYN]包并发送到了服务器。
根据TCP连接建立过程可以知道,客户端发送[SYN]包后,期待从服务器得到一个[SYN, ACK]包。
到这里,说明前面搭建的环境,以及客户端和服务端的代码都是可以正常工作的了。


从上面的结果中看到,客户端在收到[SYN, ACK]包之后,发送了一个[RST]包重置这条TCP连接。
仔细查看了代码发现,客户端的代码中并没有发送[RST]包。那么这个[RST]包是哪里来的呢?
操作系统中有协议栈的概念,所以来自应用层的数据,都会一层层的经过操作系统协议栈处理,然后通过网卡发送出去。
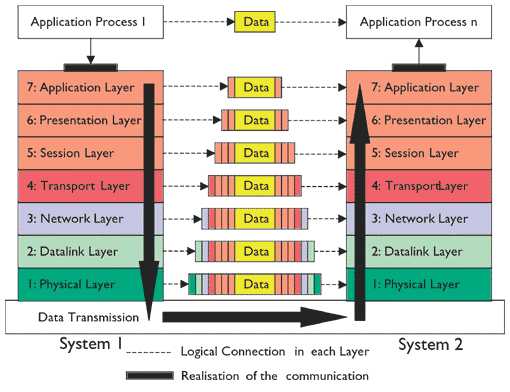
当客户端网卡收到[SYN, ACK]包后,这个包会被我们的Pcap.Net程序捕获,也会被传送给客户端操作系统。由于通过Pcap.Net构造的[SYN]包是没有经过操作系统协议栈的,所以操作系统会认为[SYN, ACK]包是一个无效TCP包,并通过[RST]包重置TCP连接。
到这里,多余[RST]包就可以解释了。
为了避免操作系统协议栈对Pcap.Net程序的影响,通过IP安全策略(通过Run->"secpol.msc"打开设置)的设置,可以避免操作系统从本机(192.168.56.101)向虚拟机(192.168.56.102)发送数据包。
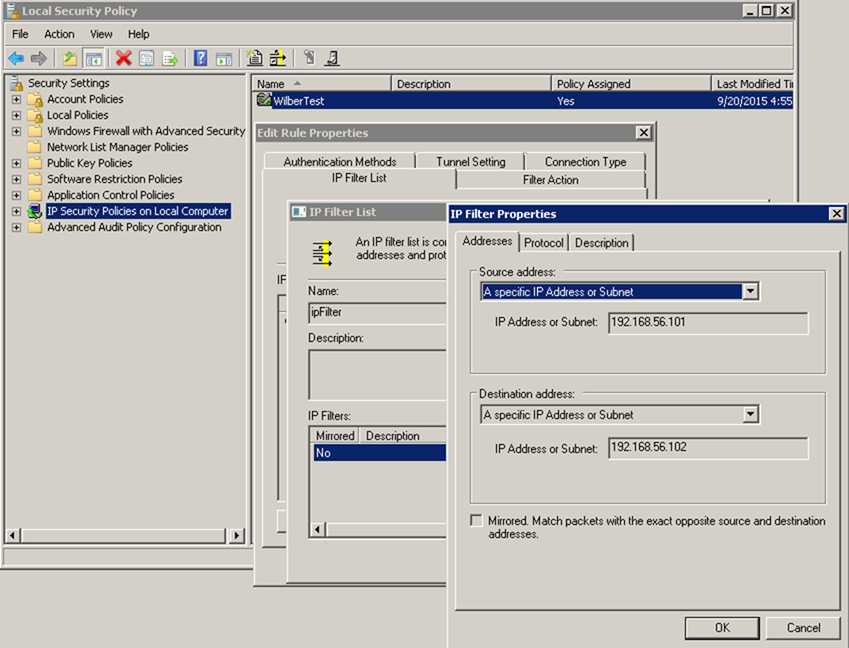
设置完成后,再次运行程序,这是程序就正常了。
由于客户端没有发送[ACK]包来确认来自服务端的[SYN, ACK]包,根据TCP工作原理,服务端会进行重传。


本文中介绍了TCP实验环境的搭建,通过Pcap.Net创建了一个客户端,可以构造不同类型的TCP数据包,并通过特定网卡向服务器发送。
后面继续基于这个环境来看看TCP的一些基本概念,TCP连接、状态变迁等等。
标签:
原文地址:http://www.cnblogs.com/wilber2013/p/4846982.html