标签:
为了在手机画面上显示Activity的window,android内部会做一下内容:
1) 创建一个Window在Window里构建View Hierachy。
2) 与WindowManager建立联系。
3) 为了与SystemServer通信,打开Binder设备。
4) 把Window注册上去,确定View Hierachy大小,位置。
5) 确定大小,位置后在Surface中开始Draw。
6) 把Surface输出在LCD中。
就这样我们就能从手机屏幕中看到了。
Activity的启动简单来说就两种:
首先我们看一下Manifast.xml文件(为了体现两种启动方式而自定义的Manifast)
<?xml version="1.0" encoding="utf-8"?>
<manifest xmlns:android="http://schemas.android.com/apk/res/android"
    package="android.com.activitytest"
    android:versionCode="1"
    android:versionName="1.0">
    <application android:icon="@drawable/icon" android:label="@string/app_name">

    <!-- MainActivity是点击应用程序图标来启动Activity-->
      <activity android:name=".MainActivity"
                  android:label="@string/app_name">
            <intent-filter>
                <action android:name="android.intent.action.MAIN" />
                <category android:name="android.intent.category.LAUNCHER" />
            </intent-filter>
        </activity>
    <!-- SubActivity是MainActivity调用startActivity函数来启动Activity-->
        <activity android:name=".SubActivity" android:label="@string/sub_activity">
        </activity>

    </application>
</manifest>
1. MainActivity的启动
首先我们先分析MainActivity的启动
分析之前我们先看一下Manifast中的 <category android:name="android.intent.category.LAUNCHER" /> ,表示要用LAUNCHER启动。
当我们点击相应的应用程序图标时,Launcher就会启动对应的应用程。
下面是Launcher的源代码
public final class Launcher extends Activity
        implements View.OnClickListener, OnLongClickListener, LauncherModel.Callbacks, AllAppsView.Watcher {

    ......

    /**
    * Launches the intent referred by the clicked shortcut.
    *
    * @param v The view representing the clicked shortcut.
    */
    public void onClick(View v) {
        Object tag = v.getTag();
        if (tag instanceof ShortcutInfo) {
            // Open shortcut
            final Intent intent = ((ShortcutInfo) tag).intent;
            int[] pos = new int[2];
            v.getLocationOnScreen(pos);
            intent.setSourceBounds(new Rect(pos[0], pos[1],
                pos[0] + v.getWidth(), pos[1] + v.getHeight()));
            startActivitySafely(intent, tag);
        } else if (tag instanceof FolderInfo) {
            ......
        } else if (v == mHandleView) {
            ......
        }
    }

    void startActivitySafely(Intent intent, Object tag) {
        intent.addFlags(Intent.FLAG_ACTIVITY_NEW_TASK);
        try {
            startActivity(intent);
        } catch (ActivityNotFoundException e) {
            ......
        } catch (SecurityException e) {
            ......
        }
    }

    ......

}
从代码中可知,当我们点击某个应用程序图标时会触发Launcher的public void onClick(View v)点击事件。
然后调用ShortcutInfo中的startActivitySafely(intent, tag);- > startActivity(intent);。
startActivity函数是启动的Activity的startActivity函数。
frameworks/base/core/java/android/app/Activity.java
public class Activity extends ContextThemeWrapper
        implements LayoutInflater.Factory,
        Window.Callback, KeyEvent.Callback,
        OnCreateContextMenuListener, ComponentCallbacks {

    ......

    @Override
    public void startActivity(Intent intent) {
        startActivityForResult(intent, -1);
    }

    ......

}
还会调用startActivityForResult来进一步处理,第二个参数传入-1表示不需要这个Actvity结束后的返回结果。
public class Activity extends ContextThemeWrapper
        implements LayoutInflater.Factory,
        Window.Callback, KeyEvent.Callback,
        OnCreateContextMenuListener, ComponentCallbacks {

    ......

    public void startActivityForResult(Intent intent, int requestCode) {
        if (mParent == null) {
            Instrumentation.ActivityResult ar =
                mInstrumentation.execStartActivity(
                this, mMainThread.getApplicationThread(), mToken, this,
                intent, requestCode);
            ......
        } else {
            ......
        }


    ......

}
frameworks/base/core/java/android/app/Instrumentation.java
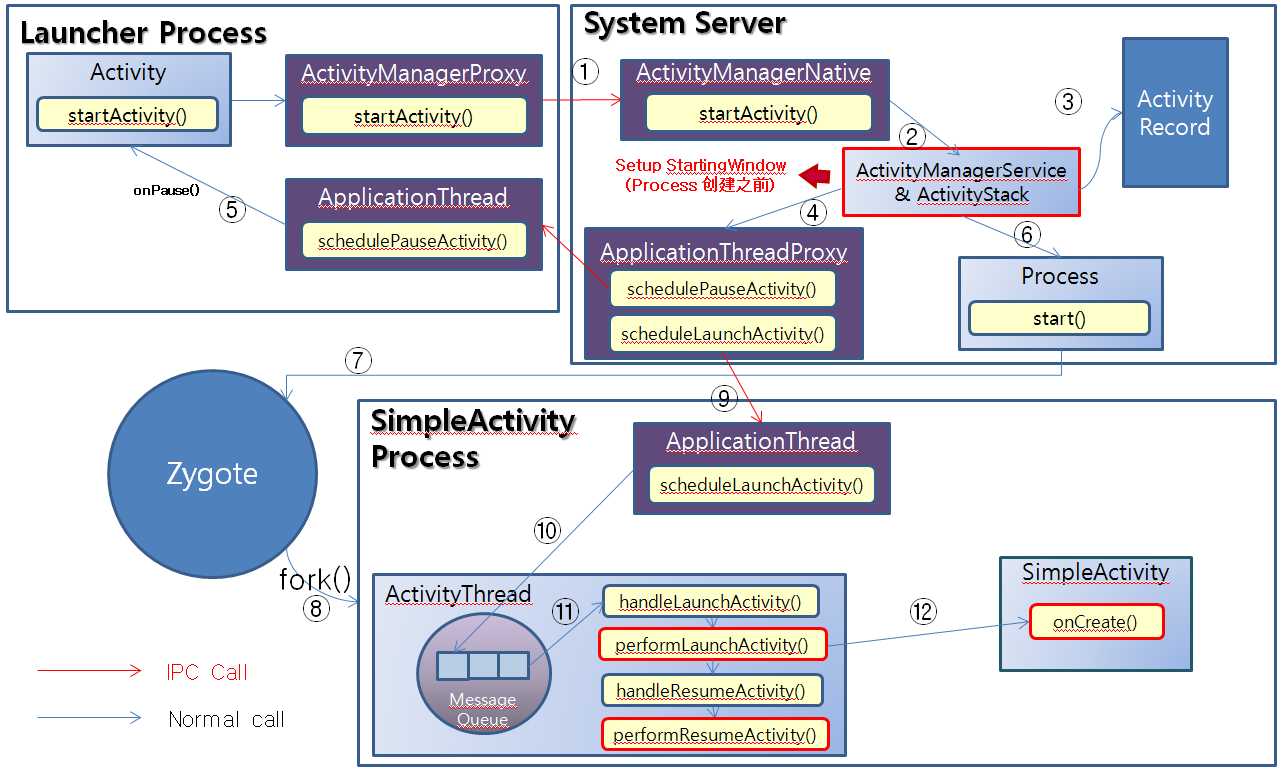
public class Instrumentation {

    ......

    public ActivityResult execStartActivity(
    Context who, IBinder contextThread, IBinder token, Activity target,
    Intent intent, int requestCode) {
        IApplicationThread whoThread = (IApplicationThread) contextThread;
        if (mActivityMonitors != null) {
            ......
        }
        try {
            int result = ActivityManagerNative.getDefault()
                .startActivity(whoThread, intent,
                intent.resolveTypeIfNeeded(who.getContentResolver()),
                null, 0, token, target != null ? target.mEmbeddedID : null,
                requestCode, false, false);
            ......
        } catch (RemoteException e) {
        }
        return null;
    }

    ......

}
重要角色出来了ActivityManagerNative.getDefault()返回ActivityManagerService。
ActivityManagerService是在另外一个进程中所以需要调用它的代理服务。即ActivityManagerProxy。
frameworks/base/core/java/android/app/ActivityManagerNative.java(内部类)
class ActivityManagerProxy implements IActivityManager
{

    ......

    public int startActivity(IApplicationThread caller, Intent intent,
            String resolvedType, Uri[] grantedUriPermissions, int grantedMode,
            IBinder resultTo, String resultWho,
            int requestCode, boolean onlyIfNeeded,
            boolean debug) throws RemoteException {
        Parcel data = Parcel.obtain();
        Parcel reply = Parcel.obtain();
        data.writeInterfaceToken(IActivityManager.descriptor);
        data.writeStrongBinder(caller != null ? caller.asBinder() : null);
        intent.writeToParcel(data, 0);
        data.writeString(resolvedType);
        data.writeTypedArray(grantedUriPermissions, 0);
        data.writeInt(grantedMode);
        data.writeStrongBinder(resultTo);
        data.writeString(resultWho);
        data.writeInt(requestCode);
        data.writeInt(onlyIfNeeded ? 1 : 0);
        data.writeInt(debug ? 1 : 0);
        mRemote.transact(START_ACTIVITY_TRANSACTION, data, reply, 0);
        reply.readException();
        int result = reply.readInt();
        reply.recycle();
        data.recycle();
        return result;
    }

    ......

}
最终还会调用ActivityManagerService(frameworks/base/services/java/com/android/server/am/ActivityManagerService.java)的startActivity函数
而在此函数中没有其他动作,仅仅做了一个转发,调用了ActivityStack.startActivityMayWait函数
frameworks/base/services/java/com/android/server/am/ActivityStack.java
public class ActivityStack {

    ......

    final int startActivityMayWait(IApplicationThread caller,
            Intent intent, String resolvedType, Uri[] grantedUriPermissions,
            int grantedMode, IBinder resultTo,
            String resultWho, int requestCode, boolean onlyIfNeeded,
            boolean debug, WaitResult outResult, Configuration config) {

        ......

        boolean componentSpecified = intent.getComponent() != null;


        intent = new Intent(intent);

        // 解析AndroidManifest.xml,得知activity的报名及activity的类名。
        ActivityInfo aInfo;
        try {
            ResolveInfo rInfo =
                AppGlobals.getPackageManager().resolveIntent(
                intent, resolvedType,
                PackageManager.MATCH_DEFAULT_ONLY
                | ActivityManagerService.STOCK_PM_FLAGS);
            aInfo = rInfo != null ? rInfo.activityInfo : null;
        } catch (RemoteException e) {
            ......
        }

        if (aInfo != null) {
            // 指定具体的组件类,通知应用启动对应的组件。
            intent.setComponent(new ComponentName(
                aInfo.applicationInfo.packageName, aInfo.name));
            ......
        }

        synchronized (mService) {
            int callingPid;
            int callingUid;
            if (caller == null) {
                ......
            } else {
                callingPid = callingUid = -1;
            }

            mConfigWillChange = config != null
                && mService.mConfiguration.diff(config) != 0;

            ......

            if (mMainStack && aInfo != null &&
                (aInfo.applicationInfo.flags&ApplicationInfo.FLAG_CANT_SAVE_STATE) != 0) {

                      ......

            }

            int res = startActivityLocked(caller, intent, resolvedType,
                grantedUriPermissions, grantedMode, aInfo,
                resultTo, resultWho, requestCode, callingPid, callingUid,
                onlyIfNeeded, componentSpecified);

            if (mConfigWillChange && mMainStack) {
                ......
            }

            ......

            if (outResult != null) {
                ......
            }

            return res;
        }

    }

    ......

}
最后调用startActivityLocked
frameworks/base/services/java/com/android/server/am/ActivityStack.java
public class ActivityStack {

    ......

    final int startActivityLocked(IApplicationThread caller,
            Intent intent, String resolvedType,
            Uri[] grantedUriPermissions,
            int grantedMode, ActivityInfo aInfo, IBinder resultTo,
                String resultWho, int requestCode,
            int callingPid, int callingUid, boolean onlyIfNeeded,
            boolean componentSpecified) {
            int err = START_SUCCESS;

        ProcessRecord callerApp = null;
        if (caller != null) {
            callerApp = mService.getRecordForAppLocked(caller);
            if (callerApp != null) {
                callingPid = callerApp.pid;
                callingUid = callerApp.info.uid;
            } else {
                ......
            }
        }

        ......

        ActivityRecord sourceRecord = null;
        ActivityRecord resultRecord = null;
        if (resultTo != null) {
            int index = indexOfTokenLocked(resultTo);

            ......

            if (index >= 0) {
                sourceRecord = (ActivityRecord)mHistory.get(index);
                if (requestCode >= 0 && !sourceRecord.finishing) {
                    ......
                }
            }
        }

        int launchFlags = intent.getFlags();

        if ((launchFlags&Intent.FLAG_ACTIVITY_FORWARD_RESULT) != 0
            && sourceRecord != null) {
            ......
        }

        ......

        ActivityRecord r = new ActivityRecord(mService, this, callerApp, callingUid,
            intent, resolvedType, aInfo, mService.mConfiguration,
            resultRecord, resultWho, requestCode, componentSpecified);

        ......

        return startActivityUncheckedLocked(r, sourceRecord,
            grantedUriPermissions, grantedMode, onlyIfNeeded, true);
    }


    ......

}
从caller(ApplicationThread)中获取进程(launcher进程)信息保存在ProcessRecord callerApp=mService.getRecordForAppLocked(caller);
创建即将要启动的Activity的相关信息ActivityRecord r = new ActivityRecord函数。
而在startActivityUncheckedLocked函数中把Task保存在r.task域中,同时,添加到mService中去,这里的mService就是ActivityManagerService了。调用startActivityLocked(r, newTask, doResume)
frameworks/base/services/java/com/android/server/am/ActivityStack.java
public class ActivityStack {

    ......

    private final void startActivityLocked(ActivityRecord r, boolean newTask,
            boolean doResume) {
        final int NH = mHistory.size();

        int addPos = -1;

        if (!newTask) {
            ......
        }

        // Place a new activity at top of stack, so it is next to interact
        // with the user.
        if (addPos < 0) {
            addPos = NH;
        }

        // If we are not placing the new activity frontmost, we do not want
        // to deliver the onUserLeaving callback to the actual frontmost
        // activity
        if (addPos < NH) {
            ......
        }

        // Slot the activity into the history stack and proceed
        mHistory.add(addPos, r);
        r.inHistory = true;
        r.frontOfTask = newTask;
        r.task.numActivities++;

     //NH表示当前系统中历史任务的个数
        if (NH > 0) {
            // We want to show the starting preview window if we are
            // switching to a new task, or the next activity‘s process is
            // not currently running.
            ......
        } else {
            // If this is the first activity, don‘t do any fancy animations,
            // because there is nothing for it to animate on top of.
            ......
        }

        ......

        if (doResume) {
            resumeTopActivityLocked(null);
        }
    }

    ......

}
resumeTopActivityLocked(null); 函数获得堆栈顶端的Activity,即MainActivity。
MainActivity创建了ActivityRecord后,它的app域一直保持为null。有了这些信息后,上面这段代码就容易理解了,它最终调用startSpecificActivityLocked进行下一步操作。
rameworks/base/services/java/com/android/server/am/ActivityStack.java
public class ActivityStack {

    ......

    private final void startSpecificActivityLocked(ActivityRecord r,
            boolean andResume, boolean checkConfig) {
        // 由于是第一次启动应用程序的Activity,所以下面语句
        ProcessRecord app = mService.getProcessRecordLocked(r.processName,
            r.info.applicationInfo.uid);

        ......

        if (app != null && app.thread != null) {
            try {
                realStartActivityLocked(r, app, andResume, checkConfig);
                return;
            } catch (RemoteException e) {
                ......
            }
        }

        mService.startProcessLocked(r.processName, r.info.applicationInfo, true, 0,
            "activity", r.intent.getComponent(), false);
    }


    ......

}
mService.getProcessRecordLocked此函数是在AMS中,路径如下
frameworks/base/services/java/com/android/server/am/ActivityManagerService.java
在此函数中创建一个ProcessRecord,调用startProcessLocked。
frameworks/base/services/java/com/android/server/am/ActivityManagerService.java
在startProcessLocked函数中:
 int pid = Process.start("android.app.ActivityThread",
                mSimpleProcessManagement ? app.processName : null, uid, uid,
                gids, debugFlags, null);
在这我们可以看到他会启动一个Process,而这个Process由Zygote创建的。在前几节中我们讲过有关Zygote,在那里我们提过Zygote的客户端也可以是AMS。从这里我们可以看出这一点。
接下来通过ActivityThread会调用Activity的onCread()。
2. SubActivity的启动
其实利用MainActivity中的组件(如:button.onclick)去startActivity是与Launcher中启动时一样的,从上面分析的内容中可以看出Luancher最终也会调用startActivity。
仅仅是调用subActivity时不会建立一个Process,仅仅利用当场线程去创建而已。然后退回到Main函数时时从ActivityStack中Pause的Activity重新显现出来。
可以参考下面的图:
标签:
原文地址:http://www.cnblogs.com/hongguang-kim/p/4825393.html