标签:
UITableView控件可能是iOS中大家最常用的控件了(滚动视图、cell重用、卡顿优化),今天要讨论的不是这些高大上的话题,今天的话题只是cell高度的计算。
* 传统frame布局下UITableViewCell 高度计算
* AutoLayout下UITableViewCell高度计算(iOS6、7)
* UITableViewCell高度计算之iOS8抽风之旅
* UITableViewCell高度计算之大一统
*第三方库UITableView-FDTemplateLayoutCell源码抛析
以下demo都是在cell高度可变的基础上进行的
1、史上最传统的UITableViewCell使用方法(号称又笨又老),相信大家都用过这种,纯frame布局,cell定制,手动传入数据通过手动计算每一行cell的高度,代码都不好意思上了。
还是上下之前的demo吧!
主要是在UITableViewCell(subCell)中使用一个静态方法传入数据并手动计算内容的高度
说到手动计算内容的高度,其实在cell里面大多是计算一些UILabel具体的宽高,根据内容计算UILabel对应的宽高,看下具体的API:
@interface NSString(UIStringDrawing)

// Single line, no wrapping. Truncation based on the NSLineBreakMode.

- (CGSize)sizeWithFont:(UIFont*)fontNS_DEPRECATED_IOS(2_0,7_0,"Use -sizeWithAttributes:");

- (CGSize)sizeWithFont:(UIFont*)font forWidth:(CGFloat)width lineBreakMode:(NSLineBreakMode)lineBreakModeNS_DEPRECATED_IOS(2_0,7_0,"Use -boundingRectWithSize:options:attributes:context:");

// Wrapping to fit horizontal and vertical size. Text will be wrapped and truncated using the NSLineBreakMode. If the height is less than a line of text, it may return

// a vertical size that is bigger than the one passed in.

// If you size your text using the constrainedToSize: methods below, you should draw the text using the drawInRect: methods using the same line break mode for consistency

- (CGSize)sizeWithFont:(UIFont*)font constrainedToSize:(CGSize)sizeNS_DEPRECATED_IOS(2_0,7_0,"Use -boundingRectWithSize:options:attributes:context:");// Uses NSLineBreakModeWordWrap

- (CGSize)sizeWithFont:(UIFont*)font constrainedToSize:(CGSize)size lineBreakMode:(NSLineBreakMode)lineBreakModeNS_DEPRECATED_IOS(2_0,7_0,"Use -boundingRectWithSize:options:attributes:context:");// NSTextAlignment is not needed to determine size
这个地方Apple提供了一个NSString的分类,我们可以通过传入对应的string 计算出label的自适应宽高,说到底就是使用sizeWithFont:系列重载函数
根据字符串计算label的content大小。
代码中使用:
(NSString一个传统的方法sizeWithFont:)来计算label新的frame,然后更新布局,之后返回一个预计算的高度值
+ (CGFloat)calulateHeightWithtTitle:(NSString*)title

{

CGFloatheight =20;

CGSizelabelSize = [titlesizeWithFont:[UIFont   systemFontOfSize:17] constrainedToSize:CGSizeMake(300,500)];

height = height + labelSize.height;

returnheight;

}
最终方法的调用在:
- (CGFloat)tableView:(UITableView*)tableView heightForRowAtIndexPath:(NSIndexPath*)indexPath

{

       return [HomeCell  calulateHeightWithtTitle:self.dataArray[indexPath.row]];

}
来完成,并且return该float值作为cell的高度。
1、下面介绍第二种方法,使用自动布局下的cell高度计算,总体来讲,自动布局下 的cell高度计算归功于UILabel的布局,自动布局下默认无需要再指定view的frame,设置完对应的约束,label会自动根据内容的多少来完成布局。废话少说先上体验版demo。
上面描述到,传统frame布局时间,主要是通过一些列手手动计算cell中label的宽高,然后在针对cell中的subView进行重新布局,最后得出一个整体的高度作为cell真实的高度,那么在自动布局中又该如何实现呢?首先自动布局一改了之前frame的概念,自动布局中不存在所谓的坐标 宽高,只有对应的约束。针对UILabel来说,自动布局下label会根据内容的多少自适应的调整label的大小,显示对应的内容。这一点先看下UILabel在iOS6以后发生的变化:
// Support for constraint-based layout (auto layout)

// If nonzero, this is used when determining -intrinsicContentSize for multiline labels

@property(nonatomic)CGFloat  preferredMaxLayoutWidthNS_AVAILABLE_IOS(6_0);
看到官方的注视,基本也大概有差不多的意思了,这东西实在autolayout下使用的,大概意思是给多行label设置一个布局时间优先使用的一个宽度。
在看下UIView的变化
@interfaceUIView (UIConstraintBasedLayoutFittingSize)

/* The size fitting most closely to targetSize in which the receiver‘s subtree can be laid out while optimally satisfying the constraints. If you want the smallest possible size, pass UILayoutFittingCompressedSize; for the largest possible size, pass UILayoutFittingExpandedSize.

Also see the comment for UILayoutPriorityFittingSizeLevel.

*/

- (CGSize)systemLayoutSizeFittingSize:(CGSize)targetSizeNS_AVAILABLE_IOS(6_0);

// Equivalent to sending -systemLayoutSizeFittingSize:withHorizontalFittingPriority:verticalFittingPriority: with UILayoutPriorityFittingSizeLevel for both priorities.
意思大概就是说 当前的这个这个尺寸关系能够最佳的适应接收器的子树在满足自适应约束的同时,如果想要一个最下的尺寸就设置为:UILayoutFittingCompressedSize;反之设置:UILayoutFittingExpandedSize。
实战应用:
自动布局下的自适应cell高度玩转,本教程完全依赖storybord ,依旧在代码UI领域的媛猿们,需要转变一下思维了。
(1)、创建故事板、初始化好tableview、cell的输出口等,准备cell的约束,如图:
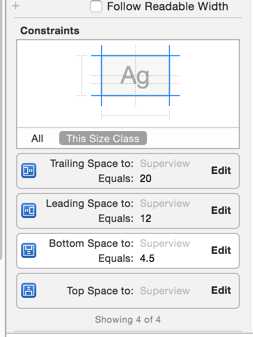
cell上只有一个label,label的约束如下,大体就是具体上下左右各加上一个约束,将来在label中放在对应的内容文字,自适应高度(不要忘了设置cell的identifier)。

(2)、部分实现处理代码
ViewController中部分代理方法
- (NSInteger)numberOfSectionsInTableView:(UITableView*)tableView

{

return1;

}

- (NSInteger)tableView:(UITableView*)tableView numberOfRowsInSection:(NSInteger)section

{

       return [self.dataArraycount];

}

- (UITableViewCell*)tableView:(UITableView*)tableView cellForRowAtIndexPath:(NSIndexPath*)indexPath

{

static NSString *cellIdentifier = @"HomeCell";

HomeCell *cell = [tableView  dequeueReusableCellWithIdentifier:cellIdentifier];

cell.content.text= [self.dataArray  objectAtIndex:indexPath.row];

CGFloat  preMaxWaith =[UIScreen  mainScreen].bounds.size.width-108;

[cell.contentset  PreferredMaxLayoutWidth:preMaxWaith];

[cell.contentlayout  IfNeeded];

returncell;

}

-(CGFloat)tableView:(UITableView*)tableView heightForRowAtIndexPath:(NSIndexPath*)indexPath

{

staticHomeCell*cell =nil;

static dispatch_once_  tonceToken;

//只会走一次

dispatch_once(&onceToken, ^{

cell = (HomeCell*)[tableView  dequeueReusableCellWithIdentifier:@"HomeCell"];

});

//calculate

CGFloatheight = [cell  calulateHeightWithtTitle:[self.dataArray objectAtIndex:indexPath.row]desrip:[self.dataArray objectAtIndex:indexPath.row]];

returnheight;

}

HomeCell.m


-(CGFloat)calulateHeightWithtTitle:(NSString*)title desrip:(NSString*)descrip

{

//这里非常重要

CGFloat preMaxWaith =[UIScreen mainScreen].bounds.size.width-108;

[self.contentset PreferredMaxLayoutWidth:preMaxWaith];

//[self.titleLabel setText:title];

//这也很重要

[self.content  layoutIfNeeded];

[self.content  setText:descrip];

[self.contentView  layoutIfNeeded];

CGSizesize = [self.contentView  systemLayoutSizeFittingSize:UILayoutFittingCompressedSize];

//加1是关键

returnsize.height+1.0f;

}
自动布局版cell高度计算OK!!
1、说到iOS8,在iOS8下如果要计算cell的高度,代码越来越少,工作越来越轻松,殊不知表面看起来特别人性的iOS8背地里面也有太多坑的勾当(具体原因见后面解释)。
先上iOS的计算cell高度的体验demo:
iOS8下计算cell高度的工作比起之前的版本更加轻松
(1)、故事版拖好对应的VC、cell,接下来上约束,约束如下:
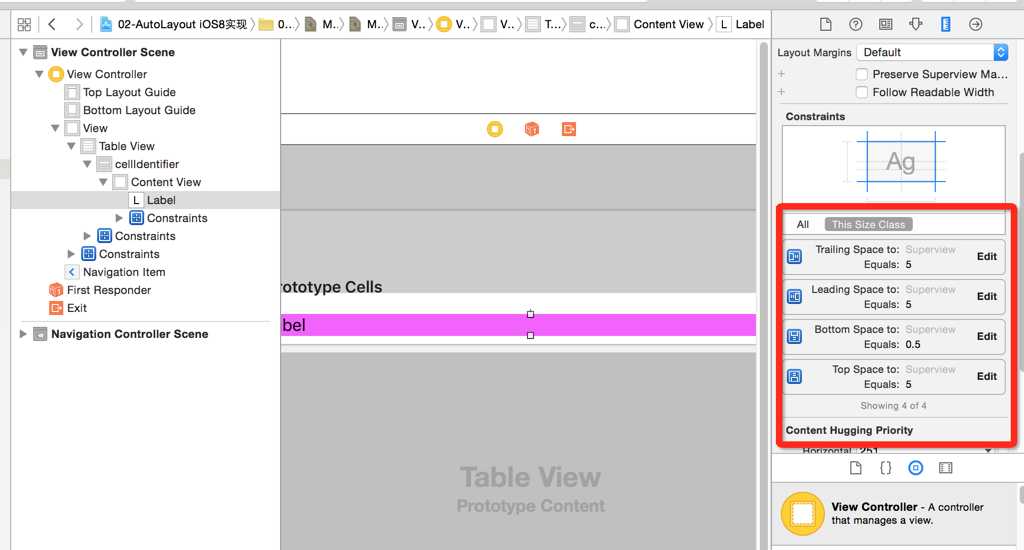
整体来说与2中的约束差不多,分别设置label距离四周的约束情况。(本篇文章要实现的本来就是相同的效果,在不同版本下的的实现方式以及优劣的对比与优化。)
设置好约束后
(2). iOS8的cell高度计算代码
设置tableview的属性
self.tableView.estimatedRowHeight=44.0;

self.tableView.rowHeight=UITableViewAutomaticDimension;
至此,iOS8cell高度自适应计算OK!! 就是这么简单...
在介绍本栏目之前先上一张表:
heightForRowAtIndexPath:cell高度计算次数统计:
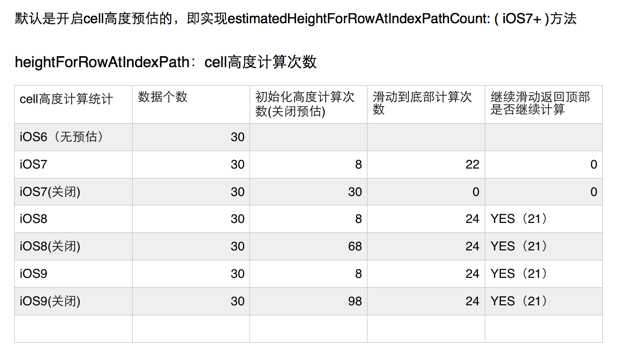
由于iOS7之后,tableview 提供了estimatedHeightForRowAtIndexPathCount的API,这就对cell高度计算的方法调用次数产生了影响。
下面首先说下estimatedHeightForRowAtIndexPathCount :
// Use the estimatedHeight methods to quickly calcuate guessed values which will allow for fast load times of the table.

// If these methods are implemented, the above -tableView:heightForXXX calls will be deferred until views are ready to be displayed, so more expensive logic can be placed there.

- (CGFloat)tableView:(UITableView*)tableView estimatedHeightForRowAtIndexPath:(NSIndexPath*)indexPathNS_AVAILABLE_IOS(7_0);
apple的文档里面说大概意思是estimatedHeight可以快速的预估一个cell的高度值,从而让table的加载速度更快。整体来说就是tableview在渲染的时间,他会首先根据内容计算每个cell的高度,从而计算出tableview的的一个contentsize(tableview继承于scrollview),但是如果有一万行数据,那么这个计算的过程会非常的卡顿,从而影响table的load的速度,我们可以给cell(除了当前需要显示在屏幕上的cell)设置一个预估的高度值,这样就大大节省了计算高度的损耗与开销。
由上图可以看出,iOS7 的tableview对于cell的高度是有缓存功能的,当划到底部,从底部再往顶部滑动时间,heightForRowAtIndexPath:cell的调用次数为0,这说话cell的高度已经换存在了内存。iOS8、iOS9坑爹的一面在于当关闭高度预估方法时间(estimatedHeightForRowAtIndexPathCount),heightForRowAtIndexPath:cell的调用次数非常多(我们一般会在这个地方计算根据内容手动计算cell的高度,或者更新cell内不各种view的约束),这个过程如果频繁的调用是非常耗损性能的,更悲剧的事造成tableview的卡顿,这个是最容忍不了的。当开启高度预估时间,高度预估之时返回了一个定值,此时heightForRowAtIndexPath:cell的调用次数大大减少,高度计算的工作也就大大减少,此时就是我们想要的效果。
此外,这个地方有一个可能忽略的问题,当我们的工程从原来的iOS7迁移到8再到9的时间,如果这个地方不做进一步的优化,之前的代码在新的系统下跑起来结果就不想而之了,为了能够兼容到所有系统下的cell高度计算,推荐一个新的工具
UITableView-FDTemplateLayoutCell
参考博客:具体教程如
(1)、FDTemplateLayoutCell 使用教程
1. 下载FDTemplateLayoutCell第三方库,导入工程
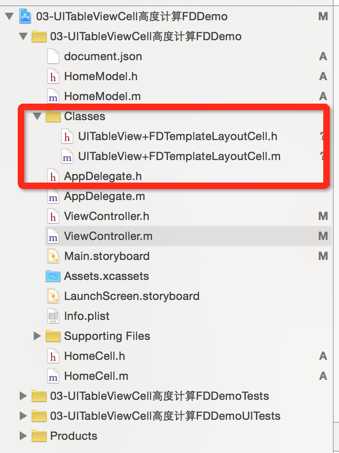
2. 导入头文件
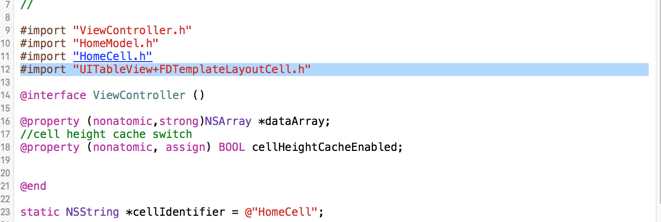
3. 使用FD实现heightForRowAtIndexPath方法,如下:
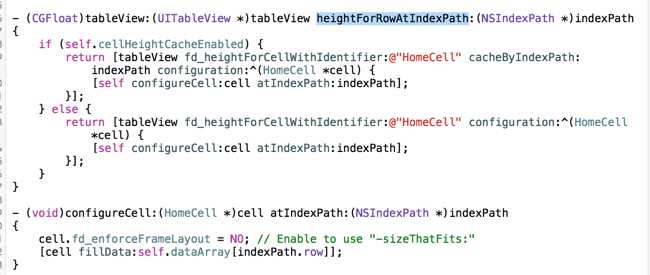
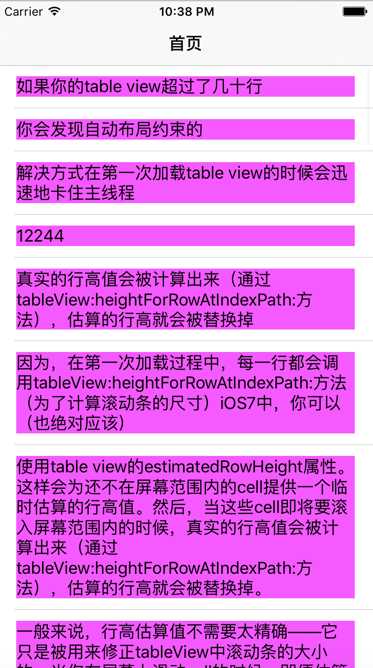
4、大功告成,使用fd一次性解决的iOS 6、7、8、9中的cell高度计算问题,FD采用自带的缓存的机制,无需多次调用heightForRowAtIndexPath时间的cell高度计算开销。
1、FDTemplateLayoutCell之所以能够做到兼容到所有的系统版本下的tableview,主要在于它维护了一套自己的cell高度缓存,同时有效的利用了tableview的高度预估的功能。从新定义新的cell高度缓存策略,这一点解决了只有iOS7下系统才会主动缓存cell高度的这一难点,有了FDiOS8、9下也能使用缓存高度
2、开启UITableView高度预估功能,优化heightForRowAtIndexPath的调用累计次数
(tableView:estimatedHeightForRowAtIndexPath: NS_AVAILABLE_IOS(7_0);)
由上可以看出estimatedHeightForRowAtIndexPath是iOS7才有的,iOS6是没有这个代理的,这个时间不仅要问,难道要iOS必须支持iOS7+以上才能使用,答案当然不是,系统的API早已做了优化,estimatedHeightForRowAtIndexPath在iOS6下面默认是可以被忽略的,不会因为版本的问题引起异常。在iOS6下高度计算的策略会跟iOS8、9下有点类似,使用FD自己提供的缓存,也能达到有效的减少计算cell高度带来的开销。
谈到FD,首先熟悉下之前的一个知识点, iOS知识点整理-RunLoop。可能有些老生常谈了,也有可能部分童鞋看到直接晕掉了,其实大多iOS里面大多第三方库的手段无外乎就是runtime(这个东西在java中叫reflact,java里面有AOP , iOS 其实跟这个差不多)、CF这些黑魔法之类的东西来进行偷天换日、移花接木。
小结:iOS 中的runloop
1、NSRunLoop提供了面向对象的API,但这些API不是线程安全的
2、CFRunLoopRef提供了纯C函数的API,所有这些API都是线程安全的
NSRunLoop是cocoa提供的,这个东西可能大多人还是经常使用的,cell里面更新异步下载成功的图片、启用一个timer追加到当前的应用循环中、启用一个常驻线程等;
CFRunLoopRef可能就相对陌生些,CF开头跟定就是CoreFoundation中定义的,可以暂时理解为每个线程都有一个对应的runloop, 在一个runloop中可以有多种Model(模式),每个Mode又包含若干个source/Timer/Observe .
程序执行的时间当前runloop 只能存在一种Model,如果发生场景切换需要退出当前Model,进入下一个Model
系统一共提供了五种model:
 NSDefaultRunLoopMode:    App默认Mode,当没有接收到ScrollView滚动是,主线程通常使用这个Mode

 NSTrackingRunLoopMode:  到接收到ScroolView或其子类的时候,主线程就会切换到这个模式下运行。

 UIInitializationRunLoopMode:当App启动时使用的第一个Mode,当启动完成后不再使用。

 NSRunLoopCommonModes,是一个tag,本质上不是一个Mode,默认
 NSDefaultRunLoopMode和NSTrackingRunLoopMode都绑定这个tag。(应用场景:有时候我们需要添加一个NSTimer在RunLoop,在这时需要制定一个Modes,现在的  需求是:我们既要在默认模式下要监听,在滚动模式下也要监听,但只能制定一个模式,这是可以制定这个CommonMode)

 GSEventReceiveRunLoopMode:接受系统内部的Mode,通常做不到。

处理不同事件使用不同的Mode,可以最大限度的把性能的最大化处理不同分类的事件,提高性能。
知道了这些,我们可以在此处做文章,我们发现UITableView(继承UIScrollView)不滚动时间是NSDefaultRunLoopMode 模式,滚动时间是NSTrackingRunLoopMode模式,我们可以 通过注册观察者来实现让tableview不滚动的时间再去计算所有的cell的高度,一旦当tableview开始滚动我们再去取得时间着时间缓存池里面已经计算 的差不多了,也就是说尽最大可能让tableview不滚动的时间处理好所有的cell高度,缓存下来,等到滑动tableview的时间优先从缓存取,这个地方尽最大避免了边滑动边计算cell高度卡顿问题。
完成了这个知识点,接下来就是处理好缓存逻辑的事情了。
1、首先对于FD来说,维护cell的高度需要将计算过的cell的高度放进一个二维数组里面(section row)
FD中存在一个可维护的NSMutableArray sections; 可以先理解为一个嵌套起来的数组是一个二位的数组,接下来的时间会把tableview 某个section下的row对应的行对应的高度存在这个位置,
2、tableView渲染的时间,统一还是会走 heightForRowAtIndexPath方法的,我们只需要在此处直接获取到cache里面的已经存储的高度就行了,在此处避开cell的高度逻辑计算过程就到达了我们的目的。

FD组件已经作了很好的封装,在heightForRowAtIndexPath中调用fd计算高度的方法,
- (CGFloat)fd_heightForCellWithIdentifier:(NSString*)identifier cacheByIndexPath:(NSIndexPath*)indexPath configuration:(void(^)(id))configuration

{

if(!identifier || !indexPath) {

return0;

}

// Enable auto cache invalidation if you use this "cacheByIndexPath" API.

if(!self.fd_autoCacheInvalidationEnabled) {

self.fd_autoCacheInvalidationEnabled=YES;

}

// Enable precache if you use this "cacheByIndexPath" API.

if(!self.fd_precacheEnabled) {

self.fd_precacheEnabled=YES;

// Manually trigger precache only for the first time.

[selffd_precacheIfNeeded];

}

// Hit the cache

if([self.fd_cellHeightCachehasCachedHeightAtIndexPath:indexPath]) {

[selffd_debugLog:[NSStringstringWithFormat:

@"hit cache - [%@:%@] %@",

@(indexPath.section),

@(indexPath.row),

@([self.fd_cellHeightCachecachedHeightAtIndexPath:indexPath])]];

return[self.fd_cellHeightCachecachedHeightAtIndexPath:indexPath];

}

// Call basic height calculation method.

CGFloatheight = [selffd_heightForCellWithIdentifier:identifierconfiguration:configuration];

[selffd_debugLog:[NSStringstringWithFormat:

@"cached - [%@:%@] %@",

@(indexPath.section),

@(indexPath.row),

@(height)]];

// Cache it

[self.fd_cellHeightCachecacheHeight:heightbyIndexPath:indexPath];

returnheight;

}
这个步骤中,基本可以看出FD的使用策略,首先开启一个[selffd_precacheIfNeeded]的操作(这个过程是做了一个预计算cell高度的操作,稍后详解),接下来的过程就是从缓存池中根据IndexPath(cell高度预存储在一个模拟的二维数组中)去读取cell的高度,如果cache命中就直接返回cell高度,否则执行:
// Call basic height calculation method.

CGFloatheight = [selffd_heightForCellWithIdentifier:identifierconfiguration:configuration];
去手动计算一次cell的高度,计算获得后存入缓存池
// Cache it

[self.fd_cellHeightCachecacheHeight:heightbyIndexPath:indexPath];
最后返回高度。
3、介绍FD的缓存池
FD在这个地方利用了runloop的黑魔法,通过注册一个观察者,当tableview停止滑动的他会主动去计算当前数据源中的剩余的cell的高度,计算完以后存储在缓存池中,这个调用就是(2)中的
// Enable precache if you use this "cacheByIndexPath" API.

if(!self.fd_precacheEnabled) {

self.fd_precacheEnabled=YES;

// Manually trigger precache only for the first time.

[selffd_precacheIfNeeded];

}
在这个开启调用中,通过一些列手段将tableview不滚动时间去计算cell的高度(具体原理此处省略),计算后存入缓存池sections,sections是一个可变数组,笔者显示把这个理解成一个内存存储元素是可变数组的数组(模拟一个二维数组),FD先是给自己增加了一个属性sections作为缓存池,通过objc_setAssociatedObject给分类增加属性的此处就不介绍了,
[selfbuildHeightCachesAtIndexPathsIfNeeded:@[indexPath]];

self.sections[indexPath.section][indexPath.row] =@(height);

// Build every section array or row array which is smaller than given index path.

[indexPaths enumerateObjectsUsingBlock:^(NSIndexPath*indexPath,NSUIntegeridx,BOOL*stop) {

NSAssert(indexPath.section>=0,@"Expect a positive section rather than ‘%@‘.",@(indexPath.section));

for(NSIntegersection =0; section <= indexPath.section; ++section) {

if(section >=self.sections.count) {

self.sections[section] =@[].mutableCopy;

}

}

NSMutableArray*rows =self.sections[indexPath.section];

for(NSIntegerrow =0; row <= indexPath.row; ++row) {

if(row >= rows.count) {

rows[row] =@(_FDTemplateLayoutCellHeightCacheAbsentValue);

}

}
}];
此处主要是构造一个缓存池,通过在sections中存储一个NSMutableArray,模拟一个二维的数组
通过indexPath的section 和 row作为下标,构造完成直接将高度存进去:
self.sections[indexPath.section][indexPath.row] =@(height);
至此缓存池结束
4、至此FD的核心手段大题已经讲完,接下来就是考虑到tableview的增删改插的时间的处理问题,这一系列的动作都会对缓存池的更新有一定的影响,FD已经做了最大的限度的优化,依旧runtime, swizzling的魔法就不多解释了。
dispatch_once(&onceToken, ^{

SELselectors[] = {

@selector(reloadData),

@selector(insertSections:withRowAnimation:),

@selector(deleteSections:withRowAnimation:),

@selector(reloadSections:withRowAnimation:),

@selector(moveSection:toSection:),

@selector(insertRowsAtIndexPaths:withRowAnimation:),

@selector(deleteRowsAtIndexPaths:withRowAnimation:),

@selector(reloadRowsAtIndexPaths:withRowAnimation:),

@selector(moveRowAtIndexPath:toIndexPath:)

};

for(NSUIntegerindex =0; index

SELoriginalSelector = selectors[index];

SELswizzledSelector =NSSelectorFromString([@"fd_"stringByAppendingString:NSStringFromSelector(originalSelector)]);

MethodoriginalMethod =class_getInstanceMethod(self, originalSelector);

MethodswizzledMethod =class_getInstanceMethod(self, swizzledSelector);

method_exchangeImplementations(originalMethod, swizzledMethod);

}

});
小结:
FD是一个封装的很完美的库,其实从一开始使用这个库就喜欢上了,作者是百度的sunnyxy,另一方面iOS中runtime仍旧是一个很强大的东西,大多的第三方库无非都是基本objc runtime做的一些便捷优化,但是一个优秀的第三方库需要作者不断的完善和大家的共同努力。
UITableViewCell 高度计算从混沌初始到天地交泰
标签:
原文地址:http://www.cnblogs.com/ccguo/p/4876875.html