标签:
目前我知道的java方面的构建工具有:ant,maven和gradle。其中ant较早,我也没用过。gradle出现最晚,吸取了ant和maven的一些优点,目前安卓开发主要使用的构建工具。这里不介绍gradle,介绍下maven。
maven 的理念是约定俗成优于配置,怎么理解呢,就是maven默认情况下构建一个项目就会成一个默认的文件结构,像这样:
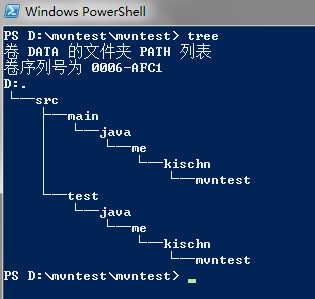
上面一个是个普通java工程(非web)的默认工程目录,如果要非要改也不是不行,但是遵守这样的规定有何不好呢?
根据上面的文件树,我们基本就可以确定:
java源文件就放到src/main/java目录下了,测试代码就放到src/test/java目录下。这样一来,以后真正打包发布的时候,maven会自动地忽视test目录下的测试代码。
扯淡什么的最无聊了,还是直接上干货,看到了,跟着做会了,才学到了。
maven.apache.org 这是官网,下载最新的zip,解压,这货和tomcat差不多,只需要解压,不用安装,但是得配置环境变量
在系统中创建 M2_HOME 变量,值为解压后的maven文件夹,就是maven的bin文件的上级~
然后再在Path环境变量里面添加 %M2_HOME%\bin 即可~
我这是在windows 7 平台下,CMD太丑了,用PowerShell来运行命令吧,powershell在开始-附件里哦~
执行mvn -V 如果显示出了maven的版本,则证明成功了。
这很简单,没必要上图了吧~
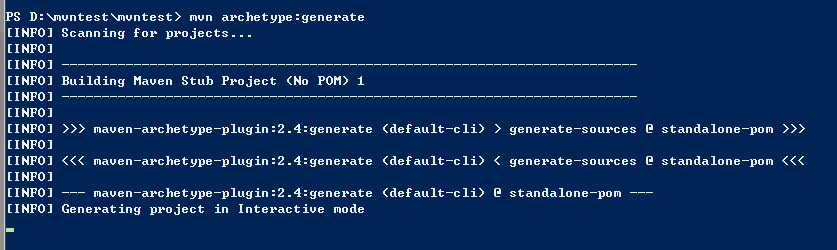
先不要问为什么,直接和图中一样,执行 mvn archetype:generate 然后maven就会执行,然后卡住……因为maven要去下载一些插件包~这句话的意思就是让maven创建一个工程啦~其实这些都没有啥意思的,因为平常没有什么人会通过命令来建maven工程,都是通过IDE的集成工具,那个超简单的~所以这个不用记,当作了解就行了~从现在起你忘上了面是啥也没什么大不了~
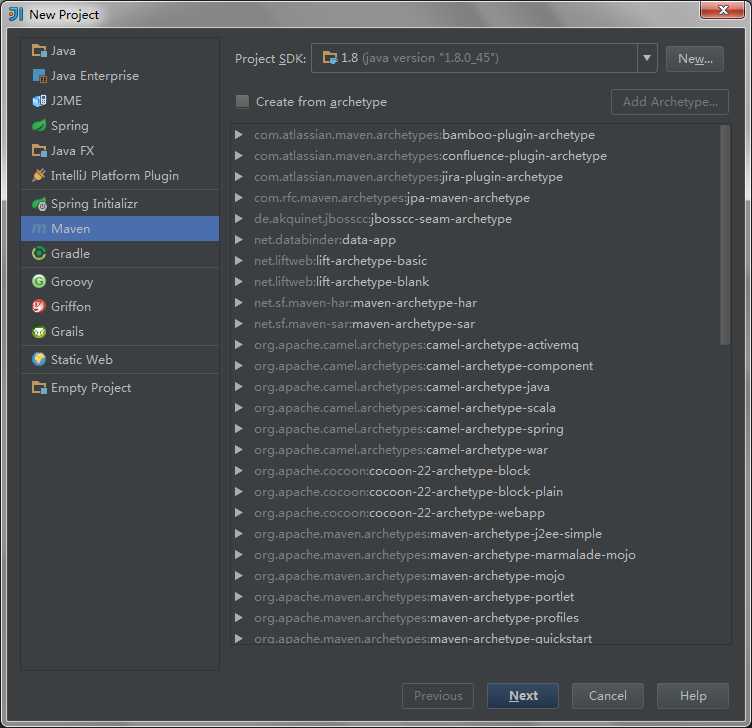
还是贴一个IDE创建Maven工程的截图吧(Intellij IDEA),右边直接选一个类型(选哪个先下面讲解),然后一路下一步就完了……0.0所以,上面有啥用?
看到这里,那个powershell应该也运行到这里了吧?

上面列表里面显示的其实和IDEA里面右侧的一样,就是让你选一个工程类型,默认是660,就是上面的上面的IDEA截图最下面那个,quickstart~直接回车就行~
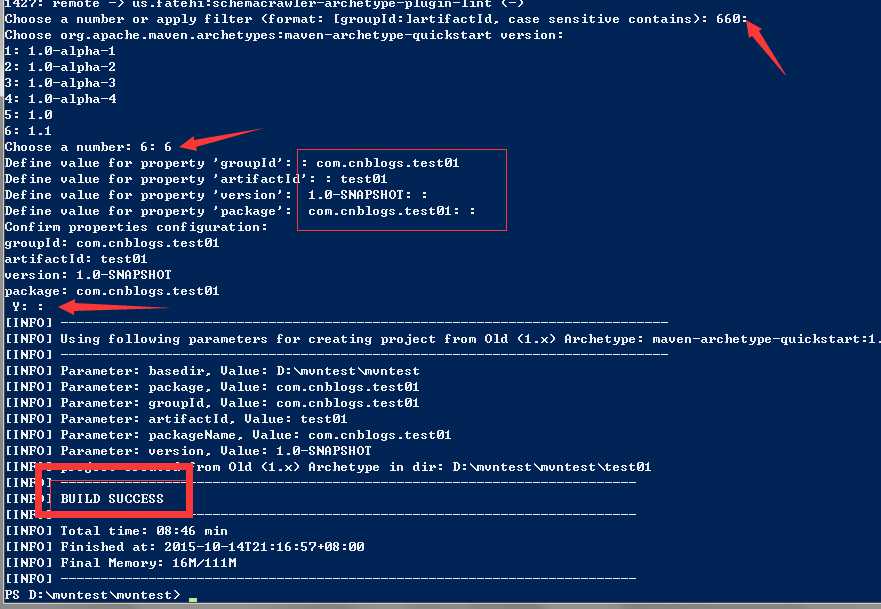
像上图一样操作,基本上项目就创建完成了。回车即可看到BUILD SUCCESS字样~下面来看看上面的一路配置~
前两个不用讲,因为约定俗成~~~说说那个groupid和artifactid,我们去http://mavenrepository.com/ 随便搜一些Jar包,都会发现,这些jar命名都是有一定规则的~
比如spring-context, 它的mvn依赖配置为:
<dependency>
    <groupId>org.springframework</groupId>
    <artifactId>spring-context</artifactId>
    <version>4.2.1.RELEASE</version>
</dependency>
一看这个,应该就能明白过来,groupId就好比是公司名称或组织名称,artifactId就是旗下的一个产品名称~version自然就是这个产品的更新代数了~通过公司名称-产品名称再加版本信息,就能确定一个唯一的产品了~这就是maven里面的坐标表示~所以不管是spring-bean,spring-ioc,spring-web等等,groupId都是org.springframework~然后产品名称就各自取的~版本也是各取各的,至于为什么大多数情况下版本号差不多一样?因为每次发布都几乎是把整个“组织”的产品都重新打个包~
好了,了解了maven中的jar的定位方式,我们来自己写一个jar包,回到刚才创建项目那里,我们看到mvn自己建了一个test01的文件夹,点进去,有一个src和一个pom.xml文件,这就是mvn的工作目录了~以后maven打包了,测试了,还是发布了,都要在这个路径下,因为mvn要读那个pom.xml里面的配置~这个文件就是maven的核心~

package com.cnblogs.test01;

/**
 * Hello world!
 *
 */
public class App
{
    public static final String name = "hello,world!";

    public static void main( String[] args )
    {
        System.out.println( "Hello World!" );
    }
}
找到上面的App.java并添加 public static final String name = "hello,world!";虽然目前来说这一步没啥用,但是一会我们还要讲依赖么~我们一会要再创建一个工程,然后添加对这个工程的依赖,获取并打印上面定义的name内容~
同时,我们看到,这里面有一个main方法,但是我们不需要在这里执行它~不是有一个test么,看看里面也有一个test的java类,maven默认添加了junit的测试包~我们只需要改那个java文件,然后运行mvn test,mvn就可以去执行test目录下的所有符合要求的测试文件~比如这样: 只是添加了一行System.out.println(App.name);这个
package com.cnblogs.test01;

import junit.framework.Test;
import junit.framework.TestCase;
import junit.framework.TestSuite;

/**
 * Unit test for simple App.
 */
public class AppTest
    extends TestCase
{
    /**
     * Create the test case
     *
     * @param testName name of the test case
     */
    public AppTest( String testName )
    {
        super( testName );
    }

    /**
     * @return the suite of tests being tested
     */
    public static Test suite()
    {
        return new TestSuite( AppTest.class );
    }

    /**
     * Rigourous Test :-)
     */
    public void testApp()
    {
    System.out.println(App.name);
        assertTrue( true );
    }
}
然后运行mvn test
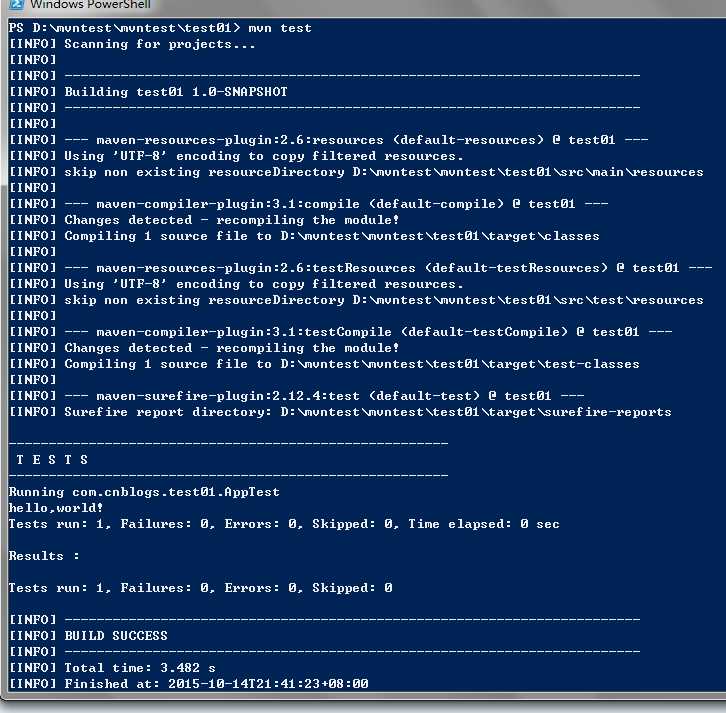
找到上面的helloworld了吗?把App.name打印出来了吧?~
看来这个项目没啥错了,那我们就把它打包,用起来吧~
这里,先说几个命令:
mvn clean 当然就是清理之前打过的包了~
mvn compile 就是编译这个项目~
mvn package 是打成jar包或war包~
mvn install 就是把jar安装到本地目录里面,以后就可以像spring-context那样,直接通过配置引用了~
这些命令可以顺序写,比如 mvn clean test install 就是先清理下,再测试,然后安装~
下面执行 mvn install (package就略过了,自己运行着玩吧~)
不贴图了……我贴文字:(方法就是 mvn clean install >> mvn.log)
[INFO] Scanning for projects...
[INFO]
[INFO] ------------------------------------------------------------------------
[INFO] Building test01 1.0-SNAPSHOT
[INFO] ------------------------------------------------------------------------
[INFO]
[INFO] --- maven-clean-plugin:2.5:clean (default-clean) @ test01 ---
[INFO] Deleting D:\mvntest\mvntest\test01\target
[INFO]
[INFO] --- maven-resources-plugin:2.6:resources (default-resources) @ test01 ---
[INFO] Using ‘UTF-8‘ encoding to copy filtered resources.
[INFO] skip non existing resourceDirectory D:\mvntest\mvntest\test01\src\main\resources
[INFO]
[INFO] --- maven-compiler-plugin:3.1:compile (default-compile) @ test01 ---
[INFO] Changes detected - recompiling the module!
[INFO] Compiling 1 source file to D:\mvntest\mvntest\test01\target\classes
[INFO]
[INFO] --- maven-resources-plugin:2.6:testResources (default-testResources) @ test01 ---
[INFO] Using ‘UTF-8‘ encoding to copy filtered resources.
[INFO] skip non existing resourceDirectory D:\mvntest\mvntest\test01\src\test\resources
[INFO]
[INFO] --- maven-compiler-plugin:3.1:testCompile (default-testCompile) @ test01 ---
[INFO] Changes detected - recompiling the module!
[INFO] Compiling 1 source file to D:\mvntest\mvntest\test01\target\test-classes
[INFO]
[INFO] --- maven-surefire-plugin:2.12.4:test (default-test) @ test01 ---
[INFO] Surefire report directory: D:\mvntest\mvntest\test01\target\surefire-reports

-------------------------------------------------------
 T E S T S
-------------------------------------------------------
Running com.cnblogs.test01.AppTest
hello,world!
Tests run: 1, Failures: 0, Errors: 0, Skipped: 0, Time elapsed: 0 sec

Results :

Tests run: 1, Failures: 0, Errors: 0, Skipped: 0

[INFO]
[INFO] --- maven-jar-plugin:2.4:jar (default-jar) @ test01 ---
[INFO] Building jar: D:\mvntest\mvntest\test01\target\test01-1.0-SNAPSHOT.jar
[INFO]
[INFO] --- maven-install-plugin:2.4:install (default-install) @ test01 ---
[INFO] Installing D:\mvntest\mvntest\test01\target\test01-1.0-SNAPSHOT.jar to C:\Users\kischn\.m2\repository\com\cnblogs\test01\test01\1.0-SNAPSHOT\test01-1.0-SNAPSHOT.jar
[INFO] Installing D:\mvntest\mvntest\test01\pom.xml to C:\Users\kischn\.m2\repository\com\cnblogs\test01\test01\1.0-SNAPSHOT\test01-1.0-SNAPSHOT.pom
[INFO] ------------------------------------------------------------------------
[INFO] BUILD SUCCESS
[INFO] ------------------------------------------------------------------------
[INFO] Total time: 4.012 s
[INFO] Finished at: 2015-10-14T21:48:05+08:00
[INFO] Final Memory: 16M/134M
[INFO] ------------------------------------------------------------------------
如上面所说,我们已经把Jar安装到本地的maven仓库里面了~可以去看看~~C:\Users\{your_user_name}\.m2\repository
上面还有一个坑没有填,就是项目依赖,不是说好App.name要让别的项目调用么,接下来就是填坑的时候了~
mvn archetype:generate 再创建一个项目,然后各种填填填,回车回车回车~最后生成一个com.cnblogs.test02的test02项目~
修改那里面的App.java为App02.java
 1 package com.cnblogs.test02;
 2
 3 /**
 4  * Hello world!
 5  *
 6  */
 7 public class App02
 8 {
 9     public void showTest01AppName(){
10         System.out.println(com.cnblogs.test01.App.name);
11     }
12
13     public static void main( String[] args )
14     {
15         System.out.println( "Hello World!" );
16     }
17 }
修改pom.xml添加对test01项目的依赖~
<project xmlns="http://maven.apache.org/POM/4.0.0" xmlns:xsi="http://www.w3.org/2001/XMLSchema-instance"
  xsi:schemaLocation="http://maven.apache.org/POM/4.0.0 http://maven.apache.org/xsd/maven-4.0.0.xsd">
  <modelVersion>4.0.0</modelVersion>

  <groupId>com.cnblogs.test02</groupId>
  <artifactId>test02</artifactId>
  <version>1.0-SNAPSHOT</version>
  <packaging>jar</packaging>

  <name>test02</name>
  <url>http://maven.apache.org</url>

  <properties>
    <project.build.sourceEncoding>UTF-8</project.build.sourceEncoding>
  </properties>

  <dependencies>
    <dependency>
      <groupId>junit</groupId>
      <artifactId>junit</artifactId>
      <version>3.8.1</version>
      <scope>test</scope>
    </dependency>
    <dependency>
      <groupId>com.cnblogs.test01</groupId>
      <artifactId>test01</artifactId>
      <version>1.0-SNAPSHOT</version>
      <!--scope就是作用域,test就是说只有mvn test的时候才用这个包,正式的时候mvn不会加进去-->
      <!--scope还有provided 一般用在比如jsp-api servlet-api这样的上面,真正打包的时候也不会加进去,因为tomcat这样的服务器里面有-->
      <!--默认的肯定就是什么时候也需要的那种了,值是啥来?runtime 因为不用写,所以忘了-->
    </dependency>
  </dependencies>
</project>
修改测试代码来进行运行
 1 package com.cnblogs.test02;
 2
 3 import junit.framework.Test;
 4 import junit.framework.TestCase;
 5 import junit.framework.TestSuite;
 6
 7 /**
 8  * Unit test for simple App.
 9  */
10 public class AppTest
11     extends TestCase
12 {
13     /**
14      * Create the test case
15      *
16      * @param testName name of the test case
17      */
18     public AppTest( String testName )
19     {
20         super( testName );
21     }
22
23     /**
24      * @return the suite of tests being tested
25      */
26     public static Test suite()
27     {
28         return new TestSuite( AppTest.class );
29     }
30
31     /**
32      * Rigourous Test :-)
33      */
34     public void testApp()
35     {
36         App02 test02app = new App02();
37         test02app.showTest01AppName();//将会打印hello,world,来自test01包的值哦~
38         assertTrue( true );
39     }
40 }
然后去test02目录下,执行mvn test结果如下:
[INFO] Scanning for projects...
[INFO]
[INFO] ------------------------------------------------------------------------
[INFO] Building test02 1.0-SNAPSHOT
[INFO] ------------------------------------------------------------------------
[INFO]
[INFO] --- maven-clean-plugin:2.5:clean (default-clean) @ test02 ---
[INFO] Deleting D:\mvntest\mvntest\test02\target
[INFO]
[INFO] --- maven-resources-plugin:2.6:resources (default-resources) @ test02 ---
[INFO] Using ‘UTF-8‘ encoding to copy filtered resources.
[INFO] skip non existing resourceDirectory D:\mvntest\mvntest\test02\src\main\resources
[INFO]
[INFO] --- maven-compiler-plugin:3.1:compile (default-compile) @ test02 ---
[INFO] Changes detected - recompiling the module!
[INFO] Compiling 1 source file to D:\mvntest\mvntest\test02\target\classes
[INFO]
[INFO] --- maven-resources-plugin:2.6:testResources (default-testResources) @ test02 ---
[INFO] Using ‘UTF-8‘ encoding to copy filtered resources.
[INFO] skip non existing resourceDirectory D:\mvntest\mvntest\test02\src\test\resources
[INFO]
[INFO] --- maven-compiler-plugin:3.1:testCompile (default-testCompile) @ test02 ---
[INFO] Changes detected - recompiling the module!
[INFO] Compiling 1 source file to D:\mvntest\mvntest\test02\target\test-classes
[INFO]
[INFO] --- maven-surefire-plugin:2.12.4:test (default-test) @ test02 ---
[INFO] Surefire report directory: D:\mvntest\mvntest\test02\target\surefire-reports

-------------------------------------------------------
 T E S T S
-------------------------------------------------------
Running com.cnblogs.test02.AppTest
hello,world!
Tests run: 1, Failures: 0, Errors: 0, Skipped: 0, Time elapsed: 0 sec

Results :

Tests run: 1, Failures: 0, Errors: 0, Skipped: 0

[INFO] ------------------------------------------------------------------------
[INFO] BUILD SUCCESS
[INFO] ------------------------------------------------------------------------
[INFO] Total time: 3.519 s
[INFO] Finished at: 2015-10-14T22:13:51+08:00
[INFO] Final Memory: 15M/129M
[INFO] ------------------------------------------------------------------------
找到那个hello,world了没?~就这样~简单的依赖就这样被maven解决了~当然,maven也可以解决更复杂点的依赖~
比如我们有A,B,C,D 四个包,D 依赖于A,C; C依赖于A,B;
现在呢,我有一个项目,需要用到D包了,当我引用之后,我需要再引进A,B,C包吗?答案是NO,maven会自己解决~D-C-B这样的依赖,叫传递依赖~
还有一个问题就是,假如C设置的对A的依赖的版本号与D依赖于A的两个A的版本号不一致,从开头讲到,也就是依赖到了同一产品的不同版本(冲突)了,怎么办?
这个时候,maven可能就不是那么明智了,但是依照Java开源界的习惯,高版本的jar对低版本jar一般都会兼容,所以我们通过执行 mvn dependency:tree 来看看怎么依赖的,然后把依赖版本低的那个,给去掉~
这里也没有一个好的例子,但是网上解决冲突的例子还是不少的,这里提供给大家:
好了,先写到这里吧~瞎扯了好多……才开始写博客,方笔从学生时代就不好,啥时候能进步~
标签:
原文地址:http://www.cnblogs.com/kischn/p/4880964.html
