标签:
UIView
cmd + 1模拟器比例100%
cmd + 2模拟器比例75%
cmd + 3模拟器比例50%
cmd + 4模拟器比例33%
cmd + 5模拟器比例25%
cmd + shift + h 点击Home键
cmd + shift + k 模拟器连接物理键盘
cmd + k 隐藏或者显示虚拟器上的键盘
cmd + shift + hh 显示所有打开的应用程序
cmd + l 锁屏
删除应用: 长按应用, 点击x
cmd + s 截屏
程序的入口是main函数
int main(int argc, char * argv[]) {
    @autoreleasepool {
        NSLog(@"程序的入口main函数");
        //指定程序的代理为AppDelegate
        //所有和程序相关的操作都是由AppDelegate来处理
        return UIApplicationMain(argc, argv, nil, NSStringFromClass([AppDelegate class]));
    }
}
Extension, 延展, 私有方法的声明和在类内部使用的实例变量
@interface AppDelegate ()

@end
@implementation AppDelegate
-(void)dealloc {
    [_window release];
    [super dealloc];
}
程序已经完成加载
- (BOOL)application:(UIApplication *)application didFinishLaunchingWithOptions:(NSDictionary *)launchOptions {
}
- (void)applicationWillResignActive:(UIApplication *)application {
    NSLog(@"程序将要注销激活");
}
- (void)applicationDidEnterBackground:(UIApplication *)application {
    NSLog(@"程序已经进入后台");
}
- (void)applicationWillEnterForeground:(UIApplication *)application {
    NSLog(@"程序将要进入前台");
}
- (void)applicationDidBecomeActive:(UIApplication *)application {
    NSLog(@"程序已经激活");
}
- (void)applicationWillTerminate:(UIApplication *)application {
    NSLog(@"程序将要终止");
}
UI: User Interface, 用户界面
UIWindow, 窗口类, 所有的控件必须放到window上才能显示, 一个iOS应用至少要有一个窗口, 继承于UIView
iOS手机中的坐标系, 不同于数学中的笛卡尔坐标系, 原点在左上角, x轴: 向右越来越大, y轴: 向下越来越大
与坐标系相关的数据类型
CGPoint, 结构体, 用于存放一个点的坐标
    CGPoint point = CGPointMake(10, 100);
    NSLog(@"%.lf, %.lf", point.x, point.y);
    NSLog(@"%@", NSStringFromCGPoint(point));
CGSize, 结构体, 用于存放矩形的宽和高
    CGSize size = CGSizeMake(150, 200);
    NSLog(@"%.lf %.lf", size.width, size.height);
    NSLog(@"%@", NSStringFromCGSize(size));
CGRect, 结构体, 用于存放矩形的位置和大小
    CGRect rect = CGRectMake(10, 100, 150, 200);
    NSLog(@"%.lf %.lf %.lf %.lf", rect.origin.x, rect.origin.y, rect.size.width, rect.size.height);
    NSLog(@"%@", NSStringFromCGRect(rect));
[UIScreen mainScreen] bounds], 主屏幕的大小
[UIScreen mainScreen], 获取到主屏幕
UIScreen, 屏幕类
NSLog(@"%@", NSStringFromCGRect([[UIScreen mainScreen] bounds]));
屏幕大小(单位:pt, point)
1, 3g, 3gs, 4, 4s: [320 * 480]
5, 5s, 5c: [320 * 568]
6, 6s: [375 * 667]
6 Plus, 6s Plus: [414 * 736]
创建一个和屏幕大小一样的window对象
self.window = [[[UIWindow alloc] initWithFrame:[[UIScreen mainScreen] bounds]] autorelease];
UIColor, 颜色类, 继承于NSObject, 用于展示一种颜色
RGBA, 取值范围[0, 1]
UIColor *color = [UIColor colorWithRed:0.656 green:1.000 blue:0.838 alpha:1.000];
设置背景颜色
self.window.backgroundColor = [UIColor purpleColor];
让当前窗口成为主窗口, 并显示
[self.window makeKeyAndVisible];
ARC->MRC
1.gar
2.strong->retain
3.重写dealloc方法
4.window, autorelease
UIView, 继承于UIResponder, 一个矩形区域, 所有的控件都是继承于UIView, 用户在手机上能够看到的都是UIView或UIView的子类
创建一个视图的步骤
   1.创建视图, 并设定位置和大小
    UIView *aView = [[UIView alloc] initWithFrame:CGRectMake(20, 30, 100, 200)];
    //2.设置视图属性
    //颜色
    aView.backgroundColor = [UIColor purpleColor];
    //是否隐藏
    aView.hidden = YES;
    //不透明度
    aView.alpha = 0.6;
    //3.添加到window上
    [self.window addSubview:aView];
    //4.释放视图
    [aView release];
    UIView *redView = [[UIView alloc] initWithFrame:CGRectMake(50, 50, 100, 100)];
    redView.backgroundColor = [UIColor redColor];
    redView.hidden = YES;
    redView.alpha = 0.7;
    [self.window addSubview:redView];
    [redView release];

    UIView *blueView = [[UIView alloc] initWithFrame:CGRectMake(100, 100, 100, 100)];
    blueView.backgroundColor = [UIColor blueColor];
    blueView.hidden = YES;
    blueView.alpha = 0.7;
    [self.window addSubview:blueView];
     [blueView release];

    UIView *greenView = [[UIView alloc] initWithFrame:CGRectMake(150, 150, 100, 100)];
    greenView.backgroundColor = [UIColor greenColor];
    greenView.hidden = YES;
    greenView.alpha = 0.7;
    [self.window addSubview:greenView];
    [greenView release];
随机位置, 随机颜色, 创建视图
UIColor *randomColor = [UIColor colorWithRed:arc4random() % 256 / 255. green:arc4random() % 256 / 255. blue:arc4random() % 256 / 255. alpha:arc4random() % 256 / 255.];
    for (NSInteger i = 0; i < 1888; i++) {
        UIView *view = [[UIView alloc] initWithFrame:CGRectMake(arc4random() % (375 - 10 + 1) / 1. , arc4random() % (667 - 10 + 1) / 1., 10, 10)];
        view.backgroundColor = [UIColor colorWithRed:arc4random() % 256 / 255. green:arc4random() % 256 / 255. blue:arc4random() % 256 / 255. alpha:1];
        [self.window addSubview:view];
        [view release];
    }
视图的层级关系
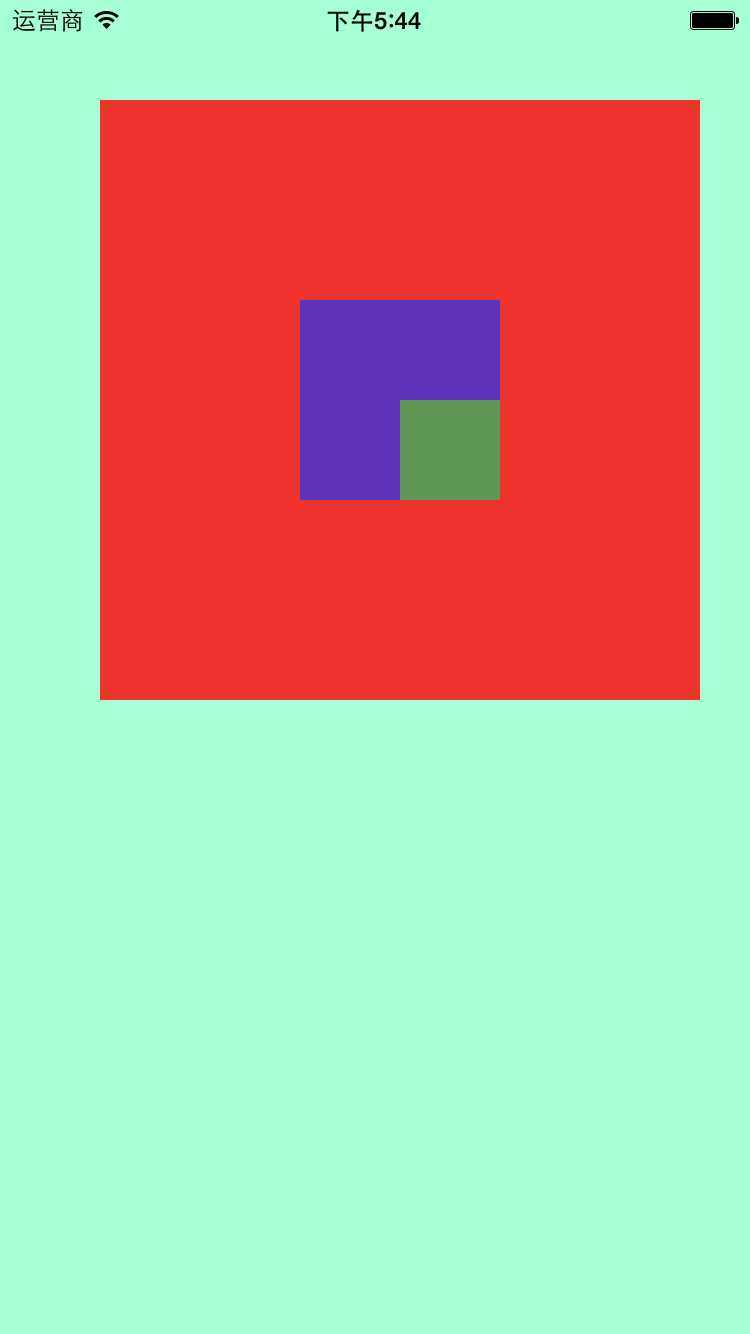
1.越晚添加的视图, 显示在最前面
2.一个视图只能有一个父视图, 但是可以有多个子视图
3.一个视图位置, 是相对于它的父类视图坐标系计算的
    UIView *redView = [[UIView alloc] initWithFrame:CGRectMake(50, 50, 300, 300)];
    redView.backgroundColor = [UIColor redColor];
    redView.hidden = NO;
    redView.alpha = 0.8;
    [self.window addSubview:redView];
    [redView release];

    UIView *blueView = [[UIView alloc] initWithFrame:CGRectMake(100, 100, 100, 100)];
    blueView.backgroundColor = [UIColor blueColor];
    blueView.hidden = NO;
    blueView.alpha = 0.7;
    //超出父视图部分是否切除, 默认NO
    blueView.clipsToBounds = YES;
    [redView addSubview:blueView];
    [blueView release];

    UIView *greenView = [[UIView alloc] initWithFrame:CGRectMake(50, 50, 100, 100)];
    greenView.backgroundColor = [UIColor greenColor];
    greenView.hidden = NO;
    greenView.alpha = 0.7;
    [blueView addSubview:greenView];
    [greenView release];

    //父视图
    NSLog(@"%@", redView.superview);
    //子视图
    NSLog(@"%@", redView.subviews);
    NSLog(@"%@", self.window.subviews);
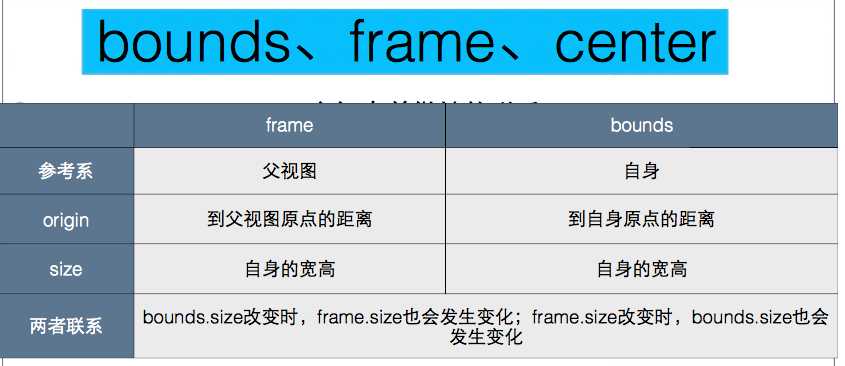
center, 基于父视图坐标系, 视图中心点在父视图坐标系中的位置
    NSLog(@"%@", NSStringFromCGPoint(redView.center));
    NSLog(@"%@", NSStringFromCGPoint(blueView.center));
frame, 基于父视图坐标系, 视图在父视图坐标系中的位置和大小
    NSLog(@"%@", NSStringFromCGRect(redView.frame));
    NSLog(@"%@", NSStringFromCGRect(blueView.frame));
bounds, 基于自身坐标系, 视图在自身坐标系中的位置和大小, 默认值:{0, 0, w, h}
    NSLog(@"%@", NSStringFromCGRect(redView.bounds));
    redView.bounds = CGRectMake(100, 100, 300, 300);
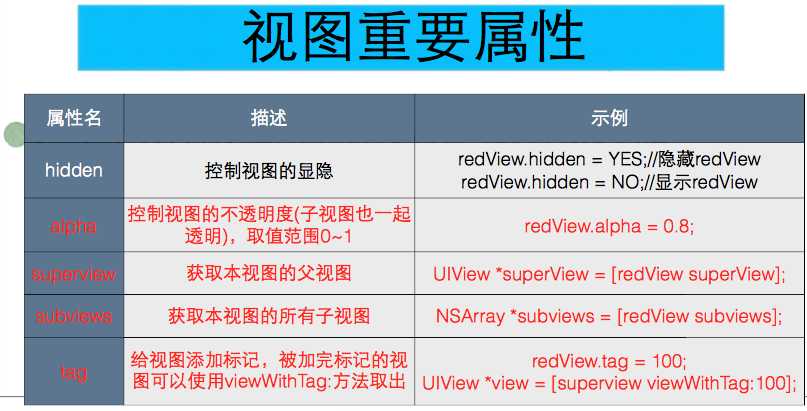
UIView属性
1.backgroundColor(默认透明色)
2.hidden
3.alpha
4.clipsToBounds
5.superView
6.subViews
7.center
8.frame
9.bounds


标签:
原文地址:http://www.cnblogs.com/OrangesChen/p/4883613.html