标签:
上一篇文章中讲到了Merge的用法和注意事项,所以本人就想,做了一个Demo进行验证下。
一、Merge的使用
(1)activity中的onCreate方法中的setContentView(R.layout.main2);
(2)应用Include或者ViewStub标签从外部导入xml结构时,可以将被导入的xml用merge作为根节点表示,这样当被嵌入父级结构中后可以很好的将它所包含的子集融合到父级结构中,而不会出现冗余的节点。<include layout="@layout/main2"/>
(3)当需要扩充的xml layout本身是由merge作为根节点的话,需要将被导入的xml layout置于 viewGroup中,同时需要设置attachToRoot为True。
View view = inflater.inflate(R.layout.main2, container, true);【注意,Fragment的onCreateView方法中不能使用这个方法,因为ViewGroup container为空】
二、Merge的注意事项
(1)<merge />只可以作为xml layout的根节点。
(2)如果你所创建的xml layout并不是用FramLayout作为根节点(而是应用LinerLayout等定义root标签),就不能应用上边的例子通过merge来优化UI结构。【merge的布局效果跟FrameLayout是等同的】
(3)Merge的父布局最好也是FrameLayout,因为使用Merge优化是指将<merge />内的元素添加到<merge />的父元素里,如果父布局不是FrameLayout,那么merge的元素添加到父布局中后,本来的展现效果就是发生变化——按照父布局的样式进行展现。
三、验证
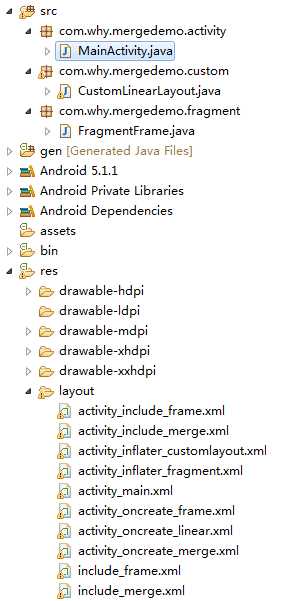
MergeDemo的目录如下图所示:
3.1、最初的布局【activity_main.xml】
(1)布局文件

<RelativeLayout xmlns:android="http://schemas.android.com/apk/res/android"
    xmlns:tools="http://schemas.android.com/tools"
    android:layout_width="match_parent"
    android:layout_height="match_parent"
    android:paddingBottom="@dimen/activity_vertical_margin"
    android:paddingLeft="@dimen/activity_horizontal_margin"
    android:paddingRight="@dimen/activity_horizontal_margin"
    android:paddingTop="@dimen/activity_vertical_margin"
    tools:context="com.why.mergedemo.activity.MainActivity" >

    <TextView
        android:layout_width="wrap_content"
        android:layout_height="wrap_content"
        android:text="activity_main" />

</RelativeLayout>
(2)activity类

package com.why.mergedemo.activity;

import android.app.Activity;
import android.os.Bundle;

public class MainActivity extends Activity {

    @Override
    protected void onCreate(Bundle savedInstanceState) {
        super.onCreate(savedInstanceState);
        setContentView(R.layout.activity_main);
    }

}
(3)HierarchyViewer图(局部)【最左侧的FrameLayout就是指MainActivity的默认布局】

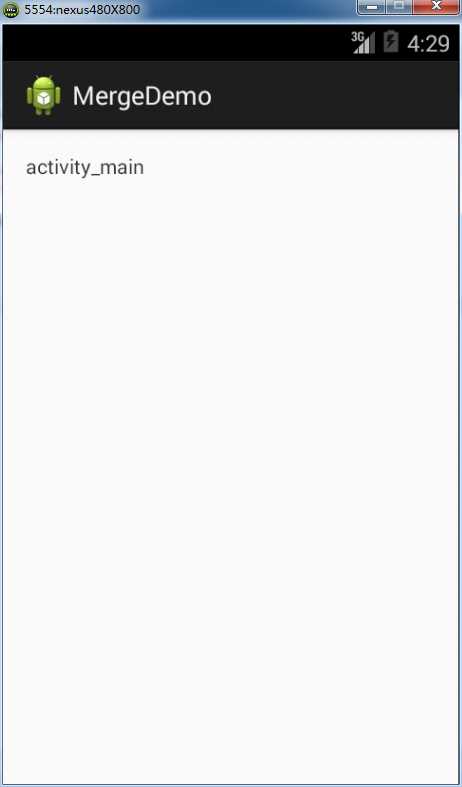
(4)效果图
3.2、用法一:activity中的onCreate方法中的setContentView(R.layout.main2);
3.2.1、activity_oncreate_linear
(1)布局文件

<?xml version="1.0" encoding="utf-8"?>
<LinearLayout xmlns:android="http://schemas.android.com/apk/res/android"
    android:layout_width="match_parent"
    android:layout_height="match_parent"
    android:orientation="vertical" >

    <ImageView
        android:layout_width="match_parent"
        android:layout_height="match_parent"
        android:scaleType="fitCenter"
        android:src="@drawable/golden_gate" />

    <TextView
        android:layout_width="wrap_content"
        android:layout_height="wrap_content"
        android:layout_gravity="center_horizontal|bottom"
        android:layout_marginBottom="20dip"
        android:background="#AA000000"
        android:padding="12dip"
        android:text="activity_oncreate_linear"
        android:textColor="#ffffffff" />

</LinearLayout>
(2)activity类

package com.why.mergedemo.activity;

import android.app.Activity;
import android.os.Bundle;

public class MainActivity extends Activity {

    @Override
    protected void onCreate(Bundle savedInstanceState) {
        super.onCreate(savedInstanceState);
        setContentView(R.layout.activity_oncreate_linear);
    }

}
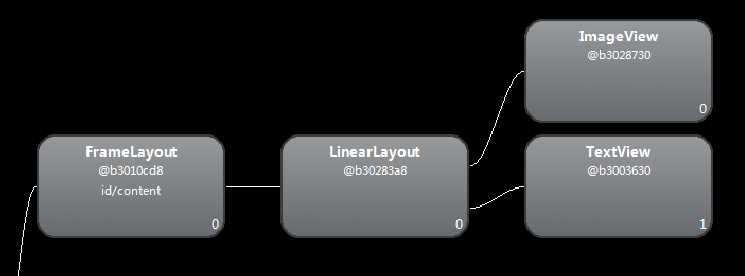
(3)HierarchyViewer图(局部)【最左侧的FrameLayout就是指MainActivity的默认布局】
(4)效果图

3.2.2、activity_oncreate_frame
(1)布局文件

<?xml version="1.0" encoding="utf-8"?>
<FrameLayout xmlns:android="http://schemas.android.com/apk/res/android"
    android:layout_width="match_parent"
    android:layout_height="match_parent" >

    <ImageView
        android:layout_width="fill_parent"
        android:layout_height="fill_parent"
        android:scaleType="fitXY"
        android:src="@drawable/golden_gate" />

    <TextView
        android:layout_width="wrap_content"
        android:layout_height="wrap_content"
        android:layout_gravity="center_horizontal|bottom"
        android:layout_marginBottom="20dip"
        android:background="#AA000000"
        android:padding="12dip"
        android:text="activity_oncreate_frame"
        android:textColor="#ffffffff" />

</FrameLayout>
<?xml version="1.0" encoding="utf-8"?>
<FrameLayout xmlns:android="http://schemas.android.com/apk/res/android"
    android:layout_width="match_parent"
    android:layout_height="match_parent" >

    <ImageView
        android:layout_width="fill_parent"
        android:layout_height="fill_parent"
        android:scaleType="fitXY"
        android:src="@drawable/golden_gate" />

    <TextView
        android:layout_width="wrap_content"
        android:layout_height="wrap_content"
        android:layout_gravity="center_horizontal|bottom"
        android:layout_marginBottom="20dip"
        android:background="#AA000000"
        android:padding="12dip"
        android:text="activity_oncreate_frame"
        android:textColor="#ffffffff" />

</FrameLayout>
(2)activity类

package com.why.mergedemo.activity;

import android.app.Activity;
import android.os.Bundle;

public class MainActivity extends Activity {

    @Override
    protected void onCreate(Bundle savedInstanceState) {
        super.onCreate(savedInstanceState);
        setContentView(R.layout.activity_oncreate_frame);
    }

}
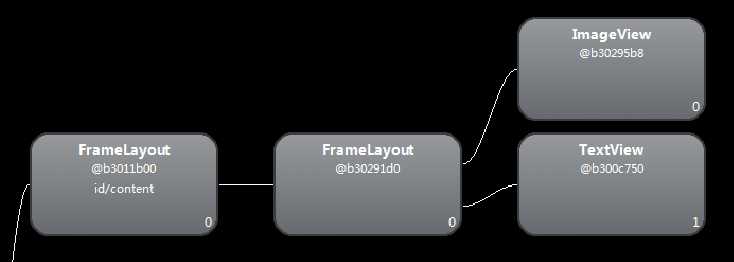
(3)HierarchyViewer图(局部)【最左侧的FrameLayout就是指MainActivity的默认布局】
(4)效果图

3.2.3、activity_oncreate_merge
(1)布局文件

<?xml version="1.0" encoding="utf-8"?>
<merge xmlns:android="http://schemas.android.com/apk/res/android"
    android:layout_width="match_parent"
    android:layout_height="match_parent" >

    <ImageView
        android:id="@+id/goldenIv"
        android:layout_width="fill_parent"
        android:layout_height="fill_parent"
        android:scaleType="fitXY"
        android:src="@drawable/golden_gate" />

    <TextView
        android:layout_width="wrap_content"
        android:layout_height="wrap_content"
        android:layout_gravity="center_horizontal|bottom"
        android:layout_marginBottom="20dip"
        android:background="#AA000000"
        android:padding="12dip"
        android:text="activity_oncreate_merge"
        android:textColor="#ffffffff" />

</merge>
(2)activity类

package com.why.mergedemo.activity;

import android.app.Activity;
import android.os.Bundle;

public class MainActivity extends Activity {

    @Override
    protected void onCreate(Bundle savedInstanceState) {
        super.onCreate(savedInstanceState);
        setContentView(R.layout.activity_oncreate_merge);
    }

}
(3)HierarchyViewer图(局部)【最左侧的FrameLayout就是指MainActivity的默认布局】
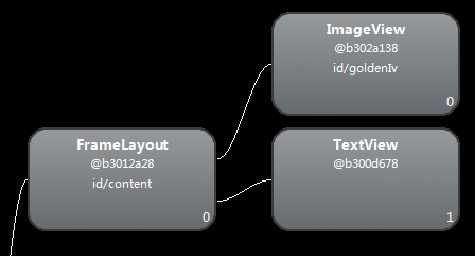
(4)效果图

3.3、用法二:应用Include从外部导入xml结构时
3.3.1、activity_include_frame
(1)布局文件

<LinearLayout xmlns:android="http://schemas.android.com/apk/res/android"
    xmlns:tools="http://schemas.android.com/tools"
    android:layout_width="match_parent"
    android:layout_height="match_parent"
    android:orientation="vertical"
    tools:context="com.why.mergedemo.activity.MainActivity" >

    <TextView
        android:id="@+id/helloId"
        android:layout_width="wrap_content"
        android:layout_height="wrap_content"
        android:text="activity_include_frame" />

    <include
        android:id="@+id/includeId"
        layout="@layout/include_frame"/>

</LinearLayout>

<?xml version="1.0" encoding="utf-8"?>
<FrameLayout xmlns:android="http://schemas.android.com/apk/res/android"
    android:layout_width="match_parent"
    android:layout_height="match_parent" >

    <ImageView
        android:layout_width="match_parent"
        android:layout_height="match_parent"
        android:scaleType="fitXY"
        android:src="@drawable/golden_gate" />

    <TextView
        android:layout_width="wrap_content"
        android:layout_height="wrap_content"
        android:layout_gravity="center_horizontal|bottom"
        android:layout_marginBottom="20dip"
        android:background="#AA000000"
        android:padding="12dip"
        android:text="include_frame"
        android:textColor="#ffffffff" />

</FrameLayout>
(2)activity类

package com.why.mergedemo.activity;

import android.app.Activity;
import android.os.Bundle;

public class MainActivity extends Activity {

    @Override
    protected void onCreate(Bundle savedInstanceState) {
        super.onCreate(savedInstanceState);
        setContentView(R.layout.activity_include_frame);
    }

}
(3)HierarchyViewer图(局部)【最左侧的FrameLayout就是指MainActivity的默认布局】
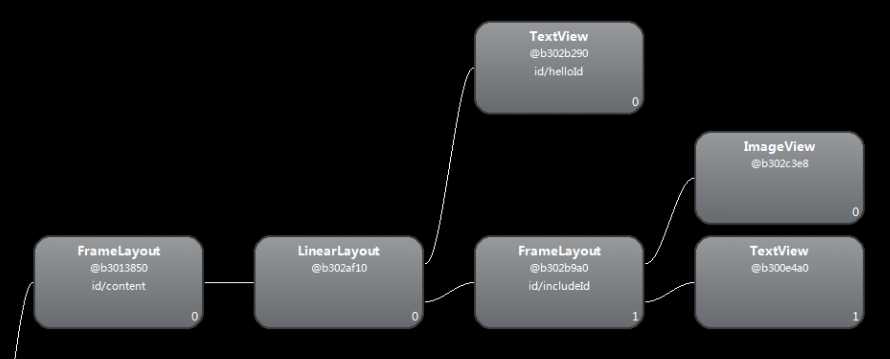
(4)效果图

3.3.2、activity_include_merge
(1)布局文件

<LinearLayout xmlns:android="http://schemas.android.com/apk/res/android"
    xmlns:tools="http://schemas.android.com/tools"
    android:layout_width="match_parent"
    android:layout_height="match_parent"
    android:orientation="vertical"
    tools:context="com.why.mergedemo.activity.MainActivity" >

    <TextView
        android:id="@+id/helloId"
        android:layout_width="wrap_content"
        android:layout_height="wrap_content"
        android:text="activity_include_merge" />

    <include
        android:id="@+id/includeId"
        layout="@layout/include_merge"/>

</LinearLayout>

<?xml version="1.0" encoding="utf-8"?>
<merge xmlns:android="http://schemas.android.com/apk/res/android"
    android:layout_width="match_parent"
    android:layout_height="match_parent" >

    <ImageView
        android:layout_width="match_parent"
        android:layout_height="match_parent"
        android:scaleType="fitXY"
        android:src="@drawable/golden_gate" />

    <TextView
        android:layout_width="wrap_content"
        android:layout_height="wrap_content"
        android:layout_gravity="center_horizontal|bottom"
        android:layout_marginBottom="20dip"
        android:background="#AA000000"
        android:padding="12dip"
        android:text="include_merge"
        android:textColor="#ffffffff" />

</merge>
(2)activity类

package com.why.mergedemo.activity;

import android.app.Activity;
import android.os.Bundle;

public class MainActivity extends Activity {

    @Override
    protected void onCreate(Bundle savedInstanceState) {
        super.onCreate(savedInstanceState);
        setContentView(R.layout.activity_include_merge);
    }

}
(3)HierarchyViewer图(局部)【最左侧的FrameLayout就是指MainActivity的默认布局】
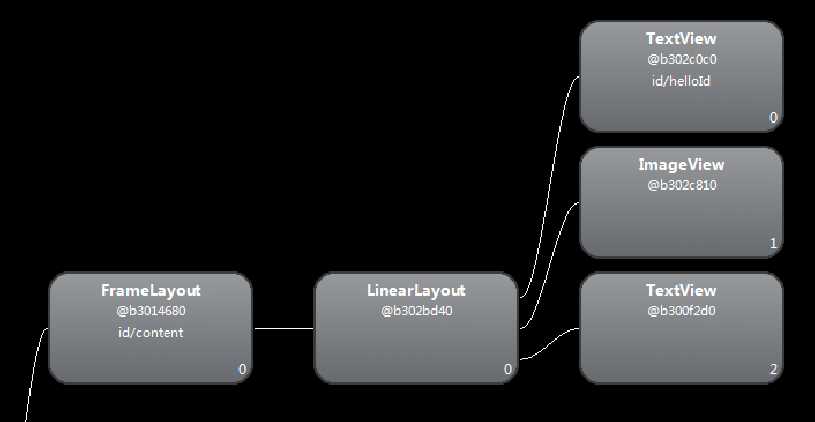
(4)效果图

3.4、用法三:应用inflate从外部导入xml结构时
3.4.1、activity_inflater_customlayout(framelayout--false)
(1)布局文件

<?xml version="1.0" encoding="utf-8"?>
<RelativeLayout xmlns:android="http://schemas.android.com/apk/res/android"
    android:layout_width="match_parent"
    android:layout_height="match_parent" >

    <TextView
        android:id="@+id/helloId"
        android:layout_width="wrap_content"
        android:layout_height="wrap_content"
        android:text="activity_inflater_customlayout" />

    <com.why.mergedemo.custom.CustomLinearLayout
        android:id="@+id/customLinearLayout"
        android:layout_width="match_parent"
        android:layout_height="match_parent"
        android:layout_below="@id/helloId"
        android:orientation="vertical">

    </com.why.mergedemo.custom.CustomLinearLayout>

</RelativeLayout>

<?xml version="1.0" encoding="utf-8"?>
<FrameLayout xmlns:android="http://schemas.android.com/apk/res/android"
    android:layout_width="match_parent"
    android:layout_height="match_parent" >

    <ImageView
        android:layout_width="match_parent"
        android:layout_height="match_parent"
        android:scaleType="fitXY"
        android:src="@drawable/golden_gate" />

    <TextView
        android:layout_width="wrap_content"
        android:layout_height="wrap_content"
        android:layout_gravity="center_horizontal|bottom"
        android:layout_marginBottom="20dip"
        android:background="#AA000000"
        android:padding="12dip"
        android:text="include_frame"
        android:textColor="#ffffffff" />

</FrameLayout>
(2)activity类

package com.why.mergedemo.activity;

import android.app.Activity;
import android.os.Bundle;

public class MainActivity extends Activity {

    @Override
    protected void onCreate(Bundle savedInstanceState) {
        super.onCreate(savedInstanceState);
        setContentView(R.layout.activity_inflater_customlayout);
    }

}

package com.why.mergedemo.custom;

import com.why.mergedemo.activity.R;

import android.content.Context;
import android.util.AttributeSet;
import android.view.LayoutInflater;
import android.view.View;
import android.widget.LinearLayout;

public class CustomLinearLayout extends LinearLayout{

    public CustomLinearLayout(Context context, AttributeSet attrs) {
        super(context, attrs);
        initCustonView(context);
    }

    /*
     * inflate(int resource, ViewGroup root, boolean attachToRoot)
     * 1. 如果root为null,attachToRoot将失去作用,设置任何值都没有意义。
     * 2. 如果root不为null,attachToRoot设为true,则会在加载的布局文件的最外层再嵌套一层root布局。
     * 3. 如果root不为null,attachToRoot设为false,则root参数失去作用。
     * 4. 在不设置attachToRoot参数的情况下,如果root不为null,attachToRoot参数默认为true。*/

    public void initCustonView(Context context){
        //引入R.layout.include_frame, attachToRoot不能等于true【Caused by: java.lang.StackOverflowError】
        //引入R.layout.include_merge, 不能有this.addView(view);
        //View view = LayoutInflater.from(context).inflate(R.layout.include_merge, this, true);

        View view = LayoutInflater.from(context).inflate(R.layout.include_frame, this, false);
        this.addView(view);
    }

}
(3)HierarchyViewer图(局部)【最左侧的FrameLayout就是指MainActivity的默认布局】

(4)效果图

3.4.2、activity_inflater_customlayout(merge--true)
(1)布局文件

<?xml version="1.0" encoding="utf-8"?>
<RelativeLayout xmlns:android="http://schemas.android.com/apk/res/android"
    android:layout_width="match_parent"
    android:layout_height="match_parent" >

    <TextView
        android:id="@+id/helloId"
        android:layout_width="wrap_content"
        android:layout_height="wrap_content"
        android:text="activity_inflater_customlayout" />

    <com.why.mergedemo.custom.CustomLinearLayout
        android:id="@+id/customLinearLayout"
        android:layout_width="match_parent"
        android:layout_height="match_parent"
        android:layout_below="@id/helloId"
        android:orientation="vertical">

    </com.why.mergedemo.custom.CustomLinearLayout>

</RelativeLayout>

<?xml version="1.0" encoding="utf-8"?>
<merge xmlns:android="http://schemas.android.com/apk/res/android"
    android:layout_width="match_parent"
    android:layout_height="match_parent" >

    <ImageView
        android:layout_width="match_parent"
        android:layout_height="match_parent"
        android:scaleType="fitXY"
        android:src="@drawable/golden_gate" />

    <TextView
        android:layout_width="wrap_content"
        android:layout_height="wrap_content"
        android:layout_gravity="center_horizontal|bottom"
        android:layout_marginBottom="20dip"
        android:background="#AA000000"
        android:padding="12dip"
        android:text="include_merge"
        android:textColor="#ffffffff" />

</merge>
(2)activity类

package com.why.mergedemo.activity;

import android.app.Activity;
import android.os.Bundle;

public class MainActivity extends Activity {

    @Override
    protected void onCreate(Bundle savedInstanceState) {
        super.onCreate(savedInstanceState);
        setContentView(R.layout.activity_inflater_customlayout);
    }

}

package com.why.mergedemo.custom;

import com.why.mergedemo.activity.R;

import android.content.Context;
import android.util.AttributeSet;
import android.view.LayoutInflater;
import android.view.View;
import android.widget.LinearLayout;

public class CustomLinearLayout extends LinearLayout{

    public CustomLinearLayout(Context context, AttributeSet attrs) {
        super(context, attrs);
        initCustonView(context);
    }

    /*
     * inflate(int resource, ViewGroup root, boolean attachToRoot)
     * 1. 如果root为null,attachToRoot将失去作用,设置任何值都没有意义。
     * 2. 如果root不为null,attachToRoot设为true,则会在加载的布局文件的最外层再嵌套一层root布局。
     * 3. 如果root不为null,attachToRoot设为false,则root参数失去作用。
     * 4. 在不设置attachToRoot参数的情况下,如果root不为null,attachToRoot参数默认为true。*/

    public void initCustonView(Context context){
        //引入R.layout.include_frame, attachToRoot不能等于true【Caused by: java.lang.StackOverflowError】
        //引入R.layout.include_merge, 不能有this.addView(view);
        View view = LayoutInflater.from(context).inflate(R.layout.include_merge, this, true);

        /*View view = LayoutInflater.from(context).inflate(R.layout.include_frame, this, false);
        this.addView(view);*/
    }

}
(3)HierarchyViewer图(局部)【最左侧的FrameLayout就是指MainActivity的默认布局】
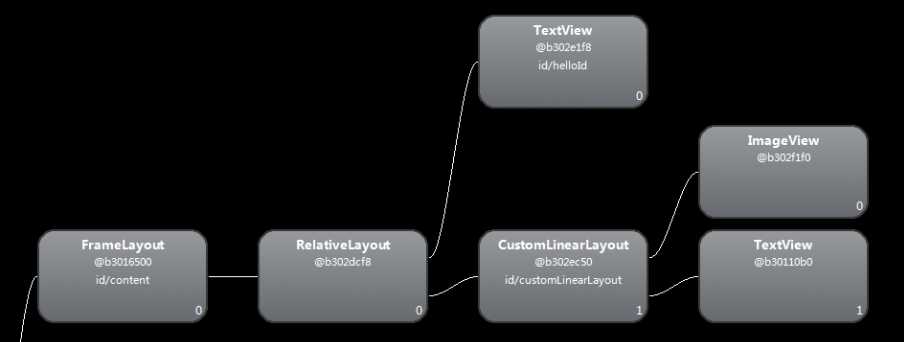
(4)效果图

关于Merge的整理--Merge的使用方法和注意事项的Demo
标签:
原文地址:http://www.cnblogs.com/whycxb/p/4889129.html