标签:
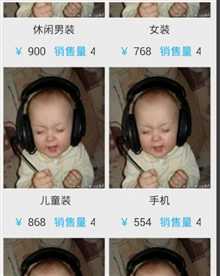
如图是效果图

定义一个 GridView 再在上面添加 产品
先定义产品的适配器

 1 package org.xml.demo;
 2
 3 import ogg.huanxin.huadong.R;
 4 import android.content.Context;
 5 import android.view.LayoutInflater;
 6 import android.view.View;
 7 import android.view.ViewGroup;
 8 import android.widget.BaseAdapter;
 9 import android.widget.LinearLayout;
10 import android.widget.TextView;
11
12 public class ProducteGridAdapter extends BaseAdapter {
13     private Context context;
14
15     public ProducteGridAdapter(Context context) {
16         super();
17         this.context = context;
18     }
19
20     private int[] costs = { 900, 768, 868, 554, 610, 152, 199, 299, 544, 366 };
21     private String[] title = { "休闲男装", "女装", " 儿童装", "手机", "休闲男装", "女装",
22             " 儿童装", "手机", "休闲男装休闲男装休闲男装", "休闲男装" };
23
24     @Override
25     public int getCount() {
26         // 在此适配器中所代表的数据集中的条目数
27         return costs.length;
28     }
29
30     @Override
31     public Object getItem(int arg0) {
32         // (获取数据集中与指定索引对应的数据项)
33         return arg0;
34     }
35
36     @Override
37     public long getItemId(int arg0) {
38         // 取在列表中与指定索引对应的行id
39         return arg0;
40     }
41
42     @Override
43     public View getView(int position, View convertView, ViewGroup parent) {
44         // 获取一个在数据集中指定索引的视图来显示数据
45         Holder holder = null;
46         if (convertView == null) {
47             holder = new Holder();
48             // 根据自定义的布局来加载布局
49             LayoutInflater mInflater = LayoutInflater.from(context);
50             convertView = mInflater.inflate(R.layout.home_produce, null);
51             holder.ll_left = (LinearLayout) convertView
52                     .findViewById(R.id.ll_left);
53             holder.ll_right = (LinearLayout) convertView
54                     .findViewById(R.id.ll_right);
55             holder.product_cost = (TextView) convertView
56                     .findViewById(R.id.product_cost);
57             holder.product_title = (TextView) convertView
58                     .findViewById(R.id.product_title);
59             // 将设置好的布局保存到缓存中,并将其设置在Tag里,以便后面方便取出Tag
60             convertView.setTag(holder);
61
62         } else {
63
64             holder = (Holder) convertView.getTag();
65
66         }
67
68         holder.product_cost.setText(costs[position] + "");
69         holder.product_title.setText(title[position]);
70
71         return convertView;
72     }
73
74     private static final class Holder {
75         private TextView product_title;
76         TextView product_cost;
77         LinearLayout ll_left;
78         LinearLayout ll_right;
79     }
80 }
其中R.layout.home_produce

 1 <?xml version="1.0" encoding="utf-8"?>
 2 <LinearLayout xmlns:android="http://schemas.android.com/apk/res/android"
 3     android:id="@+id/product"
 4     android:layout_width="match_parent"
 5     android:layout_height="match_parent"
 6     android:background="#eee"
 7     android:gravity="center_horizontal"
 8     android:orientation="vertical" >
 9
10     <ImageView
11         android:id="@+id/image_product"
12         android:layout_width="match_parent"
13         android:layout_height="180dp"
14         android:scaleType="fitXY"
15         android:src="@drawable/name" />
16
17     <TextView
18         android:id="@+id/product_title"
19         android:layout_width="match_parent"
20         android:layout_height="wrap_content"
21         android:ellipsize="end"
22         android:gravity="center_horizontal"
23         android:maxLines="1"
24         android:paddingBottom="5dp"
25         android:paddingLeft="10dp"
26         android:paddingRight="10dp"
27         android:paddingTop="5dp"
28         android:text="@string/product"
29         android:textSize="15sp" />
30
31     <LinearLayout
32         android:id="@+id/product_ll"
33         android:layout_width="match_parent"
34         android:layout_height="30dp" >
35
36         <LinearLayout
37             android:id="@+id/ll_left"
38             android:layout_width="0dp"
39             android:layout_height="match_parent"
40             android:layout_weight="1"
41             android:paddingLeft="15dp" >
42
43             <TextView
44                 android:layout_width="wrap_content"
45                 android:layout_height="match_parent"
46                 android:gravity="center_vertical"
47                 android:text="@string/money"
48                 android:textColor="@android:color/holo_blue_light"
49                 android:textSize="16sp" />
50
51             <TextView
52                 android:layout_width="wrap_content"
53                 android:layout_height="match_parent"
54                 android:layout_marginLeft="5dp"
55                 android:id="@+id/product_cost"
56                 android:gravity="center_vertical"
57                 android:text="@string/price"
58                 android:textSize="16sp" >
59             </TextView>
60         </LinearLayout>
61
62         <LinearLayout
63             android:id="@+id/ll_right"
64             android:layout_width="0dp"
65             android:layout_height="match_parent"
66             android:layout_weight="1"
67             android:gravity="right"
68             android:paddingRight="15dp" >
69
70             <TextView
71                 android:layout_width="wrap_content"
72                 android:layout_height="match_parent"
73                 android:gravity="center_vertical"
74                 android:text="@string/xiaoshou"
75                 android:textColor="@android:color/holo_blue_light"
76                 android:textSize="16sp" />
77
78             <TextView
79                 android:layout_width="wrap_content"
80                 android:layout_height="match_parent"
81                 android:layout_marginLeft="5dp"
82                 android:gravity="center_vertical"
83                 android:text="@string/much"
84                 android:textSize="16sp" >
85             </TextView>
86         </LinearLayout>
87     </LinearLayout>
88
89 </LinearLayout>
主代码
package org.xml.demo;

import ogg.huanxin.huadong.R;
import android.app.Activity;
import android.os.Bundle;

public class MyProducte extends Activity {
    // private GridView productGridView;
    private MyGridView product_gridView;
    private ProducteGridAdapter producteGridAdapter;

    @Override
    protected void onCreate(Bundle savedInstanceState) {
        super.onCreate(savedInstanceState);
        //定义布局变量
        super.setContentView(R.layout.home_product);
        //取得控件
        product_gridView = (MyGridView) super.findViewById(R.id.product);
        //设置适配器
        producteGridAdapter = new ProducteGridAdapter(this);
        product_gridView.setAdapter(producteGridAdapter);
    }

}
布局xml
先定义一个MyGridView

 1 package org.xml.demo;
 2
 3 import android.content.Context;
 4 import android.util.AttributeSet;
 5 import android.widget.GridView;
 6
 7 public class MyGridView extends GridView {
 8
 9     public MyGridView(Context context, AttributeSet attrs) {
10         super(context, attrs);
11     }
12
13     public MyGridView(Context context) {
14         super(context);
15     }
16
17     public MyGridView(Context context, AttributeSet attrs, int defStyle) {
18         super(context, attrs, defStyle);
19     }
20
21     @Override
22     public void onMeasure(int widthMeasureSpec, int heightMeasureSpec) {
23
24         int expandSpec = MeasureSpec.makeMeasureSpec(Integer.MAX_VALUE >> 2,
25                 MeasureSpec.AT_MOST);
26         super.onMeasure(widthMeasureSpec, expandSpec);
27     }
28
29 }
<?xml version="1.0" encoding="utf-8"?>
<LinearLayout xmlns:android="http://schemas.android.com/apk/res/android"
    android:layout_width="match_parent"
    android:layout_height="match_parent"
    android:background="#eee"
    android:orientation="vertical" >

    <TextView
        android:layout_width="wrap_content"
        android:layout_height="wrap_content"
        android:layout_marginLeft="15dp"
        android:gravity="center_vertical"
        android:paddingBottom="4dp"
        android:paddingTop="5dp"
        android:text="所有产品"
        android:textSize="15sp" />

    <View
        android:layout_width="fill_parent"
        android:layout_height="1dp"
        android:background="@android:color/white" />

    <ScrollView
        android:layout_width="match_parent"
        android:layout_height="wrap_content" >

        <LinearLayout
            android:layout_width="match_parent"
            android:layout_height="wrap_content"
            android:orientation="vertical" >

            <org.xml.demo.MyGridView
                android:id="@+id/product"
                android:layout_width="match_parent"
                android:layout_height="wrap_content"
                android:horizontalSpacing="5dp"
                android:numColumns="2"
                android:paddingBottom="10dp"
                android:paddingLeft="7dp"
                android:paddingRight="7dp"
                android:paddingTop="5dp"
                android:verticalSpacing="8dp" />
        </LinearLayout>
    </ScrollView>


</LinearLayout>
标签:
原文地址:http://www.cnblogs.com/wangfengdange/p/4891030.html