标签:
Get windows installer on https://git-for-windows.github.io/.
Note that in Windows, the official git tool was called "git for windows" as well as msysgit. They‘re aimed at the same thing.
You should configure some basic information at least for better using experience.
Editor & Merge tool will be need other stand alone tools, e.g. gvim, kdiff3, etc.
Here we do not configure external editor but get the kdiff3 right here http://sourceforge.net/projects/kdiff3/files/latest/download?source=files.
$ git config --global user.name "John Doe"
$ git config --global user.email johndoe@example.com
$ git config --global core.editor gvim
Say we‘re using kdiff3 in windows for Comparison and merge branch.
$ git config --global merge.tool kdiff
$ git config --global mergetool.kdiff3.path "your path to kdiff3.exe"
$ git config --list
Or if you need to check the value of a configuration, use:
$ git config user.name
$ ls ~/.ssh
There should be text files similar to below, which contains the public key & end with your email.
id_dsa.pub
id_rsa.pub
$ ssh-keygen -t rsa -b 4096 -C "your-email@example.com"
# start the ssh-agent in the background
$ ssh-agent -s
# Agent pid 59566
$ ssh-add ~/.ssh/id_rsa
$ clip < ~/.ssh/id_rsa.pub
Change directory to your local project and then:
$ git init
$ git add *.cpp
$ git add README
$ git commit -m ‘initial project version‘
$ git clone git://github.com/example/project.git [directory name]
This will create a directory using your [directory name] or the remote project name (If no directory name specified).
There‘re 3 different status here includes changed, staged, committed.
By default, if you create, modified some files in your local repository, these files will get a untracked status, nothing is record in Stage Area.
$ gvim README
$ git status
# On branch master
# Untracked files:
# (use "git add <file>..." to include in what will be committed)
#
# README
nothing added to commit but untracked files present (use "git add" to track)
Now you‘re going to track & stage these files, you can use git add to finish this.
These files will be committed together when you commit your changes next time.
$ git add README
$ git status
# On branch master
# Changes to be committed:
# (use "git reset HEAD <file>..." to unstage)
#
# new file: README
Note that you can use git diff to compare your changes all the time.
$ git diff
This will compare your unstaged file with your staged area.
You‘re ready to finish a period of development, now let‘s get a version clean and ready.
$ git diff --staged
This will compare your staged changes with the last time you committed.
$ git commit -m "Example message"
If all the needed files were tracked already, then you can also use below command to commit your changes directly without Stage files:
$ git commit -a -m "Example message"
After deleting files, the status will become "Changed but not updated".
$ git rm filesToBeRemoved
$ git rm --cached filesToBeUntracked
After that, you can just add the missing rule to the .gitignore file.
$ git rm \*.log
$ git mv filename1 filename2
$ mv README.txt README
$ git rm README.txt
$ git add README
$ git commit -m ‘initial commit‘
$ git add forgotten_file
$ git commit --amend
$ git reset HEAD benchmarks.rb
# Changes to be committed:
# (use "git reset HEAD <file>..." to unstage)
#
# modified: README.txt
#
# Changed but not updated:
# (use "git add <file>..." to update what will be committed)
# (use "git checkout -- <file>..." to discard changes in working directory)
#
# modified: benchmarks.rb
#
Firstly the file benchmarks.rb was to be committed just like the README.txt above, but now it become a unstaged file which needed other steps.
$ git checkout -- benchmarks.rb
However, this is a dangerous command because it will really discard your changes, unlike some more friendly commands, i.e. stashing.
$ git remote -v
#origin git://example.com/project.git
#peter git://hello.com/project.git
#lan //dell-pc/d/path/project.git
$ git remote add alias git://github.com/paulboone/ticgit.git
Once you have your remote repositories, you can specify you‘ll choose which repository to fetch data:
$ git fetch peter
Unpacking objects: 100% (44/44), done.
From git://github.com/paulboone/ticgit
* [new branch] master -> peter/master
* [new branch] ticgit -> pter/ticgit
$ git push [remote-name] [branch-name]
This is the most widely used part in git. Efficient, Clear, and works great.
$ git branch testing
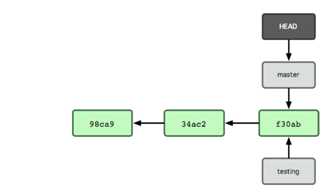
$ git checkout testing
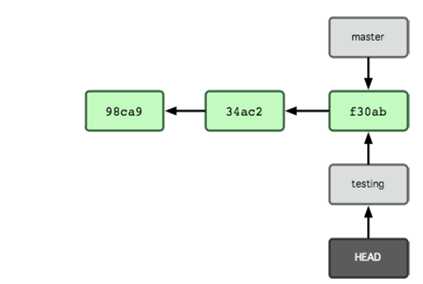
The HEAD pointer has been redirected. And now the checkout command was used to switch branches, instead of discard changes.
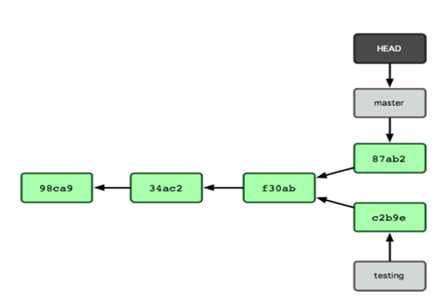
This model explains why we should use branch to control our development, and how easily it is to use.
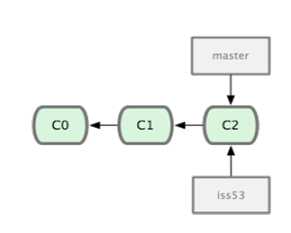
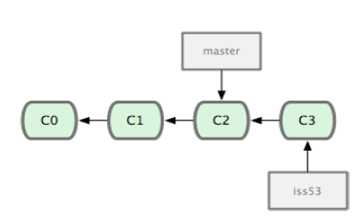
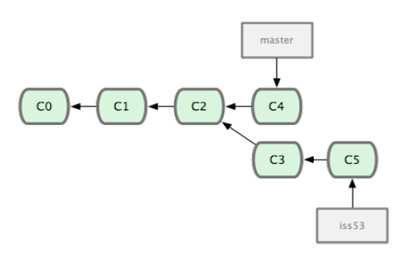
$ git branch iss53
$ git checkout iss53
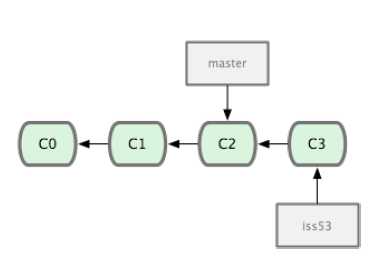
$ git commit -m "Add something"
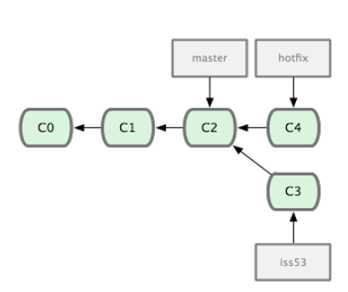
$ git checkout hotfix
#Switched to a new branch "hotfix"
When the hotfix has been committed, it looks like:
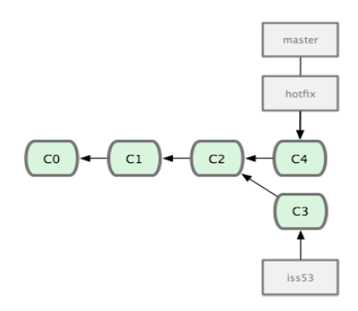
$ git branch -d hotfix
#Deleted branch hotfix (3a0874c).
$ git checkout iss53
$ git commit -m "other features"
$ git checkout master
$ git merge iss53
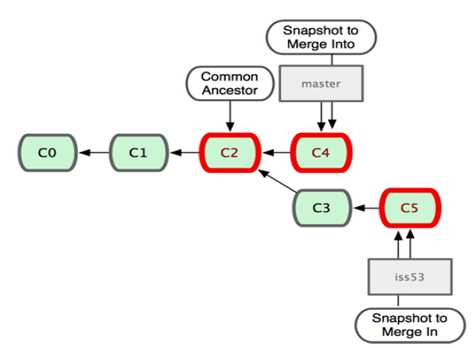
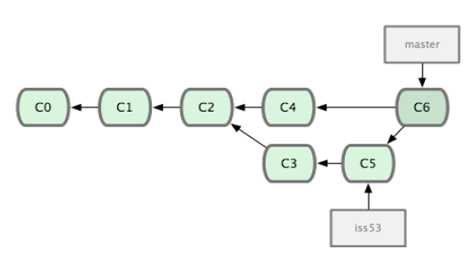
Even though the process of merge was different from the hotfix one, the git decided how to merge these two branches itself. Finding the Common ancestor, merge the commits, and create a new commit (which is a special commit named "Merge commit").
$ git mergetool
merge tool candidates: kdiff3 tkdiff xxdiff meld gvimdiff opendiff emerge vimdiff
Merging the files: index.html
Normal merge conflict for ‘index.html‘:
{local}: modified
{remote}: modified
Hit return to start merge resolution tool (opendiff):
After that, the status will become modified again and could be committed now.
$ git checkout iss53
$ git fetch origin
$ git merge origin/master iss53
$ git push origin iss53
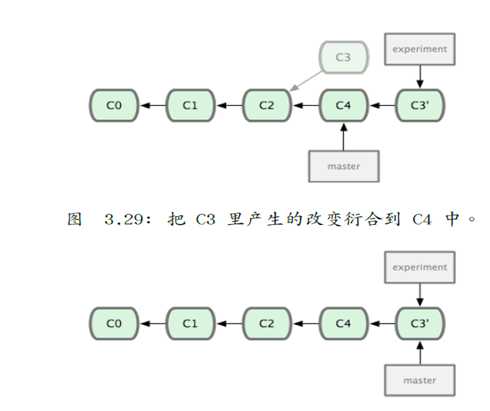
This kind of process could be completed easier via rebase:
$ git checkout iss53
$ git rebase master
$ git push origin iss53
The rebase command will generate a clearer development history:
$ git checkout -b localfix origin/serverfix
Branch localfix set up to track remote branch refs/remotes/origin/serverfix.
Switched to a new branch "localfix "
The branch name can be the same as branch on server side.
$ git push origin serverfix:localfix or
$ git push origin serverfix (if the name were the same)
标签:
原文地址:http://www.cnblogs.com/500error/p/begin-using-git.html