标签:
zbus-dist选择zbus.sh或者zbus.bat直接执行

总线默认占用 15555 端口, http://localhost:15555 可以直接进入监控,注意zbus因为原生兼容HTTP协议所以监控与消息队列使用同一个端口

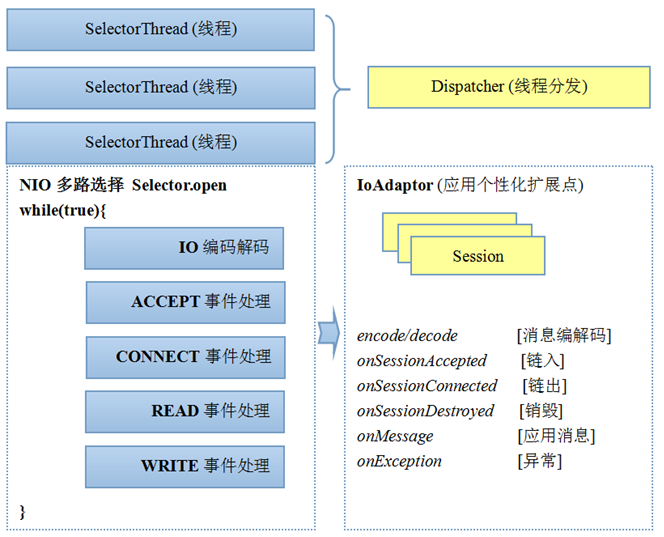
ZBUS项目不依赖其他第三方库,消息通讯基于NIO完成(NET子项目)。NET包对NIO做了简洁的封装,相对Netty而言,学习成本低几个量级,模型简单,但不失扩展性。

框架结构保持 Dispatcher + N SelectorThread + IoAdaptor
Dispatcher 负责管理N个Selector线程
SelectorThread 负责NIO读写事件分发
IoAdaptor 个性化读写事件
基于NET的服务器程序基本只要关心IoAdaptor的个性化,比如ZBUS入口就是MqAdaptor
<dependency>
    <groupId>org.zbus</groupId>
    <artifactId>zbus</artifactId>
    <version>6.2.6</version>
</dependency>
public static void main(String[] args) throws Exception {
    //创建Broker代理
    BrokerConfig config = new BrokerConfig();
    config.setServerAddress("127.0.0.1:15555");
    final Broker broker = new SingleBroker(config);

    Producer producer = new Producer(broker, "MyMQ");
    producer.createMQ(); // 如果已经确定存在,不需要创建

    //创建消息,消息体可以是任意binary,应用协议交给使用者
    Message msg = new Message();
    msg.setBody("hello world");
    producer.sendSync(msg);

    broker.close();
}
public static void main(String[] args) throws Exception{
    //创建Broker代表
    BrokerConfig brokerConfig = new BrokerConfig();
    brokerConfig.setServerAddress("127.0.0.1:15555");
    Broker broker = new SingleBroker(brokerConfig);

    MqConfig config = new MqConfig();
    config.setBroker(broker);
    config.setMq("MyMQ");

    //创建消费者
    @SuppressWarnings("resource")
    Consumer c = new Consumer(config);

    c.onMessage(new MessageHandler() {
        @Override
        public void handle(Message msg, Session sess) throws IOException {
            System.out.println(msg);
        }
    });

    //启动消费线程
    c.start();

}
参考源码test目下的rpc部分
    //1)创建Broker代表(可用高可用替代)
    BrokerConfig config = new BrokerConfig();
    config.setServerAddress("127.0.0.1:15555");
    Broker broker = new SingleBroker(config);

    //2)创建基于MQ的Invoker以及Rpc工厂,指定RPC采用的MQ为MyRpc
    MqInvoker invoker = new MqInvoker(broker, "MyRpc");
    RpcFactory factory = new RpcFactory(invoker);

    //3) 动态代理出实现类
    Interface hello = factory.getService(Interface.class);

    test(hello);

    broker.close();
无任何代码侵入使得你已有的业务接口接入到zbus,获得跨平台和多语言支持
<!-- 暴露的的接口实现示例 -->
<bean id="interface" class="org.zbus.rpc.biz.InterfaceImpl"></bean>

<bean id="serviceProcessor" class="org.zbus.rpc.RpcProcessor">
    <constructor-arg>
        <list>
            <!-- 放入你需要的暴露的的接口 -->
            <ref bean="interface"/>
        </list>
    </constructor-arg>
</bean>

<bean id="broker" class="org.zbus.broker.SingleBroker">
    <constructor-arg>
        <bean class="org.zbus.broker.BrokerConfig">
            <property name="serverAddress" value="127.0.0.1:15555" />
            <property name="maxTotal" value="20"/>
            <!-- 这里可以增加连接池参数配置,不配置使用默认值(参考commons-pool2) -->
        </bean>
    </constructor-arg>
</bean>

<!-- 默认调用了start方法,由Spring容器直接带起来注册到zbus总线上 -->
<bean id="myrpcService" class="org.zbus.rpc.mq.Service" init-method="start">
    <constructor-arg>
        <bean class="org.zbus.rpc.mq.ServiceConfig">
            <!-- 支持多总线注册 -->
            <constructor-arg>
                <list>
                    <ref bean="broker"/>
                </list>
            </constructor-arg>
            <property name="mq" value="MyRpc"/>
            <property name="consumerCount" value="2"/>
            <property name="messageProcessor" ref="serviceProcessor"/>
        </bean>
    </constructor-arg>
</bean>
<bean id="broker" class="org.zbus.broker.SingleBroker">
    <constructor-arg>
        <bean class="org.zbus.broker.BrokerConfig">
            <property name="serverAddress" value="127.0.0.1:15555" />
        </bean>
    </constructor-arg>
</bean>

<bean id="myrpc" class="org.zbus.rpc.RpcFactory">
    <constructor-arg>
        <bean class="org.zbus.rpc.mq.MqInvoker">
            <constructor-arg ref="broker"/>
            <constructor-arg value="MyRpc"/>
        </bean>
    </constructor-arg>
</bean>


<bean id="interface" factory-bean="myrpc" factory-method="getService">
    <constructor-arg type="java.lang.Class" value="org.zbus.rpc.biz.Interface"/>
</bean>
Spring完成zbus代理透明化,zbus设施从你的应用逻辑中彻底消失
public static void main(String[] args) {
    ApplicationContext context = new ClassPathXmlApplicationContext("SpringRpcClient.xml");

    Interface intf = (Interface) context.getBean("interface");
    for(int i=0;i<100;i++){
        System.out.println(intf.listMap());
    }
}
标签:
原文地址:http://www.cnblogs.com/top15from/p/4899954.html