标签:
学习笔记适合新手,如有错误请指正。?号处也请各位指点下,谢谢。
建立一个场景》新建一个Plane作为地面》在创建一组Cube作为一个小屋
把Direction Light的Intensity设置为0.2模拟夜晚的感觉
在创建一个Point Light并置于小屋的天花板
在创建一个player,其下有一个子对象Gun枪,Gun下继续创建一个子对象“GunShotEffect”
上面加上LineRenderer子弹轨迹和开枪的效果Particle System和Point Light
最后新建一个Animator Controller并命名为“PlayerController”里面有Idle和Moving两个状态
为摄像机增加脚本,使其跟随并观察Player,脚本代码如下:
CamPos.cs
using UnityEngine;
using System.Collections;

public class CamPos : MonoBehaviour {
    public float back = 3f;
    public float height = 1f;
    public Transform player;
    public float moveFac;
    Vector3 targetPos;
    void LateUpdate()
    {
        //设置摄像机的目标位置在主角的后上方
        targetPos = player.transform.position +
            -back * player.forward + new Vector3 (0f, height, 0f);
        //摄像机位置逐渐移动至目标位置
        transform.position = new Vector3 (Mathf.Lerp (transform.position.x, targetPos.x, 11),
                                         Mathf.Lerp (transform.position.y, targetPos.y, 5),
                                         Mathf.Lerp (transform.position.z, targetPos.z, 11));
        //摄像机观察主角
        transform.LookAt (player);
    }
}
PlayerManager.cs
using UnityEngine;
using System.Collections;

public class PlayerManager : MonoBehaviour {
    public float rotationSpeed;
    public float moveSpeed;

    public ParticleSystem gunShotEffect;
    public GameObject gunShotLight;
    public AudioSource gunShotSound;

    private bool isShooting = false;
    private Animator animator;
    private Rigidbody rigidbody;

    void Start () {
        animator = GetComponent<Animator>();
        rigidbody = GetComponent<Rigidbody>();
    }
    void Update () {
        //锁定鼠标光标并隐藏
        Cursor.lockState = CursorLockMode.Locked;
        Cursor.visible = false;

        //处理移动
        Moving();
        //处理旋转
        Rotating ();

        //按下鼠标左键射击
        if (Input.GetMouseButtonDown (0)) {
            GunShotStart();
        }

        //按下ESC键退出游戏
        if (Input.GetKey (KeyCode.Escape)) {
            #if !UNITY_EDITOR
            Application.Quit();
            #else
            UnityEditor.EditorApplication.isPlaying = false;
            #endif
        }
    }
    void Moving()
    {
        float x = Input.GetAxis ("Horizontal");
        Vector3 mH = x * transform.right.normalized * moveSpeed * Time.deltaTime;
        rigidbody.MovePosition(rigidbody.position+mH);

        float y = Input.GetAxis ("Vertical");
        Vector3 mV = y * transform.forward.normalized * moveSpeed * Time.deltaTime;
        rigidbody.MovePosition(rigidbody.position+mV);

        bool moving = x != 0 || y != 0;
        animator.SetBool ("IsMoving", moving);
    }
    void Rotating()
    {
        float asixX = Input.GetAxis ("Mouse X");
        transform.eulerAngles += new Vector3 (0, rotationSpeed *Time.deltaTime*asixX, 0);
    }

    void GunShotStart()
    {
        if(isShooting)
            return;
        isShooting = true;
        gunShotLight.SetActive(true);
        gunShotEffect.Play();
        gunShotSound.Play();
        Invoke("GunShotEnd",0.1f);
    }
    void GunShotEnd()
    {
        isShooting = false;
        gunShotLight.SetActive (false);
    }
}
首先,新建一个Audio Source并命名为Music,指定AudioClip为Background Music,勾选Loop将Spatial Blend设置为0
新建一个Audio Source并命名为GunShotSound,指定AudioClip为Player GunShot,取消勾选Play On Awake将Spatial Blend设置为1
在PlayerManager脚本里添加一个AudioSource参数,并在GunShotStart()函数里播放playeraManager脚本代码如下:
using UnityEngine;
using System.Collections;

public class PlayerManager : MonoBehaviour {
    public float rotationSpeed;
    public float moveSpeed;

    public ParticleSystem gunShotEffect;
    public GameObject gunShotLight;
    public AudioSource gunShotSound;

    private bool isShooting = false;
    private Animator animator;
    private Rigidbody rigidbody;

    void Start () {
        animator = GetComponent<Animator>();
        rigidbody = GetComponent<Rigidbody>();
    }
    void Update () {
        //锁定鼠标光标并隐藏
        Cursor.lockState = CursorLockMode.Locked;
        Cursor.visible = false;

        //处理移动
        Moving();
        //处理旋转
        Rotating ();

        //按下鼠标左键射击
        if (Input.GetMouseButtonDown (0)) {
            GunShotStart();
        }

        //按下ESC键退出游戏
        if (Input.GetKey (KeyCode.Escape)) {
            #if !UNITY_EDITOR
            Application.Quit();
            #else
            UnityEditor.EditorApplication.isPlaying = false;
            #endif
        }
    }
    void Moving()
    {
        float x = Input.GetAxis ("Horizontal");
        Vector3 mH = x * transform.right.normalized * moveSpeed * Time.deltaTime;
        rigidbody.MovePosition(rigidbody.position+mH);

        float y = Input.GetAxis ("Vertical");
        Vector3 mV = y * transform.forward.normalized * moveSpeed * Time.deltaTime;
        rigidbody.MovePosition(rigidbody.position+mV);

        bool moving = x != 0 || y != 0;
        animator.SetBool ("IsMoving", moving);
    }
    void Rotating()
    {
        float asixX = Input.GetAxis ("Mouse X");
        transform.eulerAngles += new Vector3 (0, rotationSpeed *Time.deltaTime*asixX, 0);
    }

    void GunShotStart()
    {
        if(isShooting)
            return;
        isShooting = true;
        gunShotLight.SetActive(true);
        gunShotEffect.Play();
        gunShotSound.Play();
        Invoke("GunShotEnd",0.1f);
    }
    void GunShotEnd()
    {
        isShooting = false;
        gunShotLight.SetActive (false);
    }
}
运行场景,角色已经能正常移动和射击了
接着我们来添加音效,新建一个Audio Mixer,在其下再创建两个子组Music和Sound
将Music游戏对象的Audio Soucre的Output指定为Music
将GunShotSound游戏对象的Audio Soucre的Output指定为Sound,分别为两个组添加Duck Volume和Send并进行设置
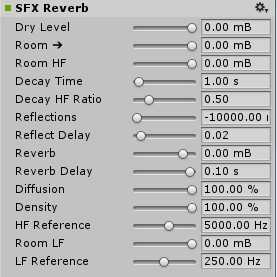
然后是添加混响,屋里开枪的话会有混响效果,这里的混响和Audio Reverb Zone不同,属于Audio Effect,需要我们自己去控制,只是音效需要混响,背景音乐不需要,所以选中Sound组点击Add,在点击SFX Reverb添加,如图所示:

当Room参数为-10000时没有混响,当为0时混响效果打到最大,所以我们用这个参数作为混响的开关
将鼠标光标移至其上并点击鼠标右键“Expose Room(of Sound》SFX Reverb)to Script”那么我们就可以在脚本里对其进行取值和赋值操作了
新建一个空的游戏对象并命名为ReverbTriggerZone,添加BoxCollider组件并勾选Is Trigger设置其位置和大小,匹配小屋并置于其中,然后添加脚本,如下:
using UnityEngine;
using System.Collections;
using UnityEngine.Audio;

public class ReverbTriggerZone : MonoBehaviour {
    public AudioMixer mixer;
    public AudioMixerSnapshot snapshotNoReverb;
    public AudioMixerSnapshot snapshotReverb;
    void OnTriggerEnter(Collider other)
    {
        //当不是玩家进入时,不处理
        if (other.name != "Player")
            return;
        //开启混响
        mixer.SetFloat ("MyExposedParam", 0);
    }

    void OnTriggerExit(Collider other)
    {
        //当不是玩家进入时,不处理
        if (other.name != "Player")
            return;
        //关闭混响
        mixer.SetFloat ("MyExposedParam", -10000);
    }
}
我们还可以使用另外一种方式:快照(Snapshot),相当于将设置保存在一张快照里,以供运行时读取不同设置
回到Audio Mixer窗口,在Snapshots栏点击“+”增加两个快照,一个起名NoReverb,设置Room为-1000;一个起名为Reverb设置Room为0
场景启动时人物在屋子外,没有混响,一次要将NoReverb设置为默认快照
对着NoReverb点击鼠标右键》Set as start Snapshot。
在NoReverb的右侧显示五角星团代表其为默认快照
ReverbTriggerZone脚本如下:
using UnityEngine;
using System.Collections;
using UnityEngine.Audio;

public class ReverbTriggerZone : MonoBehaviour {
    public AudioMixer mixer;
    public AudioMixerSnapshot snapshotNoReverb;
    public AudioMixerSnapshot snapshotReverb;
    void OnTriggerEnter(Collider other)
    {
        //当不是玩家进入时,不处理
        if (other.name != "Player")
            return;
        //开启混响
        //mixer.SetFloat ("MyExposedParam", 0);
        snapshotReverb.TransitionTo (0.1f);
    }

    void OnTriggerExit(Collider other)
    {
        //当不是玩家进入时,不处理
        if (other.name != "Player")
            return;
        //关闭混响
        //mixer.SetFloat ("MyExposedParam", -10000);
        snapshotNoReverb.TransitionTo (0.1f);
    }
}
运行发现两者的效果完全一样
标签:
原文地址:http://www.cnblogs.com/kubll/p/4936705.html