标签:
IOS中的沙盒机制(SandBox)是一种安全体系,它规定了应用程序只能在为该应用创建的文件夹内读取文件,不可以访问其他地方的内容。所有的非代码文件都保存在这个地方,比如图片、声音、属性列表和文本文件等。
1.每个应用程序都在自己的沙盒内
2.不能随意跨越自己的沙盒去访问别的应用程序沙盒的内容
3.应用程序向外请求或接收数据都需要经过权限认证
查看模拟器的沙盒文件夹在Mac电脑上的存储位置,首先,这个文件夹是被隐藏的,所以要先将这些文件显示出来,打开命令行:
显示Mac隐藏文件的命令:defaults write com.apple.finder AppleShowAllFiles -bool true
隐藏Mac隐藏文件的命令:defaults write com.apple.finder AppleShowAllFiles -bool false
然后重新启动Finder,点击屏幕左上角苹果标志——强制退出——选择Finder然后点击重新启动,这个时候在重新打开Finder就可以看到被隐藏的文件了。
还有一种比较简单的办法就是直接点击Finder图标右键——前往文件夹——输入/Users/your username/Library/Application Support/iPhone Simulator/ ,然后确认就可以了。your username是你本机的用户名
然后按下图进入相应的文件夹,就可以到模拟器的沙盒文件目录了:

接着进入一个模拟器版本,我这里是5.1

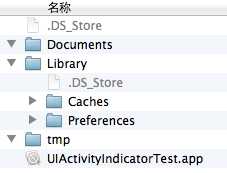
然后可以看到Applications下面存放的就是模拟器中所装的开发的应用程序,随便进入一个后可以看到,一个沙盒中包含了四个部分,如图所示:

分别是.app文件,这个就是可运行的应用文件,Documents,苹 果建议将程序中创建的或在程序中浏览到的文件数据保存在该目录下,iTunes备份和恢复的时候会包括此目录;Library,存储程序的默认设置或其它 状态信息;Library/Caches:存放缓存文件,iTunes不会备份此目录,此目录下文件不会在应用退出删除;tmp,创建和存放临时文件的地 方。
下面通过代码来获取这些目录:
 1     //获取根目录
 2         NSString *homePath = NSHomeDirectory();
 3         NSLog(@"Home目录:%@",homePath);
 4
 5         //获取Documents文件夹目录,第一个参数是说明获取Doucments文件夹目录,第二个参数说明是在当前应用沙盒中获取,所有应用沙盒目录组成一个数组结构的数据存放
 6         NSArray *docPath = NSSearchPathForDirectoriesInDomains(NSDocumentDirectory,NSUserDomainMask, YES);
 7         NSString *documentsPath = [docPath objectAtIndex:0];
 8         NSLog(@"Documents目录:%@",documentsPath);
 9
10         //获取Cache目录
11         NSArray *cacPath = NSSearchPathForDirectoriesInDomains(NSCachesDirectory, NSUserDomainMask, YES);
12         NSString *cachePath = [cacPath objectAtIndex:0];
13         NSLog(@"Cache目录:%@",cachePath);
14
15         //Library目录
16         NSArray *libsPath = NSSearchPathForDirectoriesInDomains(NSLibraryDirectory, NSUserDomainMask, YES);
17         NSString *libPath = [libsPath objectAtIndex:0];
18         NSLog(@"Library目录:%@",libPath);
19
20         //temp目录
21         NSString *tempPath = NSTemporaryDirectory();
22         NSLog(@"temp目录:%@",tempPath);
输出结果如下:
2012-08-03 11:10:24.325 SandBoxTest[12549:f803] Home目录:/Users/Ryan/Library/Application Support/iPhone Simulator/5.1/Applications/A6B99E5A-E2C7-46E9-867A-4E7619F0DA45
2012-08-03 11:10:24.325 SandBoxTest[12549:f803] Documents目录:/Users/Ryan/Library/Application Support/iPhone Simulator/5.1/Applications/A6B99E5A-E2C7-46E9-867A-4E7619F0DA45/Documents
2012-08-03 11:10:24.326 SandBoxTest[12549:f803] Cache目录:/Users/Ryan/Library/Application Support/iPhone Simulator/5.1/Applications/A6B99E5A-E2C7-46E9-867A-4E7619F0DA45/Library/Caches
2012-08-03 11:10:24.326 SandBoxTest[12549:f803] Library目录:/Users/Ryan/Library/Application Support/iPhone Simulator/5.1/Applications/A6B99E5A-E2C7-46E9-867A-4E7619F0DA45/Library
2012-08-03 11:10:24.326 SandBoxTest[12549:f803] temp目录:/var/folders/7z/1wj5h8zx7b59c02pxmpynd500000gn/T/
下面开始向目录里面创建文件,然后向文件里面写入内容:
 1     NSArray *docPath = NSSearchPathForDirectoriesInDomains(NSDocumentDirectory,NSUserDomainMask, YES);
 2         NSString *documentsPath = [docPath objectAtIndex:0];
 3         //写入文件
 4         if (!documentsPath) {
 5             NSLog(@"目录未找到");
 6         }else {
 7             NSString *filePaht = [documentsPath stringByAppendingPathComponent:@"test.txt"];
 8             NSArray *array = [NSArray arrayWithObjects:@"Title",@"Contents", nil];
 9             [array writeToFile:filePaht atomically:YES];
10         }
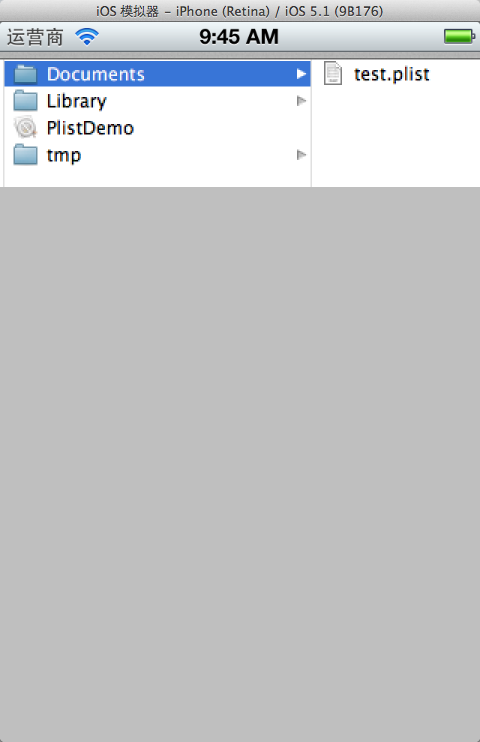
创建成功后打开文件夹目录,可以看到test.txt文件:

接下来是把该文件中的内容读出来:
1     //读取文件
2     NSArray *docPath = NSSearchPathForDirectoriesInDomains(NSDocumentDirectory,NSUserDomainMask, YES);
3         NSString *documentsPath = [docPath objectAtIndex:0];
4         NSString *readPath = [documentsPath stringByAppendingPathComponent:@"test.txt"];
5         NSArray *fileContent = [[NSArrayalloc] initWithContentsOfFile:readPath];
6         NSLog(@"文件内容:%@",fileContent);
输出结果如下:
2012-08-03 11:26:53.594 SandBoxTest[12642:f803] 文件内容:(
Title,
Contents
)
bundle是一个目录,其中包含了程序会使用到的资源.这些资源包含了如图像,声音,编译好的代码,nib文件(用户也会把bundle称为plug-in).对应bundle,
cocoa提供了类NSBundle.
我们现在用bundle获取程序里的一张图片,并显示到View上。
新建一个Single View Application,并在加入viewDidLoad方法里加入如下代码:
//    通过使用下面的方法得到程序的main bundle
    NSBundle *mainBundle = [NSBundle mainBundle];

    NSString *imagePath = [mainBundle pathForResource:@"QQ20120616-1" ofType:@"png"];
    NSLog(@"%@", imagePath);
    UIImage *image = [[UIImage alloc]initWithContentsOfFile:imagePath];
    UIImageView  *imageView = [[UIImageView alloc] initWithImage:image];
    [self.view addSubview:imageView];
在项目上右键,add图片文件图片文件QQ20120616.png。
运行程序:
打印出来图片路径如下
/Users/rongfzh/Library/Application Support/iPhone Simulator/5.1/Applications/3B8EC78A-5EEE-4C2F-B0CB-4C3F02B996D2/iOSSandbox.app/QQ20120616-1.png
我们可以看到,图片在iOSSandbox.app这个包里,
图片显示:

图片取出来并显示了。
标签:
原文地址:http://www.cnblogs.com/zhuyiios/p/4949198.html