标签:
This tutorial is actually for myself as some memos. It provides some example and explanation for the most important commands which might be simple but is worth noting down for your long term memory. I am not going to write tons of commands and their appending complex options, but some of examples that could be easy to understand and enough for your daily work at most of time. I hope they can reflect the backbone of Git and expire you to draw your own diagram for this wonderful version control system in your mind.
Long way to go, but step by step. Here we go...
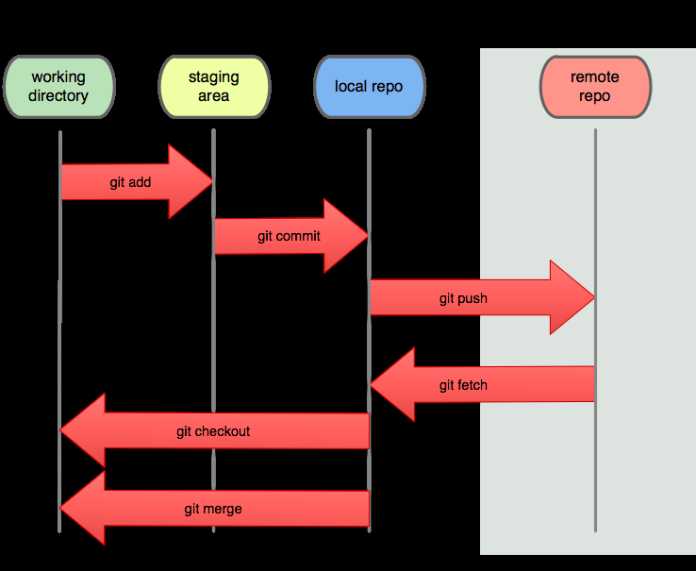
Before we touch Git, I find necessary and important to take a look at the picture below

figure 1.1
This is very clear for you to understand what typical architecture Git is about. That‘s of course very different from any previous version control systems I‘ve ever used such as VSS(Microsoft Visual SourceSafe) and TFS(Microsoft Team Foundation Server).
Please try to make sure you have installed git bash. This is a cool tool in the terminal I am going to play when going through the tutorials.
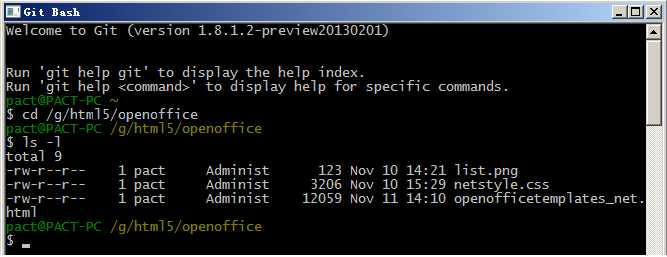
As the picture below we can see, there are 3 files in all in the folder /g/html5/openoffice . Trust me there is no more file even start with dot(.)

figure 1.2
That‘s the folder I want to create repository where the files are going to be managed by Git.
Let‘s type the command to create a repository
git init
After running the command, system will create a folder calls .git in the folder where you want to create repository, as shown below

figure 1.3
Since the new folder name starts with a dot(.), you might not see it in the explorer unless you set the Folder Options by checking item ‘Show hidden files, folders, and drives‘. But if you don‘t like to change the setting, it doesn‘t matter. Typing the command ls with option -a could show you all the hidden files and folders if they are over there as I do in the terminal.
I am about to add these 3 files to the Staging Area. Take a look back at the figure 1.1, and guess which command we are about to type. Yes, that‘s command add as the picture shown obviously.
git add --all
or
git add .
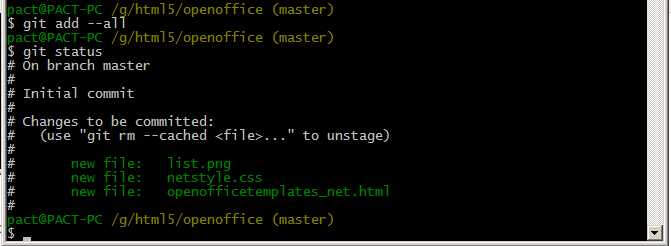
Type command status to show the result after running command add
git status

figure 1.4
If you find you‘ve done something wrong by adding more than you need, for example here, list.png is not supposed to be added, you can undo the command add by running command rm
git rm --cached list.png
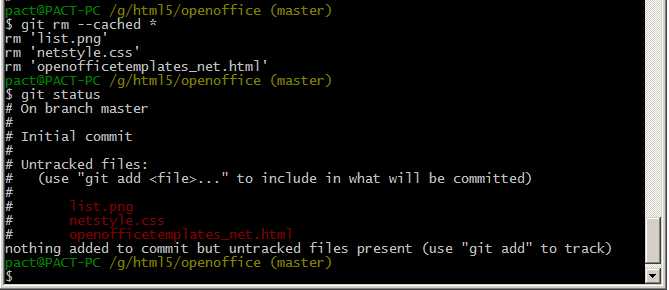
or even you want to undo all of them you‘ve added to staging are, you can run this
git rm --cached *

figure 1.5
As the picture shows the 3 files have already come out of staging area and back to untracked files.
Git Tutorial 1 - Goto Staging area
标签:
原文地址:http://www.cnblogs.com/vjianwang/p/gittutorial1.html