标签:
---恢复内容开始---
首先CToolBarCtrl类内部维护了三个重要的数据结构:一个图像列表,一个字符串列表,一个TBBUTTON结构体的列表。
知道了这一点,下面的理解起来就轻松了。慢慢来:
用CToolBarCtrl类为对话框创建工具栏的一般步骤:
1、准备一张工具栏的位图(有两种方法加载位图,一种是为工具栏中每一个按钮关联一张位图,第二种是加载一整张位图,这张位图中有所有工具栏按钮的图像,然后设定每个按钮图像的大小,这样系统就可以把一整张位图按像素分成多张位图,本文采用第二种方法)
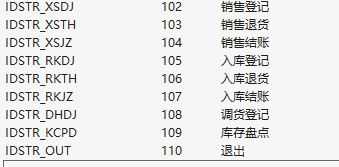
2、在资源视图中的String Table中加入工具栏中每个按钮对应的字符串,如:

3、添加一个MFC类,命名为CStandardBar,基类为CToolBarCtrl类。
4、在CStandardBar类中添加成员变量:
int m_nButtonCount; //工具栏按钮的数量
TBBUTTON *m_pTBButtons; //工具栏按钮
5、在CStandardBar类中重载基类CToolBarCtrl类中的Create函数,如下:(先给出代码然后再解释)
 1 BOOL CStandardBar::Create(DWORD dwStyle, const RECT& rect, CWnd* pParentWnd, UINT nID)
 2 {
 3     // TODO: 在此添加专用代码和/或调用基类
 4
 5     BOOL bRect=CToolBarCtrl::Create(dwStyle, rect, pParentWnd, nID);//一定要先掉用create函数用于
 6                                                                     //Creates a toolbar control and attaches it to a CToolBarCtrl object.
 7
 8
 9
10     m_nButtonCount = IDSTR_OUT - IDSTR_XSDJ + 1;        //计算得到工具栏按钮的个数
11
12
13     //CToolBarCtrl::SetBitmapSize(CSize(32,32));
14     SetBitmapSize( CSize(32,32) );                        //设置工具栏中位图的大小,会根据这个大小分割导入的位图
15
16
17
18
19     VERIFY(AddBitmap(m_nButtonCount,IDR_STANDARDBAR) != -1);//添加位图
20
21
22
23     m_pTBButtons = new TBBUTTON[m_nButtonCount];        //创建工具栏的按钮
24
25
26
27
28     for (int nIndex = 0; nIndex < m_nButtonCount; nIndex++)
29     {
30         CString string;
31         string.LoadString(nIndex + IDSTR_XSDJ);        //从字符串表中加载字符
32
33         // Add second ‘\0‘
34
35
36         //向工具条的字符串列表添加字符串
37         int nStringLength = string.GetLength() + 2;
38         TCHAR * pString = string.GetBufferSetLength(nStringLength);
39
40         //The last string must be terminated with two null characters.
41         pString[nStringLength-2] = 0;
42         pString[nStringLength-1] = 0;
43
44
45         VERIFY((m_pTBButtons[nIndex].iString = AddStrings(pString)) != -1);//向工具条的字符串列表添加字符串
46
47         string.ReleaseBuffer();
48
49
50         m_pTBButtons[nIndex].fsState =TBSTATE_ENABLED;
51         m_pTBButtons[nIndex].fsStyle =TBSTYLE_FLAT;
52         m_pTBButtons[nIndex].dwData = 0;
53         m_pTBButtons[nIndex].iBitmap = nIndex;
54         m_pTBButtons[nIndex].iString =nIndex;
55         m_pTBButtons[nIndex].idCommand = nIndex + IDSTR_XSDJ;
56     }
57
58

59 60     m_pTBButtons[m_nButtonCount-1].idCommand=IDCANCEL;
61
62     //添加按钮
63
64
65     //分隔按钮
66     TBBUTTON sepButton;
67     sepButton.idCommand = 0;
68     sepButton.fsStyle = TBSTYLE_SEP;
69     sepButton.fsState = TBSTATE_ENABLED;
70     sepButton.iString = 0;
71     sepButton.iBitmap = 0;
72     sepButton.dwData = 0;
73
74     for (int nIndex = 0; nIndex < m_nButtonCount; nIndex++)
75     {
76         //添加按钮
77         VERIFY(AddButtons(1,&m_pTBButtons[nIndex]));
78         if (!((nIndex +1) % 3))
79         {
80             VERIFY(AddButtons(1,&sepButton));//添加分隔按钮
81         }
82     }
83     //this->SetStyle(TBSTYLE_FLAT|CCS_TOP);
84
85     return bRect;
86 }
在重写的函数中:
(1)要调用基类CToolBarCtrl类的Create函数,用于创建一个CToolBarCtrl类的对象并且绑定工具栏。
(2)计算出工具栏中按钮的数量m_nButtonCount,在以后的代码中要使用它。
(3)设置每个按钮对应的位图的大小:SetBitmapSize( CSize(32,32) ); 然后加载整张位图:
AddBitmap(m_nButtonCount,IDR_STANDARDBAR)。之所以要设置每个按钮对应的位图的大小是因为只有这样,MFC的底层才知道怎样去分割那一整张位图,我的那个位图的长势288像素,工具栏中有9个按钮,288/9=32,所以设置为(32,32).
(4)创建TBBUTTON数组,在循环中给每个元素赋值。这里仔细说一下:
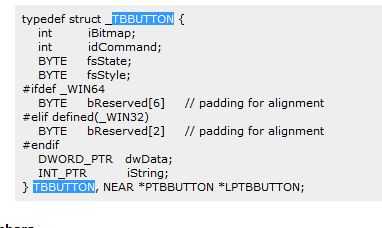
TBBUTTON的定义:

其中那些以字符i开头的iBitmap,iString都是一个序号,什么序号(索引)呢?一开始我们就说过,CToolBarCtrl类中维护了三个重要的数据结构,而iBitmap和iString就是图像列表和字符串列表中元素的索引。这个索引怎么产生的能?我们每调用一次AddBitmap(AddStrings)函数,对应的索引就会加一。正是因为这种机制,按钮和字符串以及位图才会关联对应起来。idCommand是按钮对应的ID.
(5)用AddButtons往工具栏中添加按钮。(代码中还添加了分割条)
6、在对话框类中添加CStandardBar类的对象:
CStandardBar m_StandardBar;
7、在OnCreate或者OninitDialog函数中调用重写的Create函数和调整大小的函数。如:
m_StandardBar.Create( WS_VISIBLE | WS_CHILD |WS_BORDER|TBSTYLE_WRAPABLE  | CCS_TOP,CRect(0,0,0,0),this, IDR_STANDARDBAR);
m_StandardBar.AutoSize();
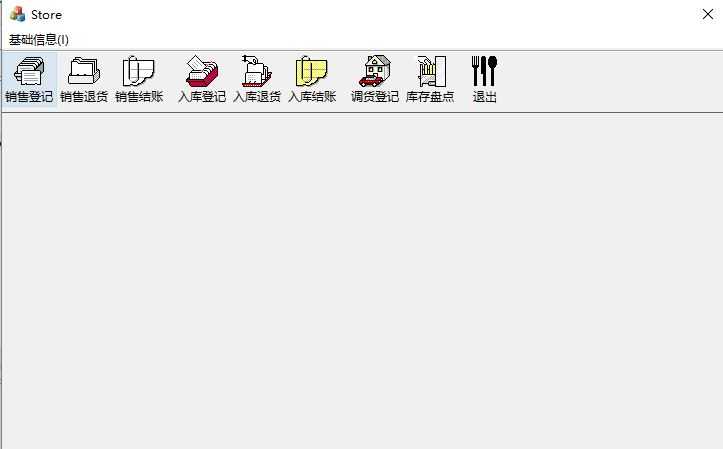
这样对话框中的工具栏就建立了,最后给一张效果图;

---恢复内容结束---
标签:
原文地址:http://www.cnblogs.com/qingergege/p/5093663.html