标签:
上章是介绍简单的把django.http.HttpResponse的内容显示到网页上,下面就介绍以下如何使用渲染模版的方法来显示内容。本节代码是基于Django 1.8,但 Django 1.4 - Django 1.9操作都是一样的。
温馨提示:如果你想学习Django,那么就请您从现在开始按照笔记记录一步一步的用手把代码敲出来,千万不要偷懒哦。。。。。
1、创建一个zqxt_tmpl项目,并创建一个一个learn的应用,
root@w:~# django-admin startproject zqxt_tmpl #项目
root@w:~# cd zqxt_tmpl/
root@w:~/zqxt_tmpl# python manage.py startapp learn #应用
2、在把创建的应用加到settings.INSTALLED_APPS中
root@w:~/zqxt_tmpl# sudo vi zqxt_tmpl/settings.py
................
INSTALLED_APPS = (
‘django.contrib.admin‘,
‘django.contrib.auth‘,
‘django.contrib.contenttypes‘,
‘django.contrib.sessions‘,
‘django.contrib.messages‘,
‘django.contrib.staticfiles‘,
‘learn‘, #添加的应用
)
3、打开learn/views.py写一个首页视图
root@w:~/zqxt_tmpl# sudo vi learn/views.py
from django.shortcuts import render
def home(request): #创建一个函数调用home.html
return render(request, ‘home.html‘)
4、在learn目录下新建一个templates文件夹,在里面创建一个home.html
默认配置下,Django的模版系统会知道在app下面找到templates文件夹中的模版文件。
root@w:~# mkdir zqxt_tmpl/learn/templates
root@w:~# touch zqxt_tmpl/learn/templates/home.html
root@w:~# tree zqxt_tmpl
zqxt_tmpl
├── learn
│ ├── admin.py
│ ├── __init__.py
│ ├── models.py
│ ├── templates
│ │ └── home.html
│ ├── tests.py
│ └── views.py
├── manage.py
└── zqxt_tmpl
├── __init__.py
├── __init__.pyc
├── settings.py
├── settings.pyc
├── urls.py
└── wsgi.py
3 directories, 13 files
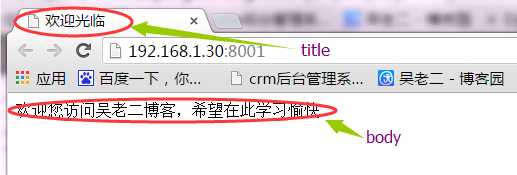
5、在home.html中写一些内容。
root@w:~# sudo vi zqxt_tmpl/learn/templates/home.html
<!DOCTYPE html>
<html>
<head>
<title>欢迎光临</title> #title头部欢迎语
</head>
<body>
欢迎您访问吴老二博客,希望在此学习愉快 #内部内容
</body>
</html>
6、将视图函数对应的网址,更改zqxt_tmpl/zqxt_tmpl/urls.py
root@w:~# sudo vi zqxt_tmpl/zqxt_tmpl/urls.py
from django.conf.urls import patterns, include, url
from django.contrib import admin
admin.autodiscover()
urlpatterns = patterns(‘‘,
# Examples:
url(r‘^$‘, ‘learn.views.home‘, name=‘home‘),#把前面的注释去掉
# url(r‘^blog/‘, include(‘blog.urls‘)),
url(r‘^admin/‘, include(admin.site.urls)),
)
Django 1.8.x及以上:
from django.conf.urls import include, url
from django.contrib import admin
from learn import views as learn_views
urlpatterns = [
url(r‘^$‘, learn_views.home, name=‘home‘), #news
url(r‘^admin/‘, include(admin.site.urls)),
]
7、【可选】创建数据库表
root@w:~/zqxt_tmpl# python manage.py syncdb
Creating tables ...
Creating table django_admin_log
Creating table auth_permission
Creating table auth_group_permissions
Creating table auth_group
Creating table auth_user_groups
Creating table auth_user_user_permissions
Creating table auth_user
Creating table django_content_type
Creating table django_session
You just installed Django‘s auth system, which means you don‘t have any superusers defined.
Would you like to create one now? (yes/no): yes
Username (leave blank to use ‘root‘): root #数据名称默认root
Email address:
Password: #数据库密码
Password (again):
Superuser created successfully.
Installing custom SQL ...
Installing indexes ...
Installed 0 object(s) from 0 fixture(s)
Django 1.9.x 及上:
root@w:~/zqxt_tmpl# python manage.py migrate
创建数据库虽然不会用,但是可以让一些提示消失(提示你要创建数据库之类的)
8、运行开发服务器
root@w:~/zqxt_tmpl# python manage.py runserver 192.168.1.30:8001 #如果本地测试的话就不需要加IP了
Validating models...
0 errors found
December 24, 2015 - 09:41:55
Django version 1.6.10, using settings ‘zqxt_tmpl.settings‘
Starting development server at http://192.168.1.30:8001/
Quit the server with CONTROL-C.
网页测试效果:
模版补充知识:
一般的网站通用部分,比如导航,底部,访问统计代码等。
nav.html bottom.html tongji.html
root@w:~# cd zqxt_tmpl/learn/templates/
root@w:~/zqxt_tmpl/learn/templates# touch nav.html bottom.html tongji.html
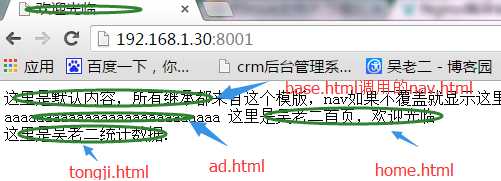
可以先写一个base.html来包含这些通用文件(include)
root@w:~/zqxt_tmpl/learn/templates# sudo vi base.html
<!DOCTYPE html>
<html>
<head>
<title>{% block title %}默认标题{% endblock %} -吴老二博客</title>
</head>
<body>
{% include ‘nav.html‘ %}
{% block content %}
<div>这里是默认内容,所有继承都来自这个模版,如果不覆盖就显示这里的默认内容.</div>
{% endblock %}
{% include ‘bottom.html‘ %}
{% include ‘tongji.html‘ %}
</body>
</html>
如果需要,写足够多的block以便继承的模版可以重写该部分,include是包含其它文件的内容,就是把一些网页共用的部分拿出来,重复利用,改动的时候也方便一些,还可以把广告代码放在一个单独的html中,改动也方便,在用到的时候直接继承base.html就好了,继承后的模版也可以在block块中include其它的模版文件。
这里用首页home.html,继承或者说扩展(extends)原来的base.html,可以简单的这样写,重写部分代码(默认值部分不用修改)
root@w:~/zqxt_tmpl/learn/templates# sudo vi home.html
<!DOCTYPE html>
<html>
<head>
<title>欢迎光临</title>
</head>
<body>
{% extends ‘base.html‘ %}
{% block title %}欢迎光临吴老二博客首页{% endblock %}
{% block content %}
{% include ‘ad.html‘ %}
这里是吴老二首页,欢迎光临
{% endblock %}
</body>
</html>
浏览器浏览效果:
注:模版一般放在app下的templates下,Django会自动找到,加入每个app都有一个index.html,当我们在views.py中使用的时候,如何判断是当前app的home.html呢?
这就需要把每个app中的templates文件夹在建一个app的名称,仅和该app相关的模版放在app/templates/app目录下。
例如:项目zqxt下有两个app应用分别为tutorial和tryit


root@w:~# django-admin startproject zqxt
root@w:~# tree zqxt
zqxt
├── manage.py
└── zqxt
├── __init__.py
├── settings.py
├── urls.py
└── wsgi.py
1 directory, 5 files
root@w:~# cd zqxt
root@w:~/zqxt# python manage.py startapp tutorial
root@w:~/zqxt# python manage.py startapp tryit
root@w:~/zqxt# cd
root@w:~#
root@w:~# tree zqxt
zqxt
├── manage.py
├── tryit
│?? ├── admin.py
│?? ├── __init__.py
│?? ├── models.py
│?? ├── tests.py
│?? └── views.py
├── tutorial
│?? ├── admin.py
│?? ├── __init__.py
│?? ├── models.py
│?? ├── tests.py
│?? └── views.py
└── zqxt
├── __init__.py
├── __init__.pyc
├── settings.py
├── settings.pyc
├── urls.py
└── wsgi.py
3 directories, 17 files
root@w:~# cd zqxt/t
tryit/ tutorial/
root@w:~# cd zqxt/tutorial/
root@w:~/zqxt/tutorial# mkdir -p templates/tutorial
root@w:~/zqxt/tutorial# touch templates/tutorial/index.html templates/tutorial/search.html
root@w:~/zqxt/tutorial# cd ..
root@w:~/zqxt# cd t
tryit/ tutorial/
root@w:~/zqxt# cd tryit/
root@w:~/zqxt/tryit# mkdir -p templates/tryit
root@w:~/zqxt/tryit# touch templates/tryit/index.html templates/tryit/poll.html
root@w:~/zqxt/tryit# cd
root@w:~# tree zqxt
zqxt
├── manage.py
├── tryit
│?? ├── admin.py
│?? ├── __init__.py
│?? ├── models.py
│?? ├── templates
│?? │?? └── tryit
│?? │?? ├── index.html
│?? │?? └── poll.html
│?? ├── tests.py
│?? └── views.py
├── tutorial
│?? ├── admin.py
│?? ├── __init__.py
│?? ├── models.py
│?? ├── templates
│?? │?? └── tutorial
│?? │?? ├── index.html
│?? │?? └── search.html
│?? ├── tests.py
│?? └── views.py
└── zqxt
├── __init__.py
├── __init__.pyc
├── settings.py
├── settings.pyc
├── urls.py
└── wsgi.py
7 directories, 21 files
项目zqxt 这在使用的时候“tutorial/index.html”和“tryit/index.html”这样作为app名称的一部分,就不会混淆
以下内容主要是针对Django模板中的循环,条件判断,常用的标签,过滤器的使用。
1、列表,字典,类的实例的使用
2、循环:迭代显示列表,字典等中的内容
3、条件判断:判断是否显示该内容,比如判断是手机访问,还是电脑访问,给出不一样的代码。
4、标签:for,if这样的功能都是标签。
5、过滤器:管道符号后面的功能,比如{{ var|length }},求变量长度的length就是一个过滤器。
经常需要将一个或多个变量共享给多个页面或者所有页面使用,比如在网页上显示来访者的IP,这个可以是用Django上下文渲染器来做。
实例,显示一个基本的字符串在页面上(在项目zqxt_tmpl上)
root@w:~/zqxt_tmpl/learn# sudo vi views.py
# -*- coding: utf-8 -*-
from django.shortcuts import render
def home(request):
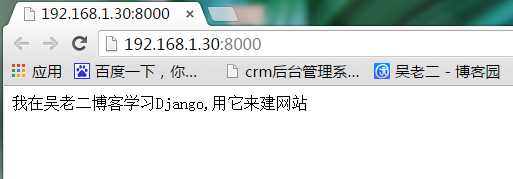
string = u"我在吴老二博客学习Django,用它来建网站"
return render(request, ‘home.html‘, {‘string‘: string})
在视图中锄地了一个字符串名称是string到模版home.html,在模版中这样使用:
root@w:~/zqxt_tmpl/learn/templates# sudo vi home.html
{{ string }}
浏览器访问,在本机上运行:
root@w:~/zqxt_tmpl# python manage.py runserver 192.168.1.30:8000
Validating models...
0 errors found
December 25, 2015 - 03:25:16
Django version 1.6.10, using settings ‘zqxt_tmpl.settings‘
Starting development server at http://192.168.1.30:8000/
Quit the server with CONTROL-C.
[25/Dec/2015 03:25:32] "GET / HTTP/1.1" 200 53
浏览器:
实例二:for循环和list内容的显示在zqxt_tmpl/learn/views.py
root@w:~/zqxt_tmpl# sudo vi learn/views.py
# -*- coding: utf-8 -*-
from django.shortcuts import render
def home(request):
TutorialList = ["HTML", "CSS", "jQuery", "Django"]
return render(request, ‘home.html‘, {‘TutorialList‘: TutorialList})
在视图中传递了一个List到模版zqxt_tmpl/learn/templates/home.html,在模版中使用它:
root@w:~# sudo vi zqxt_tmpl/learn/templates/home.html
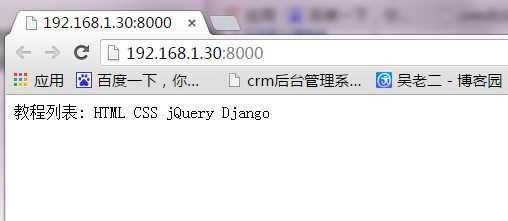
教程列表:
{% for i in TutorialList %}
{{ i }}
{% endfor %}
本地运行服务:
root@w:~/zqxt_tmpl# python manage.py runserver 192.168.1.30:8000
Validating models...
0 errors found
December 25, 2015 - 03:38:06
Django version 1.6.10, using settings ‘zqxt_tmpl.settings‘
Starting development server at http://192.168.1.30:8000/
Quit the server with CONTROL-C.
[25/Dec/2015 03:38:10] "GET / HTTP/1.1" 200 42
for循环要一个结束标记,上面的代码假如对应的是首页的网址(自己修改urls.py),显示在网页上就是:
总结:一般的变量之类的用{{}} (变量),功能类的,比如循环,条件判断是用{% %}(标签)
实例三:显示字典中的内容:
root@w:~/zqxt_tmpl# sudo vi learn/views.py
# -*- coding: utf-8 -*-
from django.shortcuts import render
def home(request):
info_dict = {‘site‘: u‘吴老二‘, ‘content‘: u‘自己建网站‘}
# TutorialList = ["HTML", "CSS", "jQuery", "Django"]
return render(request, ‘home.html‘, {‘info_dict‘: info_dict})
# return render(request, ‘home.html‘, {‘TutorialList‘: TutorialList})
为了和上个例子做对比我把上例注释掉了,您也可以注释掉也可以直接删除掉。
root@w:~/zqxt_tmpl# sudo vi learn/templates/home.html
【站点】:{{ info_dict.site }} 【内容】:{{ info_dict.content }}
#{% for i in TutorialList %}
#{{ i }}
#{% endfor %}
在模版注释了上个实例您也可以删除,这个实例模版中取字典的键是用info_dict.site,而不是Python中的info_dict[‘site‘],效果如下:

注:以上实例在浏览器浏览之前都要运行以下python manage.py runserver IP:prot
还可以这样遍历字典:
root@w:~/zqxt_tmpl# sudo vi learn/templates/home.html
{% for key, value in info_dict.items %}
{{ key }}: {{ value }}
{% endfor %}
其实就是遍历这样一个List:[(‘content‘: u‘自己建网站‘), (‘site‘: u‘吴老二‘)]

实例四:在模版进行条件判断和for循环的详细操作:
root@w:~/zqxt_tmpl# sudo vi learn/views.py
# -*- coding: utf-8 -*-
from django.shortcuts import render
def home(request):
List = map(str, range(100)) #一个长度为100的list
return render(request, ‘home.html‘, {‘List‘: List})
使用逗号将这些元素连接起来:
root@w:~/zqxt_tmpl# sudo vi learn/templates/home.html
{% for item in List %}
{{ item }},
{% endfor %}
效果如下:
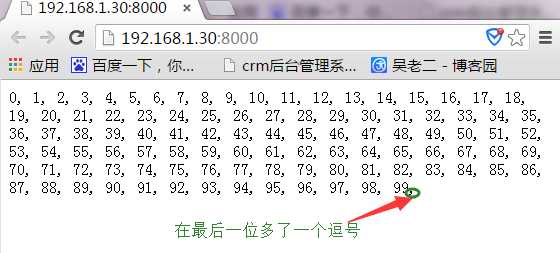
最后一个元素的后面也有一个逗号,这样不是我们想要的,如何判断是不是遍历到最后一个元素呢?
这里可以用forloop.last这个变量,如果是最后一项其为真,否则为假,更改如下:
root@w:~/zqxt_tmpl# sudo vi learn/templates/home.html
{% for item in List %}
{{ item }}{% if not forloop.last %},{% endif %}
{% endfor %}
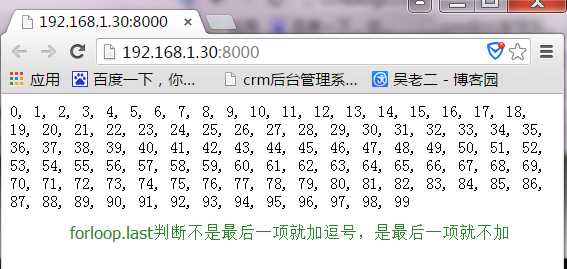
for循环补充如下:
变量描述
forloop.counter 索引从1
forloop.counter0 索引从0
forloop.revcounter 索引从最大长度到1
forloop.revcounter0 索引从最大长度到0
forloop.first 当遍历的元素为第一项时为真
forloop.last 当遍历的元素为最后一项时为真
forloop.parentloop 用在嵌套的for循环中,获取上一层for循环的forloop
当列表中可能为空值时用for empty
<ul>
{% for athlete in athlete_list %}
<li>{{ athlete.name }}</li>
{% empty %}
<li>抱歉,列表为空</li>
{% endfor %}
</ul>
实例五,模版上得到视图对应的网址:
# views.py
def add(request, a, b):
c = int(a) + int(b)
return HttpResponse(str(c))
# urls.py
urlpatterns = patterns(‘‘,
url(r‘^add/(\d+)/(\d+)/$‘, ‘app.views.add‘, name=‘add‘),
)
# template html
{% url ‘add‘ 4 5 %}
这样网址上就会显示出:/add/4/5/这个网址,假如我们以后修改urls.py中的
这一部分,改成另的,比如:
这样,我们不需要在次修改模版,当再次访问的时候,网址就会自动变成/jiafa/4/5/
注意:如果是Django 1.4的话,需要在模版开头上 {% load url from future %} (如果有 extends 的话,加在 extends 下面)
这可以使用as语句将内容取别名(相当于定义一个变量),多次使用(但视图名称到网址转换只进行了一次)
{% url ‘some-url-name‘ arg arg2 as the_url %}
<a href="{{ the_url }}">链接到:{{ the_url }}</a>
实例六,模版中的逻辑操作
==,!=,>=,<=,>,<这些比较都可以在模版中使用,比如:
{% if var >= 90 %}
成绩优秀,吴老二博客你没少去吧!学得不错
{% elif var >= 80 %}
成绩良好
{% elif var >= 70 %}
成绩一般
{% elif var >= 60 %}
需要努力
{% else %}
不及格啊,大哥!多去吴老二博客学习啊!
{% endif %}
and,or,not,in,not in也可以在模版中使用
假如我们判断num是不是在0到100之间:
{% if num <= 100 and num >= 0 %}
num在0到100之间
{% else %}
数值不在范围之内!
{% endif %}
假如我们判断’wulaoer‘
{% if ‘wulaoer‘ in List %}
自强学堂在名单中
{% endif %}
实例七,模版中获取当前网址,当前用户等:
如果不是在 views.py 中用的 render 函数,是render to response的话,需要将request加入到上下文渲染器
Django 1.8 及以后 修改settings.py
TEMPLATES = [
{
‘BACKEND‘: ‘django.template.backends.django.DjangoTemplates‘,
‘DIRS‘: [],
‘APP_DIRS‘: True,
‘OPTIONS‘: {
‘context_processors‘: [
...
‘django.template.context_processors.request‘,
...
],
},
},
]
Django 1.7 及以前修改settings.py:
如果没有TEMPLATE_CONTEXT_PROCESSORS请自行添加下列默认值:
TEMPLATE_CONTEXT_PROCESSORS = (
"django.contrib.auth.context_processors.auth",
"django.core.context_processors.debug",
"django.core.context_processors.i18n",
"django.core.context_processors.media",
"django.core.context_processors.static",
"django.core.context_processors.tz",
"django.contrib.messages.context_processors.messages",
)
然后再加上 django.core.context_processors.request
TEMPLATE_CONTEXT_PROCESSORS = (
...
"django.core.context_processors.request",
...
)
然后在模版中我们就可以用request了。
获取当前用户:
如果登陆就显示内容,不登陆就不显示内容:
{% if request.user.is_authenticated %}
{{ request.user.username }},您好!
{% else %}
请登陆,这里放登陆链接
{% endif %}
获取当前网址:
获取当前GET参数:
{{ request.GET.urlencode }}
合并到一起用的一个例子:
<a href="{{ request.path }}?{{ request.GET.urlencode }}&delete=1">当前网址加参数 delete</a>
比如我们可以判断delete参数是不是1来删除当前的页面内容。
Django之路: 模版篇
标签:
原文地址:http://www.cnblogs.com/wulaoer/p/5072794.html


