标签:
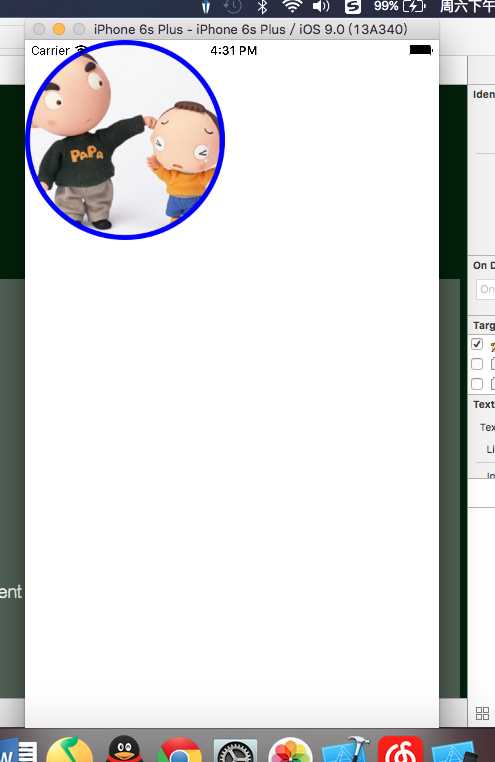
#import "ViewController.h"

@interface ViewController ()

@end

@implementation ViewController

- (void)viewDidLoad {
    [super viewDidLoad];
    // Do any additional setup after loading the view, typically from a nib.
}
-  (void)touchesBegan:(NSSet<UITouch *> *)touches withEvent:(UIEvent *)event
{
//    获取要剪裁的图片
    UIImage *image = [UIImage imageNamed:@"papa"];
//    给图片设置的rect
    CGRect imageRect = CGRectMake(0, 0, image.size.width, image.size.height);
//    开启图形上下文
    UIGraphicsBeginImageContextWithOptions(image.size, NO, 0.0);
//    获取图形上下文
    CGContextRef bitmapContext = UIGraphicsGetCurrentContext();
//    画圆的路径
    CGContextAddEllipseInRect(bitmapContext, imageRect);
//     把圆路径之外的剪切掉
    CGContextClip(bitmapContext);
//    在上下文中添加图片
    [image drawInRect:imageRect];
//    给图片设置边框
    //给边框设置宽度
    CGContextSetLineWidth(bitmapContext, 5);
    //给边框设置颜色
    [[UIColor blueColor] set];
    CGContextAddEllipseInRect(bitmapContext, imageRect);
//    画出该边框
    CGContextStrokePath(bitmapContext);
    //    获取这个图片
    UIImage *newImage = UIGraphicsGetImageFromCurrentImageContext();
//    结束位图编辑
    UIGraphicsEndImageContext();
//    显示图片
    UIImageView *imageView = [[UIImageView alloc] initWithFrame:CGRectMake(0, 0, 200, 200)];
    [self.view addSubview:imageView];
    imageView.image = newImage;
//    保存图片
//    先把图片转存NSData,调用write方法
    NSData *imageData = UIImagePNGRepresentation(newImage);
    [imageData writeToFile:@"/Users/mac/Desktop/new.png" atomically:YES];

}
2016-1-9 Quartz框架的学习,剪裁图片并设置边框
标签:
原文地址:http://www.cnblogs.com/BJTUzhengli/p/5116703.html