标签:
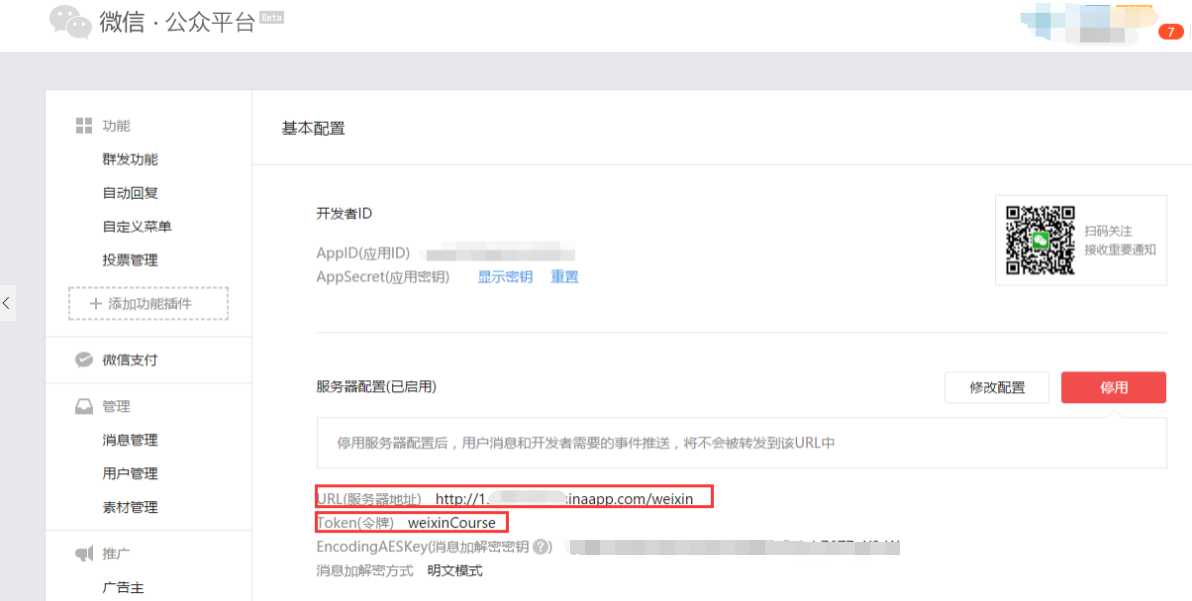
公众号与自己项目的对接,也就是公众号会将相关事件交给你自己的项目处理,你需要提供一个入口,即一个servlet的url
1.创建Servlet,在doGet方法中处理验证消息,供公众号对接
 1 public class WeixinServlet extends HttpServlet {
 2
 3     private static final long serialVersionUID = 1L;
 4
 5     public WeixinServlet() {
 6     }
 7
 8     public void destroy() {
 9     }
10
11     public void doGet(HttpServletRequest request, HttpServletResponse response)
12             throws ServletException, IOException {
13
14         // 微信加密签名
15         String signature = request.getParameter("signature");
16         // 时间戳
17         String timestamp = request.getParameter("timestamp");
18         // 随机数
19         String nonce = request.getParameter("nonce");
20         // 随机字符串
21         String echostr = request.getParameter("echostr");
22
23         PrintWriter out = response.getWriter();
24         // 通过检验signature对请求进行校验,若校验成功则原样返回echostr,表示接入成功,否则接入失败
25         if (SignUtil.checkSignature(signature, timestamp, nonce)) {
26             out.print(echostr);
27         }
28         out.close();
29         out = null;
30     }
31
32     public void doPost(HttpServletRequest request, HttpServletResponse response)
33             throws ServletException, IOException {
34
35     }
36
37     public void init() throws ServletException {
38     }
39 }
SignUtil的源码:
 1 public class SignUtil {
 2
 3     // 与接口配置信息中的Token要一致
 4     private static String token = "weixinCourse";
 5
 6     /**
 7      * 验证签名
 8      *
 9      * @param signature
10      * @param timestamp
11      * @param nonce
12      * @return
13      */
14     public static boolean checkSignature(String signature, String timestamp,
15             String nonce) {
16         String[] arr = new String[] { token, timestamp, nonce };
17         // 将token、timestamp、nonce三个参数进行字典序排序
18         Arrays.sort(arr);
19         StringBuilder content = new StringBuilder();
20         for (int i = 0; i < arr.length; i++) {
21             content.append(arr[i]);
22         }
23         MessageDigest md = null;
24         String tmpStr = null;
25
26         try {
27             md = MessageDigest.getInstance("SHA-1");
28             // 将三个参数字符串拼接成一个字符串进行sha1加密
29             byte[] digest = md.digest(content.toString().getBytes());
30             tmpStr = byteToStr(digest);
31         } catch (NoSuchAlgorithmException e) {
32             e.printStackTrace();
33         }
34
35         content = null;
36         // 将sha1加密后的字符串可与signature对比,标识该请求来源于微信
37         return tmpStr != null ? tmpStr.equals(signature.toUpperCase()) : false;
38     }
39
40     public static String sha1(String content){
41         MessageDigest md = null;
42         String tmpStr = null;
43
44         try {
45             md = MessageDigest.getInstance("SHA-1");
46             // 将三个参数字符串拼接成一个字符串进行sha1加密
47             byte[] digest = md.digest(content.toString().getBytes());
48             tmpStr = byteToStr(digest);
49         } catch (NoSuchAlgorithmException e) {
50             e.printStackTrace();
51         }
52         return tmpStr;
53     }
54
55     /**
56      * 将字节数组转换为十六进制字符串
57      *
58      * @param byteArray
59      * @return
60      */
61     private static String byteToStr(byte[] byteArray) {
62         String strDigest = "";
63         for (int i = 0; i < byteArray.length; i++) {
64             strDigest += byteToHexStr(byteArray[i]);
65         }
66         return strDigest;
67     }
68
69     /**
70      * 将字节转换为十六进制字符串
71      *
72      * @param mByte
73      * @return
74      */
75     private static String byteToHexStr(byte mByte) {
76         char[] Digit = { ‘0‘, ‘1‘, ‘2‘, ‘3‘, ‘4‘, ‘5‘, ‘6‘, ‘7‘, ‘8‘, ‘9‘, ‘A‘,
77                 ‘B‘, ‘C‘, ‘D‘, ‘E‘, ‘F‘ };
78         char[] tempArr = new char[2];
79         tempArr[0] = Digit[(mByte >>> 4) & 0X0F];
80         tempArr[1] = Digit[mByte & 0X0F];
81
82         String s = new String(tempArr);
83         return s;
84     }
85
86 }
第二,将项目部署到新浪云上,将servlet的请求地址配置到公众号上

标签:
原文地址:http://www.cnblogs.com/lijile/p/5130253.html