标签:android style blog http color os

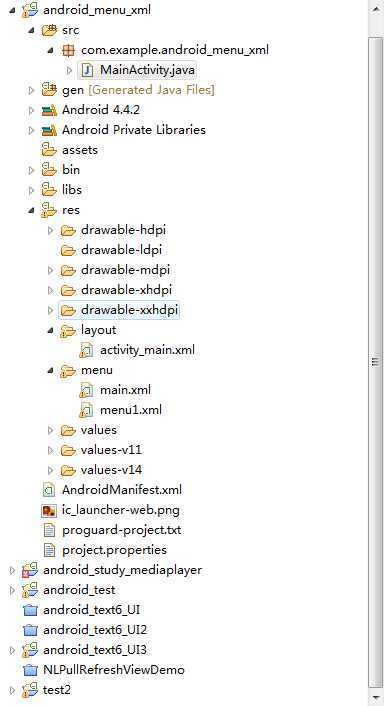
在android3.0中引入了menu菜单,通过menu的xml文件,我们能迅速新建生成一个菜单文件,接下来一一介绍几种常用的菜单。
1.menu的调用,重写两个方法即可实现
    @Override
    public boolean onCreateOptionsMenu(Menu menu) {
        // TODO Auto-generated method stub
        getMenuInflater().inflate(R.menu.main, menu);//填充menu文件夹中的main.xml菜单layout
        return super.onCreateOptionsMenu(menu);
    }

    @Override
    public boolean onOptionsItemSelected(MenuItem item) {//对菜单的子项实现监控
        // TODO Auto-generated method stub
        switch (item.getItemId()) {
        case R.id.add:
            Toast.makeText(MainActivity.this, "add", Toast.LENGTH_SHORT).show();
            break;
        case R.id.edit:
            Toast.makeText(MainActivity.this, "edit", Toast.LENGTH_SHORT)
                    .show();
            break;
        case R.id.del:
            Toast.makeText(MainActivity.this, "del", Toast.LENGTH_SHORT).show();
            break;
        }
        return super.onOptionsItemSelected(item);
    }
2.subMenu的用法,请看代码和注释
    @Override
    public boolean onMenuItemSelected(int featureId, MenuItem item) {//重写onMenuItemSelected即可实现子选项的点击事件监控,本人在实验过程中,发现改变主题会使子选项失效
        // TODO Auto-generated method stub
        switch (item.getItemId()) {
        case R.id.addall:
            Toast.makeText(MainActivity.this, "addall", Toast.LENGTH_SHORT)
                    .show();
            break;
        case R.id.addsomeone:
            Toast.makeText(MainActivity.this, "addsomeone", Toast.LENGTH_SHORT)
                    .show();
            break;
        }
        return super.onMenuItemSelected(featureId, item);
    }
3.popMenu的用法
在menu的xml中声明;
<RelativeLayout xmlns:android="http://schemas.android.com/apk/res/android"
    xmlns:tools="http://schemas.android.com/tools"
    android:layout_width="match_parent"
    android:layout_height="match_parent"
    tools:context="${packageName}.${activityClass}" >
<!-- 在button中设置触发时的方法体 -->
    <Button
        android:id="@+id/button1"
        android:layout_width="wrap_content"
        android:layout_height="wrap_content"
        android:layout_alignParentTop="true"
        android:layout_marginLeft="22dp"
        android:layout_marginTop="45dp"
        android:onClick="showpopMenu"
        android:text="弹出菜单" />

    <ListView
        android:id="@+id/listView1"
        android:layout_width="match_parent"
        android:layout_height="wrap_content"
        android:layout_alignParentLeft="true"
        android:layout_below="@+id/button1" >
    </ListView>

</RelativeLayout>
在activity中实现方法体,即可实现弹窗效果
    public void showpopMenu(View view) {
        PopupMenu popupMenu = new PopupMenu(context, view);
        popupMenu.getMenuInflater().inflate(R.menu.menu1, popupMenu.getMenu());
        popupMenu.show();
    }
3.contextMenu,重写两个方法,即可实现contextMenu效果
public class MainActivity extends Activity implements OnItemLongClickListener {
    private ListView lv;
    private ArrayAdapter<String> mArrayAdapter;
    public Context context = MainActivity.this;

    @Override
    protected void onCreate(Bundle savedInstanceState) {
        super.onCreate(savedInstanceState);
        setContentView(R.layout.activity_main);
        init();
        lv.setAdapter(mArrayAdapter);
        registerForContextMenu(lv);
    }

    void init() {
        lv = (ListView) findViewById(R.id.listView1);
        mArrayAdapter = new ArrayAdapter<String>(context,
                android.R.layout.simple_list_item_1, getData());
    }

    public void showpopMenu(View view) {
        PopupMenu popupMenu = new PopupMenu(context, view);
        popupMenu.getMenuInflater().inflate(R.menu.menu1, popupMenu.getMenu());
        popupMenu.show();
    }

    List<String> getData() {
        List<String> mlist = new ArrayList<String>();
        for (int i = 0; i < 10; i++) {
            mlist.add("minfan" + i);
        }
        return mlist;
    }

    @Override
    public boolean onContextItemSelected(MenuItem item) {
        // TODO Auto-generated method stub
        AdapterContextMenuInfo info = (AdapterContextMenuInfo) item
                .getMenuInfo();
        String value = mArrayAdapter.getItem(info.position);//value值表示的是listview中的item的信息,用于定位
        switch (item.getItemId()) {
        case R.id.item1:
            Toast.makeText(context, "item1" + value, Toast.LENGTH_SHORT).show();
            break;
        case R.id.item2:
            Toast.makeText(context, "item2" + value, Toast.LENGTH_SHORT).show();
            break;
        case R.id.item3:
            Toast.makeText(context, "item3" + value, Toast.LENGTH_SHORT).show();
            break;
        }
        return super.onContextItemSelected(item);
    }

    @Override
    public void onCreateContextMenu(android.view.ContextMenu menu, View v,
            android.view.ContextMenu.ContextMenuInfo menuInfo) {
        getMenuInflater().inflate(R.menu.menu1, menu);
    };
}
Menu,SubMenu,popupMenu,contextMenu的xml用法,布布扣,bubuko.com
Menu,SubMenu,popupMenu,contextMenu的xml用法
标签:android style blog http color os
原文地址:http://www.cnblogs.com/mf0819/p/3863341.html