目录:
1、gitlab简介
2、安装配置gitlab
2.1、实验环境介绍
2.2、更改仓库存储位置
2.3、开启https访问
2.4、启用SMTP服务
3、GitLab的基本使用
4、备份及恢复
5、总结
1、gitlab简介
GitLab 是一个用于仓库管理系统的开源项目。使用Git作为代码管理工具,并在此基础上搭建起来的web服务。GitLab拥有强大的功能,可实现git仓库管理,代码审查,问题跟踪,WIkI等功能,而且配合GitLab CI能更简单的实现持续集成和自动部署。GitLab的组件主要包括:Packages / Dependencies,Ruby,Go,System Users,Database,Redis,GitLab,Nginx,详细信息请见(http://doc.gitlab.com/ce/install/installation.html)。
2、安装配置gitlab
GitLab不支持部署在Windows主机上,它只主机部署在Ubuntu、 Debian、CentOS、Raspberry PI这样的平台,而且只对64位的系统进行支持,如下图:
GitLab的部署方式有两种,一种是源代码方式部署,另一种是用通用包部署,官方称为 “Omnibus package installation”部署方式。源代码部署方式工作量大,且容易出错,官方强烈建议使用通用包的方式来部署。“Omnibus package installation”这种方式部署的GitLab会在有GitLab进程崩溃时会使用Runit来重启GitLab的进程,如果从源代码来安装GitLab,则没有Runit这种管理方式。所以建议大家还是以通用包的方式来部署。
2.1、实验环境介绍
平台:Debian 8.1 x64
IP地址:192.168.207.128
GitLab包:gitlab-ce_8.2.1-ce.0_amd64.deb 软件包下载地址:http://mirror.tuna.tsinghua.edu.cn/gitlab-ce/,请根据自己的平台选择下载,可惜在完成此博客时好像被墙了。
注意:在安装GitLab时请确保主机端口80没有被占用,在一次测试中因主机默认安装了nginx,并在开机时启动,导致当我部署好GitLab后访问首页时只出现nginx的欢迎页面,这个问题困扰了好久,后来才发现是主机默认已监听在了80端口。
root@test1:~/tools# pwd
/root/tools
root@test1:~/tools# ls
gitlab-ce_8.2.1-ce.0_amd64.deb
root@test1:~/tools# dpkg -i gitlab-ce_8.2.1-ce.0_amd64.deb
正在选中未选择的软件包 gitlab-ce。
(正在读取数据库 ... 系统当前共安装有 94237 个文件和目录。)
正准备解包 gitlab-ce_8.2.1-ce.0_amd64.deb  ...
正在解包 gitlab-ce (8.2.1-ce.0) ...
正在设置 gitlab-ce (8.2.1-ce.0) ...
gitlab: Thank you for installing GitLab!
gitlab: To configure and start GitLab, RUN THE FOLLOWING COMMAND:
sudo gitlab-ctl reconfigure
gitlab: GitLab should be reachable at http://test1.cstonline.net
gitlab: Otherwise configure GitLab for your system by editing /etc/gitlab/gitlab.rb file
gitlab: And running reconfigure again.
gitlab:
gitlab: For a comprehensive list of configuration options please see the Omnibus GitLab readme
gitlab: https://gitlab.com/gitlab-org/omnibus-gitlab/blob/master/README.md
gitlab:
It looks like GitLab has not been configured yet; skipping the upgrade script.
这样GitLab的安装工作就结束了,在输出信息中可以看到有一个链接(https://gitlab.com/gitlab-org/omnibus-gitlab/blob/master/README.md),这个链接很重要的,从这里可以获取到GitLab的所有配置的详细信息,有时间可以好好读读。
GitLab安装好后,可以查看一下它都把程序安装在哪里去了,用如下命令:
root@test1:~/tools# dpkg -L gitlab-ce | less
#输出信息相当多,请加上less分屏显示
2.2、更改仓库存储位置
默认时GitLab的仓库存储位置在“/var/opt/gitlab/git-data/repositories”,在实际生产环境中显然我们不会存储在这个位置,一般都会划分一个独立的分区来存储仓库的数据,我这里规划把数据存放在“/data/git-data”目录下。
root@test1:~/tools# mkdir -pv /data/git-data
mkdir: 已创建目录 "/data"
mkdir: 已创建目录 "/data/git-data"
root@test1:~# chown -R git.git /data/git-data  #修改创建目录的属主和属组为git用户
root@test1:~/tools# cp /etc/gitlab/gitlab.rb /etc/gitlab/gitlab.rb.bak
root@test1:~/tools# vim /etc/gitlab/gitlab.rb
#启用git_data_dir参数,并修改如下:
git_data_dir "/data/git-data"
#并修改external_url的值修改为规划的访问域名
external_url ‘http://test.gitlab.net‘
root@test1:~/tools# gitlab-ctl reconfigure   #重新编译gitlab.rb文件,使用做的修改生效
重新编辑后,GitLab在仓库目录会自动创建一个repositories文件,如下:
root@test1:~# ls -ld /data/git-data/repositories/
drwxrws--- 2 git git 4096 1月   4 14:15 /data/git-data/repositories/
在windows主机的hosts里做好域名解析后访问我们的gitlab,如下图:
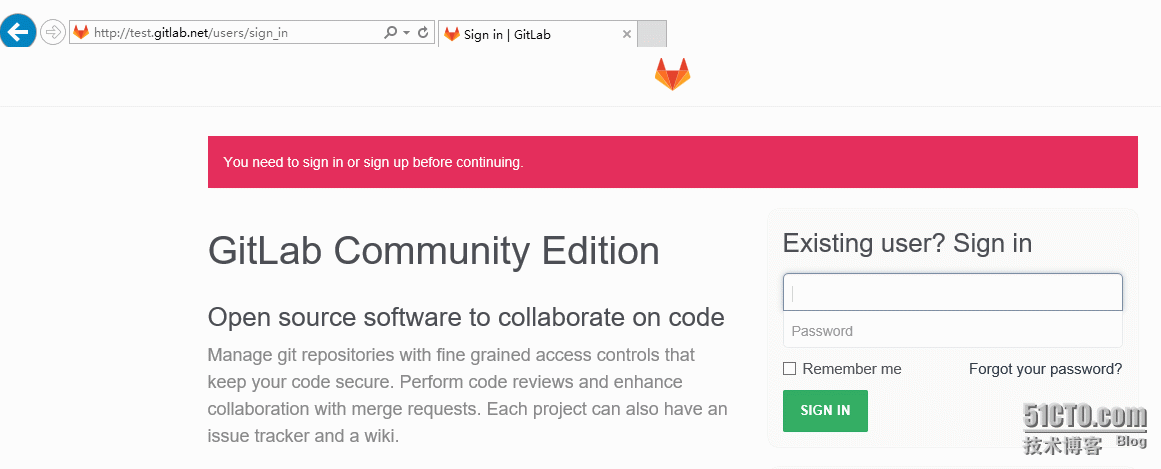 默认的用户为“root”,密码为“5iveL!fe”,为了安全第一次登陆时会要求你修改登陆密码,如下图:
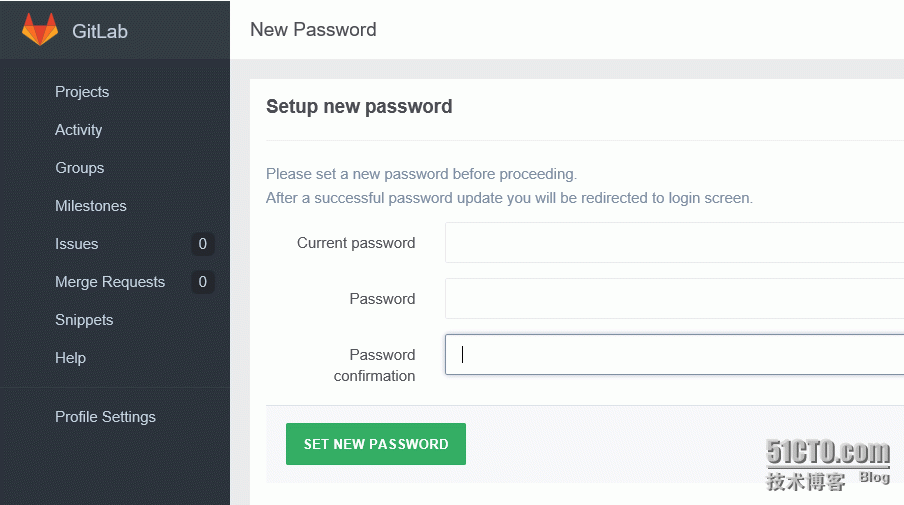 到这里GitLab就基本可用了,但在企业中运用一般不会直接走http协议,都会用https这种安全协议来访问GitLab服务。
2.3、开启https访问
默认时, omnibus-gitlab没有启用https,假如我们要为test.gitlab.net域名启用https,那我们就需要为GitLab申请一个合法的证书,如果GitLab只是我们企业内部使用,完全可以自建一个CA,并为此GitLab颁发一个证书。
2.3.1、自建CA
root@test1:~# mkdir -pv /etc/ssl/demoCA/{private,newcerts}
mkdir: 已创建目录 "/etc/ssl/demoCA"
mkdir: 已创建目录 "/etc/ssl/demoCA/private"
mkdir: 已创建目录 "/etc/ssl/demoCA/newcerts"
root@test1:~# cd /etc/ssl
root@test1:/etc/ssl# (umask 077;openssl genrsa -out ./demoCA/private/cakey.pem 2048)   #生成密钥
Generating RSA private key, 2048 bit long modulus
................................................................+++
......................+++
e is 65537 (0x10001)
root@test1:/etc/ssl# openssl req -new -x509 -key ./demoCA/private/cakey.pem -out ./demoCA/cacert.pem -days 3650  #生成自签证书
You are about to be asked to enter information that will be incorporated
into your certificate request.
What you are about to enter is what is called a Distinguished Name or a DN.
There are quite a few fields but you can leave some blank
For some fields there will be a default value,
If you enter ‘.‘, the field will be left blank.
-----
Country Name (2 letter code) [AU]:CN
State or Province Name (full name) [Some-State]:ChongQing
Locality Name (eg, city) []:YuBei
Organization Name (eg, company) [Internet Widgits Pty Ltd]:SJKJ
Organizational Unit Name (eg, section) []:Operation Services
Common Name (e.g. server FQDN or YOUR name) []:test.gitlab.net    #这里是CA的域名,可以不与gitlab的相同
Email Address []:admin@admin.com
root@test1:/etc/ssl# touch ./demoCA/index.txt
root@test1:/etc/ssl# echo 01 > ./demoCA/serial
2.3.2、为gitlab申请证书、CA进行颁发
root@test1:~# ls /etc/gitlab/
gitlab.rb  gitlab.rb.bak  gitlab-secrets.json
#gitlab会在"/etc/gitlab/ssl"目录去寻找密钥文件和证书文件,并且证书文件和密钥文件名应与访问gitlab的域名相同,我们这里就是"test.gitlab.net"
root@test1:~# mkdir -p /etc/gitlab/ssl     #此目录路径不能随意更改
root@test1:~# cd /etc/gitlab/ssl
root@test1:/etc/gitlab/ssl# (umask 077;openssl genrsa -out test.gitlab.net.key 1024)
Generating RSA private key, 1024 bit long modulus
.....................++++++
.................................++++++
e is 65537 (0x10001)
root@test1:/etc/gitlab/ssl# ls
test.gitlab.net.key
root@test1:/etc/gitlab/ssl# openssl req -new -x509 -key test.gitlab.net.key -out test.gitlab.net.csr   #生成证书签署请求
You are about to be asked to enter information that will be incorporated
into your certificate request.
What you are about to enter is what is called a Distinguished Name or a DN.
There are quite a few fields but you can leave some blank
For some fields there will be a default value,
If you enter ‘.‘, the field will be left blank.
-----
Country Name (2 letter code) [AU]:CN
State or Province Name (full name) [Some-State]:ChongQing
Locality Name (eg, city) []:YuBei
Organization Name (eg, company) [Internet Widgits Pty Ltd]:SJKJ
Organizational Unit Name (eg, section) []:Operation Services
Common Name (e.g. server FQDN or YOUR name) []:test.gitlab.net
Email Address []:test@admin.com
A challenge password []:                   #回车
An optional company name []:         #回车
root@test1:/etc/gitlab/ssl# ls
test.gitlab.net.csr  test.gitlab.net.key
root@test1:/etc/gitlab/ssl# openssl ca -in test.gitlab.net.csr -out test.gitlab.net.crt -days 3650   #CA签署证书
Using configuration from /usr/lib/ssl/openssl.cnf
Error opening CA private key ./demoCA/private/cakey.pem
140185766790800:error:02001002:system library:fopen:No such file or directory:bss_file.c:398:fopen(‘./demoCA/private/cakey.pem‘,‘r‘)
140185766790800:error:20074002:BIO routines:FILE_CTRL:system lib:bss_file.c:400:
unable to load CA private key
在签署证书是报错了,根据报错信息得知在签署证书时会在当前目录下去寻找“ ./demoCA/private/cakey.pem”这个CA的密钥文件,所以应该切换到“/etc/ssl”目录下去执行上边的命令,如下:
root@test1:/etc/ssl# openssl ca -in /etc/gitlab/ssl/test.gitlab.net.csr -out /etc/gitlab/ssl/test.gitlab.net.crt -days 3650
Using configuration from /usr/lib/ssl/openssl.cnf
Check that the request matches the signature
Signature ok
Certificate Details:
        Serial Number: 1 (0x1)
        Validity
            Not Before: Jan  6 01:13:40 2016 GMT
            Not After : Jan  3 01:13:40 2026 GMT
        Subject:
            countryName               = CN
            stateOrProvinceName       = ChongQing
            organizationName          = SJKJ
            organizationalUnitName    = Operation Services
            commonName                = test.gitlab.net
            emailAddress              = test@admin.com
        X509v3 extensions:
            X509v3 Basic Constraints:
                CA:FALSE
            Netscape Comment:
                OpenSSL Generated Certificate
            X509v3 Subject Key Identifier:
                52:95:81:FD:1D:D9:CE:40:D8:22:9C:95:8D:D0:8D:1C:A8:7D:78:4D
            X509v3 Authority Key Identifier:
                keyid:05:0A:A9:09:33:18:C3:99:71:19:BD:3F:EA:92:EB:A5:D2:30:72:EB
Certificate is to be certified until Jan  3 01:13:40 2026 GMT (3650 days)
Sign the certificate? [y/n]:y
1 out of 1 certificate requests certified, commit? [y/n]y
Write out database with 1 new entries
Data Base Updated
root@test1:/etc/ssl# ls /etc/gitlab/ssl/
test.gitlab.net.crt  test.gitlab.net.csr  test.gitlab.net.key
root@test1:/etc/ssl# rm -f /etc/gitlab/ssl/test.gitlab.net.csr    #证书签署请求文件可以删除
root@test1:/etc/ssl# chmod 700 /etc/gitlab/ssl   #  更改目录权限
root@test1:/etc/ssl# ls -ld /etc/gitlab/ssl
drwx------ 2 root root 4096 1月   6 09:24 /etc/gitlab/ssl
2.3.3、开启GitLab的https支持
root@test1:/etc/ssl# vim /etc/gitlab/gitlab.rb
# note the ‘https‘ below
external_url ‘https://test.gitlab.net‘
##### open htts #####################
nginx[‘redirect_http_to_https‘] = true
nginx[‘ssl_certificate‘] = "/etc/gitlab/ssl/test.gitlab.net.crt"
nginx[‘ssl_certificate_key‘] = "/etc/gitlab/ssl/test.gitlab.net.key"
"nginx[‘redirect_http_to_https‘] = true"表示将所有的http流量转发到https上, 下边两行代表GitLab和密钥和证书所在路径,从这里我猜测存放密钥和证书的路径是可以自定义的,只要在这里正确指定即可,这个我没有验证。
root@test1:/etc/ssl# gitlab-ctl reconfigure #重新编译配置
运行上边的命令会重新编译配置文件并会重新启动GitLab的各个组件的服务,现在再来访问一下我们的GitLab,如下:
直接访问“http://test.gitlab.net”也会被强制定向到https的安全链接。
2.3.4、启用SMTP服务
当在GitHub上注册一个新用户时你会收到一封邮件,邮件里会有一些提示性的信息或者点击一个链接让你更改登陆密码,GitLab也一样可以配置这样的邮件提醒功能,如果你没有自己的邮件服务器,那一般都是配置启用第三方SMTP服务。详情请参照官方https://gitlab.com/gitlab-org/omnibus-gitlab/blob/master/doc/settings/smtp.md。官方资料中没有介绍怎样配置163邮箱的SMTP配置方法,这里我就以它为例。
root@test1:~# vim /etc/gitlab/gitlab.rb            #把以下内容追加到最后
##### open smtp ############
gitlab_rails[‘smtp_enable‘] = true
gitlab_rails[‘smtp_address‘] = "smtp.163.com"
gitlab_rails[‘smtp_port‘] = 465
gitlab_rails[‘smtp_user_name‘] = "XXXXX@163.com"
gitlab_rails[‘smtp_password‘] = "***********"
gitlab_rails[‘smtp_domain‘] = "163.com"
gitlab_rails[‘smtp_authentication‘] = "login"
gitlab_rails[‘smtp_enable_starttls_auto‘] = true
gitlab_rails[‘smtp_tls‘] = true
gitlab_rails[‘gitlab_email_from‘] = "XXXX@163.com"
在启用SMTP时花了不少时间,因为各个参数之间要配合使用,而这个也只能自己不断尝试才行。
root@test1:~# gitlab-ctl reconfigure #重新编译
现在我们的GitLab就启用了SMTP功能。
3、GitLab的基本使用
打开GitLab首页,注册一个新用户,如下:
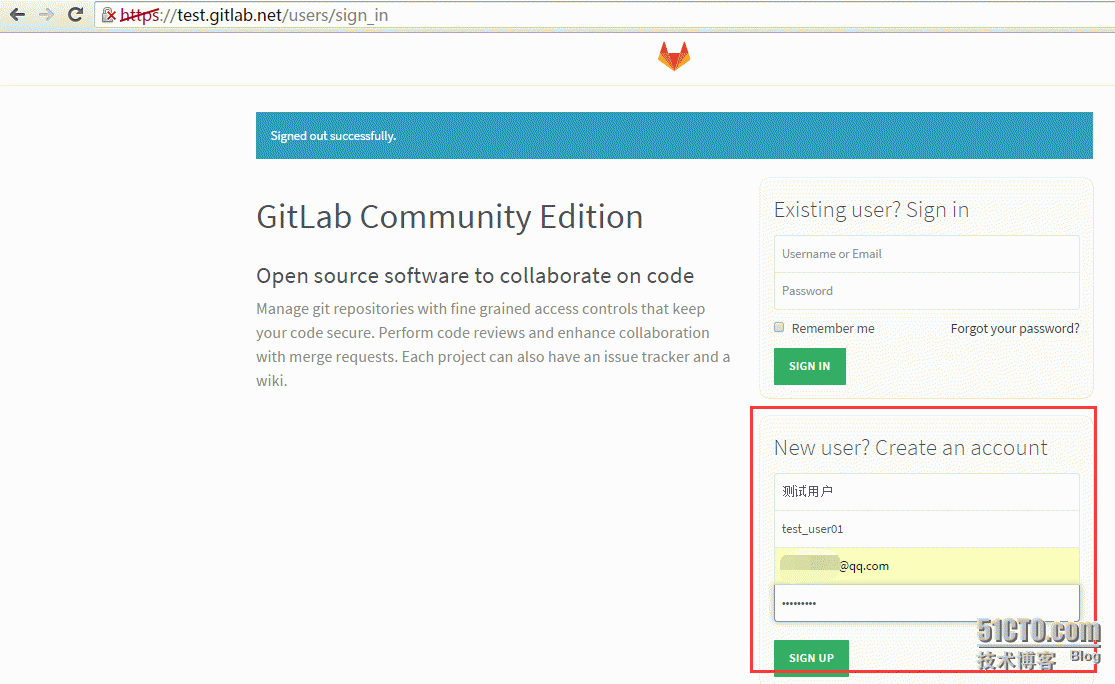 点击“SIGN UP”后就会收到GitLab发送的邮件,点击链接就可以登陆GitLab,如下:
点击链接后,会报证书安全性问题,因为我们是自建的CA,所以证书是不合法的,直接忽略掉即可,然后会打开如下页面:
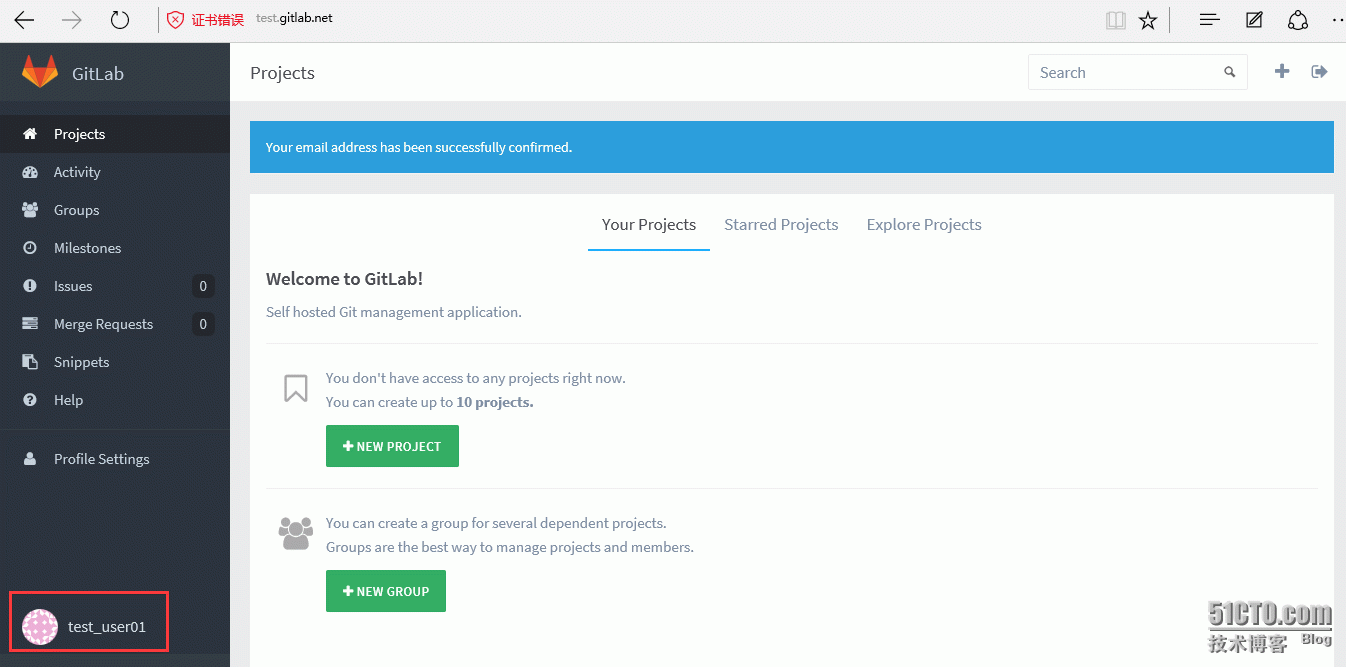 新建的用户可以正常登陆了,接着我们就创建一个项目,点击上图中的“NEW PROJECT”,填写一些基本信息就可以创建一个项目,如下:
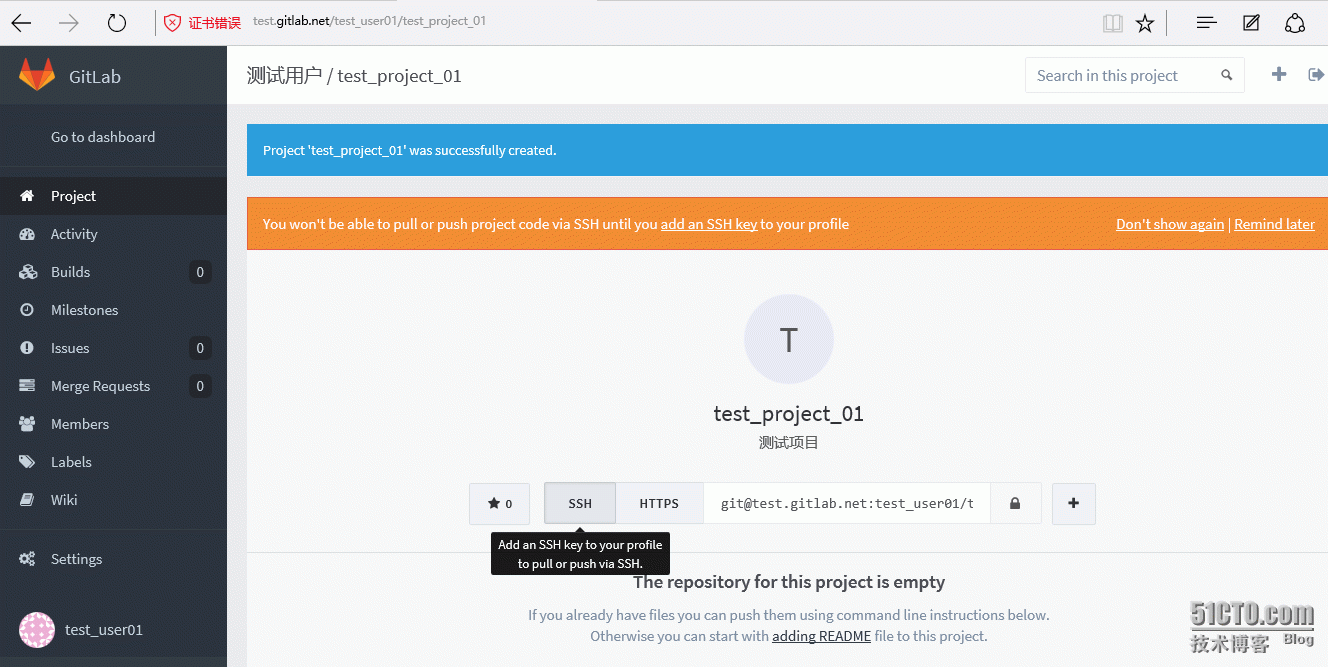 这样我们就创建好了一个自己的仓库。github的使用还得下来慢慢研究。
4、备份及恢复
如果在企业中部署了gitlab环境,那它担任的角色一都是相当重要的,你不会希望因一些故障导致gitlab的配置文件、仓库数据被损坏,所以应该对仓库和配置文件进行定期的备份,而且不建议把备份的数据存放在本机,而是应该存放在一个安全的地方。备份的数据也应该只有root用户拥有读取权限。
4.1、配置文件备份
Omnibus-gitlab安装的gitlab仓库会用到以下四个不同的目录:
截取官方来说明,如下:
”/opt/gitlab“目录下是gitlab的应用代码和相应的依赖程序
”/var/opt/gitlab“此目录下是运行”gitlab-ctl reconfigure“命令编译后的应用数据和配置文件,不需要人为修改配置
”/etc/gitlab“此目录下存放了以omnibus-gitlab包安装方式时的配置文件,这里的配置文件才需要管理员手动编译配置
”/var/log/gitlab“此目录下存放了gitlab各个组件产生的日志
在实际的生产环境中建议不要把备份文件存放在本地,但这里做演示我就直接备份在root用户家目录下。
root@test1:~/backup# pwd
/root/backup
root@test1:~/backup# umask 0077; tar -cf $(date "+etc-gitlab-%s.tar") -C / etc/gitlab
root@test1:~/backup# ls -l
总用量 20
-rw------- 1 root root 20141 1月  22 11:10 etc-gitlab-1453432213.tar
这里以unix时间戳来标记备份的时间,这个时间戳对人来说不好读懂,可使用date命令把其转换成人可读的格式,如下:
root@test1:~/backup# date -d @1453432213
2016年 01月 22日 星期五 11:10:13 CST
4.1、gitlab应用备份
确保”/etc/gitlab/gitlab.rb“文件中启用以下两项:
gitlab_rails[‘backup_path‘] = "/data/git-backups"
# limit backup lifetime to 7 days - 604800 seconds
gitlab_rails[‘backup_keep_time‘] = 604800
创建备份目录,修改属主和属组:
root@test1:~# mkdir /data/git-backups
chown -R git.git /data/git-backups
手动进行一次备份,测试一下备份是否有效:
root@test1:~# gitlab-rake gitlab:backup:create
Dumping database ...
Dumping PostgreSQL database gitlabhq_production ... [DONE]
done
Dumping repositories ...
 * test_user01/test_project_01 ... [SKIPPED]
 * test_user01/test_project_01.wiki ...  [SKIPPED]
done
Dumping uploads ...
done
Dumping builds ...
done
Dumping artifacts ...
done
Dumping lfs objects ...
done
Creating backup archive: 1453442983_gitlab_backup.tar ... done
Uploading backup archive to remote storage  ... skipped
Deleting tmp directories ... done
done
done
done
done
done
done
Deleting old backups ... done. (0 removed)
root@test1:~# ls /data/git-backups/ -l
总用量 32
-rw------- 1 git git 30720 1月  22 14:09 1453442983_gitlab_backup.tar
#备份文件是一个归档文件,且开头是unix时间
当然这个备份动作应该让计划任务来完成,如下:
root@test1:~# echo ‘0 2 * * * /usr/bin/gitlab-rake gitlab:backup:create CRON=1‘ >> /var/spool/cron/root
root@test1:~# cat /var/spool/cron/root
0 2 * * * /usr/bin/gitlab-rake gitlab:backup:create  CRON=1
经测试这种直接编辑/var/spool/cron/root文件的方法在debian 8上不生效,还是老实使用”crontab -e“来制定计划任务。
上边的“CRON=1”官方上的解释如下:

 大概意思是说这个变量可以当在计划任务备份时没有错误输出时不向系统发送垃圾邮件。
4.3、备份恢复
目前服务器上的备份情况如下:
root@test1:/data/git-backups# pwd
/data/git-backups
root@test1:/data/git-backups# ls
1453442983_gitlab_backup.tar  1453445423_gitlab_backup.tar  1453446075_gitlab_backup.tar
root@test1:/data/git-backups# ls /root/backup/
etc-gitlab-1453432213.tar.gz
现在我们模拟把gitlab的配置文件和仓库目录损坏,我们来个狠的如下操作:
root@test1:~# gitlab-ctl cleanse
此命令在帮助信息中是这样解释的”Delete *all* gitlab data, and start from scratch“,把gitlab的所有数据都删除
root@test1:~/backup# pwd
/root/backup
root@test1:~/backup# ls
etc-gitlab-1453432213.tar.gz  repositories.1453449827
root@test1:~/backup# tar xf etc-gitlab-1453432213.tar.gz -C /
root@test1:~/backup# ls /etc/gitlab
gitlab.rb  gitlab.rb.bak  gitlab-secrets.json  ssl
root@test1:~/backup# gitlab-ctl reconfigure    #/etc/gitlab恢复后需要编译
重新编译后,一个全新的gitlab又恢复回来了,这时又可以用root用户,默认密码5iveL!fe来登陆。
现在来恢复我们备份的仓库信息:
在重新恢复"/etc/gitlab/gitlab.rb"后并没有启用gitlab备份的功能,所以还得手动启用以下两个参数:
gitlab_rails[‘backup_path‘] = "/data/git-backups"
# limit backup lifetime to 7 days - 604800 seconds
gitlab_rails[‘backup_keep_time‘] = 604800
root@test1:~/backup# gitlab-ctl reconfigure   #重新编译使其生效
root@test1:/data/git-backups# pwd
/data/git-backups
root@test1:/data/git-backups# ls
1453442983_gitlab_backup.tar  1453445423_gitlab_backup.tar  1453446075_gitlab_backup.tar
root@test1:/data/git-data# gitlab-ctl stop unicorn
ok: down: unicorn: 1s, normally up
root@test1:/data/git-data# gitlab-ctl stop sidekiq
ok: down: sidekiq: 0s, normally up
root@test1:/data/git-backups# gitlab-rake gitlab:backup:restore BACKUP=1453446075
BACKUP后的时间戳是你想备份时备份文件前的时间戳,此命令运行后会有许多的输出,其中在输出以下内容时我选择了输入了”yes“,
This will rebuild an authorized_keys file.
You will lose any data stored in authorized_keys file.
Do you want to continue (yes/no)? yes
恢复完成后,在刚才的恢复操作时,gitlab会把原有的repositories目录备份,如下:
root@test1:/data/git-backups# ls /data/git-data/
repositories  repositories.old.1453455794
root@test1:/data/git-backups# ls /data/git-data/repositories -l
    #有点不解的是仓库目录下没有”root“这个用户的目录,但在后边的测试中root是可以登陆的
总用量 4
drwxrwx--- 3 git git 4096 1月  22 17:43 test_user01
root@test1:/data/git-backups# gitlab-ctl restart   #重启一下
打开主页用root用户和备份时的密码登陆是没问题的,而且之前建的测试用户也是存在的,如下:
5、总结
至此,gitlab环境的搭建就介绍到这里,总结起来,gitlab的环境搭建比较繁琐,有许多细节需要注意,所以完全可以把这个过程写成shell脚本,只要调试通过,那在以后有相似的环境需要,那就会事倍功半,在下一次博客中我就会把本次博客的过程写成shell脚本。
参考资料:
https://gist.github.com/jhjguxin/c1583284bb7a0bb2f117
https://gitlab.com/gitlab-org/omnibus-gitlab/blob/master/doc/settings/backups.md
https://gitlab.com/gitlab-org/omnibus-gitlab/blob/master/README.md
本文出自 “专注运维,与Linux共舞” 博客,请务必保留此出处http://zhaochj.blog.51cto.com/368705/1737738
原文地址:http://zhaochj.blog.51cto.com/368705/1737738