标签:cacti安装
cacti监控安装
参考:http://www.apelearn.com/bbs/forum.php?mod=viewthread&tid=7418&highlight=cacti
一、服务器端安装
1、首先安装epel扩展源,epel即Extra Packages for Enterprise Linux,也就是为企业级Linux提供的扩展软件源,适用于 RHEL,CentOS,Scientific Linux系统
[root@rs1 ~]# yum install -y epel-release
2、、安装lamp
[root@rs1 ~]# yum install -y httpd php php-mysql mysql mysql-server mysql-devel php-gd libjpeg libjpeg-devel libpng-devel
3、安装cacti监控主机、net-snmp、rrdtol
[root@rs1 ~]# yum install -y cacti net-snmp net-snmp-utils rrdtool
4、启动服务
[root@rs1 ~]# /etc/init.d/mysqld start
[root@rs1 ~]# /etc/init.d/snmpd start
[root@rs1 ~]# /etc/init.d/httpd start 这里报错了,原因是之前安装过LNMP
Unable to open logs [失败]
解决方法参考:http://www.apelearn.com/bbs/forum.php?mod=viewthread&tid=9961&highlight=cacti
说明:由于前面安装过LNMP,用yum安装LNMP后启动httpd出问题
error1:Could not reliably determine the server‘s fully qualified domain name
原因:这是在/etc/httpd/conf/httpd.conf中确实对主机端口的指定
解决办法:vim /etc/httpd/conf/httpd.conf 增加一条 ServerName localhost:80
error2:(98)Address already in use: make_sock: could not bind to address 0.0.0.0:80
原因:80端口被占用
解决办法:netstat -lnp |grep 80 ;发现nginx占用80端口,使用kill -9 PID 结果nginx重启了,使用killall nginx杀死成功。/etc/init.d/httpd start ok
5、编辑http配置文件
[root@rs1 ~]# vim /etc/httpd/conf.d/cacti.conf
把"Deny from all" 改为"Allow from all"
[root@rs1 ~]# /etc/init.d/httpd restart
6、导入数据库创建cacti库
[root@rs1 ~]# mysql -uroot -e "create database cacti"
创建cacti用户
[root@rs1 ~]# mysql -uroot -e "grant all on cacti.* to ‘cacti‘@‘127.0.0.1‘identified by ‘cacti‘;"
导入sql文件
[root@rs1 ~]# mysql -uroot cacti < /usr/share/doc/cacti-0.8.8b/cacti.sql
7、编辑cacti配置文件
[root@rs1 ~]# vim /usr/share/cacti/include/config.php #修改为caicti用户
$database_hostname = "127.0.0.1";
$database_username = "cacti";
$database_password = "cacti";
[root@rs1 ~]# /etc/init.d/httpd restart
8. web访问cacti并安装
http://192.168.101.108/cacti/
点击“next” ,第一次安装默认new install,点击"Next",点击”Finish“ 即可
输入admin admin 登录,重新设置新的密码,我设置的是daixuan,点击Save,完成
9. 执行poller.php, 生成图形, 加入计划任务
点击graphs->Default Tree->Host Localhost,进入系统监控界面,发现图片是裂掉的,需要执行/usr/bin/php
[root@rs1 ~]# /usr/bin/php /usr/share/cacti/poller.php
发现警告很多,根据警告提示,添加date.timezone,再次执行命令不报错,图片正常显示
[root@rs1 ~]# vim /etc/php.ini
date.timezone = "Asia/Chongqing"
添加cron任务,每5分总去执行一次探测
[root@rs1 ~]# crontab -e
增加:
*/5 * * * * /usr/bin/php /usr/share/cacti/poller.php
二、 安装客户端(增加一个linux服务器)
1. 安装snmp
[root@dir ~]# yum install -y net-snmp
2、修改snmpd.conf
[root@dir ~]# vim /etc/snmp/snmpd.conf
syslocation dir(192.168.101.230)
syscontact Root 1350368559@qq.com
3、启动snmp
[root@dir ~]# service snmpd start
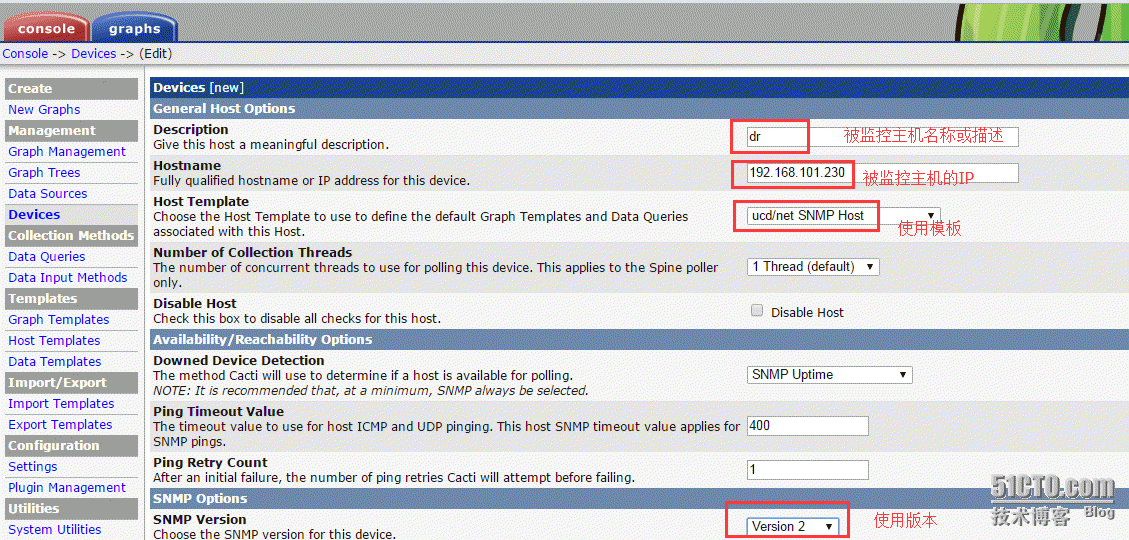
4. 登录cacti管理后台,点左上角的console , 再点Device, 在右上角点”Add“
Description 监控主机的名称或描述
Hostname 监控主机的ip
Host Template 模板,选ucd/net SNMP Host
SNMP Version 选Version 2
点右下角的create
点右上角的”Create Graphs for this Host“
Graph Types: 选择SNMP - Interface Statistics
在下面框中选择要监控的网卡,比如我选择eth0, 在最右侧小方块里打对勾,然后点右下角的create
Graph Types: 再选择 Graph Template Based
在下面的框中,选择你要监控的项目,比如ucd/net - Load Average
在右侧小方块中打对勾,然后点右下角的create

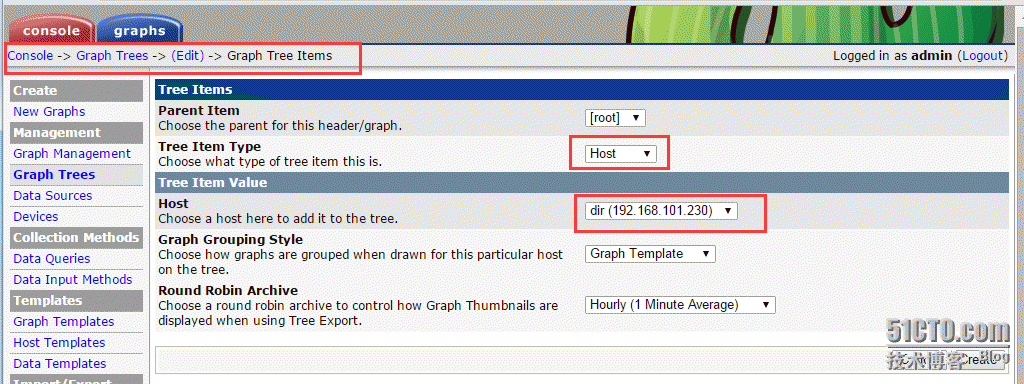
5. 点左侧的Graph Trees
选中”Default Tree“
点右上角的Add
Tree Item Type 选择 ”Host“
Host 选择我们刚刚增加的那个机器ip
点右下角的create,然后跳转之后,点击右下角的save
6. 点左上角的Graphs
在左侧可以看到
Defaut Tree下面已经增加了我们刚刚添加的主机,图形一开始不会那么快出来,要等一会才可以
在cacti服务器上,执行poller.php, 生成图形
[root@rs1 ~]# /usr/bin/php /usr/share/cacti/poller.php --force
本文出自 “daixuan” 博客,请务必保留此出处http://daixuan.blog.51cto.com/5426657/1737924
标签:cacti安装
原文地址:http://daixuan.blog.51cto.com/5426657/1737924