标签:
1.git在linux操作系统下已经安装无需再次安装。windows操作系统下需要安装,
这部分转载自http://www.cnblogs.com/monodin/p/3268679.html
msysgit是Git for Windows版,其Home Page为:https://git-for-windows.github.io/ 点击页面中“Download”进入下载列表。可根据个人喜好选择下载版本。这里选择下载最新版
二、安装
下载完毕,双击开始安装:
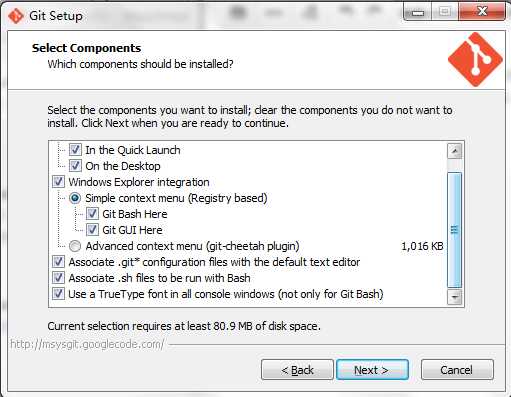
1、除了AdvancedXXX选项,其余全选中
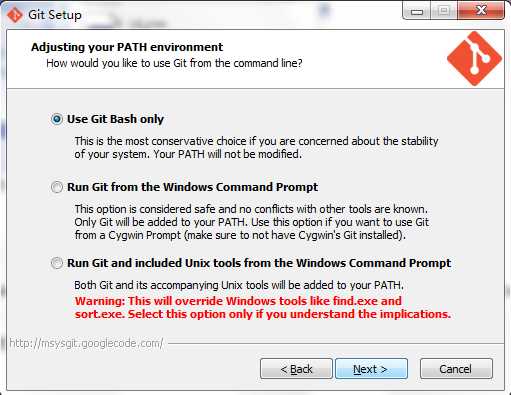
2、选择“Use Git Bash only”
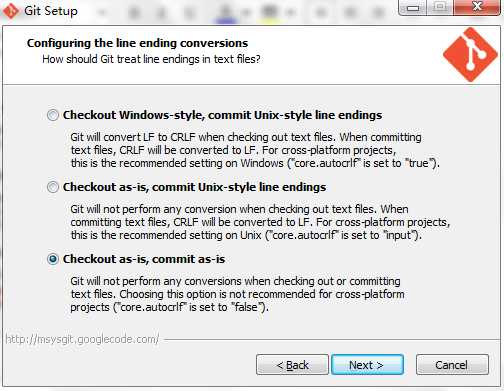
3、选择“Checkout as-is,commit as-is”
4、等待安装完毕。
2.配置git
配置Name和Email
命令格式:git config --global user.name "your name"
git config --global user.email "your email address"
为了提高命令输出的可读性
输入 git config --global color.ui auto
此时进入~/.gitconfig会看到刚才的配置
3.设置SSH KEY
运行一下命令设置ssh key:
ssh-keygen -t rsa -C "your_email@example.com"
会输出Generating public/private rsa key pair.
Enter file in which to save the key
(/Users/your_user_directory/.ssh/id_rsa):(按回车键)
Enter passphrase (empty for no passphrase)(输入密码)
Enter same passphrase again(再次输入密码)
Your identification has been saved in /home/tekkub/.ssh/id_rsa.
Your public key has been saved in /home/tekkub/.ssh/id_rsa.pub.
The key fingerprint is:
……………… 最后得到了两个文件:~/.ssh/id_rsa和~/.ssh/id_rsa.pub
4.添加ssh密钥
在github上添加ssh密钥,这要添加的是“id_rsa.pub”里面的公钥。打开https://github.com/settings/ssh Add SSH KEY title随便取 Key就是~/.ssh/id_rsa.pub里的全部内容此时你的github注册的主邮箱会收到邮件提醒你The following SSH key was added to your account:.......
5.此时就可以用手中的私人密钥与github进行认证和通讯了
输入命令 ssh -T git@github.com 输出 The authenticity of host ‘github.com (x.x.x.x)’ can’t be established.
RSA key fingerprint is ....
Are you sure you want to continue connecting (yes/no)? yes
Warning: Permanently added ‘github.com,x.x.x.x′ (RSA) to the list of known hosts.
Hi xxx! You’ve successfully authenticated, but GitHub does not provide shell access
Connection to github.com closed.
6.git操作
建立本地git文件夹 输入git init进行初始化操作
克隆仓库到本地 : git clone git@github.com:CheungChanDevCoder/pythonTools.git
对代码进行编辑和修改提交使用git add 文件名 加入"暂存区"
使用git log 查看提交日志 参数--pretty=short只显示提交日志第一行 git log -p 文件名 显示提交之前之后文件的变化 --graph 图形化显示使用
git status查看当前状态
使用git commit -m "record message" 将暂存区中的文件提交并记录提交记录 ,如果需要详细记录提交信息 不输入-m 会进入编辑提交信息编辑器一般第一行简要概括更改内容第二行空行第三行详细描述更改内容 如果想中止提交可直接退出编辑器便会中止提交,提交之后想修改提交的信息用git commit --amend可以进行修改 若是文件较少可以用git commit -am "recored message"来代替add 和commit -m两步使用
git diff查看当前工作树与暂存区的差别 git diff HEAD专门查看当前工作树与最后一次提交的差别
git branch查看当前分支 -a显示当前分支的相关信息。
git checkout -b feature-A 创建feature-A分支并切换到feature-A分支 相当于git branch feature-A;git checkout feature-A两条命令 git checkout master 切换到master分支 git checkout - 切换到上一分支合并分支 git checkout master;git merge --no-ff feature-A先切换到master分支在合并 此时会打开编辑器录入合并信息 之后合并成功恢复历史
git reflog查看当前仓库执行过的操作会有各个版本的哈希值 使用git reset --hard 哈希值恢复到历史状态
解决冲突 根据冲突报告修改冲突的文件 再次git commit -am "record message"即可
压缩历史 如果遇到拼写错误等问题可以add commit之后将两个历史纪录合并成一条 使用git rebase -i HEAD-2 命令会打开编辑器,将pick 7a34294 Add feature-C pick 6fba227 Fix typo中的第二个pick改成fixup即可
添加远程仓库 git remote add origin git@github.com:CheungChanDevCoder/pythonTools.git 此时会把远程仓库设成origin
推送至远程仓库 推送至master分支 先切换到master分支 git push -u origin master 其中-u表示upstream(上游)在推送的同时设置了origin 仓库的master分支是本地仓库当前分支的上游。 推送至master以外的分支,不如本地创建了feature-D分支 先切换到feature-D分支然后 git push -u origin feature-D
获取远程仓库的feature-D分支 git checkout -b feature-D origin/feature-D 推送至远程feature-D git push即可
更新本地的feature-D到远程的最新状态 git pull origin feature-D
git学习总结
标签:
原文地址:http://www.cnblogs.com/CheungChanBlogs/p/gitLearning.html