标签:
这个LED的小程序基于的是德飞莱的最小系统板 我当时写这个程序的时候想的就是这个程序能够便于理解 也便于移植 便于调用 我参加过电赛 对于STM32的一个管脚修改的麻烦是深有体会 一个地方不对就没法工作 所以这次我写这个库的时候 我也特别注意了这些方面 一个小LED 挺简单的 有时候用来做调试用的话 我觉得还是挺好的 下面我将自己的源码分享 个人能力有限 大神不要笑哈!!!
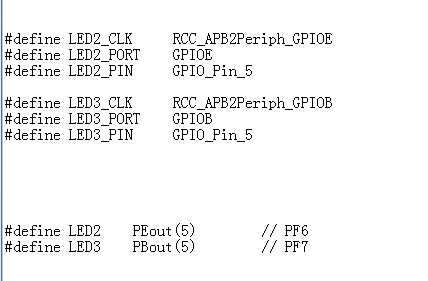
在这个源码里面 你仅仅只需要修改

的内容 就可以快速的对STM32的任意一个管脚实行 高低电平控制的
注意就是里面有个delay的操作 这个事先要在主函数里面进行初始化的(如果不初始化会死在循环里面) 这个delay的源码是借用原子大哥的
#ifndef __LED_H
#define __LED_H

#include<sys.h>

#define LED2_ON  1
#define LED2_OFF 2

#define LED3_ON  3
#define LED3_OFF 4

#define LED2_REV 5        //管脚取反
#define LED3_REV 6    //管脚取反


#define LED2_CLK     RCC_APB2Periph_GPIOE
#define LED2_PORT    GPIOE
#define LED2_PIN     GPIO_Pin_5

#define LED3_CLK     RCC_APB2Periph_GPIOB
#define LED3_PORT    GPIOB
#define LED3_PIN     GPIO_Pin_5


#define LED2    PEout(5)    // PF6
#define LED3    PBout(5)    // PF7


void LED_Init(void);
void LED2_Init(void);
void LED3_Init(void);


void DEBUG_LED(u8 x);

#endif
/******************************************************************************
* 文件      LED.c
* 作者      Belye
* 版本      ST V3.5.0
* 日期      03-February-2016
* 提要      基于德飞莱开发板的LED的底层驱动程序
* 使用方式  函数调用示例
* 注意      记得修改对应的LED初始化管脚
******************************************************************************/
//V1.0 修改说明
//调整代码 加入取反

/***************************************   函数调用示例   ************************************
    LED2_Init();//记得修改此函数里面的内容
    DEBUG_LED(LED2_ON);
**********************************************************************************************/

#include<LED.h>
#include<delay.h>


void LED_Init()
{
    LED2_Init();
    LED3_Init();
}
void LED2_OPEN()
{
    LED2=0;
}

void LED2_CLOSE()
{
    LED2=1;
}


void LED2REV()
{
 GPIO_WriteBit(LED2_PORT, LED2_PIN,(BitAction)(1-(GPIO_ReadOutputDataBit(LED2_PORT, LED2_PIN))));

}


void LED3_OPEN()
{
    LED3=0;
}

void LED3_CLOSE()
{
    LED3=1;
}

void LED3REV()
{
    GPIO_WriteBit(LED3_PORT, LED3_PIN,(BitAction)(1-(GPIO_ReadOutputDataBit(LED3_PORT, LED3_PIN))));
}


void DEBUG_LED(u8 x)
{
   switch (x)
   {
        case 1:
            LED2_OPEN();
            break;
        case 2:
            LED2_CLOSE();
            break;
        case 3:
            LED3_OPEN();
            break;
        case 4:
            LED3_CLOSE();
            break;
        case 5:
            LED2REV();
            break;
        case 6:
            LED3REV();
            break;
        default:
            break;
    }
}


void LED2_Init(void)
{

    GPIO_InitTypeDef  GPIO_InitStructure;

    RCC_APB2PeriphClockCmd(LED2_CLK, ENABLE);

    GPIO_InitStructure.GPIO_Pin = LED2_PIN;
    GPIO_InitStructure.GPIO_Mode = GPIO_Mode_Out_PP;
    GPIO_InitStructure.GPIO_Speed = GPIO_Speed_50MHz;
    GPIO_Init(LED2_PORT, &GPIO_InitStructure);
    GPIO_SetBits(LED2_PORT,LED2_PIN);


}

void LED3_Init(void)
{

    GPIO_InitTypeDef  GPIO_InitStructure;

    RCC_APB2PeriphClockCmd(LED3_CLK, ENABLE);

    GPIO_InitStructure.GPIO_Pin = LED3_PIN;
    GPIO_InitStructure.GPIO_Mode = GPIO_Mode_Out_PP;
    GPIO_InitStructure.GPIO_Speed = GPIO_Speed_50MHz;
    GPIO_Init(LED3_PORT, &GPIO_InitStructure);
    GPIO_SetBits(LED3_PORT,LED3_PIN);


}
标签:
原文地址:http://www.cnblogs.com/Belye/p/5185804.html