标签:
Run loops是线程的一个基本构成部分。一个run loop 是一个事件处理循环,你可以使用它来处理线程收到的事件。设计run loop的目的就是可以使得线程在收到事件的时候处理事件而为收到事件的时候进入sleep状态(个人理解,线程如果启用了run loop那么这个线程就变成了一个内部的服务线程,不会主动死掉)
对于Run loop 的管理并不是全部系统自动完成的。你必须自己完成线程中run loop的启动并编写逻辑代码去处理收到的时间。在Cocoa和 Core Foundation提供了run loop的对象来帮助你完成这些工作,包括配置和管理。并不是任何时候都需要去创建这些对象;每一个线程包括主线程都有自己的run loop对象,只有其他线程需要去显式的启动它。在主线程中它的run loop的执行是在应用启动的时候自己完成的。
在接下来的文章中我们将讨论run loop的原理以及如何在你的应用中配置和使用run loop。对于run loop的对象可以参考 NSRunLoop Class Reference 和CFRunLoop Reference.
run loop就如其名。他是让你的线程处于循环状态并且适应这个循环去处理接受到的事件。你需要自己写代码来维持这种循环-换句话说,你的代码中需要有while或者for循环来驱动run loop。在你的循环中,你需要借助run loop 对象去执行事件的接受和处理代码逻辑。
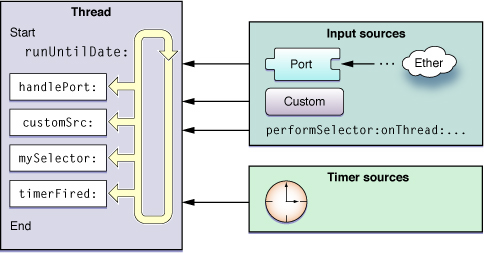
一个run loop可以接受两种类型的事件源。Input源发送异步事件,通常此种事件来自于另外一个县城或者应用。Timer源发送同步事件,通常发生在调度和重复的调用场景中。这两种类型的事件源都使用应用指定的处理方式去处理事件。
Figure 3-1展示了一个run loop处理多种源事件的概念图。input源发送的异步事件给相应的处理器并且使得runUntilDate:方法退出。Timer源事件发送的事件则不会使得run loop退出。
Figure 3-1 Structure of a run loop and its sources
除了能够处理源事件外,run loop也可以生成关于自身运行状态的通知。注册为run-loop的观察者可以接受到这种通知并且可以使用它们在线程上做一些额外的处理。你可以通过使用Core Foundation框架在线程上安装run-loop 观察者
接下来的章节中将提供更多关于run loop和其所拥有的方法的讲解。并且会描述run loop在处理事件的不同时间点生成的不同通知。
一个run loop的模式的意思是哪些input源和timers会被监控的集合和哪些观察者会被通知的集合的组合。任意一次运行run loop的时候,你需要指定(不管是显式还是隐式)其运行模式。在run loop执行期间也只有属于此模式下的事件会被监控和处理。(相同的,只有属于此模式下的观察者才会被通知),其他类型的源或者观察者只有在对应的模式加载后才能被识别。
你实际代码中,你只需要通过对应的模式名称来用于开启模式。Cocoa和Core Foundation框架定义了一个默认模式和其他几个常用的模式,使用它们值需要分别知道它们的名字即可。当然你也可以自定义模式,模式的名字可以随便取,但是模式的内容需要严格定义。你必须确定需要加载哪些input源,timers和哪些观察者是关心这个模式的。
在run loop执行期间模式就好比一个过滤器来过滤匹配此模式的事件。大多数时候,你只需要将线程运行在默认模式下即可。一个modal panel场景下,你需要运行在“modal”模式下,当处于这个模式的时候,只有和modal panel相关的事件才会被发送给线程。对于某些线程,你可能需要使用自定义模式去防止低优先级的源占用长任务导致的性能问题。
注意:模式的区别其实就是事件源的区别,而不是事件类型的区别。例如,你不能去使用模式去过滤分辨鼠标事件还是键盘事件。你只能使用模式去坚挺不同的端口列表,或者临时性的阻塞timers,如果你认为其中某些事件你并不想在此模式下关心了,那么必须重新改变此模式下的源和观察者的设定。
Table 3-1 列表是Cocoa和Core Foundation框架定义的标准模式,附带详细的说明以方便你的选择和使用。使用列表中的name列中列出的模式名称你就可以在你的代码中指定使用它们了。
|
Mode |
Name |
Description |
|---|---|---|
|
Default |
|
The default mode is the one used for most operations. Most of the time, you should use this mode to start your run loop and configure your input sources. 默认模式是最常用的模式。大多数的时候你应该直接使用此模式去启动你的runloop和配置input源。 |
|
Connection |
|
Cocoa uses this mode in conjunction with Cocoa框架使用此模式通过NSConnection去监控网络应答。你应该很少使用到他。 |
|
Modal |
|
Cocoa uses this mode to identify events intended for modal panels. Cocoa使用此模式来处理相关的modal panels事件。 |
|
Event tracking |
|
Cocoa uses this mode to restrict incoming events during mouse-dragging loops and other sorts of user interface tracking loops. Cocoa框架使用此模式来约束鼠标动作和其他用户接口动作的事件。 |
|
Common modes |
|
This is a configurable group of commonly used modes. Associating an input source with this mode also associates it with each of the modes in the group. For Cocoa applications, this set includes the default, modal, and event tracking modes by default. Core Foundation includes just the default mode initially. You can add custom modes to the set using the 这个其实是一个模式的集合,在此模式下配置的input源同样作用域集合下的所有模式,这个集合默认包括了default,modal和event tracking 模式。Core框架中集合中值包含的默认模式,你可以将自定义的模式也加入其中,具体方法见CFRunLoopAddCommonMode |
Input源将异步事件发送给线程。事件的种类依赖于input源,大致input源可以分为两个大类。基于port的input源监控应用的特定端口。用户input源监控用户相关的事件。其实我们并不需要台关心过多细节,系统为我们做了很多。这两者的区别主要再远他们是如何触发的。济源port的源是内核自动触发的,用户源则必须认为的从其他线程触发。
当你创建了一个input源,你讲这个源设置进现场的某些模式中。模式将会滤过出他们来进行处理。大多数时候,你是运行在默认模式下的,但是你可以指定自定义模式。如果input远不再当前模式下,任何相关事件将会不能得到执行。
接下来的几个小节将会介绍一些input源
Cocoa和Core框架提供了几个内置的基于port相关的对象来创建基于port的input源。例如,在Cocoa中,你根本就不需要去直接创建input 源。你只要简单的通过NSPort创建一个port的对象让后将这个对象加载到run loop中。这个port对象将会创建和配置相关的input类型
In Core Foundation, you must manually create both the port and its run loop source. In both cases, you use the functions associated with the port opaque type (CFMachPortRef, CFMessagePortRef, or CFSocketRef) to create the appropriate objects.
For examples of how to set up and configure custom port-based sources, see Configuring a Port-Based Input Source.
创建一个用户的input源,你必须使用 Core Foundation框架中的 CFRunLoopSourceRef函数。配置一个用户input源需要多个回调函数。Core Foundation框架将会调用这些函数来配置源,处理时间和去清理操作。
除了定义接受事件后的表现外,开发人员必须也定义事件转发机制。这部分的源是来自其他线程的而且源自身需要主动提供数据在准备被处理的时候注定触发它。事件发送机制需要但是也不要太过复杂。
创建用户input源的例子可参考Defining a Custom Input Source。也可以参考CFRunLoopSource Reference来学习用户input源。
除了基于port的源,COcoa定义了还定义了一种可以让你在线程中使用 perform a selector方式来触发的用户input源。类似基于port的源,perform selector需要在目标线程上被序列化,并且可以有效缓解在一个线程中触发多个方法二带来的同步问题。和基于port源一样样的是,perform selector源需要在触发selector后在runloop中自己移除自己。
在OS X v10.5版本前,perform selector源被广泛的用于向主线程发送消息,但是v10.5以及之后的版本你可以使用这个机制像任何线程发送消息。
当你在向其他线程performing a selector的时候,目标线程必须已经开启了runloop。对于你自己创建的线程来说,这就意味着你必须等到你的代码完全启动runloop后才能接受事件。因为主线程会启动自己的runloop,然而,你可能在代理方法applicationDidFinishLaunching:方法运行的时候向主线程发送消息的时候遇到麻烦,因为此时向其他送消息会出现问题。run loop将会一次性的将队列中已有的perform selector处理完毕,而绝非一次run loop迭代中只处理一个perform selector。
Table 3-2 列出了NSObject中定义的可想其他线程perform selector的方法。因为这些方法被定义在NSObject中,你可以在任何类任何OC类中使用它们,包括POSIX线程。这些方法在操作perform the selector的时候并不会开启新线程。
|
Methods |
Description |
|---|---|
|
Performs the specified selector on the application’s main thread during that thread’s next run loop cycle. These methods give you the option of blocking the current thread until the selector is performed. 向主线程发送selector消息,这些selector将会在主线程的下一个run loop周期中被执行。这些方法将会在当前线程中阻塞直到selector被调用。 |
|
|
Performs the specified selector on any thread for which you have an 向其他线程发送selector消息。这些方法将会阻塞当前线程直到selector被调用。 |
|
|
Performs the specified selector on the current thread during the next run loop cycle and after an optional delay period. Because it waits until the next run loop cycle to perform the selector, these methods provide an automatic mini delay from the currently executing code. Multiple queued selectors are performed one after another in the order they were queued. 向自身线程发送消息,他会在下一个run loop循环中延迟指定时间执行。因为它是需要等到下一个run loop周期才会执行的,所以这些方法提供了一个自动的最小延迟时间。多个selector会按照队列中存放的顺序逐个执行。 |
|
|
Lets you cancel a message sent to the current thread using the 这些方法可以取消之前通过 |
更加详细的信息科参考NSObject Class Reference.
Timer sources向线程转发同步事件,此事件将会则预设时间点执行。Timers可以唤醒当前线程去做逻辑处理。例如,一个搜索框可以使用timer,当用户一旦确定某个搜索项目则会触发一个自动的搜索。这种延迟搜索的方式可以给了用户去完善搜索关键字的填充。
虽然他会生成基于时间的通知,一个timer并不是基于一个真实的时间机制。就像input sources,timers也和run loop的模式相关联。如果一个一个timer并没有在当前loop的模式中,他将不会执行。相同的,如果一个timer在loop正在处理其他handler的时候触发了,它也需要等到一个周期。如果runloop压根就没有被执行,那么timer也就永远不会被执行的。
你可以将timers的时间配置成一次性的或者重复的。一个重复的timer会在调度时间到达的时候被触发,但是可能并不是和真正的配置时间相一致。例如,如果timer配置在一个指定的时间触发并且周期为每5秒执行,调度时间将是每5秒,但是实际触发时间可能会有延迟,如果延迟太多那么会丢失一个或者几个调度次数,timer只会为丢失的调度次数触发一次调度弥补,当弥补调度做完后会重新回到现有的调度节奏上。
详细的关系timer sources的调度请查看Configuring Timer Sources.也可以查看 NSTimer Class Reference or CFRunLoopTimer Reference.
对比于sources,sources将会在同步或者异步事件发生的时候触发,而观察者是runloop在自身执行过程中产生的一种通知。你可能会使用run loop的观察者机制去为事件处理或者线程状态转换的时候做一些准备处理。你可以观察到如下事件:
The entrance to the run loop. 进入runloop的时候
When the run loop is about to process a timer.当开始即将处理一个timer的时候
When the run loop is about to process an input source.当即将处理input source的时候
When the run loop is about to go to sleep.当runn loop即将sleep的时候
When the run loop has woken up, but before it has processed the event that woke it up.当从sleep中被唤醒但是还未处理唤醒事件的时候。
The exit from the run loop. 退出runloop的时候
你可以通过Core Foundation框架往runloop中增加观察者。当要去创建观察者的话,你需要创建CFRunLoopObserverRef对象,这个对象类型可以在观察对象发生的时候回调用户回调函数。
和timers一样,run-loop观察者可以一次性或者重复性配置使用。一次性的观察者会触发后就将自身从runloop上卸载,一个重复性的观察者则相反。你可以在创建观察者的时候指定这个特性。
关于怎样创建run-loop观察者的例子可参考Configuring the Run Loop.和 CFRunLoopObserver Reference.
每一次线程的run loop执行事件和为观察者生成通知。顺序如下
Notify observers that the run loop has been entered. 通知观察者runloop已经进入。
Notify observers that any ready timers are about to fire.通知观察者timers即将触发
Notify observers that any input sources that are not port based are about to fire.通知观察者input source(非基于port)即将触发
Fire any non-port-based input sources that are ready to fire.触发非基于port的input source
If a port-based input source is ready and waiting to fire, process the event immediately. Go to step 9. 如果任何基于port的inputsource等待触发,立即触发,转入步骤9
Notify observers that the thread is about to sleep.通知观察者线程即将进入sleep
Put the thread to sleep until one of the following events occurs:线程进入sleep直到下面的任何事件发生:
An event arrives for a port-based input source.基于port的事件
A timer fires.timer触发
The timeout value set for the run loop expires.runloop超时
The run loop is explicitly woken up. 显式唤醒runloop
Notify observers that the thread just woke up.通知观察者线程被唤醒
Process the pending event.处理事件
If a user-defined timer fired, process the timer event and restart the loop. Go to step 2.如果用户定义的timer触发了,处理timer事件并重启runloop,返回步骤2
If an input source fired, deliver the event.如果input source触发了,发送事件。
If the run loop was explicitly woken up but has not yet timed out, restart the loop. Go to step 2.如果runloop显式唤醒但是还没有到达超时,返回步骤2
Notify observers that the run loop has exited.通知观察者runloop退出
因为timer和input source处理前会先由观察者接收到相关通知,所以说事件接受通知和事件执行之间会有一个时间空隙。如果事件间的时间你是相当关心的,那么你可以利用步骤6和步骤8来计算他们之间的间隔时间。
因为runloop中存在timers和其他一些周期性的事件,但是loop有可能对于这些事件的发送有时候会发生混乱。典型的例子是不断的敲击键盘或者来自应用的重复的请求事件。因为此时你的代码是直接处理这些事件的,而不是让应用正常的转发这些事件,活跃的timers将得不到执行知道鼠标处理完成将控制权交还给应用。
一个 run loop可以通过run loop 对象被显式的唤醒。其他事件也可以使得run loop被唤醒。例如,增加另外的非基于port的input source来唤醒run loop 这样inputsource就可以被立即处理,而不是等到其他事件的发生??
只要当你的应用需要开启多线程的时候才会去考虑是否需要run loop机制。run loop对于应用的主线程来说是一种默认开启的机制。app框架会自动启动主线程的runloop。在iOs的UIApplication类的run方法(或者OS X系统中的NSApplication类)中会启动应用的主 loop。如果使用Xcode来生成的工程,那么你就不需要手动去指定,默认即可。
对于新建的线程,你需要决定是否需要开启run loop,如果需要,那么需要手动的配置和其他他。但是记住有些场景的线程中是没有必要开启runloop的比如这个线程是做长任务的。run loop更加倾向于去做一些线程间的交互,例如,下面的场景中则需要考虑开启run loop:
Use ports or custom input sources to communicate with other threads.
Use timers on the thread.
Use any of the performSelector… methods in a Cocoa application.
performSelector…这种方法的。Keep the thread around to perform periodic tasks.
如果你选择使用run loop,配置和启动也是非常简单的。和所有的线程编程一样,你应该考虑好线程的退出场景。这总是比强制结束一个线程要优雅很多。
一个run loop对象提供了很对方法去增加input source,timers和run-loop观察者和运行run loop。每一个线程都会自带一个run loop对象,在Cocoa中,这个对象叫做NSRunLoop的实例。在底层实现中也提供了CFRunLoopRef这样的操作函数。
取得当前线程的run loop可以采用下面任意一种方法:
CFRunLoopGetCurrent函数虽然他们并不是取得相同的对象,但是你可以从NSRunLoop对象中直接获取CFRunLoopRef。NSRunLoop类定义了一个叫做getCFRunLoop方法来返回一个CFRunLoopRef类型的数据。因为这两个对象都指向同一个runloop,所以你可以混合使用他们。
在一个新线程中启动run loop之前,你必须至少为他增加一个input source或者timer。如果runloop没有任何source去监控的话,他会立即退出的。关于如何增加source可以参考Configuring Run Loop Sources.小节。
除了增加sources外,你也可以通过这两个对象为run loop增加观察者,以方便监控run loop的运行。如果需要增加观察者你可以使用CFRunLoopAddObserver函数创建CFRunLoopObserverRef类型的数据并将它加载到runloop中。run loop观察者必须必须有 CoreFoundation框架来生成,即使他是一个Cocoa应用。
Listing 3-1 展示了在一个线程中为其runloop增加观察者的主要步骤。这个例子的目的是向你展示如何创建runloop饿观察者,所以代码简单的设定了一个全局的观察者。基本的功能就是在timer触发的时候回打印日志(这部分没有展示)
Listing 3-1 Creating a run loop observer
- (void)threadMain
{
    // The application uses garbage collection, so no autorelease pool is needed.
    NSRunLoop* myRunLoop = [NSRunLoop currentRunLoop];

    // Create a run loop observer and attach it to the run loop.
    CFRunLoopObserverContext  context = {0, self, NULL, NULL, NULL};
    CFRunLoopObserverRef    observer = CFRunLoopObserverCreate(kCFAllocatorDefault,
            kCFRunLoopAllActivities, YES, 0, &myRunLoopObserver, &context);

    if (observer)
    {
        CFRunLoopRef    cfLoop = [myRunLoop getCFRunLoop];
        CFRunLoopAddObserver(cfLoop, observer, kCFRunLoopDefaultMode);
    }

    // Create and schedule the timer.
    [NSTimer scheduledTimerWithTimeInterval:0.1 target:self
                selector:@selector(doFireTimer:) userInfo:nil repeats:YES];

    NSInteger    loopCount = 10;
    do
    {
        // Run the run loop 10 times to let the timer fire.
        [myRunLoop runUntilDate:[NSDate dateWithTimeIntervalSinceNow:1]];
        loopCount--;
    }
    while (loopCount);
}
当你将为了线程提供长时间服务而配置了run loop的时候,最好增减一个input source来接受消息。虽然你可以通过timer来进入run loop,但是一旦timer触发,会使runloo退出,当然也可以通过配置重复timer来保持runloop的运行,但是也是需要定期的唤醒线程,相比交input souce则等到事件的发生,在没有相关事件发生的时候保证runloop的sleep。
在应用中只有其他线程才需要开启runloop。一个runloop必须有至少一个input source或者timer用于监控,否则runloop将会立即退出。
下面提供了集中启动runloop的方法:
Unconditionally
With a set time limit
In a particular mode
无条件的进入runloop是最简单的方式,但是也是最简陋饿。运行无条件的runloop使得线程进入永久的循环,这样的方式使得开发人员很难控制。你可以增加或者删除input source或者timer,但是要想退出只能强制杀死它。这种方式也没有办法运行在用户自定义的模式下。
与无条件runloop不同,拥有一个超时设定的runloop会比较好一点,当设定了超时,runloop 将一直运行知道时间到达或者超时。如果如果超时了你可以重启它。
除了超时外,你也可以让你的runloop运行在指定的模式下。模式和超时并不是互斥的,你可以在运行runloop的时候同时指定他们。关于模式可参考Run Loop Modes.Listing 3-2 展示了线程的启动runloop的主要框架代码。这个例子的关键目的是向你展示runloop的基本构成。本质上就是为runloop增加input source和timers后重复性的调用主要代码来保持runloop的运行。每当runloop结束返回的时候,你在去检查条件是否满足了,如果满足就可以退出循环结束线程。这个例子使用基于Core Foundation框架的run loop机制所以它能够返回结果来检查为什么runloop退出了。你可能也会使用NSRunLoop类来运行runlop,语法差不多但是不能检查返回结果,它的例子可参考Listing 3-14.
Listing 3-2 Running a run loop
- (void)skeletonThreadMain
{
    // Set up an autorelease pool here if not using garbage collection.
    BOOL done = NO;

    // Add your sources or timers to the run loop and do any other setup.

    do
    {
        // Start the run loop but return after each source is handled.
        SInt32    result = CFRunLoopRunInMode(kCFRunLoopDefaultMode, 10, YES);

        // If a source explicitly stopped the run loop, or if there are no
        // sources or timers, go ahead and exit.
        if ((result == kCFRunLoopRunStopped) || (result == kCFRunLoopRunFinished))
            done = YES;

        // Check for any other exit conditions here and set the
        // done variable as needed.
    }
    while (!done);

    // Clean up code here. Be sure to release any allocated autorelease pools.
}
有两种方式可以当runloop退出
使用超时时间是最优先的选择。使用超时时间可以让runloop在退出前处理完毕时间,通知等。
使用CFRunLoopStop函数让一个runloop退出效果和超时差不多。两者的差别是这个方法可以用于无条件启动的runloop上。
虽然移除一个runloop的input source和timers会导致runloop的退出,但是这不是退出的常规做法。系统有些inputsoure你是感知不到的,所以这种方式经常会失败。
线程安全依赖于你炒作runloop时候使用的api。 Core Foundation中的函数是线程安全的。
COcoa的NSRunLoop类是非线程安全的。如果你使用NSRunLoop类去操作runloop,你应该只在当前线程中使用。
The following sections show examples of how to set up different types of input sources in both Cocoa and Core Foundation.
接下来的小节中展示如何使用Cocoa和Core Foundation框架用于增加不同类型的sources。
我想吐了 不翻了
Creating a custom input source involves defining the following:
The information you want your input source to process.
A scheduler routine to let interested clients know how to contact your input source.
A handler routine to perform requests sent by any clients.
A cancellation routine to invalidate your input source.
Because you create a custom input source to process custom information, the actual configuration is designed to be flexible. The scheduler, handler, and cancellation routines are the key routines you almost always need for your custom input source. Most of the rest of the input source behavior, however, happens outside of those handler routines. For example, it is up to you to define the mechanism for passing data to your input source and for communicating the presence of your input source to other threads.
Figure 3-2 shows a sample configuration of a custom input source. In this example, the application’s main thread maintains references to the input source, the custom command buffer for that input source, and the run loop on which the input source is installed. When the main thread has a task it wants to hand off to the worker thread, it posts a command to the command buffer along with any information needed by the worker thread to start the task. (Because both the main thread and the input source of the worker thread have access to the command buffer, that access must be synchronized.) Once the command is posted, the main thread signals the input source and wakes up the worker thread’s run loop. Upon receiving the wake up command, the run loop calls the handler for the input source, which processes the commands found in the command buffer.
Figure 3-2 Operating a custom input source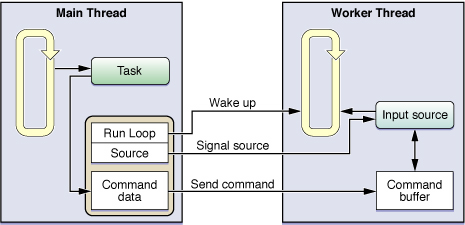
The following sections explain the implementation of the custom input source from the preceding figure and show the key code you would need to implement.
Defining a custom input source requires the use of Core Foundation routines to configure your run loop source and attach it to a run loop. Although the basic handlers are C-based functions, that does not preclude you from writing wrappers for those functions and using Objective-C or C++ to implement the body of your code.
The input source introduced in Figure 3-2 uses an Objective-C object to manage a command buffer and coordinate with the run loop. Listing 3-3 shows the definition of this object. The RunLoopSource object manages a command buffer and uses that buffer to receive messages from other threads. This listing also shows the definition of the RunLoopContext object, which is really just a container object used to pass a RunLoopSource object and a run loop reference to the application’s main thread.
Listing 3-3 The custom input source object definition
@interface RunLoopSource : NSObject |
{
|
CFRunLoopSourceRef runLoopSource; |
NSMutableArray* commands; |
} |
- (id)init; |
- (void)addToCurrentRunLoop; |
- (void)invalidate; |
// Handler method |
- (void)sourceFired; |
// Client interface for registering commands to process |
- (void)addCommand:(NSInteger)command withData:(id)data; |
- (void)fireAllCommandsOnRunLoop:(CFRunLoopRef)runloop; |
@end |
// These are the CFRunLoopSourceRef callback functions. |
void RunLoopSourceScheduleRoutine (void *info, CFRunLoopRef rl, CFStringRef mode); |
void RunLoopSourcePerformRoutine (void *info); |
void RunLoopSourceCancelRoutine (void *info, CFRunLoopRef rl, CFStringRef mode); |
// RunLoopContext is a container object used during registration of the input source. |
@interface RunLoopContext : NSObject |
{
|
CFRunLoopRef runLoop; |
RunLoopSource* source; |
} |
@property (readonly) CFRunLoopRef runLoop; |
@property (readonly) RunLoopSource* source; |
- (id)initWithSource:(RunLoopSource*)src andLoop:(CFRunLoopRef)loop; |
@end |
Although the Objective-C code manages the custom data of the input source, attaching the input source to a run loop requires C-based callback functions. The first of these functions is called when you actually attach the run loop source to your run loop, and is shown in Listing 3-4. Because this input source has only one client (the main thread), it uses the scheduler function to send a message to register itself with the application delegate on that thread. When the delegate wants to communicate with the input source, it uses the information in RunLoopContext object to do so.
Listing 3-4 Scheduling a run loop source
void RunLoopSourceScheduleRoutine (void *info, CFRunLoopRef rl, CFStringRef mode) |
{
|
RunLoopSource* obj = (RunLoopSource*)info; |
AppDelegate* del = [AppDelegate sharedAppDelegate]; |
RunLoopContext* theContext = [[RunLoopContext alloc] initWithSource:obj andLoop:rl]; |
[del performSelectorOnMainThread:@selector(registerSource:) |
withObject:theContext waitUntilDone:NO]; |
} |
One of the most important callback routines is the one used to process custom data when your input source is signaled. Listing 3-5 shows the perform callback routine associated with the RunLoopSource object. This function simply forwards the request to do the work to the sourceFired method, which then processes any commands present in the command buffer.
Listing 3-5 Performing work in the input source
void RunLoopSourcePerformRoutine (void *info) |
{
|
RunLoopSource* obj = (RunLoopSource*)info; |
[obj sourceFired]; |
} |
If you ever remove your input source from its run loop using the CFRunLoopSourceInvalidate function, the system calls your input source’s cancellation routine. You can use this routine to notify clients that your input source is no longer valid and that they should remove any references to it. Listing 3-6shows the cancellation callback routine registered with the RunLoopSource object. This function sends another RunLoopContext object to the application delegate, but this time asks the delegate to remove references to the run loop source.
Listing 3-6 Invalidating an input source
void RunLoopSourceCancelRoutine (void *info, CFRunLoopRef rl, CFStringRef mode) |
{
|
RunLoopSource* obj = (RunLoopSource*)info; |
AppDelegate* del = [AppDelegate sharedAppDelegate]; |
RunLoopContext* theContext = [[RunLoopContext alloc] initWithSource:obj andLoop:rl]; |
[del performSelectorOnMainThread:@selector(removeSource:) |
withObject:theContext waitUntilDone:YES]; |
} |
Note: The code for the application delegate’s registerSource: and removeSource: methods is shown in Coordinating with Clients of the Input Source.
Listing 3-7 shows the init and addToCurrentRunLoop methods of the RunLoopSource class. The init method creates the CFRunLoopSourceRef opaque type that must actually be attached to the run loop. It passes the RunLoopSource object itself as the contextual information so that the callback routines have a pointer to the object. Installation of the input source does not occur until the worker thread invokes the addToCurrentRunLoop method, at which point the RunLoopSourceScheduleRoutine callback function is called. Once the input source is added to the run loop, the thread can run its run loop to wait on it.
Listing 3-7 Installing the run loop source
- (id)init |
{
|
CFRunLoopSourceContext context = {0, self, NULL, NULL, NULL, NULL, NULL,
|
&RunLoopSourceScheduleRoutine, |
RunLoopSourceCancelRoutine, |
RunLoopSourcePerformRoutine}; |
runLoopSource = CFRunLoopSourceCreate(NULL, 0, &context); |
commands = [[NSMutableArray alloc] init]; |
return self; |
} |
- (void)addToCurrentRunLoop |
{
|
CFRunLoopRef runLoop = CFRunLoopGetCurrent(); |
CFRunLoopAddSource(runLoop, runLoopSource, kCFRunLoopDefaultMode); |
} |
For your input source to be useful, you need to manipulate it and signal it from another thread. The whole point of an input source is to put its associated thread to sleep until there is something to do. That fact necessitates having other threads in your application know about the input source and have a way to communicate with it.
One way to notify clients about your input source is to send out registration requests when your input source is first installed on its run loop. You can register your input source with as many clients as you want, or you can simply register it with some central agency that then vends your input source to interested clients. Listing 3-8 shows the registration method defined by the application delegate and invoked when the RunLoopSource object’s scheduler function is called. This method receives the RunLoopContext object provided by the RunLoopSource object and adds it to its list of sources. This listing also shows the routine used to unregister the input source when it is removed from its run loop.
Listing 3-8 Registering and removing an input source with the application delegate
- (void)registerSource:(RunLoopContext*)sourceInfo; |
{
|
[sourcesToPing addObject:sourceInfo]; |
} |
- (void)removeSource:(RunLoopContext*)sourceInfo |
{
|
id objToRemove = nil; |
for (RunLoopContext* context in sourcesToPing) |
{
|
if ([context isEqual:sourceInfo]) |
{
|
objToRemove = context; |
break; |
} |
} |
if (objToRemove) |
[sourcesToPing removeObject:objToRemove]; |
} |
Note: The callback functions that call the methods in the preceding listing are shown in Listing 3-4 and Listing 3-6.
After it hands off its data to the input source, a client must signal the source and wake up its run loop. Signaling the source lets the run loop know that the source is ready to be processed. And because the thread might be asleep when the signal occurs, you should always wake up the run loop explicitly. Failing to do so might result in a delay in processing the input source.
Listing 3-9 shows the fireCommandsOnRunLoop method of the RunLoopSource object. Clients invoke this method when they are ready for the source to process the commands they added to the buffer.
Listing 3-9 Waking up the run loop
- (void)fireCommandsOnRunLoop:(CFRunLoopRef)runloop |
{
|
CFRunLoopSourceSignal(runLoopSource); |
CFRunLoopWakeUp(runloop); |
} |
Note: You should never try to handle a SIGHUP or other type of process-level signal by messaging a custom input source. The Core Foundation functions for waking up the run loop are not signal safe and should not be used inside your application’s signal handler routines. For more information about signal handler routines, see the sigaction man page.
To create a timer source, all you have to do is create a timer object and schedule it on your run loop. In Cocoa, you use the NSTimer class to create new timer objects, and in Core Foundation you use the CFRunLoopTimerRef opaque type. Internally, the NSTimer class is simply an extension of Core Foundation that provides some convenience features, like the ability to create and schedule a timer using the same method.
In Cocoa, you can create and schedule a timer all at once using either of these class methods:
These methods create the timer and add it to the current thread’s run loop in the default mode (NSDefaultRunLoopMode). You can also schedule a timer manually if you want by creating your NSTimer object and then adding it to the run loop using the addTimer:forMode: method of NSRunLoop. Both techniques do basically the same thing but give you different levels of control over the timer’s configuration. For example, if you create the timer and add it to the run loop manually, you can do so using a mode other than the default mode. Listing 3-10 shows how to create timers using both techniques. The first timer has an initial delay of 1 second but then fires regularly every 0.1 seconds after that. The second timer begins firing after an initial 0.2 second delay and then fires every 0.2 seconds after that.
Listing 3-10 Creating and scheduling timers using NSTimer
NSRunLoop* myRunLoop = [NSRunLoop currentRunLoop]; |
// Create and schedule the first timer. |
NSDate* futureDate = [NSDate dateWithTimeIntervalSinceNow:1.0]; |
NSTimer* myTimer = [[NSTimer alloc] initWithFireDate:futureDate |
interval:0.1 |
target:self |
selector:@selector(myDoFireTimer1:) |
userInfo:nil |
repeats:YES]; |
[myRunLoop addTimer:myTimer forMode:NSDefaultRunLoopMode]; |
// Create and schedule the second timer. |
[NSTimer scheduledTimerWithTimeInterval:0.2 |
target:self |
selector:@selector(myDoFireTimer2:) |
userInfo:nil |
repeats:YES]; |
Listing 3-11 shows the code needed to configure a timer using Core Foundation functions. Although this example does not pass any user-defined information in the context structure, you could use this structure to pass around any custom data you needed for your timer. For more information about the contents of this structure, see its description in CFRunLoopTimer Reference.
Listing 3-11 Creating and scheduling a timer using Core Foundation
CFRunLoopRef runLoop = CFRunLoopGetCurrent(); |
CFRunLoopTimerContext context = {0, NULL, NULL, NULL, NULL};
|
CFRunLoopTimerRef timer = CFRunLoopTimerCreate(kCFAllocatorDefault, 0.1, 0.3, 0, 0, |
&myCFTimerCallback, &context); |
CFRunLoopAddTimer(runLoop, timer, kCFRunLoopCommonModes); |
Both Cocoa and Core Foundation provide port-based objects for communicating between threads or between processes. The following sections show you how to set up port communication using several different types of ports.
To establish a local connection with an NSMachPort object, you create the port object and add it to your primary thread‘s run loop. When launching your secondary thread, you pass the same object to your thread‘s entry-point function. The secondary thread can use the same object to send messages back to your primary thread.
Listing 3-12 shows the primary thread code for launching a secondary worker thread. Because the Cocoa framework performs many of the intervening steps for configuring the port and run loop, the launchThread method is noticeably shorter than its Core Foundation equivalent (Listing 3-17); however, the behavior of the two is nearly identical. One difference is that instead of sending the name of the local port to the worker thread, this method sends the NSPort object directly.
Listing 3-12 Main thread launch method
- (void)launchThread |
{
|
NSPort* myPort = [NSMachPort port]; |
if (myPort) |
{
|
// This class handles incoming port messages. |
[myPort setDelegate:self]; |
// Install the port as an input source on the current run loop. |
[[NSRunLoop currentRunLoop] addPort:myPort forMode:NSDefaultRunLoopMode]; |
// Detach the thread. Let the worker release the port. |
[NSThread detachNewThreadSelector:@selector(LaunchThreadWithPort:) |
toTarget:[MyWorkerClass class] withObject:myPort]; |
} |
} |
In order to set up a two-way communications channel between your threads, you might want to have the worker thread send its own local port to your main thread in a check-in message. Receiving the check-in message lets your main thread know that all went well in launching the second thread and also gives you a way to send further messages to that thread.
Listing 3-13 shows the handlePortMessage: method for the primary thread. This method is called when data arrives on the thread‘s own local port. When a check-in message arrives, the method retrieves the port for the secondary thread directly from the port message and saves it for later use.
Listing 3-13 Handling Mach port messages
#define kCheckinMessage 100 |
// Handle responses from the worker thread. |
- (void)handlePortMessage:(NSPortMessage *)portMessage |
{
|
unsigned int message = [portMessage msgid]; |
NSPort* distantPort = nil; |
if (message == kCheckinMessage) |
{
|
// Get the worker thread’s communications port. |
distantPort = [portMessage sendPort]; |
// Retain and save the worker port for later use. |
[self storeDistantPort:distantPort]; |
} |
else |
{
|
// Handle other messages. |
} |
} |
For the secondary worker thread, you must configure the thread and use the specified port to communicate information back to the primary thread.
Listing 3-14 shows the code for setting up the worker thread. After creating an autorelease pool for the thread, the method creates a worker object to drive the thread execution. The worker object’s sendCheckinMessage: method (shown in Listing 3-15) creates a local port for the worker thread and sends a check-in message back to the main thread.
Listing 3-14 Launching the worker thread using Mach ports
+(void)LaunchThreadWithPort:(id)inData |
{
|
NSAutoreleasePool* pool = [[NSAutoreleasePool alloc] init]; |
// Set up the connection between this thread and the main thread. |
NSPort* distantPort = (NSPort*)inData; |
MyWorkerClass* workerObj = [[self alloc] init]; |
[workerObj sendCheckinMessage:distantPort]; |
[distantPort release]; |
// Let the run loop process things. |
do |
{
|
[[NSRunLoop currentRunLoop] runMode:NSDefaultRunLoopMode |
beforeDate:[NSDate distantFuture]]; |
} |
while (![workerObj shouldExit]); |
[workerObj release]; |
[pool release]; |
} |
When using NSMachPort, local and remote threads can use the same port object for one-way communication between the threads. In other words, the local port object created by one thread becomes the remote port object for the other thread.
Listing 3-15 shows the check-in routine of the secondary thread. This method sets up its own local port for future communication and then sends a check-in message back to the main thread. The method uses the port object received in the LaunchThreadWithPort: method as the target of the message.
Listing 3-15 Sending the check-in message using Mach ports
// Worker thread check-in method |
- (void)sendCheckinMessage:(NSPort*)outPort |
{
|
// Retain and save the remote port for future use. |
[self setRemotePort:outPort]; |
// Create and configure the worker thread port. |
NSPort* myPort = [NSMachPort port]; |
[myPort setDelegate:self]; |
[[NSRunLoop currentRunLoop] addPort:myPort forMode:NSDefaultRunLoopMode]; |
// Create the check-in message. |
NSPortMessage* messageObj = [[NSPortMessage alloc] initWithSendPort:outPort |
receivePort:myPort components:nil]; |
if (messageObj) |
{
|
// Finish configuring the message and send it immediately. |
[messageObj setMsgId:setMsgid:kCheckinMessage]; |
[messageObj sendBeforeDate:[NSDate date]]; |
} |
} |
To establish a local connection with an NSMessagePort object, you cannot simply pass port objects between threads. Remote message ports must be acquired by name. Making this possible in Cocoa requires registering your local port with a specific name and then passing that name to the remote thread so that it can obtain an appropriate port object for communication. Listing 3-16 shows the port creation and registration process in cases where you want to use message ports.
Listing 3-16 Registering a message port
NSPort* localPort = [[NSMessagePort alloc] init]; |
// Configure the object and add it to the current run loop. |
[localPort setDelegate:self]; |
[[NSRunLoop currentRunLoop] addPort:localPort forMode:NSDefaultRunLoopMode]; |
// Register the port using a specific name. The name must be unique. |
NSString* localPortName = [NSString stringWithFormat:@"MyPortName"]; |
[[NSMessagePortNameServer sharedInstance] registerPort:localPort |
name:localPortName]; |
This section shows how to set up a two-way communications channel between your application’s main thread and a worker thread using Core Foundation.
Listing 3-17 shows the code called by the application’s main thread to launch the worker thread. The first thing the code does is set up a CFMessagePortRef opaque type to listen for messages from worker threads. The worker thread needs the name of the port to make the connection, so that string value is delivered to the entry point function of the worker thread. Port names should generally be unique within the current user context; otherwise, you might run into conflicts.
Listing 3-17 Attaching a Core Foundation message port to a new thread
#define kThreadStackSize (8 *4096) |
OSStatus MySpawnThread() |
{
|
// Create a local port for receiving responses. |
CFStringRef myPortName; |
CFMessagePortRef myPort; |
CFRunLoopSourceRef rlSource; |
CFMessagePortContext context = {0, NULL, NULL, NULL, NULL};
|
Boolean shouldFreeInfo; |
// Create a string with the port name. |
myPortName = CFStringCreateWithFormat(NULL, NULL, CFSTR("com.myapp.MainThread"));
|
// Create the port. |
myPort = CFMessagePortCreateLocal(NULL, |
myPortName, |
&MainThreadResponseHandler, |
&context, |
&shouldFreeInfo); |
if (myPort != NULL) |
{
|
// The port was successfully created. |
// Now create a run loop source for it. |
rlSource = CFMessagePortCreateRunLoopSource(NULL, myPort, 0); |
if (rlSource) |
{
|
// Add the source to the current run loop. |
CFRunLoopAddSource(CFRunLoopGetCurrent(), rlSource, kCFRunLoopDefaultMode); |
// Once installed, these can be freed. |
CFRelease(myPort); |
CFRelease(rlSource); |
} |
} |
// Create the thread and continue processing. |
MPTaskID taskID; |
return(MPCreateTask(&ServerThreadEntryPoint, |
(void*)myPortName, |
kThreadStackSize, |
NULL, |
NULL, |
NULL, |
0, |
&taskID)); |
} |
With the port installed and the thread launched, the main thread can continue its regular execution while it waits for the thread to check in. When the check-in message arrives, it is dispatched to the main thread’s MainThreadResponseHandler function, shown in Listing 3-18. This function extracts the port name for the worker thread and creates a conduit for future communication.
Listing 3-18 Receiving the checkin message
#define kCheckinMessage 100 |
// Main thread port message handler |
CFDataRef MainThreadResponseHandler(CFMessagePortRef local, |
SInt32 msgid, |
CFDataRef data, |
void* info) |
{
|
if (msgid == kCheckinMessage) |
{
|
CFMessagePortRef messagePort; |
CFStringRef threadPortName; |
CFIndex bufferLength = CFDataGetLength(data); |
UInt8* buffer = CFAllocatorAllocate(NULL, bufferLength, 0); |
CFDataGetBytes(data, CFRangeMake(0, bufferLength), buffer); |
threadPortName = CFStringCreateWithBytes (NULL, buffer, bufferLength, kCFStringEncodingASCII, FALSE); |
// You must obtain a remote message port by name. |
messagePort = CFMessagePortCreateRemote(NULL, (CFStringRef)threadPortName); |
if (messagePort) |
{
|
// Retain and save the thread’s comm port for future reference. |
AddPortToListOfActiveThreads(messagePort); |
// Since the port is retained by the previous function, release |
// it here. |
CFRelease(messagePort); |
} |
// Clean up. |
CFRelease(threadPortName); |
CFAllocatorDeallocate(NULL, buffer); |
} |
else |
{
|
// Process other messages. |
} |
return NULL; |
} |
With the main thread configured, the only thing remaining is for the newly created worker thread to create its own port and check in. Listing 3-19 shows the entry point function for the worker thread. The function extracts the main thread’s port name and uses it to create a remote connection back to the main thread. The function then creates a local port for itself, installs the port on the thread’s run loop, and sends a check-in message to the main thread that includes the local port name.
Listing 3-19 Setting up the thread structures
OSStatus ServerThreadEntryPoint(void* param) |
{
|
// Create the remote port to the main thread. |
CFMessagePortRef mainThreadPort; |
CFStringRef portName = (CFStringRef)param; |
mainThreadPort = CFMessagePortCreateRemote(NULL, portName); |
// Free the string that was passed in param. |
CFRelease(portName); |
// Create a port for the worker thread. |
CFStringRef myPortName = CFStringCreateWithFormat(NULL, NULL, CFSTR("com.MyApp.Thread-%d"), MPCurrentTaskID());
|
// Store the port in this thread’s context info for later reference. |
CFMessagePortContext context = {0, mainThreadPort, NULL, NULL, NULL};
|
Boolean shouldFreeInfo; |
Boolean shouldAbort = TRUE; |
CFMessagePortRef myPort = CFMessagePortCreateLocal(NULL, |
myPortName, |
&ProcessClientRequest, |
&context, |
&shouldFreeInfo); |
if (shouldFreeInfo) |
{
|
// Couldn‘t create a local port, so kill the thread. |
MPExit(0); |
} |
CFRunLoopSourceRef rlSource = CFMessagePortCreateRunLoopSource(NULL, myPort, 0); |
if (!rlSource) |
{
|
// Couldn‘t create a local port, so kill the thread. |
MPExit(0); |
} |
// Add the source to the current run loop. |
CFRunLoopAddSource(CFRunLoopGetCurrent(), rlSource, kCFRunLoopDefaultMode); |
// Once installed, these can be freed. |
CFRelease(myPort); |
CFRelease(rlSource); |
// Package up the port name and send the check-in message. |
CFDataRef returnData = nil; |
CFDataRef outData; |
CFIndex stringLength = CFStringGetLength(myPortName); |
UInt8* buffer = CFAllocatorAllocate(NULL, stringLength, 0); |
CFStringGetBytes(myPortName, |
CFRangeMake(0,stringLength), |
kCFStringEncodingASCII, |
0, |
FALSE, |
buffer, |
stringLength, |
NULL); |
outData = CFDataCreate(NULL, buffer, stringLength); |
CFMessagePortSendRequest(mainThreadPort, kCheckinMessage, outData, 0.1, 0.0, NULL, NULL); |
// Clean up thread data structures. |
CFRelease(outData); |
CFAllocatorDeallocate(NULL, buffer); |
// Enter the run loop. |
CFRunLoopRun(); |
} |
Once it enters its run loop, all future events sent to the thread’s port are handled by the ProcessClientRequest function. The implementation of that function depends on the type of work the thread does and is not shown here.
标签:
原文地址:http://www.cnblogs.com/ios123/p/5194794.html