标签:
注意:本章代码基于 第十章 企业项目开发--分布式缓存Redis(2)
代码的github地址:https://github.com/zhaojigang/ssmm0
消息队列是分布式系统中实现RPC的一种手段。
1、消息队列的基本使用流程
假设:
分析:
在这里我们作为演示,,每当注册一个admin的之后,我们异步写一条日志log数据到数据库。
下边的举例也是对代码的解释。
当server1执行一个"http://localhost:8080/admin/register?username=canglang25&password=1457890"操作,即向数据库插一条admin信息时,同时将日志log信息写入server3,之后不会等待log信息被server2消费掉就直接返回(异步);
server2循环接收server3中的消息队列中的消息,并将这些log消息写入数据库。
2、消息队列的作用
3、消息队列的两种方式
4、实例(基于P2P实现)
4.1、整体代码结构:
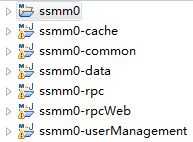
4.2、模块依赖关系
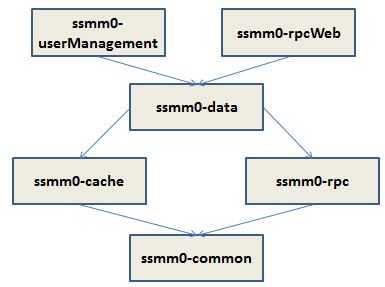
注:箭头的指向就是当前模块所依赖的模块。(eg.rpcWeb依赖data)
4.3、代码
代码整体没变,只列出部分新增代码,完整代码从文首的github进行clone即可。
4.3.1、ssmm0
pom.xml

    <!-- 管理子模块 -->
    <modules>
        <module>common</module><!-- 通用类模块 -->
        <module>cache</module><!-- 缓存模块 -->
        <module>rpc</module><!-- rpc模块 -->
        <module>data</module><!-- 封装数据操作 -->
        <module>userManagement</module><!-- 具体业务1-人员管理系统,这里的userManagement部署在serverA上(配合rpcWeb测试rpc) -->
        <module>rpcWeb</module><!-- 具体业务2-用于测试RPC的另一台机器,这里的rpcWeb项目部署在serverB上 -->
    </modules>

            <!-- 日志:若没有,activemq获取连接报错 -->
            <dependency>
                <groupId>org.slf4j</groupId>
                <artifactId>slf4j-log4j12</artifactId>
                <version>1.5.11</version>
            </dependency>
说明:只列出部分新增的代码。
注意:
4.3.2、ssmm0-common
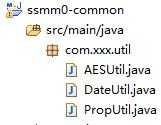
pom.xml

 1 <?xml version="1.0" encoding="UTF-8"?>
 2 <project xmlns="http://maven.apache.org/POM/4.0.0" xmlns:xsi="http://www.w3.org/2001/XMLSchema-instance"
 3     xsi:schemaLocation="http://maven.apache.org/POM/4.0.0 http://maven.apache.org/maven-v4_0_0.xsd">
 4
 5     <modelVersion>4.0.0</modelVersion>
 6
 7     <!-- 指定父模块 -->
 8     <parent>
 9         <groupId>com.xxx</groupId>
10         <artifactId>ssmm0</artifactId>
11         <version>1.0-SNAPSHOT</version>
12     </parent>
13
14     <groupId>com.xxx.ssmm0</groupId>
15     <artifactId>ssmm0-common</artifactId>
16
17     <name>ssmm0-common</name>
18     <packaging>jar</packaging>
19
20     <dependencies>
21     <!-- bc-加密 -->
22         <dependency>
23             <groupId>org.bouncycastle</groupId>
24             <artifactId>bcprov-jdk15on</artifactId>
25         </dependency>
26         <!-- cc加密 -->
27         <dependency>
28             <groupId>commons-codec</groupId>
29             <artifactId>commons-codec</artifactId>
30         </dependency>
31     </dependencies>
32 </project>
DateUtil:

 1 package com.xxx.util;
 2
 3 import java.text.DateFormat;
 4 import java.text.SimpleDateFormat;
 5 import java.util.Date;
 6
 7 /**
 8  * 线程安全的日期类工具
 9  */
10 public class DateUtil {
11     private static final String DATE_FORMAT = "yyyy-MM-dd HH:mm:ss";
12     private static ThreadLocal<DateFormat> threadLocal = new ThreadLocal<DateFormat>();
13
14     /**
15      * 获取DateFormat实例
16      */
17     public static DateFormat getDateFormat() {
18         DateFormat df = threadLocal.get();//从threadLocal中获取当前线程的DateFormat实例副本
19         if(df==null){//如果当前线程实例为null,说明该线程第一次使用该方法
20             df = new SimpleDateFormat(DATE_FORMAT);//创建df实例
21             threadLocal.set(df);//将df实例放置到threadLocal中去
22         }
23         return df;
24     }
25
26     /**
27      * 将Date格式化为String字符串
28      */
29     public static String formatDate(Date date) {
30         return getDateFormat().format(date);
31     }
32
33     /**
34      * 获取当前时间
35      * @return 字符串(eg.2001-11-12 12:23:34)
36      */
37     public static String getCurrentTime() {
38         //第一种方式
39         //return formatDate(new Date());
40
41         //第二种方式(也是最推荐的方式)
42         DateFormat df = getDateFormat();
43         return df.format(System.currentTimeMillis());
44
45         //第三种方式
46         /*Calendar c = Calendar.getInstance();
47         return c.get(Calendar.YEAR)+"-"+c.get(Calendar.MONTH)+"-"+c.get(Calendar.DATE)
48             +"-"+c.get(Calendar.HOUR)+"-"+c.get(Calendar.MINUTE)+"-"+c.get(Calendar.SECOND);*/
49     }
50
51     /*****************测试*****************/
52     /*public static void main(String[] args) {
53         System.out.println(getCurrentTime());
54     }*/
55 }
注意:
PropUtil:即之前的FileUtil
4.3.3、ssmm0-rpc
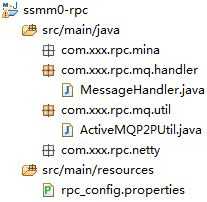
pom.xml

 1 <?xml version="1.0" encoding="UTF-8"?>
 2 <project xmlns="http://maven.apache.org/POM/4.0.0" xmlns:xsi="http://www.w3.org/2001/XMLSchema-instance"
 3     xsi:schemaLocation="http://maven.apache.org/POM/4.0.0 http://maven.apache.org/maven-v4_0_0.xsd">
 4
 5     <modelVersion>4.0.0</modelVersion>
 6
 7     <!-- 指定父模块 -->
 8     <parent>
 9         <groupId>com.xxx</groupId>
10         <artifactId>ssmm0</artifactId>
11         <version>1.0-SNAPSHOT</version>
12     </parent>
13
14     <groupId>com.xxx.ssmm0</groupId>
15     <artifactId>ssmm0-rpc</artifactId>
16
17     <name>ssmm0-rpc</name>
18     <packaging>jar</packaging>
19
20     <!-- 引入实际依赖 -->
21     <dependencies>
22         <!-- 引入自定义common模块 -->
23         <dependency>
24             <groupId>com.xxx.ssmm0</groupId>
25             <artifactId>ssmm0-common</artifactId>
26             <version>1.0-SNAPSHOT</version>
27         </dependency>
28         <!-- activemq -->
29         <dependency>
30             <groupId>org.apache.activemq</groupId>
31             <artifactId>activemq-all</artifactId>
32             <version>5.5.0</version>
33         </dependency>
34     </dependencies>
35 </project>
rpc_config.properties

#activemq配置
activemq.queueURL=tcp://127.0.0.1:61616
activemq.queueName=adminQueue
说明:
ActiveMQP2PUtil:基于P2P的activemq的消息收发工具类

  1 package com.xxx.rpc.mq.util;
  2
  3 import java.io.Serializable;
  4 import java.util.Properties;
  5
  6 import javax.jms.Connection;
  7 import javax.jms.ConnectionFactory;
  8 import javax.jms.DeliveryMode;
  9 import javax.jms.Destination;
 10 import javax.jms.JMSException;
 11 import javax.jms.Message;
 12 import javax.jms.MessageConsumer;
 13 import javax.jms.MessageProducer;
 14 import javax.jms.ObjectMessage;
 15 import javax.jms.Session;
 16
 17 import org.apache.activemq.ActiveMQConnection;
 18 import org.apache.activemq.ActiveMQConnectionFactory;
 19
 20 import com.xxx.rpc.mq.handler.MessageHandler;
 21 import com.xxx.util.PropUtil;
 22
 23 /**
 24  * activemq p2p 工具类
 25  */
 26 public class ActiveMQP2PUtil {
 27     private static final String RPC_CONFIG_FILE = "rpc_config.properties";
 28     private static String queueURL;        //队列所在的URL
 29     private static String queueName;    //队列名称
 30     private static ConnectionFactory connectionFactory;    //连接工厂
 31
 32     static{
 33         Properties props = PropUtil.loadProps(RPC_CONFIG_FILE);
 34         queueURL = props.getProperty("activemq.queueURL", "tcp://127.0.0.1:61616");
 35         System.out.println(queueURL);
 36         queueName = props.getProperty("activemq.queueName", "adminQueue");
 37         connectionFactory = new ActiveMQConnectionFactory(ActiveMQConnection.DEFAULT_USER,
 38                                                           ActiveMQConnection.DEFAULT_PASSWORD,
 39                                                           queueURL);
 40     }
 41
 42     /**
 43      * 发送消息
 44      */
 45     public static void sendMessage(Serializable message){
 46         Connection conn = null;
 47         try {
 48             conn = connectionFactory.createConnection();//创建连接
 49             conn.start();//启动连接
 50             Session session = conn.createSession(true, Session.AUTO_ACKNOWLEDGE);//创建session
 51             Destination destination = session.createQueue(queueName);//创建队列
 52             MessageProducer producer = session.createProducer(destination);
 53             producer.setDeliveryMode(DeliveryMode.NON_PERSISTENT);//消息设置为非持久化
 54             ObjectMessage msg = session.createObjectMessage(message);//创建消息:createObjectMessage()该方法的入参是Serializable型的
 55             producer.send(msg);//发送消息
 56             session.commit();//提交消息
 57         } catch (JMSException e) {
 58             e.printStackTrace();
 59         }finally{
 60             if(conn!=null){
 61                 try {
 62                     conn.close();
 63                 } catch (JMSException e) {
 64                     e.printStackTrace();
 65                 }
 66             }
 67         }
 68     }
 69
 70     /**
 71      * 接收消息
 72      * @param handler 自定义的消息处理器
 73      */
 74     public static void receiveMessage(MessageHandler handler){
 75         Connection conn = null;
 76         try {
 77             conn = connectionFactory.createConnection();//创建连接
 78             conn.start();//启动连接
 79             Session session = conn.createSession(false, Session.AUTO_ACKNOWLEDGE);//创建session
 80             Destination destination = session.createQueue(queueName);//创建队列
 81             MessageConsumer consumer = session.createConsumer(destination);//创建消息消费者
 82             while(true){//死循环接收消息
 83                 Message msg = consumer.receive();//接收消息
 84                 if(msg!=null){
 85                     handler.handle(msg);//处理消息
 86                     //System.out.println(msg);
 87                 }
 88             }
 89         } catch (JMSException e) {
 90             e.printStackTrace();
 91         }finally{
 92             if(conn!=null){
 93                 try {
 94                     conn.close();
 95                 } catch (JMSException e) {
 96                     e.printStackTrace();
 97                 }
 98             }
 99         }
100     }
101
102     /*public static void main(String[] args) {
103         sendMessage("hello world3");
104     }*/
105 }
说明:
MessageHandler:消息处理器接口(其实现类是对接收到的消息进行处理的真正部分)

 1 package com.xxx.rpc.mq.handler;
 2
 3 import javax.jms.Message;
 4
 5 /**
 6  * 消息处理器接口
 7  */
 8 public interface MessageHandler {
 9     public void handle(Message message);
10 }
4.3.4、ssmm0-data
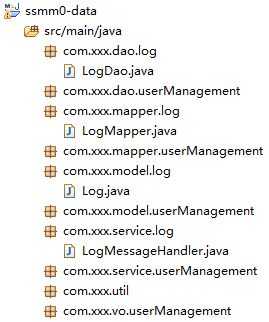
pom.xml

 1 <?xml version="1.0" encoding="UTF-8"?>
 2 <project xmlns="http://maven.apache.org/POM/4.0.0" xmlns:xsi="http://www.w3.org/2001/XMLSchema-instance"
 3     xsi:schemaLocation="http://maven.apache.org/POM/4.0.0 http://maven.apache.org/maven-v4_0_0.xsd">
 4
 5     <modelVersion>4.0.0</modelVersion>
 6
 7     <!-- 指定父模块 -->
 8     <parent>
 9         <groupId>com.xxx</groupId>
10         <artifactId>ssmm0</artifactId>
11         <version>1.0-SNAPSHOT</version>
12     </parent>
13
14     <groupId>com.xxx.ssmm0</groupId>
15     <artifactId>ssmm0-data</artifactId>
16
17     <name>ssmm0-data</name>
18     <packaging>jar</packaging><!-- 只是作为其他模块使用的工具 -->
19
20     <!-- 引入实际依赖 -->
21     <dependencies>
22         <!-- mysql -->
23         <dependency>
24             <groupId>mysql</groupId>
25             <artifactId>mysql-connector-java</artifactId>
26         </dependency>
27         <!-- 数据源 -->
28         <dependency>
29             <groupId>org.apache.tomcat</groupId>
30             <artifactId>tomcat-jdbc</artifactId>
31         </dependency>
32         <!-- mybatis -->
33         <dependency>
34             <groupId>org.mybatis</groupId>
35             <artifactId>mybatis</artifactId>
36         </dependency>
37         <dependency>
38             <groupId>org.mybatis</groupId>
39             <artifactId>mybatis-spring</artifactId>
40         </dependency>
41         <!-- servlet --><!-- 为了会用cookie -->
42         <dependency>
43             <groupId>javax.servlet</groupId>
44             <artifactId>javax.servlet-api</artifactId>
45         </dependency>
46         <!-- guava cache -->
47         <dependency>
48             <groupId>com.google.guava</groupId>
49             <artifactId>guava</artifactId>
50             <version>14.0.1</version>
51         </dependency>
52         <!-- 引入自定义cache模块 -->
53         <dependency>
54             <groupId>com.xxx.ssmm0</groupId>
55             <artifactId>ssmm0-cache</artifactId>
56             <version>1.0-SNAPSHOT</version>
57         </dependency>
58         <!-- 引入自定义rpc模块 -->
59         <dependency>
60             <groupId>com.xxx.ssmm0</groupId>
61             <artifactId>ssmm0-rpc</artifactId>
62             <version>1.0-SNAPSHOT</version>
63         </dependency>
64     </dependencies>
65 </project>
Log:日志模型类

package com.xxx.model.log;

import java.io.Serializable;

/**
 * 日志
 */
public class Log implements Serializable {
    private static final long serialVersionUID = -8280602625152351898L;

    private String operation;   // 执行的操作
    private String currentTime; // 当前时间

    public String getOperation() {
        return operation;
    }

    public void setOperation(String operation) {
        this.operation = operation;
    }

    public String getCurrentTime() {
        return currentTime;
    }

    public void setCurrentTime(String currentTime) {
        this.currentTime = currentTime;
    }
}
注意:
说明:对应的数据库表
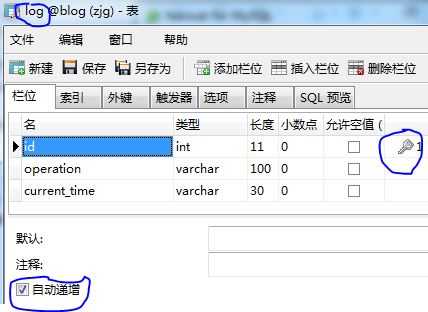
LogMapper

 1 package com.xxx.mapper.log;
 2
 3 import org.apache.ibatis.annotations.Insert;
 4
 5 import com.xxx.model.log.Log;
 6
 7 /**
 8  * 日志Mapper
 9  */
10 public interface LogMapper {
11
12     /**
13      * 这里需要注意的是,current_time是数据库的保留参数,两点注意:
14      * 1、最好不要用保留参数做变量名
15      * 2、如果不经意间已经用了,那么保留参数需要用``括起来(`-->该符号是英文状态下esc键下边的那个键)
16      * @param log
17      * @return
18      */
19     @Insert("INSERT INTO log(operation, `current_time`) VALUES(#{operation},#{currentTime})")
20     public int insertLog(Log log);
21
22 }
注意:由于疏忽,在创建数据库的时候,属性"当前时间"取名为"current_time",没注意到该词是MySQL的关键字(即保留字)。
LogDao:

 1 package com.xxx.dao.log;
 2
 3 import org.springframework.beans.factory.annotation.Autowired;
 4 import org.springframework.stereotype.Repository;
 5
 6 import com.xxx.mapper.log.LogMapper;
 7 import com.xxx.model.log.Log;
 8
 9 /**
10  * 日志DAO
11  */
12 @Repository
13 public class LogDao {
14
15     @Autowired
16     private LogMapper logMapper;
17     /***************注解*****************/
18     public boolean insertLog(Log log){
19         return logMapper.insertLog(log)==1?true:false;
20     }
21
22 }
LogMessageHandler:MessageHandler的实现类,对接收到的log消息进行具体的操作

 1 package com.xxx.service.log;
 2
 3 import javax.jms.JMSException;
 4 import javax.jms.Message;
 5 import javax.jms.ObjectMessage;
 6
 7 import org.springframework.beans.factory.annotation.Autowired;
 8 import org.springframework.stereotype.Component;
 9
10 import com.xxx.dao.log.LogDao;
11 import com.xxx.model.log.Log;
12 import com.xxx.rpc.mq.handler.MessageHandler;
13
14
15 /**
16  * 日志处理器(更适合放在data层)
17  * 因为:
18  * 1、data依赖于rpc,而rpc不依赖于data,所以如果该类放在rpc层,并且该类需要用到数据库操作(eg.将日志写入数据库),那么就不好办了
19  * 2、rpc层说白了,就是一些rpc工具类,实际上与业务无关,与业务有关的,我们可以抽取到该部分来
20  */
21 @Component
22 public class LogMessageHandler implements MessageHandler {
23
24     @Autowired
25     private LogDao logDao;
26
27     public void handle(Message message) {
28         System.out.println(logDao);
29         ObjectMessage objMsg = (ObjectMessage)message;
30         try {
31             Log log = (Log)objMsg.getObject();
32             logDao.insertLog(log);//将日志写入数据库
33         } catch (JMSException e) {
34             e.printStackTrace();
35         }
36
37     }
38
39 }
说明:
AdminService:

 1     /**
 2      * 测试activeMQ
 3      *
 4      * 消息生产者做的事:(部署在服务器A)
 5      * 1)添加一个用户
 6      * 2)用户添加成功后,
 7      * 2.1)创建一个Log(日志类)实例
 8      * 2.2)将该日志实例作为消息发送给消息队列
 9      *
10      * 消息消费者做的事:(部署在服务器B)
11      * 1)从队列接收消息
12      * 2)用日志处理器对消息进行操作(将该消息写入数据库)
13      */
14     public boolean register(Admin admin) {
15         boolean isRegisterSuccess = adminDao.register(admin);
16         if(isRegisterSuccess) {
17             Log log = new Log();
18             log.setOperation("增加一个用户");
19             log.setCurrentTime(DateUtil.getCurrentTime());
20
21             ActiveMQP2PUtil.sendMessage(log);//将消息发送到消息服务器(即activeMQ服务器),不需要等待消息处理结果,直接向下执行
22         }
23         return isRegisterSuccess;
24     }
说明:
4.3.5、ssmm0-rpcWeb
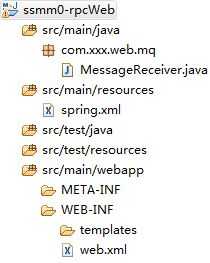
pom.xml

 1 <?xml version="1.0" encoding="UTF-8"?>
 2 <project xmlns="http://maven.apache.org/POM/4.0.0" xmlns:xsi="http://www.w3.org/2001/XMLSchema-instance"
 3     xsi:schemaLocation="http://maven.apache.org/POM/4.0.0 http://maven.apache.org/maven-v4_0_0.xsd">
 4
 5     <modelVersion>4.0.0</modelVersion>
 6
 7     <!-- 指定父模块 -->
 8     <parent>
 9         <groupId>com.xxx</groupId>
10         <artifactId>ssmm0</artifactId>
11         <version>1.0-SNAPSHOT</version>
12     </parent>
13
14     <groupId>com.xxx.ssmm0</groupId>
15     <artifactId>ssmm0-rpcWeb</artifactId>
16
17     <name>ssmm0-rpcWeb</name>
18     <packaging>war</packaging><!-- 需要部署的模块 -->
19
20     <!-- 引入实际依赖 -->
21     <dependencies>
22         <!-- 将ssmm0-data项目作为一个jar引入项目中 -->
23         <dependency>
24             <groupId>com.xxx.ssmm0</groupId>
25             <artifactId>ssmm0-data</artifactId>
26             <version>1.0-SNAPSHOT</version>
27         </dependency>
28         <!-- spring mvc(如果没有web.xml中的CharacterEncodingFilter找不到) -->
29         <dependency>
30             <groupId>org.springframework</groupId>
31             <artifactId>spring-web</artifactId>
32         </dependency>
33         <dependency>
34             <groupId>org.springframework</groupId>
35             <artifactId>spring-webmvc</artifactId>
36         </dependency>
37     </dependencies>
38 </project>
spring.xml

<?xml version="1.0" encoding="UTF-8"?>
<beans xmlns="http://www.springframework.org/schema/beans"
    xmlns:xsi="http://www.w3.org/2001/XMLSchema-instance" xmlns:context="http://www.springframework.org/schema/context"
    xmlns:mvc="http://www.springframework.org/schema/mvc"
    xsi:schemaLocation="http://www.springframework.org/schema/beans
                           http://www.springframework.org/schema/beans/spring-beans-3.2.xsd
                           http://www.springframework.org/schema/context
                           http://www.springframework.org/schema/context/spring-context-3.2.xsd
                           http://www.springframework.org/schema/mvc http://www.springframework.org/schema/mvc/spring-mvc-3.2.xsd">

    <!-- 注解扫描 -->
    <context:component-scan base-package="com.xxx.web" /><!-- 只扫描web就可以 -->

    <!-- 这里需要引入ssmm0-data项目中配置的spring-data.xml(之前不引也可以成功,忘记怎么配置的了) -->
    <import resource="classpath:spring-data.xml"/>
</beans>
web.xml

<?xml version="1.0" encoding="utf-8"?>
<web-app version="2.5" xmlns="http://java.sun.com/xml/ns/javaee"
    xmlns:xsi="http://www.w3.org/2001/XMLSchema-instance"
    xsi:schemaLocation="http://java.sun.com/xml/ns/javaee http://java.sun.com/xml/ns/javaee/web-app_2_5.xsd">

    <servlet>
        <servlet-name>dispatcherServlet</servlet-name>
        <servlet-class>org.springframework.web.servlet.DispatcherServlet</servlet-class>
        <init-param>
            <param-name>contextConfigLocation</param-name>
            <param-value>classpath:spring.xml</param-value>
        </init-param>
        <load-on-startup>1</load-on-startup>
    </servlet>
    <servlet-mapping>
        <servlet-name>dispatcherServlet</servlet-name>
        <url-pattern>/</url-pattern>
    </servlet-mapping>

    <filter>
        <filter-name>encodingFilter</filter-name>
        <filter-class>org.springframework.web.filter.CharacterEncodingFilter</filter-class>
        <init-param>
            <param-name>encoding</param-name>
            <param-value>UTF-8</param-value>
        </init-param>
        <init-param>
            <param-name>forceEncoding</param-name>
            <param-value>true</param-value>
        </init-param>
    </filter>
    <filter-mapping>
        <filter-name>encodingFilter</filter-name>
        <url-pattern>/*</url-pattern>
    </filter-mapping>

    <welcome-file-list>
        <welcome-file>/index.jsp</welcome-file>
    </welcome-file-list>
</web-app>
MessageReceiver:死循环从队列接收消息并将消息传给消息处理器实现类(LogMessageHandler)处理

 1 package com.xxx.web.mq;
 2
 3 import org.springframework.beans.factory.annotation.Autowired;
 4 import org.springframework.stereotype.Controller;
 5 import org.springframework.web.bind.annotation.RequestMapping;
 6
 7 import com.xxx.rpc.mq.util.ActiveMQP2PUtil;
 8 import com.xxx.service.log.LogMessageHandler;
 9
10 /**
11  * 用于接收消息的测试类
12  */
13 @Controller
14 @RequestMapping("/mq")
15 public class MessageReceiver {
16
17     @Autowired
18     private LogMessageHandler handler;
19
20     @RequestMapping("/receive")
21     public void receiveMessage() {
22         ActiveMQP2PUtil.receiveMessage(handler);
23     }
24
25 }
5、测试
5.1、安装activemq
1)下载解压"apache-activemq-5.5.0-bin.zip",之后,若是32bit机器,进入"E:\activemq-5.5.0\bin\win32"下,双击"activemq.bat"即可。(当然,如果双击无法启动,可能有其他进程占用61616端口,查一下是哪一个进程,然后去服务中关掉即可)
2)启动服务后,在浏览器输入"http://127.0.0.1:8161/admin/queues.jsp",看到队列页面,则安装并启动成功,该页面是一个队列消息的监控页面,包括
5.2、运行ssmm0-userManagement
浏览器执行"http://localhost:8080/admin/register?username=canglang25&password=1457890"
注意:这里使用了8080端口
5.3、运行ssmm0-rpcWeb
浏览器执行"http://localhost:8081/mq/receive"
注意:
说明:jetty在不同的端口下可以同时启动,在同一端口下后边启动的服务会覆盖之前启动的服务
6、总结
标签:
原文地址:http://www.cnblogs.com/java-zhao/p/5229476.html