标签:
一、什么是plist文件
1>将数据直接写在代码里面,不是一种合理的做法。如果数据经常修改,就要经常翻开对应的代码进行修改,造成代码扩展性低
2>因此,可以考虑将经常变得数据放在文件中进行存储,程序启动后从文件中读取最新的数据。如果要变动数据,直接修改数据文件即可,不用修改代码
3>一般可以使用属性列表文件存储NSArray或者NSDictionary之类的数据,这种“属性列表文件”的扩展名是plist,因此也成为“plist文件”
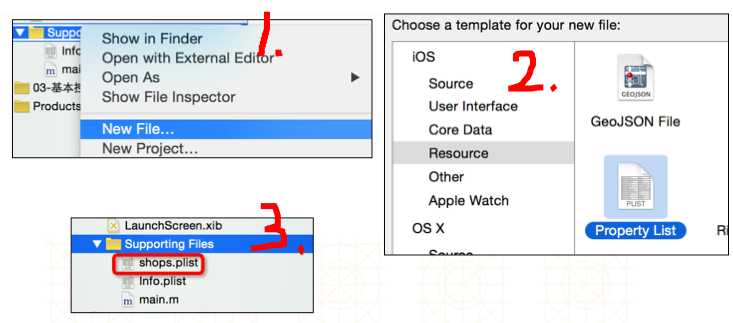
二、创建plist文件

三、解析plist文件
代码实例:
1   // 一个NSBundle对象对应一个资源包(图片、音频、视频、plis等文件)
2     // NSBundle的作用:用来访问与之对应的资源包内部的文件,可以用来获得文件的全路径
3     // 项目中添加的资源都会被添加到主资源包中
4     // [NSBundle mainBundle]关联的就是项目的主资源包
5     NSBundle *bundle = [NSBundle mainBundle];
6     NSString *file = [bundle pathForResource:@"things" ofType:@"plist"];
7     self.things = [NSArray arrayWithContentsOfFile:file];
四、plist文件的使用注意
1>plist的文件名不能叫做"info"、"Info"之类的
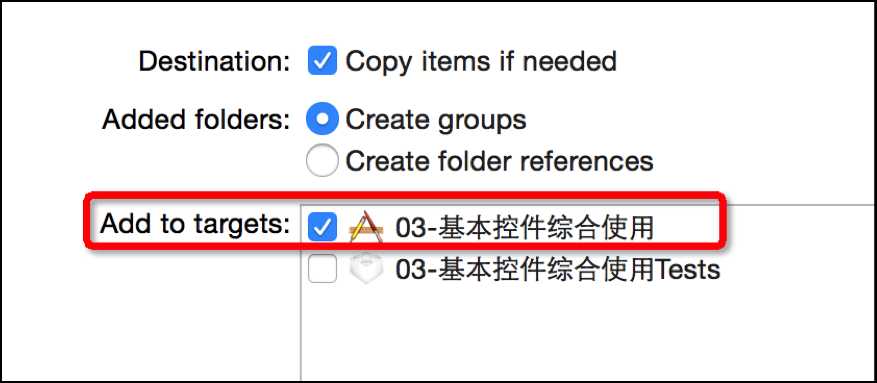
2>添加plist等文件资源的时候,一定要勾选下面的选项

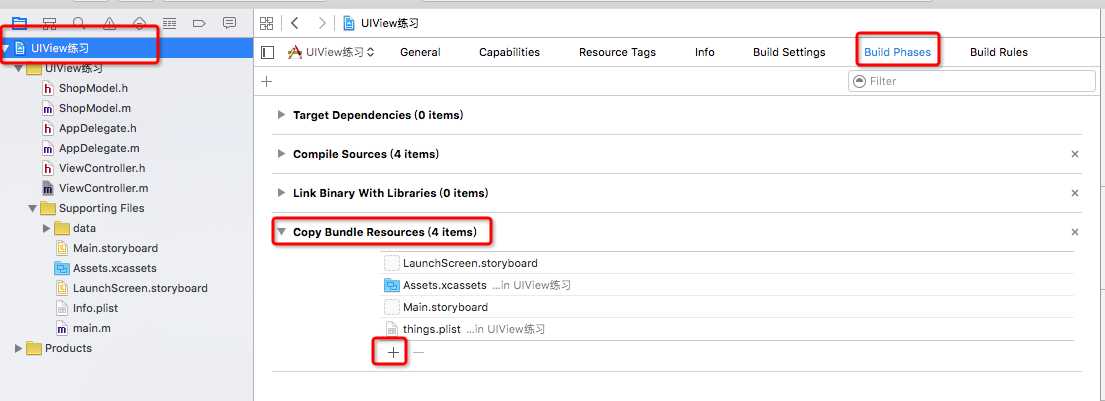
如果遇到忘了勾选的情况,可以用一下方式解决

五、懒加载
1>为什么用到懒加载
加载plist等文件数据,加载数据用懒加载,如果一上来就将所有数据都加载,第一影像程序性能,第二,加载的数据本次操作不一定能用上,浪费内存--懒加载的本质就是重写getter方法,也就是使用数据的时候才进行加载!
2>代码实例--之前是在viewDidLoad方法中获取的数据,不管用不用到都要加载。以下方法是在用到时再加载
1 @property (strong, nonatomic) NSArray *things; // 重写get方法,实现懒加载
 1 // 重写things的get方法,实现懒加载
 2 - (NSArray *)things
 3 {
 4     if (_things == NULL) {
 5         // 加载主资源包
 6         NSBundle *bundle = [NSBundle mainBundle];
 7         // 通过主资源包获取things.plist的全路径
 8         NSString *file = [bundle pathForResource:@"things" ofType:@"plist"];
 9         // 通过全路径获取数据
10         _things = [NSArray arrayWithContentsOfFile:file];
11     }
12     return _things;
13 }
六、模型--模型取代字典
1>模型的本质就是直接继承NSObject的类文件
2>字典转模型的过程最好封装在模型内部,模型中的属性对应字典的哪个key值,模型说的算,外部不要干涉,外部只管调用模型的构造方法获取模型
3>模型应该提供一个可以传入字典参数的构造方法,一个类方法,一个对象方法
 1 //  ShopModel.h
 2 //  UIView练习
 3 //
 4 //  Created by admin on 16/3/5.
 5 //  Copyright © 2016年 admin. All rights reserved.
 6 //  商品模型
 7
 8 #import <Foundation/Foundation.h>
 9
10 @interface ShopModel : NSObject
11 /** 商品名称 */
12 @property(nonatomic,strong) NSString *name;
13 /** 商品图片 */
14 @property(nonatomic,strong) NSString *icon;
15
16 - (instancetype)initWithDic:(NSDictionary *)dic;
17 + (instancetype)shopModelWithDic:(NSDictionary *)dic;
18 @end
模型的实现部分:
 1 //  ShopModel.m
 2 //  UIView练习
 3 //
 4 //  Created by admin on 16/3/5.
 5 //  Copyright © 2016年 admin. All rights reserved.
 6 //
 7
 8 #import "ShopModel.h"
 9
10 @implementation ShopModel
11
12 - (instancetype)initWithDic:(NSDictionary *)dic
13 {
14     if (self = [super init])
15     {
16         self.name = dic[@"name"];
17         self.icon = dic[@"icon"];
18     }
19     return self;
20 }
21
22 +(instancetype)shopModelWithDic:(NSDictionary *)dic
23 {
24     return [[self alloc] initWithDic:dic];
25 }
26 @end
5>懒加载+模型
之前的懒加载代码,得到的数据是字典的集合,下面的代码是在懒加载的过程中实现了字典转换模型
 1 // 重写things的get方法,实现懒加载
 2 - (NSArray *)things
 3 {
 4     if (_things == NULL) {
 5         // 加载主资源包
 6         NSBundle *bundle = [NSBundle mainBundle];
 7         // 通过主资源包获取things.plist的全路径
 8         NSString *file = [bundle pathForResource:@"things" ofType:@"plist"];
 9         // 通过全路径获取数据
10         _things = [NSArray arrayWithContentsOfFile:file];
11
12         // 思路:数据的get方法,直接返回模型的集合,遍历字典数组,将字典的数据在懒加载过程中都转化成模型数据
13         NSMutableArray *arrTemp = [NSMutableArray array]; // 定义可变数组
14         for (NSDictionary *dic in _things) {
15             [arrTemp addObject:[ShopModel shopModelWithDic:dic]];
16         }
17         _things = arrTemp; // 将装有的模型集合赋值给成员变量
18     }
19     return _things;
20 }
七、补充instancetype
1>instancetype在类型表示上,跟id一样,可以表示任何对象类型
2>instancetype只能用在返回值类型上,不能像id一样用在参数类型上
3>instancetype比id多一个好处:编译器会检测instancetype的真实类型
边练边学--plist文件,懒加载,模型初使用--补充instancetype
标签:
原文地址:http://www.cnblogs.com/gchlcc/p/5246144.html